background image

2

English

VENTILATION CAUTION

When installing this unit, make sure to leave space 
around the unit for ventilation to improve heat radiation 
(at least 20 cm at top, 10 cm at rear, and 20 cm at each 
side).

WARNING

Slots and openings in the cabinet are provided for 
ventilation to ensure reliable operation of the product, 
and to protect it from overheating. To prevent fire 
hazard, the openings should never be blocked or 
covered with items (such as newspapers, table-cloths, 
curtains) or by operating the equipment on thick carpet 
or a bed.

D3-4-2-1-7b*_A1_En

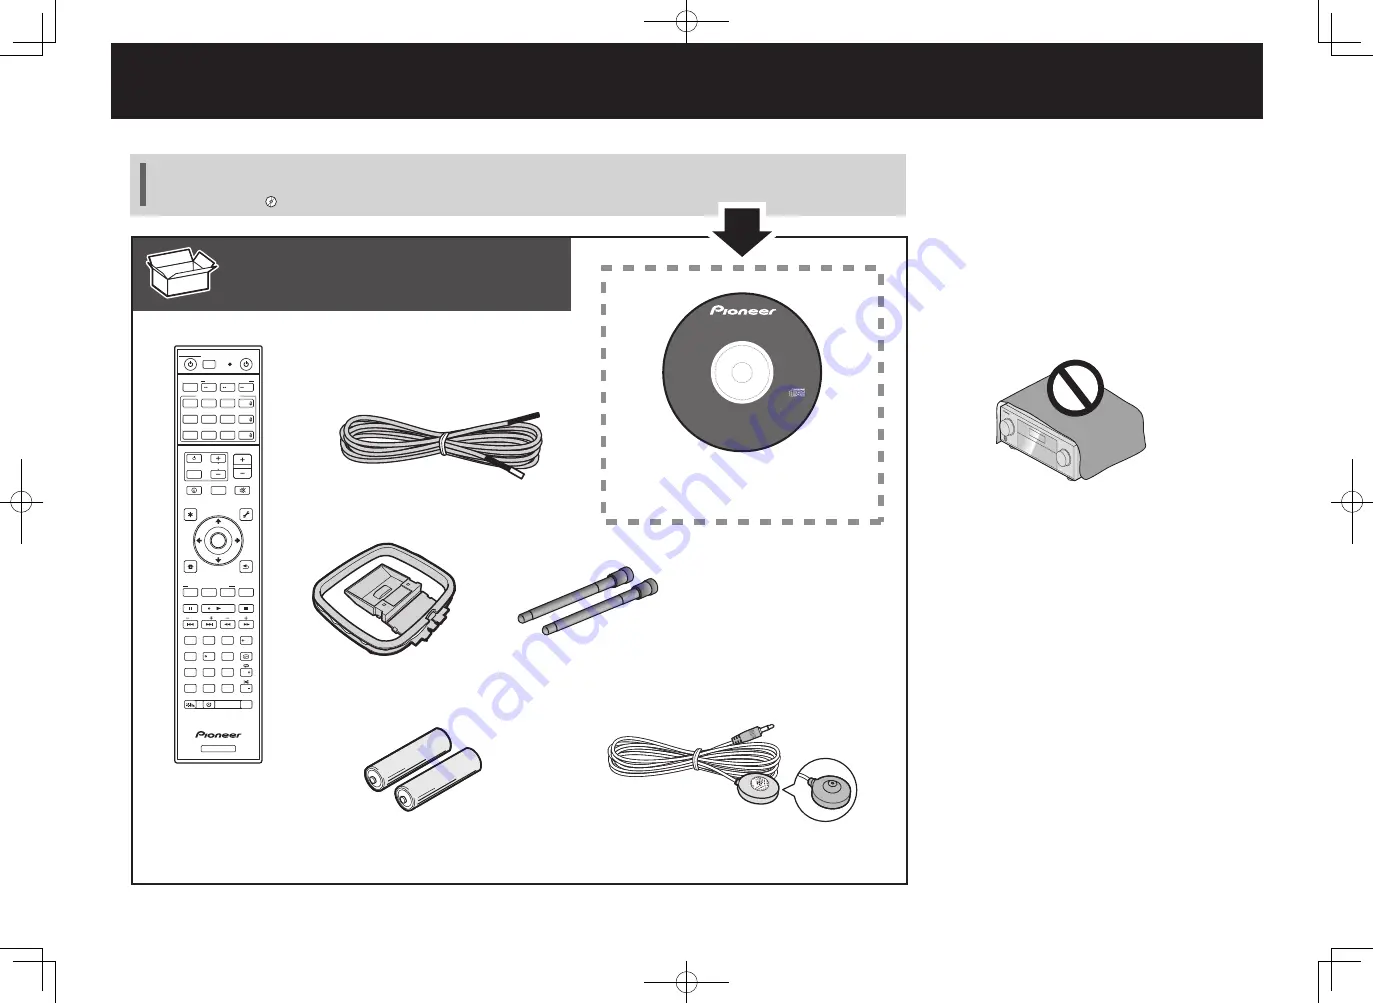
What’s in the box

Thank you for buying this Pioneer product. This Quick Start Guide includes instructions for basic connections and operations to 
allow simple use of the receiver. For detailed descriptions of the receiver, see the “Operating Instructions” provided on the 
included CD-ROM (    ).

Remote Control

Setup microphone

AAA size IEC R03 dry cell batteries x2

AM loop antenna

Wireless antenna x2

FM wire antenna

CD-ROM

RECEIVER

D.ACCESS

DIMMER SLEEP

RCU SETUP

MPX

PRESET

TUNE

BAND

PTY

iPod

TUNER

INPUT

USB

ADPT

ROKU

BT

TV

TV

MHL

CD

OUT P.

DVD

BD

ALL ZONE STBY

SOURCE

STANDBY/ON

MAIN

SAT

SUB ZONE CONTROL

SOURCE CONTROL

MUTE

VOLUME

VOL

TOP 

MENU

HOME

MENU

TOOLS

MENU

ENTER

RETURN

CLASS

ENTER

CLR

CH

CH

2

5

4

6

8

0

7

9

1

3

AUDIO

DISP

SURR

AUTO

CH LV.

ADV

STATUS

AUDIO P.

VIDEO P.

Z2

Z3

HDZ

LISTENING MODE

HDMI

NET

ALL

Fav

RECEIVER

These quick start guide

Warranty sheet

Safety Brochure

Power cord

SC-LX89

SC-LX79

Operating Instructions

Mode d’emploi

Bedienungsanleitung

Istruzioni per l’uso

Handleiding

Manual de instrucciones

Инструкции по эксплуатации

MADE IN MALAYSIA

FABRIQUÉ EN MALAISIE

СДЕЛАНО В МАЛАЙЗИЯ

USB-DAC driver for Windows® (SC-LX89 Only)

Pilote USB-DAC pour Windows® (SC-LX89 seulement)

USB-DAC-Treiber für Windows® (nur SC-LX89)

Driver USB-DAC per Windows® (solo SC-LX89)

USB-DAC-stuurprogramma voor Windows® (alleen SC-LX89)
Controlador USB-DAC para Windows® (SC-LX89 solamente)

Драйвер USB-DAC для Windows® (только SC-LX89)

SC-LX89

-K/-S

SC-LX79

-K/-S

Содержание SC-LX79-k/-s

Страница 1: ...de Kurzanleitung Guida di avvio rapido Snelstartgids Guía de inicio rápido Краткое руководство пользователя AV Receiver Amplificateur AV AV Receiver Sintoamplificatore AV AV Receiver Receptor AV AV ресивер SC LX 79 K S SC LX89 K S ...

Страница 2: ...tteries x2 AM loop antenna Wireless antenna x2 FM wire antenna CD ROM RECEIVER D ACCESS DIMMER SLEEP RCU SETUP MPX PRESET TUNE BAND PTY iPod TUNER INPUT USB ADPT ROKU BT TV TV MHL CD OUT P DVD BD ALL ZONE STBY SOURCE STANDBY ON MAIN SAT SUB ZONE CONTROL SOURCE CONTROL MUTE VOLUME VOL TOP MENU HOME MENU TOOLS MENU ENTER RETURN CLASS ENTER CLR CH CH 2 5 4 6 8 0 7 9 1 3 AUDIO DISP SURR AUTO CH LV ADV...

Страница 3: ... PC Network connection is required Follow the instructions in the booklet to perform connection and initial settings If you have an iPhone or iPad Please search for Start up Navi app in the App Store If you have an Android device Please search for Start up Navi app in Google Play LAN LAN Use Start up Navi app to perform connection and initial settings Use a smartphone tablet Network connection is ...

Страница 4: ...nstructions Setting network connection in the CD ROM s operating instructions Plugging in the receiver After connecting to a LAN connect the power cord of the receiver to a power outlet 1 Plug the supplied power cord into the AC IN socket on the back of the receiver 2 Plug the other end into a power outlet Turning the power on Press STANDBY ON to switch on the receiver and your computer Wait a few...

Страница 5: ...ver is not connected to the network Check to make sure that the receiver and router are properly connected 3 Enter number in 2 above in the field in Internet Explorer shown below and then press the ENTER key Example Input Format 192 168 0 124 With a Windows PC you can use the following method to launch AVNavigator Launch Explorer and then right click SC LX89 or SC LX79 displayed in the Network fol...

Страница 6: ...nection patterns Top forward Top backward etc For details see Connecting your equipment of the operating instructions To play Dolby Atmos you need to connect the speaker of either the Top middle Surround back Top forward Top backward Front height or Front wide The Dolby Enabled Speaker can be used in place of the Top middle speaker Refer to the operating instructions for details Connecting up Foll...

Страница 7: ... EXTRA 2 L R Single FRONT CENTER R L SURROUND R L SURROUND BACK R L TOP MIDDLE R L EXTRA 1 R L SPEAKERS SELECTABLE LINELEVEL INPUT Subwoofer SW Front Right R Surround Right SR Surround Left SL Front Left L Center C Surround back Right SBR Surround back Left SBL CAUTION These speaker terminals carry HAZARDOUS LIVE voltage To prevent the risk of electric shock when connecting or disconnecting the sp...

Страница 8: ...ng instructions Please refer to the TV s operation manual for directions on connections and setup for the TV Connecting antennas ANTENNA AMLOOP 1 4 5 2 3 a b c Plugging in the receiver Only plug in after you have connected all your components to this receiver including the speakers CAUTION Handle the power cord by the plug Do not pull out the plug by tugging the cord and never touch the power cord...

Страница 9: ...n the display of the receiver after the setup microphone is connected pull out the setup microphone from the receiver and wait for approximately a minute and then connect the microphone to the receiver again Set to ear height when using a tripod etc for the microphone MASTER VOLUME STANDBY ON INPUT SELECTOR MCACC SETUP MIC The Full Auto MCACC screen appears on your TV Speaker System 7 2 2 5 2 2 7 ...

Страница 10: ...4 Start the playback component s playback E g Start playback of the Blu ray Disc player 5 Use VOLUME to adjust the volume level When no sound is emitted increase the volume to approximately 30 dB Notes When the sound is not produced from the center speaker rear speaker and subwoofer refer to Frequently asked questions in the booklet When the remote control does not work refer to the Frequently ask...

Страница 11: ... and press down the STANDBY ON button on the front panel for 5 seconds or more The power turns off in 5 seconds after the power is turned on The receiver s setting will be maintained Also try replugging the power cord of the connecting devices To produce sound from TV Refer to page 8 of the booklet to perform connection and setting To play press the TV button to switch to TV input The remote contr...

Страница 12: ...ur de ses parois de manière à améliorer la dissipation de chaleur au moins 20 cm sur le dessus 10 cm à l arrière et 20 cm de chaque côté AVERTISSEMENT Les fentes et ouvertures du coffret sont prévues pour la ventilation pour assurer un fonctionnement stable de l appareil et pour éviter sa surchauffe Pour éviter les risques d incendie ne bouchez jamais les ouvertures et ne les recouvrez pas d objet...

Страница 13: ...on Start up Navi sur l App Store Si vous avez un appareil Android Se il vous plaît rechercher l application Start up Navi sur Google Play 1 Lisez le livret Si vous avez un Mac ou un PC 2 Suivez les directives du AVNavigator intégré dans le récepteur pour procéder à la connexion et aux réglages initiaux Utilisez l application Start up Navi pour effectuer la connexion et les réglages initiaux Utilis...

Страница 14: ... le mode d emploi du CD ROM Branchement du récepteur Après la connexion à un réseau LAN branchez le cordon d alimentation du récepteur à une prise électrique 1 Branchez le cordon d alimentation fourni à la prise AC IN située à l arrière du récepteur 2 Branchez l autre extrémité sur une prise électrique Mise en marche Appuyez sur STANDBY ON pour allumer le récepteur et votre ordinateur Après la mis...

Страница 15: ...e le récepteur et le routeur sont correctement raccordés 3 Saisissez le numéro de l étape 2 ci dessus dans le champ d Internet Explorer indiqué ci dessous puis appuyez sur la touche ENTER Exemple de format d entrée 192 168 0 124 Avec un PC sous Windows vous pouvez utiliser la méthode suivante pour lancer AVNavigator Lancez l explorateur puis faites un clic droit sur SC LX89 ou SC LX79 qui s affich...

Страница 16: ...des enceintes supérieure avant supérieure arrière etc Pour les détails voir Raccordement de votre équipement dans le mode d emploi Pour lire Dolby Atmos vous devez connecter l enceinte Moyen haut Surround arrière Supérieure avant Supérieure arrière Avant haut ou Avant large L enceinte compatible avec Dolby peut être utilisée à la place de l enceinte Moyen haut Reportez vous au mode d emploi pour l...

Страница 17: ...FRONT CENTER R L SURROUND R L SURROUND BACK R L TOP MIDDLE R L EXTRA 1 R L SPEAKERS SELECTABLE LINELEVEL INPUT Caisson de grave SW Avant Droite R Surround Droite SR Surround Gauche SL Avant Gauche L Centre C Surround arrière Droite SBR Surround arrière Gauche SBL ATTENTION Les bornes des haut parleurs sont sous une tension ACTIVE DANGEREUSE Pour éviter tout risque de décharge électrique lors du br...

Страница 18: ...Guide d utilisation du téléviseur pour consulter les instructions concernant les connexions et la configuration du téléviseur Raccordement Équipements compatibles HDMI DVI Raccordement des antennes ANTENNA AMLOOP 1 4 5 2 3 a b c Branchement du récepteur N effectuez le branchement qu après avoir raccordé tous les composants au récepteur y compris les enceintes ATTENTION Tenir le câble d alimentatio...

Страница 19: ...de configuration fourni Si Please wait s affiche sur l écran du récepteur après le branchement du microphone de configuration débranchez le microphone de configuration du récepteur et attendez environ une minute puis rebranchez le microphone de configuration au récepteur Régler à hauteur d oreille lors de l utilisation d un trépied etc pour le microphone MASTER VOLUME STANDBY ON INPUT SELECTOR MCA...

Страница 20: ...cteur Ex Démarrez la lecture sur le lecteur de disque Blu ray 5 Utilisez VOLUME pour régler le volume Si aucun son n est émis augmentez le volume à environ 30 dB Remarques Lorsque le son ne provient pas de l enceinte centrale de l enceinte arrière et du caisson de grave reportez vous à la Foire aux questions dans le livret Lorsque la télécommande ne fonctionne pas reportez vous à la Foire aux ques...

Страница 21: ...econdes ou plus L alimentation s interrompt 5 secondes après la mise sous tension Les réglages du récepteur seront conservés Essayez également de rebrancher le cordon d alimentation des appareils connectés Pour produire du son à partir du téléviseur Reportez vous à la page 8 du livret pour procéder à la connexion et au réglage Pour lire appuyez sur le bouton TV pour passer en mode entrée TV La tél...

Страница 22: ...s für einen ausreichenden Freiraum gesorgt werden um eine einwandfreie Wärmeabfuhr zu gewährleisten mindestens 20 cm oberhalb des Gerätes 10 cm hinter dem Gerät und jeweils 20 cm an der Seite des Gerätes WARNUNG Im Gerätegehäuse sind Ventilationsschlitze und andere Öffnungen vorgesehen die dazu dienen eine Überhitzung des Gerätes zu verhindern und einen zuverlässigen Betrieb zu gewährleisten Um Br...

Страница 23: ...vorzunehmen Verwenden Sie einen Mac PC Netzwerkverbindung erforderlich Befolgen Sie die Anweisungen in der Broschüre um den Anschluss und die Grundeinstellungen vorzunehmen Falls Sie ein iPhone oder einen iPad haben Bitte suchen Sie nach der App Start up Navi im App Store Falls Sie ein Android Gerät haben Bitte suchen Sie nach der App Start up Navi in Google Play LAN LAN Wenn die Anzeige WIRELESS ...

Страница 24: ...dienungsanleitung Einrichten der Netzwerkverbindung nach Anschluss des Receivers an das Stromnetz Stellen Sie eine LAN Verbindung her und verbinden Sie das Netzkabel des Receivers mit einer Steckdose 1 Schließen Sie das mitgelieferte Netzkabel an die AC IN Buchse auf der Rückseite des Receivers an 2 Schließen Sie das andere Ende an eine Steckdose an Einschalten des Geräts Drücken Sie auf STANDBY O...

Страница 25: ...einem Netzwerk verbunden Überprüfen Sie ob der Receiver und Router ordnungsgemäß miteinander verbunden sind 3 Geben Sie in den Internet Explorer im unten angezeigten Feld die Nummer von Schritt 2 ein und drücken Sie dann auf die ENTER Taste Example Input Format 192 168 0 124 Bei einem Windows PC können Sie die folgende Methode verwenden um AVNavigator zu starten Starten Sie den Explorer und klicke...

Страница 26: ...ard usw Weitere Informationen entnehmen Sie dem Kapitel Anschluss der Geräte in der Bedienungsanleitung Um Dolby Atmos abzuspielen müssen Sie die Lautsprecher entweder an Top Middle Surround hinten Top Forward Top Backward Front Height oder Front Wide anschließen Der Dolby fähige Lautsprecher kann an Stelle des Top Middle Lautsprechers verwendet werden Weitere Informationen finden Sie in der Bedie...

Страница 27: ... SUBWOOFER 1 2 EXTRA 1 EXTRA 2 L R Single FRONT CENTER R L SURROUND R L SURROUND BACK R L TOP MIDDLE R L EXTRA 1 R L SPEAKERS SELECTABLE LINELEVEL INPUT Subwoofer SW Vorne rechts R Surround rechts SR Surround links SL Vorne links L Center C Surround hinten rechts SBR Surround hinten links SBL ACHTUNG Diese Lautsprecheranschlüsse führen LEBENSGEFÄHRLICHE Spannung Um beim Anschließen oder Trennen de...

Страница 28: ...ernsehgerät Anschluss der Antennen ANTENNA AMLOOP 1 4 5 2 3 a b c Anschluss des Receivers an das Stromnetz Schließen Sie den Receiver erst an das Stromnetz an nachdem Sie alle gewünschten Komponenten an diesen Receiver angeschlossen haben einschließlich der Lautsprecher ACHTUNG Fassen Sie das Netzkabel immer am Stecker Ziehen Sie nicht am Kabel selbst und fassen Sie das Netzkabel niemals mit nasse...

Страница 29: ...ay des Receivers angezeigt wird nachdem das Setup Mikrofon angeschlossen wurde entfernen Sie das Setup Mikrofon vom Receiver warten Sie etwa eine Minute und schließen Sie das Mikrofon dann erneut an den Receiver an Auf Ohrhöhe einstellen wenn ein Stativ oder dergleichen für das Mikrofon verwendet werden soll MASTER VOLUME STANDBY ON INPUT SELECTOR MCACC SETUP MIC Die Bildschirmansicht Full Auto MC...

Страница 30: ...rt 4 Starten Sie die Wiedergabe der Wiedergabekomponente Z B Starten Sie die Wiedergabe des Blu ray Disc Players 5 Mit dem VOLUME können Sie die Lautstärke einstellen Wenn kein Ton ausgegeben wird erhöhen Sie die Lautstärke auf ca 30 dB Hinweise Wird im mittleren hinteren Lautsprecher und im Subwoofer kein Ton erzeugt siehe Häufig gestellte Fragen in der Broschüre Funktioniert die Fernbedienung ni...

Страница 31: ...urücksetzen Zum Zurücksetzen schalten sie den Strom ab und drücken Sie die Taste STANDBY ON auf der Vorderseite für ca 5 Sekunden oder länger Der Strom wird 5 Minuten nachdem der Strom eingeschaltet wurde abgeschaltet Die Einstellungen des Empfängers werden beibehalten Versuchen Sie auch das Netzkabel der angeschlossenen Geräte umzustecken So erzeugen Sie den Ton des TV Für Anschluss und Einstellu...

Страница 32: ...sciare un certo spazio all intorno dello stesso per consentire una adeguata circolazione dell aria e migliorare la dispersione del calore almeno 20 cm sulla parte superiore 10 cm sul retro e 20 cm su ciascuno dei lati ATTENZIONE L apparecchio è dotato di un certo numero di fessure e di aperture per la ventilazione allo scopo di garantirne un funzionamento affidabile e per proteggerlo dal surriscal...

Страница 33: ...ioni nell opuscolo per effettuare il collegamento e le impostazioni iniziali Se si possiede un iPhone o un iPad L applicazione Start up Navi è disponibile nell App Store Se si possiede un dispositivo Android L applicazione Start up Navi è disponibile in Google Play Informazioni relative al lampeggio della spia WIRELESS Lampeggia quando si utilizza la modalità WAC Modalità in cui le impostazioni di...

Страница 34: ...del collegamento di rete nelle istruzioni per l uso del CD ROM Collegamento del ricevitore Dopo aver stabilito la connessione a una rete LAN collegare il cavo di alimentazione del ricevitore a una presa di corrente 1 Collegare il cavo di alimentazione in dotazione alla presa AC IN nella parte posteriore del ricevitore 2 Collegare l altra estremità a una presa a muro Accensione Premere STANDBY ON p...

Страница 35: ...ete In tal caso assicurarsi che ricevitore e router siano collegati correttamente 3 Immettere il numero del punto 2 sopra descritto nel campo del browser Internet Explorer indicato sotto quindi premere il tasto INVIO Esempio del formato di immissione 192 168 0 124 Con un PC Windows è possibile utilizzare il metodo seguente per lanciare AVNavigator Avviare Esplora risorse e fare clic con il pulsant...

Страница 36: ...re superiore posteriore superiore ecc Per maggiori dettagli vedere Collegamento all attrezzatura delle istruzioni per l uso Per utilizzare la funzione Dolby Atmos è necessario collegare il diffusore centrale superiore surround posteriore anteriore superiore posteriore superiore frontale alto o ad ampiezza frontale Il diffusore Dolby Enabled può essere usato al posto del diffusore superiore central...

Страница 37: ...L R Single FRONT CENTER R L SURROUND R L SURROUND BACK R L TOP MIDDLE R L EXTRA 1 R L SPEAKERS SELECTABLE LINELEVEL INPUT Subwoofer SW Anteriore destro R Surround destro SR Surround sinistro SL Anteriore sinistro L Centrale C Surround posteriore destro SBR Surround posteriore sinistro SBL ATTENZIONE Questi terminali contengono voltaggi PERICOLOSI Per evitare il rischio di folgorazioni nel collegar...

Страница 38: ...ollegamento delle antenne ANTENNA AMLOOP 1 4 5 2 3 a b c Collegamento del ricevitore Collegare il ricevitore solo dopo avere collegato tutti i componenti compresi gli diffusori ATTENZIONE Prendete sempre il filo di alimentazione per la spina Non tiratelo mai agendo per il filo stesso e non toccate mai il filo con le mani bagnati perchè questo potrebbe causare cortocircuiti o scosse elettriche Non ...

Страница 39: ...i ad esempio in un automobile o vicino ad una sorgente di calore Questo potrebbe causare perdite di acido farle surriscaldare esplodere o prendere fuoco Può anche ridurne la durata o le prestazioni Nell inserire le batterie fare attenzione a non danneggiare le molle del loro terminale Questo potrebbe causare perdite o surriscaldamenti delle batterie Quando si smaltiscono le batterie esauste si rac...

Страница 40: ...duzione del componente desiderato Ad es Avviare la riproduzione del lettore di dischi Blu ray Disc 5 Utilizzare VOLUME per regolare il livello del volume Se non viene emesso alcun suono aumentare il volume fino a circa 30 dB Note Se non viene riprodotto alcun suono dal diffusore centrale dal diffusore posteriore e dal subwoofer fare riferimento alle Domande frequenti nell opuscolo Quando il teleco...

Страница 41: ...are Per reimpostare scollegare l alimentazione quindi premere il tasto STANDBY ON sul pannello anteriore per almeno 5 secondi L alimentazione viene scollegata 5 secondi dopo il collegamento dell alimentazione Le impostazioni del ricevitore verranno mantenute Inoltre provare a ricollegare il cavo di alimentazione dei dispositivi di collegamento Per produrre suono dalla TV Fare riferimento alla pagi...

Страница 42: ...n van het apparaat op dat er voldoende vrije ruimte rondom het apparaat is om een goede doorstroming van lucht te waarborgen tenminste 20 cm boven 10 cm achter en 20 cm aan de zijkanten van het apparaat WAARSCHUWING De gleuven en openingen in de behuizing van het apparaat zijn aangebracht voor de ventilatie zodat een betrouwbare werking van het apparaat wordt verkregen en oververhitting wordt voor...

Страница 43: ...g is vereist Volg de instructies in het boekje om de verbindings en begininstellingen uit te voeren Als u een iPhone of iPad hebt Zoek de app Start up Navi in de App Store Als u een Android apparaat hebt Zoek de app Start up Navi in Google Play LAN LAN Over het knipperen van de WIRELESS aanduiding Knippert wanneer u de WAC stand gebruikt Stand waarin netwerkinstellingen kunnen worden gewijzigd met...

Страница 44: ...rkverbinding instellen in de handleiding op de CD ROM De receiver aansluiten op het stopcontact Nadat u de receiver op het LAN hebt aangesloten steekt u de stekker van het netsnoer in het stopcontact 1 Sluit het geleverde netsnoer aan op de AC IN aansluiting aan de achterkant van de receiver 2 Steek het andere einde in het stopcontact Inschakelen Druk op STANDBY ON om de receiver en de computer aa...

Страница 45: ... op het netwerk aangesloten Controleer of de ontvanger en router correct zijn aangesloten 3 Voer het adres uit stap 2 in het veld in Internet Explorer in zoals hieronder wordt getoond en druk op de ENTER toets voorbeeld van invoernotatie 192 168 0 124 Met een Windows PC kunt u de volgende methode gebruiken om AVNavigator te starten Start Explorer en klik met de rechtermuisknop op SC LX89 of SC LX7...

Страница 46: ...luiting van de luidsprekers boven voor boven achter enz Zie Uw apparatuur aansluiten in de handleiding voor meer informatie Voor het afspelen van Dolby Atmos moet u de luidspreker boven midden surround achter boven voor boven achter hoog voor of breed voor aansluiten De Dolby luidspreker kan worden gebruikt in plaats van de boven middenluidspreker Raadpleeg de handleiding voor meer informatie Aans...

Страница 47: ... EXTRA 1 EXTRA 2 L R Single FRONT CENTER R L SURROUND R L SURROUND BACK R L TOP MIDDLE R L EXTRA 1 R L SPEAKERS SELECTABLE LINELEVEL INPUT Subwoofer SW Rechtsvoor R Surround rechts SR Surround links SL Linksvoor L Midden C Surround rechtsachter SBR Surround linksachter SBL WAARSCHUWING Deze luidsprekeraansluitingen hebben een GEVAARLIJKE spanning Om een elektrische schok te voorkomen bij het aansl...

Страница 48: ... aanwijzingen betreffende de aansluitingen en instellingen van de TV De antennes aansluiten ANTENNA AMLOOP 1 4 5 2 3 a b c Stopcontact Steek de stekker pas in het stopcontact als u alle andere apparaten waaronder de luidsprekers hebt aangesloten op de receiver WAARSCHUWING Pak het netsnoer beet bij de stekker Trek de stekker er niet uit door aan het snoer te trekken en trek nooit aan het netsnoer ...

Страница 49: ...t verschijnt op het scherm van de receiver nadat de instelmicrofoon is aangesloten trek de instelmicrofoon dan uit de receiver en wacht ongeveer een minuut Sluit daarna de microfoon weer op de receiver aan Stel in op oorhoogte wanneer u een statief enz gebruikt voor de microfoon MASTER VOLUME STANDBY ON INPUT SELECTOR MCACC SETUP MIC Het scherm Full Auto MCACC verschijnt op uw TV Speaker System 7 ...

Страница 50: ...unctie 4 Start met afspelen van het weergave apparaat Bijv Start met afspelen van de Blu ray disc speler 5 Gebruik VOLUME om het volume in te stellen Als er geen geluid wordt weergegeven verhoogt u het volume tot ongeveer 30 dB Opmerkingen Als er geen geluid wordt weergegeven via de middenluidspreker achterluidspreker en subwoofer raadpleegt u Veelgestelde vragen in het boekje Als de afstandsbedie...

Страница 51: ... Om te resetten schakelt u de stroom uit en drukt u 5 seconden of langer op de STANDBY ON knop op het voorpaneel De stroom wordt uitgeschakeld 5 seconden na het inschakelen van de stroom De instellingen van de receiver blijven behouden U kunt ook de stekker van het netsnoer van de aangesloten apparaten uit het stopcontact halen en er weer insteken Geluid weergeven via de TV Raadpleeg pagina 8 van ...

Страница 52: ...no al mismo para la ventilación con el fin de mejorar la disipación de calor por lo menos 20 cm encima 10 cm detrás y 20 cm en cada lado ADVERTENCIA Las ranuras y aberturas de la caja del aparato sirven para su ventilación para poder asegurar un funcionamiento fiable del aparato y para protegerlo contra sobrecalentamiento Para evitar el peligro de incendio las aberturas nunca deberán taparse ni cu...

Страница 53: ...ión y la configuración inicial 1 Lea el folleto Si tiene un Mac PC 2 Siga las instrucciones del AVNavigator incorporado en el receptor para realizar la conexión y la configuración inicial 1 Lea el folleto siguiendo el orden 2 Siga las instrucciones de cada paso Sobre el parpadeo del indicador WIRELESS Parpadea al utilizar el modo WAC modo en el que los ajustes de red pueden cambiarse mediante un i...

Страница 54: ...uración de la conexión a la red en las instrucciones de funcionamiento del CD ROM Conexión del receptor Tras la conexión a una LAN conecte el cable de alimentación del receptor a una toma de corriente 1 Conecte el cable de alimentación suministrado a la toma AC IN de la parte posterior del receptor 2 Conecte el otro extremo a una toma de corriente Encendido Pulse STANDBY ON para encender el recept...

Страница 55: ...ptor y el enrutador están conectados debidamente 3 Introduzca el número indicado en el paso 2 anterior en el campo de Internet Explorer mostrado abajo y pulse a continuación la tecla ENTER Formato de entrada de ejemplo 192 168 0 124 Si está utilizando un PC con Windows puede usar el método siguiente para iniciar AVNavigator Inicie Explorer y haga clic con el botón derecho en SC LX89 o SC LX79 que ...

Страница 56: ...es de conexión de altavoces delantero superior trasero superior etc Para conocer detalles consulte Conexión del equipo en el manual de instrucciones Para reproducir Dolby Atmos debe conectar el altavoz central superior trasero de sonido envolvente delantero superior trasero superior alto delantero o ancho delantero El Dolby Enabled Speaker puede utilizarse en lugar del altavoz Central superior Par...

Страница 57: ... R L TOP MIDDLE R L EXTRA 1 R L SPEAKERS SELECTABLE LINELEVEL INPUT Subwoofer SW Delantero derecho R Sonido envolvente izquierdo SL Sonido envolvente derecho SR Delantero izquierdo L Central C Sonido envolvente trasero derecho SBR Sonido envolvente trasero izquierdo SBL PRECAUCIÓN Por estos terminales de altavoz circula tensión ACTIVA que es PELIGROSA Para evitar el peligro de descargas eléctricas...

Страница 58: ...onexiones y configuración del televisor consulte el manual de funcionamiento del mismo Conexión de antenas ANTENNA AMLOOP 1 4 5 2 3 a b c Conexión del receptor No conecte el receptor hasta que no haya conectado todos los componentes de este receptor incluidos los altavoces PRECAUCIÓN Tome el cable de alimentación por la clavija No extraiga la clavija tirando del cable Nunca toque el cable de alime...

Страница 59: ...se wait en la pantalla tras conectar el micrófono de configuración desconecte el micrófono de configuración del receptor espere aproximadamente un minuto y después vuelva a conectar el micrófono en el receptor Ajuste a la altura de la oreja cuando use un trípode u otro elemento para el micrófono MASTER VOLUME STANDBY ON INPUT SELECTOR MCACC SETUP MIC La pantalla Full Auto MCACC aparece en su telev...

Страница 60: ...ponente de reproducción Ej Inicie la reproducción del reproductor de discos Blu ray 5 Use VOLUME para ajustar el nivel del volumen Cuando no se emita ningún sonido aumente el volumen a aproximadamente 30 dB Notas Cuando no se reproduce el sonido desde el altavoz central el trasero y el subwoofer consulte las Preguntas frecuentes del folleto Si el mando a distancia no funciona consulte las Pregunta...

Страница 61: ...nden Intente volver a ajustarlos Para ello apague la alimentación y presione el botón STANDBY ON del panel delantero durante 5 segundos o más La alimentación se desactiva 5 segundos después de su activación Se mantendrá la configuración del receptor Pruebe a volver a conectar el cable de alimentación de los dispositivos de conexión Reproducción de sonido de TV Consulte la página 8 del folleto para...

Страница 62: ... безопасноти Кабель питания ОБЯЗАТЕЛЬНАЯ ВЕНТИЛЯЦИЯ При установке устройства обеспечьте достаточное пространство для вентиляции во избежание повышения температуры внутри устройства не менее 20 см сверху 10 см сзади и по 20 см слева и справа ПРЕДУПРЕЖДЕНИЕ В корпусе устройства имеются щели и отверстия для вентиляции обеспечивающие надежную работу изделия и защищающие его от перегрева Во избежание п...

Страница 63: ...одимо подключение к сети Для выполнения подключения и начальных настроек следуйте инструкциям приведенным в буклете Если у вас есть iPhone или iPad Найдите приложение приложение Start up Navi в App Store Если у вас есть устройство Android Найдите приложение приложение Start up Navi в Google Play LAN LAN Замечания относительно мигающего индикатора WIRELESS Мигает при использовании режима WAC Режим ...

Страница 64: ...и Настройка сетевого подключения инструкции по эксплуатации на компакт диске Подключение ресивера к розетке После подключения к беспроводной сети LAN подсоедините кабель питания ресивера к сети питания 1 Подключите поставляемый кабель питания к разъему AC IN на задней стороне ресивера 2 Подключите другой конец к розетке Включение питания Нажмите STANDBY ON чтобы включить ресивер и компьютер Прежде...

Страница 65: ...ен Выполните проверку чтобы убедиться что ресивер и маршрутизатор подключены правильно 3 Введите цифры показанные на дисплее в шаге 2 в командной строке Internet Explorer как показано ниже и нажмите клавишу ENTER Пример формата ввода 192 168 0 124 Если у вас есть ПК под управлением Windows можно запустить AVNavigator следующим способом Запустите Проводник и щелкните правой кнопкой мыши SC LX89 или...

Страница 66: ...я Существуют и другие схемы подключения громкоговорителей верхнего переднего и верхнего заднего и т д Подробные сведения см в разделе Подключение оборудования инструкции по эксплуатации Для воспроизведения Dolby Atmos необходимо подключить громкоговоритель верхнего среднего канала заднего канала объемного звучания верхнего переднего и верхнего заднего переднего верхнего или переднего бокового кана...

Страница 67: ...CTABLE LINELEVEL INPUT Левый громкоговоритель объемного звучания SL ПРЕДУПРЕЖДЕНИЕ Данные терминалы громкоговорителей содержат ОПАСНОЕ ДЛЯ ЖИЗНИ напряжение Во избежание риска электрошока при подключении или отсоединении кабелей громкоговорителей перед прикосновением к любым неизолированным частям отсоедините кабель питания Верхний средний правый TMdR Верхний средний левый TMdL Передний правый гром...

Страница 68: ...ия по подключению и настройке телевизора пожалуйста смотрите в руководстве по эксплуатации к телевизору Подключение антенн ANTENNA AMLOOP 1 4 5 2 3 a b c Подключение ресивера к розетке Подключайте ресивер к розетке только после подключения к нему всех компонентов в том числе и громкоговорителей ПРЕДУПРЕЖДЕНИЕ Держите сетевой шнур за вилку Не вытаскивайте вилку взявшись за шнур и никогда не касайте...

Страница 69: ...ние Выполняйте измерения соблюдая тишину 1 Подключите поставляемый микрофон настройки Если после подключения микрофона на экране ресивера появляется сообщение Please wait отключите микрофон от ресивера и подождите около минуты затем вновь подключите микрофон к ресиверу При использовании штатива и т д для микрофона настройте высоту прослушивания MASTER VOLUME STANDBY ON INPUT SELECTOR MCACC SETUP M...

Страница 70: ...оизведения Например запустите воспроизведение на проигрывателе Blu ray Disc 5 С помощью VOLUME отрегулируйте уровень громкости Если звук не выводится увеличьте громкость до прибл 30 дБ Примечания Если нет звука из центрального громкоговорителя заднего громкоговорителя или низкочастотного громкоговорителя см раздел Вопросы и ответы буклета Если пульт ДУ не работает см раздел Вопросы и ответы буклет...

Страница 71: ...пакт диске Функции HDMI сети и т д не работают Причина Решение Функции ресивера и подключенные устройства не работают Попробуйте сбросить настройки Чтобы сбросить настройки выключите питание и держите кнопку STANDBY ON на передней панели нажатой в течение 5 секунд или больше Питание будет выключено через 5 секунд после его включения Настройка ресивера будет сохранена Также можно попробовать отключ...

Страница 72: ...илку из розетки и подключите ее снова чтобы восстановить нормальные условия эксплуатации Если не удается устранить неисправность после выполнения шагов ниже если экран внезапно застывает или перестают полностью работать кнопки на пульте ДУ или передней панели выполните следующее Нажмите u STANDBY ON на передней панели и отключите питание затем снова включите питание Если это не решило проблему то ...

Страница 73: ...да Терминал HDMI 19 контактный Не DVI Выход HDMI 5 В 55 мА Вход HDMI терминал MHL 5 В 900 мА Терминал USB USB2 0 High Speed Type A 5 В 1 A Терминал USB только SC LX89 USB2 0 High Speed Type B Разъем для iPod USB Раздел интегрированного управления Терминал управления IR ø 3 5 мини джек MONO Сигнал IR Максимальный уровень 2 0 В Терминал 12 В триггера ø 3 5 мини джек MONO Тип выхода 12 В триггера 12 ...

Страница 74: ...есяце и годе производства Дата изготовления оборудования Год 2001 A 2002 B 2003 C 2004 D 2005 E 2006 F 2007 G 2008 H 2009 I 2010 J Символ 12 цифр 10 цифр 2 цифры Год 2011 K 2012 L 2013 M 2014 N 2015 O 2016 P 2017 Q 2018 R 2019 S 2020 T Символ P2 Месяц изготовления Месяц 1 A 2 B 3 C 4 D 5 E 6 F 7 G 8 H 9 I 10 J 11 K 12 L Символ D3 7 10 7_A1_Ru ...

Страница 75: ...nă български Polski Norsk Íslenska Pioneer declara que este está conforme com os requisitos essenciais e outras disposições da Directiva 1999 5 CE Pioneer tímto prohlašuje že tento je ve shodě se základními požadavky a dalšími příslušnými ustanoveními směrnice 1999 5 ES Käesolevaga kinnitab Pioneer seadme vastavust direktiivi 1999 5 EÜ põhinõuetele ja nimetatud direktiivist tulenevatele teistele a...

Страница 76: ...208 836 3612 France 6 Avenue de Marais F 95816 Argenteuil Cedex FRANCE Tel 33 0 969 368 050 Корпорация О энд Пи 2 3 12 Яэсу Чуо ку г Токио 104 0028 ЯПОНИЯ Примечание Корпорация О энд Пи устанавливает следующую продолжительность срока службы официально поставляемых на Российский рынок товаров Аудио и видеооборудование 7 лет Переносное аудиооборудование 6 лет Другое оборудование наушники микрофон и ...

Отзывы: