background image

Basic playback

4

4

32

4

61

9

Note

Compatible USB devices include external magnetic hard 

drives, portable flash memory (particularly keydrives) and 

digital audio players (MP3 players) of format FAT16/32.

Copyrighted audio files cannot be played back on this 

receiver.

With large amounts of data, it may take longer for the 

receiver to read the contents of a USB device.

If the file selected cannot be played back, this receiver 

automatically skips to the next file playable.

When the file currently being played back has no title 

assigned to it, the file name is displayed in the OSD instead; 

when neither the album name nor the artist name is 

present, the row is displayed as a blank space.

Note that non-roman characters in the playlist are 

displayed as ‘

#

’.

Make sure the receiver is in standby when disconnecting 

the USB device.

1

Switch on the receiver and your TV.

See 

Connecting a USB device

 on page 25

.

2

Switch the TV input so that it connects to the receiver.

Switch the TV input to the input that connects this 

receiver to the TV through the corresponding HDMI 

cable.

3

Press 

iPod USB

 on the remote control to switch the 

receiver to the iPod/USB input.

When the display shows the names of folders and files, 

you’re ready to play from the USB device.
If a 

USB Error

 message lights in the display, try following 

the points below:

Switch the receiver off, then on again.

Reconnect the USB device with the receiver switched 

off.

Select another input source (like 

BD

), then switch back 

to 

iPod/USB

.

Use a dedicated AC adapter (supplied with the device) 

for USB power.

If this doesn’t remedy the problem, it is likely your USB 

device is incompatible.

Playing back audio files stored on a USB memory 
device

The maximum number of levels that you can select in Step 1 

(below) is 9.

Note that non-Roman characters in the playlist are 

displayed as ‘

#

’.

1

Use 

/

 to select a folder, then press 

ENTER

 to browse 

that folder.

To return to the previous level any time, press 

RETURN

.

2

Continue browsing until you arrive at what you want to 
play, then press 

 to start playback.

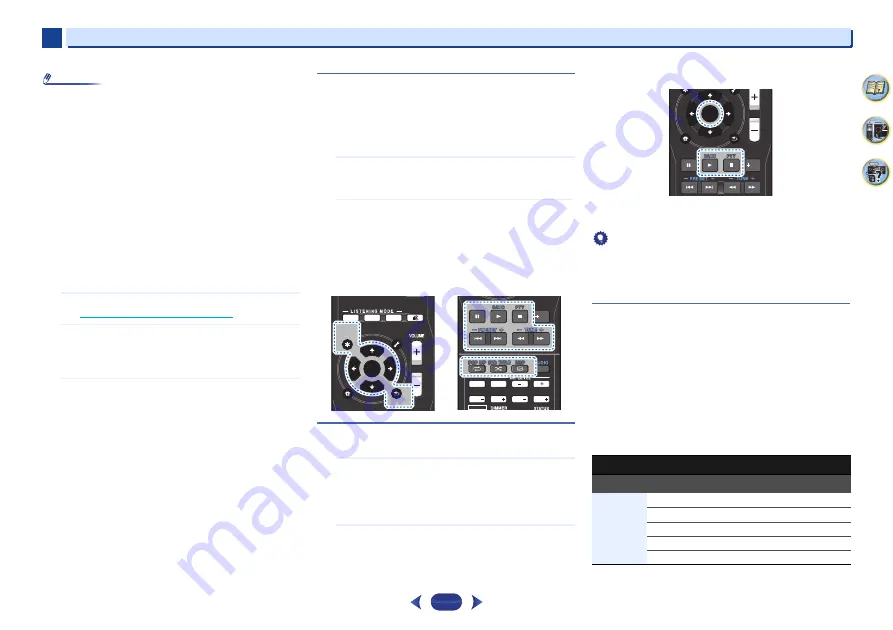
Basic playback controls

This receiver’s remote control buttons can be used for basic 

playback of files stored on USB devices.

Press 

iPod USB

 to switch the remote control to the iPod/

USB operation mode.

Playing back photo files stored on a USB memory 
device

1

Use 

/

 to select a folder, then press 

ENTER

 to browse 

that folder.

For high resolution files, some time may be required 

for the photo to appear.

To return to the previous level any time, press 

RETURN

.

2

Continue browsing until you arrive at what you want to 
play, then press 

 to start playback.

The selected content is displayed in full screen and a 

slideshow starts.

Basic playback controls

ENTER

 – Starts displaying a photo and playing a slideshow.

 – Stops the player and returns to the previous menu.

Tip

Slideshows of photo files can be played while listening to 

music files by returning to the folder/file list display while 

playing a music file on a USB device then playing the photo 

files.

About playable file formats

The USB function of this receiver supports the following file 

formats. Note that some file formats are not available for 

playback although they are listed as playable file formats.
With MP3, WAV, AAC, FLAC, AIFF and Apple Lossless files, 

when music files with the same format, sampling frequency, 

quantization bit number and number of channels are played 

successively, they are played with no gap.

-

Make sure the gap is at the minimum when using MP3 or 

AAC. If you are concerned about the gap, please use 

WAV or FLAC files.

Music files

MUTE

AUTO

SURR

ADV

ENTER

RETURN

AUDIO P.

TOP

MENU

HOME
MENU

TOOLS

MENU

BAND

PTY

ENTER

RETURN

AUDIO P.

TOP

MENU

CLR

SB CH

CH SEL

Fav

RETURN

HOME
MENU

SHIFT

BASS

BASS

TRE

TRE

BAND

PTY

Extension

Stream

MP3 (MPEG-1 Audio Layer 3)

.mp3

a

Sampling frequency

32 kHz, 44.1 kHz, 48 kHz

Quantization bitrate

16 bit

Channel

2 ch

Bitrate

8 kbps to 320 kbps

VBR/CBR

Supported/Supported

ENTER

Fav

RETURN

HOME
MENU

BAND

PTY

ENTER

Содержание Elite VSX-44

Страница 1: ...or reference in the event of an insurance claim such as loss or theft Improve product development Your input helps us continue to design products that meet your needs Receive a free Pioneer newsletter Registered customers can opt in to receive a monthly newsletter Receive free tips updates and service bulletins on your new product AV Receiver VSX 44 Operating Instructions ...

Страница 2: ...ried out without appropriate authorization may invalidate the user s right to operate the equipment D8 10 2_A1_En WARNING This equipment is not waterproof To prevent a fire or shock hazard do not place any container filled with liquid near this equipment such as a vase or flower pot or expose it to dripping splashing rain or moisture D3 4 2 1 3_A1_En WARNING To prevent a fire hazard do not place a...

Страница 3: ...n damaged in any way such as power supply cord or plug is damaged liquid has been spilled or objects have fallen into the apparatus the apparatus has been exposed to rain or moisture does not operate normally or has been dropped D3 7 13 69_En 11 12 13 14 CAUTION The STANDBY ON switch on this unit will not completely shut off all power from the AC outlet Since the power cord serves as the main disc...

Страница 4: ...e file formats 32 Playing a MHL compatible device 33 Enjoy Roku video streaming service 33 Bluetooth ADAPTER for Wireless Enjoyment of Music 34 Wireless music play 34 Pairing the Bluetooth ADAPTER and Bluetooth wireless technology device 34 Listening to Music Contents of Bluetooth wireless technology device with Your System 35 Listening to the radio 36 Improving FM sound 36 Saving station presets ...

Страница 5: ...ULTI ZONE controls 58 09 Control with HDMI function Making Control with HDMI connections 59 HDMI Setup 59 Before using synchronization 60 About synchronized operations 60 Cautions on the Control with HDMI function 60 10 Additional information Troubleshooting 61 General 61 NETWORK feature 62 Troubleshooting of wireless LAN 63 HDMI 64 Important information regarding the HDMI connection 64 Windows 8 ...

Страница 6: ...r iPhone can be connected to the receiver s USB terminal to play the music files on the iPod or iPhone Also the iPod or iPhone is charged when it is connected to the receiver Network Roku Ready This receiver is certified Roku Ready By just plug the Roku Streaming Stick into the MHL port you can enjoy the hottest movies TV shows music games and more on your TV by streaming it directly from the Inte...

Страница 7: ...ores the output of compressed audio such as WMA AAC and MP3 to the level of CD sound by creating new signals to restore the minor details left out during the compression process Installation iControlAV5 Remote Application This is an application that allowing intuitive operation of many of the receiver s functions This application is available on the App Store for iPhone iPod touch and iPad And als...

Страница 8: ...big effect on the sound Determining the speakers application page 14 Connecting the speakers page 15 Switching the speaker terminal page 18 2 Connecting the components For surround sound you ll want to hook up using a digital connection from the Blu ray Disc DVD player to the receiver About video outputs connection page 19 Connecting a TV and playback components page 20 Connecting antennas page 23...

Страница 9: ...s page 36 7 HDMI indicator Blinks when connecting an HDMI equipped component lights when the component is connected page 20 8 iPod iPhone indicator Lights when an iPod iPhone is connected and iPod USB input is selected page 31 9 Remote sensor Receives the signals from the remote control see Operating range of remote control on page 13 10 MASTER VOLUME dial 11 STANDBY ON 12 PHONES jack Use to conne...

Страница 10: ... type etc 26 Character display Displays various system information 27 DTS indicators DTS Lights when a source with DTS encoded audio signals is detected HD Lights when a source with DTS EXPRESS or DTS HD encoded audio signals is detected ES Lights to indicate DTS ES decoding 96 24 Lights when a source with DTS 96 24 encoded audio signals is detected NEO 6 When one of the NEO 6 modes of the receive...

Страница 11: ... to access TOP MENU Displays the disc top menu of a Blu ray Disc DVD HOME MENU Displays the HOME MENU screen RETURN Confirm and exit the current menu screen MENU Displays the TOOLS menu of Blu ray Disc player Press TUNER first to access TOOLS Memorizes stations for recall page 36 also used to change the name page 36 BAND Switches between AM FM ST stereo and FM MONO radio bands page 36 Press iPod U...

Страница 12: ...ct channels VOL Use to adjust the volume on your TV While holding down TV button press the input function buttons listed in the table below for component you want to control for about five seconds This may not operate depending on the TV Default setting Pioneer TV preset 16 MUTE Mutes unmutes the sound 17 VOLUME Use to set the listening volume 18 Fav Press while a song is being played back or stop...

Страница 13: ...here are obstacles between the remote control and the receiver s remote sensor Direct sunlight or fluorescent light is shining onto the remote sensor The receiver is located near a device that is emitting infrared rays The receiver is operated simultaneously with another infrared remote control unit 30 7 m 23 ft 30 ...

Страница 14: ...minals to listen to stereo playback in another room See Switching the speaker terminal on page 18 for the listening options with this setup You will not be able to connect the B speakers if you connect the front height speakers in the main zone Further if you use the B speakers a 5 1 ch playback will be the maximum in the main zone No sound is output from the surround back speaker Bi amping connec...

Страница 15: ...e left and right front height speakers at least one meter directly above the left and right front speakers If you re going to place speakers around your CRT TV use shielded speakers or place the speakers at a sufficient distance from your CRT TV The subwoofer can be placed on the floor Ideally the other speakers should be at about ear level when you re listening to them Putting the speakers on the...

Страница 16: ...s connected If neither the surround back speaker nor the front height speaker is connected either setting will suffice see The Speaker System setting on page 57 When using only one surround back speaker connect it to the SURROUND BACK L Single terminals Connection diagram LINE LEVEL INPUT LINE LEVEL INPUT FRONT R L SURROUND R L FRONT HEIGHT R L CENTER PREOUT SUBWOOFER SURROUND BACK R L Front heigh...

Страница 17: ...onnecting your equipment 2 2 17 4 61 9 Front Bi Amp connection Hight Low Hight Low Center Surround right Front right Front left Subwoofer 2 Surround left Front height left Front height right Subwoofer 1 ...

Страница 18: ... Note Set the HDMI parameter in Setting the Audio options on page 39 to THRU THROUGH and set the input signal in Selecting the audio input signal on page 29 to HDMI if you want to hear HDMI audio output from your TV no sound will be heard from this receiver If the video signal does not appear on your TV try adjusting the resolution settings on your component or display Note that some components su...

Страница 19: ...rs You can also use a standard RCA video cable for coaxial digital connections Video cables Standard RCA video cables These cables are the most common type of video connection and are used to connect to the composite video terminals The yellow plugs distinguish them from cables for audio Component video cables Use component video cables to get the best possible color reproduction of your video sou...

Страница 20: ... is no need to connect an audio cable In this case set ARC at HDMI Setup to ON see HDMI Setup on page 59 Please refer to the TV s operation manual for directions on connections and setup for the TV Note In order to listen to the audio from the TV that is connected to this receiver using an analog audio cables set up for analog audio input is required see The Input Assign menu on page 55 On 4K supp...

Страница 21: ...ver s front panel display while performing the various operations and making settings Note In order to listen to the audio from the TV that is connected to this receiver using a analog audio cables set up for analog audio input is required see The Input Assign menu on page 55 Only one component can be connected to both the optical input terminal and coaxial input terminal If connecting other devic...

Страница 22: ... on the components on the local network including your computer Connect the LAN terminal on this receiver to the LAN terminal on your router with or without the built in DHCP server function with a straight LAN cable CAT 5 or higher Turn on the DHCP server function of your router In case your router does not have the built in DHCP server function it is necessary to set up the network manually For ...

Страница 23: ... 3 Place the AM antenna on a flat surface and in a direction giving the best reception 4 Connect the FM wire antenna into the FM antenna socket For best results extend the FM antenna fully and fix to a wall or door frame Don t drape loosely or leave coiled up Using external antennas To improve FM reception Use an F connector not supplied to connect an external FM antenna To improve AM reception Co...

Страница 24: ...12 V Trigger Setting on page 57 Note that this will only work with components that have a standby mode Connect the 12 V TRIGGER jack of this receiver to the 12 V trigger of another component Use a cable with a mono mini plug on each end for the connection After you ve specified the input functions that will switch on the trigger you ll be able to switch the component on or off just by pressing the...

Страница 25: ... separately to connect your MHL enabled device to the MHL terminal on the front panel of this receiver The MHL compatible device is recharged whenever it is connected to this unit Recharging is enabled only when the unit s power is turned on For instructions on playing the MHL compatible device see Playing a MHL compatible device on page 33 Note Do not place the MHL device on this unit which has t...

Страница 26: ...ikely to be stepped on A damaged power cord can cause a fire or give you an electrical shock Check the power cord once in a while When you find it damaged ask your nearest PIONEER authorized service center or your dealer for a replacement The receiver should be disconnected by removing the mains plug from the wall socket when not in regular use e g when on vacation Note After this receiver is conn...

Страница 27: ...e If you have a tripod use it to place the microphone so that it s about ear level at your normal listening position Otherwise place the microphone at ear level using a table or a chair 4 Press BD button on the remote control to switch to BD entry 5 Press RECEIVER on the remote control then press the HOME MENU button The Home Menu appears on your TV Use and ENTER on the remote control to navigate ...

Страница 28: ...uto MCACC setup has finished You return to the Home Menu The settings made in the Auto MCACC setup should give you excellent surround sound from your system but it is also possible to adjust these settings manually using the Home Menu starting on page 53 Note Depending on the characteristics of your room sometimes identical speakers with cone sizes of around 12 cm 5 inches will end up with differe...

Страница 29: ...check the digital audio output settings on your DVD player or digital satellite receiver It should be set to output Dolby Digital DTS and 88 2 kHz 96 kHz PCM 2 channel audio and if there is an MPEG audio option set this to convert the MPEG audio to PCM Depending on your DVD player or source discs you may only get digital 2 channel stereo and analog sound In this case the receiver must be set to a ...

Страница 30: ...connections page 19 and set the signal input to C1 O1 digital Some DVD players don t output DTS signals For more details refer to the instruction manual supplied with your DVD player Tip In order to enjoy the picture and or sound from devices connected to each terminal select the input by doing the following DVD BD TUNER ADAPTER SAT CBL DVD DVD SAT CBL DVD SAT CBL GAME MHL NETWORK DVD MHL C1 TV 1 ...

Страница 31: ... advantage of the OSD of your TV connected to this receiver Note that non roman characters in the title are displayed as This feature is not available for photos or video clips on your iPod Finding what you want to play When your iPod is connected to this receiver you can browse songs stored on your iPod by playlist artist album name song name genre or composer similar to using your iPod directly ...

Страница 32: ...owse that folder To return to the previous level any time press RETURN 2 Continue browsing until you arrive at what you want to play then press to start playback Basic playback controls This receiver s remote control buttons can be used for basic playback of files stored on USB devices Press iPod USB to switch the remote control to the iPod USB operation mode Playing back photo files stored on a U...

Страница 33: ...be operable To playback from a MHL compatible device connected to the receiver on a TV that is also connected to the receiver the power to the receiver must be turned on Enjoy Roku video streaming service Connect the Roku Streaming Stick sold separately to the MHL terminal on the main device to enjoy video streaming 1 Press STANDBY ON to switch on the receiver and your TV See Connecting a MHL comp...

Страница 34: ...supports AVRCP profiles Remote control operations cannot be guaranteed for all Bluetooth wireless technology enabled devices Pairing the Bluetooth ADAPTER and Bluetooth wireless technology device Pairing must be done before you start playback of Bluetooth wireless technology content using Bluetooth ADAPTER Make sure to perform pairing first time you operate the system or any time pairing data is c...

Страница 35: ...ology device is connected Bluetooth wireless technology device name appears in the receiver display The system can display alphanumeric characters only Other characters may not be displayed correctly When Bluetooth wireless technology device is not connected WAITING appears in the receiver display In this case perform the connection operation from the side of the Bluetooth wireless technology devi...

Страница 36: ...n preset 3 Press PRESET to select the station preset you want You can also use the number buttons 4 Press ENTER The preset number stop blinking and the receiver stores the station Note If the receiver is left disconnected from the AC power outlet for over a month the station memories will be lost and will have to be reprogrammed Stations are stored in stereo When the station is stored in the FM MO...

Страница 37: ...aker setup and the type of source you re listening to If the source is Dolby Digital DTS or Dolby Surround encoded the proper decoding format will automatically be selected and shows in the display When you select STEREO ALC Auto Level Control stereo mode this unit equalizes playback sound levels if each sound level varies with the music source recorded in a portable audio player When you select S...

Страница 38: ...c Calibration Equalization see Setting the Audio options on page 39 Using surround back channel processing You can have the receiver automatically use 6 1 or 7 1 decoding for 6 1 encoded sources for example Dolby Digital EX or DTS ES or you can choose to always use 6 1 or 7 1 decoding for example with 5 1 encoded material With 5 1 encoded sources a surround back channel will be generated but the m...

Страница 39: ...case set the setting to OFF 1 Switch the receiver into standby 2 While holding down PRESET on the front panel and hold the STANDBY ON for about two seconds UP MIX OFF appears and the Up Mix function turns off If you want to turn this function on perform steps 1 and 2 again When set to ON the Up Mix indicator on the front panel lights Note Set to ON regardless of this setting when playing DTS HD si...

Страница 40: ...revent the ultra low bass tones from distorting the sound from the speakers The LFE is not limited when set to 0 dB which is the recommended value When set to 15 dB the LFE is limited by the respective degree When OFF is selected no sound is output from the LFE channel 0 0 dB 5 5 dB 10 10 dB 15 15 dB 20 20 dB OFF SACD G SACD Gain d Brings out detail in SACDs by maximizing the dynamic range during ...

Страница 41: ... to ON on this receiver depends on the type of your subwoofer Set your subwoofer to maximize the effect It is also recommended you try changing the orientation or the place of your subwoofer Set the built in lowpass filter switch of your subwoofer to OFF If this cannot be done on your subwoofer set the cutoff frequency to a higher value If the speaker distance is not properly set you may not have ...

Страница 42: ...playing and stopping files can be performed from the external controller Volume adjustment and the muting control are also possible Depending on the external controller being used playback may be interrupted when the volume is adjusted from the controller In this case adjust the volume from the receiver or remote control Using AirPlay on iPod touch iPhone iPad and iTunes AirPlay works with iPhone ...

Страница 43: ...et radio that supports Pandora M SERVER Server components on the network Media server FAVORITE Favorite songs currently being registered Depending on the selected category the names of folders files and Internet radio stations are displayed 2 Use to select the folder music files or Internet radio station to play back and then press ENTER Press to scroll up and down the list and select the desired ...

Страница 44: ...roadcast stations in your favorites The address of the special Pioneer Internet radio site is http www radio pioneer com 1 Display the Internet Radio list screen To display the Internet Radio list screen perform step 1 at Playback with Network functions on page 43 2 Use to select Help then press ENTER 3 Use to select Get access code then press ENTER The access code required for registration on the...

Страница 45: ...ic on your mobile device and this unit is selected the sound will be output from this unit Depending on the volume level the output may be loud so be sure to check the audio output selection carefully before starting audio streaming In addition if you accidentally select this unit and play the sound on it switch the audio output selection to the mobile device Note A separate contract with payment ...

Страница 46: ...5 254 Class B 172 16 0 1 to 172 31 255 254 Class C 192 168 0 1 to 192 168 255 254 Subnet Mask In case an xDSL modem or a terminal adapter is directly connected to this receiver enter the subnet mask provided by your ISP on paper In most cases enter 255 255 255 0 Default Gateway In case a gateway router is connected to this receiver enter the corresponding IP address Primary DNS Server Secondary DN...

Страница 47: ...ur computer When downloading an update file from the Pioneer website onto your computer the file will be in ZIP format Unzip the ZIP file before saving it on the USB memory device If there are any old downloaded files or downloaded files for other models on the USB memory device delete them Important DO NOT unplug the power cord during updating Do not disconnect the USB memory device during updati...

Страница 48: ...has been confirmed for Mac OS X 10 7 and Safari 5 1 Friendly Name setting using Safari browser 1 Launch Safari on your computer 2 Press Bookmark icon Click Bonjour list a and then select this receiver s name Friendly Name b in Bookmark 3 Select Network Setup 4 Click Friendly Name 5 Enter friendly name and then press Apply Note This setting for the network has been confirmed for Mac OS X 10 7 and S...

Страница 49: ...ss finished successfully will be shown when the update is completed Unplug the power cord from the AC outlet after the update is completed Factory Reset Use to reset all network connection settings to their initial factory setting condition 1 Select Factory Reset from the Network Setup menu 2 Select Start 3 Select OK to confirm The screen will return automatically to the play screen System Informa...

Страница 50: ...NG OR OTHER SECURITY INTRUSION AND PIONEER DISCLAIMS ANY LIABILITY IN CONNECTION WITH THE FOREGOING PIONEER IS NOT LIABLE OR RESPONSIBLE FOR ANY LOSS OR DAMAGE ARISING FROM ACCESS TO OR USE OF CONTENT NO ORAL OR WRITTEN INFORMATION OR ADVICE GIVEN BY PIONEER OR ITS CUSTOMER SERVICES REPRESENTATIVES WILL CREATE ANY SUCH WARRANTY IN NO EVENT WILL PIONEER ITS AFFILIATES OR THEIR RESPECTIVE OFFICERS D...

Страница 51: ...s Media Player is software to deliver music photos and movies from a Microsoft Windows computer to home stereo systems and TVs With this software you can play back files stored on the PC through various devices wherever you like in your home This software can be downloaded from Microsoft s website Windows Media Player 11 for Windows XP or Windows Vista Windows Media Player 12 for Windows 7 or 8 Fo...

Страница 52: ...kHz 96 kHz 176 4 kHz 192 kHz Quantization bitrate 16 bit 24 bit Channel 2 ch WMA WMA2 7 8 9 wmab Sampling frequency 32 kHz 44 1 kHz 48 kHz Quantization bitrate 16 bit Channel 2 ch Bitrate 5 kbps to 320 kbps VBR CBR Supported Supported AAC MPEG 4 AAC LC MPEG 4 HE AAC m4a aac 3gp 3g2 Sampling frequency 32 kHz 44 1 kHz 48 kHz Quantization bitrate 16 bit Channel 2 ch Bitrate 16 kbps to 320 kbps VBR CB...

Страница 53: ...tandby Allows the AirPlay function to be used even when the receiver is in the standby mode see The Network Standby menu on page 56 MHL Setup Changes the settings related to MHL page 56 Speaker System Specifies how you are using the speaker terminals page 57 OSD Setup Sets the overlay function ON OFF Manual speaker setup This receiver allows you to make detailed settings to optimize the surround s...

Страница 54: ... lots of bass it may seem logical to select LARGE for your front speakers and PLUS for the subwoofer This may not however yield the best bass results Depending on the speaker placement of your room you may actually experience a decrease in the amount of bass due to low frequency cancellations In this case try changing the position or direction of speakers If you can t get good results listen to th...

Страница 55: ...u re finished press RETURN You return to the Manual SP Setup menu The Input Assign menu Assigns input function for analog audio input terminal and component video input terminal and component video input terminal For the assignment of the digital signal inputs see Selecting the audio input signal on page 29 Analog Input ANALOG IN1 audio input terminal is assigned to CD under factory settings but t...

Страница 56: ...on cannot be used when the receiver is in the standby mode This lets you reduce power consumption in the standby mode If the Network Standby setting is set to ON the power consumption during standby will increase 3 When you re finished press RETURN You return to the Home Menu The MHL Setup menu Auto Switching Select whether or not to switch the input automatically to the MHL input when an MHL comp...

Страница 57: ...r to the input function set here a control signal is output from the receiver s 12 V trigger terminal and operations such as power coupling with other devices and equipment can be achieved 1 Select 12V Trigger from the Home Menu 2 Select the input function that triggers simultaneous operation of 12 V trigger output 3 Choose ON or OFF for the 12V Trigger 4 When you re finished press RETURN You retu...

Страница 58: ...r is in standby the display is dimmed and ZONE continues to light in the display 2 Press CONTROL MULTI ZONE ON OFF button on the front panel Each press will switch between main zone and sub zone control If no operation is performed for a few seconds MULTI ZONE CONTROL mode will automatically end 3 Press INPUT SELECTOR dial to select the source for the zone you have selected For example Z2 DVD send...

Страница 59: ...topped blinking To get the most out of this function we recommend that you connect your HDMI component not to a TV but rather directly to the HDMI terminal on this receiver HDMI Setup You must adjust the settings of this receiver as well as the connected Control with HDMI compatible components in order to make use of the Control with HDMI function For more information see the operating instruction...

Страница 60: ... turned off To turn the synchronized amp mode back on set audio to be played through the receiver from the TV s menu screen etc This receiver will power up and switch to the synchronized amp mode When in the synchronized amp mode the synchronized amp mode is canceled if an operation that produces sound from the TV is performed from the TV s menu screen etc When the synchronized amp mode is cancele...

Страница 61: ...he instruction manual supplied with the source component No image is output when an input function is selected Make sure the component is connected correctly refer to Connecting your equipment on page 14 Use the same type of video cables for the source component and TV to connect to this receiver see About video outputs connection on page 19 Check The Input Assign menu on page 55 to make sure you ...

Страница 62: ... the component is properly connected to this receiver or the power supply The PC or Internet radio is not properly operated The corresponding IP address is not properly set Switch on the built in DHCP server function of your router or set up the network manually according to your network environment page 56 The IP address is being automatically configured The automatic configuration process takes ...

Страница 63: ...ess indicators are not all lit Check that the USB cable connecting the wireless LAN converter to the receiver s DC OUTPUT for WIRELESS LAN terminal is properly connected The LAN cable is not firmly connected Firmly connect the LAN cable page 22 Wireless LAN converter and base unit wireless LAN router etc are too far apart or there is an obstacle between them Improve the wireless LAN environment by...

Страница 64: ...that it will not work with this receiver even if it is HDCP compatible In this case connect using the composite video jacks between source and receiver If video images do not appear on your TV try adjusting the resolution Deep Color or other setting for your component To output signals in Deep Color use an HDMI cable High Speed HDMI Cable to connect this receiver to a component or TV with the Deep...

Страница 65: ... Apache License Version 2 0 You may obtain a copy of the License at http www apache org licenses LICENSE 2 0 About FLAC FLAC Decoder Copyright 2000 2001 2002 2003 2004 2005 2006 2007 2008 2009 Josh Coalson Redistribution and use in source and binary forms with or without modification are permitted provided that the following conditions are met Redistributions of source code must retain the above c...

Страница 66: ...st and dirt When the surface is dirty wipe with a soft cloth dipped in some neutral cleanser diluted five or six times with water and wrung out well and then wipe again with a dry cloth Do not use furniture wax or cleansers Never use thinners benzine insecticide sprays or other chemicals on or near this unit since these will corrode the surface Status messages Descriptions Connection Down The sele...

Страница 67: ... 65 8 in H x 131 2 in D Weight without package 9 2 kg 20 lb 5 oz Furnished Parts Microphone for Auto MCACC setup 1 Remote control 1 Dry cell batteries AAA size IEC R03 2 AM loop antenna 1 FM wire antenna 1 Warranty card 1 Quick start guide 1 Safety Brochure 1 SPEAKER CAUTION Sheet English only 1 These operating instructions CD ROM Note Specifications and the design are subject to possible modifica...

Страница 68: ...erved PIONEER HOME ELECTRONICS CORPORATION 1 1 Shin ogura Saiwai ku Kawasaki shi Kanagawa 212 0031 Japan PIONEER ELECTRONICS USA INC P O BOX 1540 Long Beach California 90801 1540 U S A TEL 800 421 1404 PIONEER ELECTRONICS OF CANADA INC 340 Ferrier Street Unit 2 Markham Ontario L3R 2Z5 Canada TEL 1 877 283 5901 905 479 4411 PIONEER EUROPE NV Haven 1087 Keetberglaan 1 B 9120 Melsele Belgium TEL 03 5...

Отзывы: