Pioneer DMH-W4600NEX Скачать руководство пользователя страница 26

- 26 -

En
gl

ish

 CAUTION

Never turn this product off and disconnect the device while the Bluetooth setting operation is being 
processed.

After registering and connecting the Bluetooth devices to this product, you can switch 
among the devices using the switch devices key in the phone function and some audio 
sources.

You can register up to five Bluetooth devices on this product (page 25).

You can connect one of the registered devices to this product. In cases where the 
registered device is equipped with a phone function, a total of two devices can be 
connected at the same time when using the phone function. If two of the five 
registered devices are already connected, you can connect the remaining third device 
to use the audio function only from the switch devices key on the audio source screen.

The icon for the cellular phone currently being used is displayed on the phone menu 
screen. If you connect two cellular phones to this product at the same time, you can 
switch between the cellular phones using the switch devices key. The contents of the 
phone menu are memorized for each connected cellular phone (page 27).

The switch devices key will appear for some audio sources. The audio source may 
automatically switch to another source depending on the selected device.
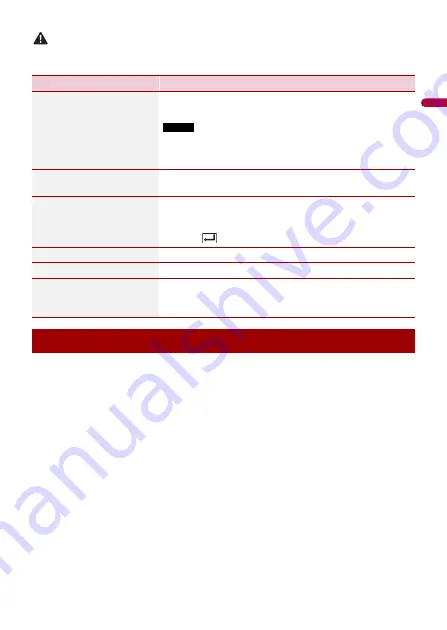
Menu Item

Description

[Auto Connect]

[On] [Off]

Select [On] to connect the last connected Bluetooth device 
automatically when using the hands-free phone function.

NOTE

If two Bluetooth devices were connected the last time, the two 
devices are connected to this product automatically in the order 
that they are registered in the device list.

[Visibility]

[On] [Off]

Select [On] to make this product visible to the other device.

[PIN Code Input]

Change the PIN code for Bluetooth connection.
The default PIN code is “0000”.

1

Touch [0] to [9] to input the pin code (up to 8 digits).

2

Touch .

[Device Information]

Displaying the device name and address of this product.

[Bluetooth Memory Clear]

Touch [Clear] then [OK] to clear the Bluetooth memory.

[Sound Quality Settings]

[Quality] [Connectivity]

Select [Quality] to prioritize the Bluetooth sound quality.
Select [Connectivity] to prioritize the Bluetooth 
connection.

Switching the connected Bluetooth device

Содержание DMH-W4600NEX

Страница 1: ...MH WC6600NEX DMH WC5700NEX DMH W4660NEX DMH W4600NEX RDS AV RECEIVER Important Serial number The serial number is located on the bottom of this unit For your own security and convenience be sure to record this number on the enclosed warranty card Operation Manual ...

Страница 2: ...Amazon Alexa 77 SiriusXM Satellite Radio 84 HDMI 92 AUX 93 Contents Thank you for buying this Pioneer product Please read through these instructions so you will know how to operate your model properly After you have finished reading the instructions keep this document in a safe place for future reference The screen shown in the examples may differ from actual screens which may be changed without n...

Страница 3: ... iDatalink 96 Metra Axxess 101 Settings 104 Displaying the setting screen 104 System settings 104 Theme settings 113 Audio settings 115 Video settings 119 Communication settings 120 Favorite menu 122 Other functions 123 Appendix 125 ...

Страница 4: ...Part 15 of the FCC Rules These limits are designed to provide reasonable protection against harmful interference in a residential installation This equipment generates uses and can radiate radio frequency energy and if not installed and used in accordance with the instructions may cause harmful interference to radio communications However there is no guarantee that interference will not occur in a...

Страница 5: ...LLOWING GUIDELINES Do not turn up the volume so high that you can t hear what s around you Use caution or temporarily discontinue use in potentially hazardous situations Do not use headphones while operating a motorized vehicle the use of headphones may create a traffic hazard and is illegal in many areas WARNING Do not attempt to install or service this product by yourself Installation or servici...

Страница 6: ...rake before making the necessary adjustments Never set the volume of this product so high that you cannot hear outside traffic and emergency vehicles To promote safety certain functions are disabled unless the vehicle is stopped and the parking brake is applied Keep this manual handy as a reference for operating procedures and safety information Do not install this product where it may i obstruct ...

Страница 7: ...may be illegal Where such regulations apply they must be obeyed If you attempt to watch video image while driving the warning Viewing of front seat video source while driving is strictly prohibited will appear on the screen To watch video image on this display stop the vehicle in a safe place and apply the parking brake Please keep the brake pedal pushed down before releasing the parking brake The...

Страница 8: ... After sales service for Pioneer products When taking this product to the dealer or authorized Pioneer Service Station make sure to bring both the unit and LCD display DMH WT8600NEX DMH WT7600NEX DMH WT86NEX DMH WT76NEX DMH WC6600NEX Visit us at the following site https www pioneerelectronics com PUSA https www pioneerelectronics ca POCEN Handling the USB connector Failure to operate Please contac...

Страница 9: ...ay be glue on the edge of the film However this does not affect the usability of this unit DMH WT8600NEX DMH WT7600NEX DMH WT86NEX DMH WT76NEX DMH WC6600NEX The information will be erased by disconnecting the yellow lead from the battery or removing the battery itself Some of the settings and recorded contents will not be reset This manual uses diagrams of actual screens to describe operations How...

Страница 10: ...indicates to touch and hold the appropriate soft key on the touch screen This indicates to swipe in the direction of the arrow on the touch screen This indicates to drag in the direction of the arrow on the touch screen ...

Страница 11: ... the home menu screen is displayed touch to display the previously used AV source screen Touch to activate the voice recognition mode such as Siri when the iPhone is connected to the unit via Bluetooth or USB Touch and hold to display mobile device search or select screen Volume LCD screen 8600NEX 7600NEX 86NEX 76NEX 6600NEX 4660NEX 4600NEX 5700NEX ...

Страница 12: ... used Press to pause or resume playback or play from the beginning when resume is off or For audio Press and hold to perform fast reverse or fast forward For video Press to perform fast reverse or fast forward or or Press to return to the previous track file or go to the next track file Press to answer or end a call Press to stop playback If you resume playback playback will start from the point w...

Страница 13: ...English 13 The remote control is sold separately 76NEX 4600NEX 86NEX ...

Страница 14: ...n result in an explosion Do not handle the battery with metallic tools Do not store the battery with metallic objects If the battery leaks wipe the remote control completely clean and install a new battery When disposing of used batteries please comply with governmental regulations or environmental public institution s rules that apply in your country area Perchlorate Material special handling may...

Страница 15: ...ers or a 6 speaker system with front and rear speakers and subwoofers Network Mode 3 way system with a high range speaker middle range speaker and subwoofer low range speaker for reproduction of high middle and low frequencies bands WARNING Do not use the unit in Standard Mode when a speaker system for 3 way Network Mode is connected to the unit This may cause damage to the speakers 5 Touch OK Ini...

Страница 16: ...ens Touching an item on the list allows you to narrow down the options and proceed to the next operation Appears when all characters are not displayed on the display area If you touch the key the rests are scrolled for display NOTE This function is available only when you stop your vehicle in a safe place and apply the parking brake Appears when items cannot be displayed on a single page Drag the ...

Страница 17: ...while dragging the key Operating the on screen keyboard Displays the characters that are entered Enters the characters in the text box Confirms the entry and proceeds to the next step Deletes the input text to the left of the cursor one letter at a time Enters a space Switches between alphabet and numbers symbols Switches between capital and lower case letters ...

Страница 18: ...cation Customizing the home menu screen page 19 The following items can be customized Changing the home menu screen layout page 19 Rearranging the icons in the favorite source application area page 19 Rearranging the displayed icons in the favorite source application area page 19 When you finish customizing touch Notification page 22 Source application page 46 Favorite radio stations page 19 Sugge...

Страница 19: ... the favorite source application area 1 Touch and hold the favorite source application area 2 Drag the icon to the desired position When you finish rearranging touch Rearranging the displayed icons in the favorite source application area 1 Touch and hold the favorite source application area The source application list area appears on the screen 2 Drag unneeded icon in the favorite source applicati...

Страница 20: ...on from the list screen page 20 Updates the favorite radio stations The next 3 stations on the favorites list are displayed NOTE This function is only available when there are more than 4 favorite radio stations on the list Adds removes a favorite Available radio stations Touch to tune in to the selected radio station Favorite radio stations screen List screen ...

Страница 21: ...d radio stations it is necessary to restore all settings to the default settings in Restore Settings in page 108 Suggested radio stations Displaying the suggested radio stations screen Suggested radio stations Touch to tune in to the selected radio station List of suggested radio stations Touch to select the suggested radio station from the list screen page 22 Updates the suggested radio stations ...

Страница 22: ...s notification function you need to register a team in CarAVAssist and import it to this unit page 44 in advance To use the sports notification function make sure that the GPS antenna is installed properly and this unit is connected to the Internet via a Wi Fi network page 34 For details on GPS antenna installation refer to the Installation Manual 1 Touch then swipe right on the screen When you fi...

Страница 23: ... is available only when you stop your vehicle in a safe place and apply the parking brake 1 Touch 2 Touch and hold the widgets area 3 Touch the widget that you want to customize When you finish customizing touch Widget customizing screen Received notifications Touch to display the details of the notification Widget Customizing the widget Notification screen ...

Страница 24: ...dgets area Also some widget functions may be limited due to the combination of widgets Widget area To rearrange the widgets drag them to the desired locations To remove a widget drag the widget to Available source application lists for the widgets Flick left right to switch between widget lists Adjusts the size of the widgets Touch a corner of the selected widget and drag it to adjust the size TIP...

Страница 25: ...s the one that is displayed on the mobile device before touching Yes to pair the device If you try to connect an unconnected cellular phone while two cellular phones are already connected the first one of the two connected cellular phones will be disconnected and the unconnected cellular phone will be connected instead TIPS The Bluetooth connection can also be made by detecting this product from t...

Страница 26: ...lar phones using the switch devices key The contents of the phone menu are memorized for each connected cellular phone page 27 The switch devices key will appear for some audio sources The audio source may automatically switch to another source depending on the selected device Menu Item Description Auto Connect On Off Select On to connect the last connected Bluetooth device automatically when usin...

Страница 27: ...a Bluetooth in advance page 25 CAUTION For your safety avoid talking on the phone as much as possible while driving 1 Touch then swipe left on the screen 2 Touch Phone The phone menu screen appears 3 Touch one of the call icons on the phone menu screen Hands free phoning Making a phone call ...

Страница 28: ...tion screen For details refer to CarAVAssist page 43 Switches the search language to English or system language NOTE It may not appear depending on the system language setting Using the preset dial lists page 29 Using phone book Select a contact from the phone book Touch the desired name on the list then select the phone number TIPS The contacts on your phone will be automatically transferred to t...

Страница 29: ...al list 1 Touch then swipe left on the screen 2 Touch Phone 3 Touch 4 Touch the desired entry on the list to make a call The dial screen appears and dialing starts Deleting a phone number 1 Touch then swipe left on the screen 2 Touch Phone 3 Touch 4 Touch 5 Touch Yes 1 Touch to answer the call Touch to end the call TIPS Touch while getting a call waiting switch to the talking person Touch while ge...

Страница 30: ...utton If two cellular phones are automatically connected to this product with the Bluetooth device auto connect function the voice recognition function Siri Eyes Free Mode will be set on the first phone If you want to use the voice recognition function Siri Eyes Free Mode on another connected iPhone touch with numbered to the other iPhone The iPhone that you switch to will be set as the current de...

Страница 31: ...lar phone must be 10 meters or less when sending and receiving voice and data via Bluetooth technology With some cellular phones the ring sound may not be output from the speakers If private mode is selected on the cellular phone hands free phoning may be disabled Registration and connection Cellular phone operations vary depending on the type of cellular phone Refer to the instruction manual that...

Страница 32: ... connect the device to this product page 25 NOTES Depending on the Bluetooth audio player connected to this product the available operations with this product may be limited to the following two levels A2DP Advanced Audio Distribution Profile Only playing back songs on your audio player is possible A2DP and AVRCP Audio Video Remote Control Profile Playing back pausing selecting songs etc are possi...

Страница 33: ...backward Sets a repeat play range Switches between random and normal file playback order Selects a file or folder from the list to playback NOTE This function is available only when the AVRCP version of the Bluetooth device is 1 4 or higher Switches among the Bluetooth devices when the devices are connected to this product via Bluetooth page 26 Bluetooth audio playback screen ...

Страница 34: ...word is required 9 Input the network password then touch Connect Important When you connect this unit to the Internet via Wi Fi for the first time the Internet Communication Service the Terms of Use and Privacy Policy is displayed To use the Internet service you need to accept the policy Otherwise most of the applications that use the Internet are not available You can select to accept or withdraw...

Страница 35: ...ly Network connection priority Drag the network upward to prioritize the connection by touching Searches for existing networks Touch to go to Adding access point screen page 35 Deletes the networks Wi Fi network type Access point setting screen Hotspot setting abcdefg abcdefg abcdefg abcdefg Other Add network WPA2 WPA2 WPA2 None Adding access point screen ...

Страница 36: ...e screen 2 Touch then 3 Touch Wi Fi Settings Hotspot 4 Touch Easy setup 5 Touch WPS PIN 6 Input the displayed PIN code from the device to be connected 1 Touch then swipe left on the screen 2 Touch then 3 Touch Wi Fi Settings Hotspot Connects Wi Fi network Touch to select desired network then enter the password if required TIP If you want to connect to a network that is not listed on the screen tou...

Страница 37: ...iver compatible mobile device with CarAVAssist app and wireless services data plan required This unit s firmware must be version 2 00 or later Menu Item Description Wi Fi On Off Switch Wi Fi connection on or off Hotspot setting Set up the Wi Fi access point page 34 Easy setup Set up the Wi Fi connection via WPS access page 36 MAC Address Displays the MAC address IP Address Displays the IP address ...

Страница 38: ...e a Wi Fi connection with this unit Receiver Internet Access connection is successfully established NOTE If Receiver Internet Access connection is not established try the followings Activate the Wi Fi setting on your mobile device Deactivate the Wi Fi connection via mobile device tethering Confirm that Access point is turned On in the Wireless Settings Smartphone setting page 37 For Android OS 10 ...

Страница 39: ...droid Auto is in use Wi Fi Audio is displayed as Apple CarPlay when the Apple CarPlay is in use Wi Fi audio screen Example Apple CarPlay Wi Fi audio with Apple CarPlay operation is same as the iPod source function For details of the operation refer to the iPhone operation page 62 Basic operation Apple CarPlay 6 10 12 48 Abcdefghi Abcdefghijk Abcdef 9999 9999 9999 99 Sun ...

Страница 40: ...r function you may need to connect this unit to the Internet via a Wi Fi network To use the browser function you need to register webpage URLs as your favorite webpages on CarAVAssist then import them to this unit in advance page 44 To use the browser function you need to accept the Internet Communication Service the Terms of Use and Privacy Policy page 113 The browser may not be able to access or...

Страница 41: ...ebsite screen Available website thumbnails Touch to go to the selected website Browser toolbar To display the toolbar swipe down from the top of the screen Returns to the web browser screen Displays the previous page Displays the next page Refreshes the page Web browser screen ...

Страница 42: ...owser while Apple CarPlay or Android Auto is in operation the browser is displayed on the connected rear monitor only when the browser is displayed on the main monitor Otherwise a black screen is displayed on the connected rear monitor ...

Страница 43: ...lication For iPhone users This function is compatible with iOS 12 0 or later You can download CarAVAssist on the App Store For smartphone Android users This function is compatible with devices that have Android OS 6 0 or later installed You can download CarAVAssist on the Google Play Store Promoting the use of the unit The interface of the unit can be changed by using your iPhone smartphone Androi...

Страница 44: ...n of the application 5 Touch one of the transfer modes CAUTION Never turn this product or your iPhone smartphone off while the firmware is being updated You can only update the firmware when the vehicle is stopped and the parking brake is engaged You cannot update the old firmware version once the latest firmware is updated 1 Download the firmware update files into your iPhone or smartphone throug...

Страница 45: ...ions to finish updating the firmware NOTES This product will reset automatically after the firmware update is completed if the update is successful If an error message appears on the screen touch the display and perform the above steps again ...

Страница 46: ...s iDatalink page 96 Car Features iDatalink page 96 or Metra Axxess page 101 Browser page 40 Sports page 74 Weather page 75 Amazon Alexa page 77 Camera view page 95 1 Touch then swipe left on the screen The source application screen appears Source application Supported source and application Displaying the source application list screen abcdefg abcdefg HD Radio USB Wi Fi Audio HDMI SiriusXM Car Sou...

Страница 47: ...d on ACC ON Connected Wi Fi network Touch to go to the Wi Fi settings page 36 Connected mobile device Touch to go to the preset list screen in the hands free phone when a device is connected with this unit via Bluetooth Touch to start searching or go to the device select screen when the device is not connected NOTE When Apple CarPlay or Android Auto is activated the device select screen appears ev...

Страница 48: ...ed off NOTE This function is available only when you stop your vehicle in a safe place and apply the parking brake 1 Touch when the AV source is in use 2 Touch 3 Drag the source application key to the desired position Displays the source application list Settings page 104 and Favorite menu page 122 Selects or customizes the equalizer curve page 117 Hands free phoning page 27 Selecting a source an ...

Страница 49: ... HD Radio stations feature the following High quality audio FM multicasting Data service HD Radio Technology Radio About HD Radio stations 8600NEX 7600NEX 86NEX 76NEX 6600NEX 4660NEX 5700NEX 4600NEX Sub channel AM band Analog AM Analog AM Digital AM FM band Analog FM Analog FM Digital FM Analog FM Digital FM 1ch Digital FM 2ch Digital FM 3ch Main channel ...

Страница 50: ...D3 Channel Guide and other relevant data streams Adjacent to traditional main stations are extra local FM channels These HD2 HD3 Channels provide new original music as well as deep cuts into traditional genre Visual information related to content being played on your HD Radio receiver such as Album Art historical photographs still art from live broadcasts among other related content 1 Touch then s...

Страница 51: ...e list 1 to 6 to switch to the preset channel Selects the FM1 FM2 FM3 or AM band Performs BSM best stations memory function page 52 Displays area radio stations list page 52 Manual tuning Seek tuning or non stop seek tuning Releasing the key in a few seconds skips to the nearest station from the current frequency Keep holding the key for long seconds to perform non stop seek tuning Switches the te...

Страница 52: ...1 Touch and hold to begin search The six strongest broadcast frequencies will be stored under the preset channel keys in the order of their signal strength 1 Touch Cancel This unit displays the radio stations that are available at your current location 1 Touch Important To use the area radio stations list function you may need to connect this unit to the Internet via a Wi Fi network and set Sugges...

Страница 53: ...o stations Touch to tune in to the selected radio station Radio settings Menu Item Description Blending On Off Switches to the analog broadcast of the same frequency level automatically when reception of a digital broadcast becomes weak Select Off to receive only an analog signal Seek Select the method of seek tuning Seek All Seeks stations from both analog and digital broadcasting Seek HD Only se...

Страница 54: ...Level2 Level3 Level4 AM Level1 Level2 Local seek tuning allows you to only tune into radio stations with sufficiently strong signals NOTES Level4 for FM and Level2 for AM are available only with the stations with the strongest signals This setting is available only when HD Radio is selected as the source Menu Item Description ...

Страница 55: ...ype C cable is required for connection The supplied USB Type C cable and the adaptor are for connecting a USB storage device to this unit only Do not use the cable and the adaptor for other products or purposes 1 Pull out the USB Type C storage device from the USB Type C cable NOTES Check that no data is being accessed before pulling out the USB storage device Turn off ACC OFF the ignition switch ...

Страница 56: ...size for the video and image files page 123 Audio source screen 1 Starting procedure Basic operation Audio source Displays the link search screen Touch the song to play back followed by touching the song information after switching to Music Browse mode page 58 TIP If you touch the artwork the list of songs in the album is displayed NOTE This function is available for the USB storage device only Sw...

Страница 57: ...iles Photo Image files Selects a file from the list Touch a file on the list to playback TIP Touching a folder on the list shows its contents You can play a file on the list by touching it NOTE When you play audio files stored in a USB storage device you can search for a file using Music Browse page 58 Displays the hidden function bar TIP You can also display the hidden function bar by flicking th...

Страница 58: ...uch the desired song title or file name to play back If the selection made with Music Browse has been canceled you can switch to Music Browse mode again by touching the Tag tab on the file folder list screen and touching the desired track TIP Once the database is created in this unit there is no need to create the database again as long as the same contents are saved To enter the Music Browse mode...

Страница 59: ...start from the beginning next time Performs frame by frame playback Performs slow motion playback Sets a repeat play range for all files the current folder the current file Switches the audio language Switches the following media file types Music Audio files Video Video files Photo Image files Selects a file from the list Touch a file on the list to playback TIP Touching a folder on the list shows...

Страница 60: ...lder or the next folder Saves the current images as the wallpaper Touch the following items to overwrite the image As AVScreen Saves the image as the wallpaper for the AV screen As HomeScreen Saves the image as the wallpaper for the home menu screen As Both Saves the image as the wallpaper for both the AV screen and home menu screen NOTE If you save the new image the current wallpaper is overwritt...

Страница 61: ...play range or does not play them in random order Switches the following media file types Music Audio files Video Video files Photo Image files Selects a file from the list Touch a file on the list to playback TIP Touching a folder on the list shows its contents You can play a file on the list by touching it ...

Страница 62: ...vice to be connected For details of the compatibility refer to Compatible iPhone models page 137 1 Connect your iPhone iPhone via USB or Bluetooth 2 Touch then swipe left on the screen 3 Touch iPod NOTES For USB connection refer to the Installation Manual For Bluetooth connection see page 25 iPhone Connecting your iPhone Basic operation Audio source Audio source screen ...

Страница 63: ...l in the selected list the current song Plays songs within the selected list album randomly Switches among connected devices Selects a song from the list Touch the category then the title of the list to playback of the selected list TIPS If you use English as the system language the alphabet search function is available Touch the initial search bar to use this function When you touch Apple Music R...

Страница 64: ... available in your country or region For details about Apple Music Radio visit the following site https www apple com music Switches between playback and pause Skips files forward or backward Apple Music Radio source Switches between playback and pause Apple Music Radio screen ...

Страница 65: ...back songs similar to the current song Touch Play Less Like This to set it not to play back the current song again Touch Add to iTunes Wish List to add the current song to the iTunes wish list NOTE This function may not be used depending on your Apple Music account status Skips tracks forward ...

Страница 66: ...sit the following site https www apple com ios carplay The content and functionality of the supported applications are the responsibility of the App providers In Apple CarPlay usage is limited while driving with availability of functions and content determined by the App providers Apple CarPlay allows access to applications other than those listed that are subject to limitations while driving PION...

Страница 67: ...on list screen by swiping the screen to the left on the home menu screen Before using Apple CarPlay wirelessly turn on the Bluetooth function on the iPhone 1 Turn on the Wi Fi function page 37 2 Touch then TIP You can skip the step 2 by touching and holding button 3 Touch The available devices appear on the list NOTE The unit cannot detect the device unless the Bluetooth or Apple CarPlay setting m...

Страница 68: ...s turned on While Apple CarPlay is turned on only a Bluetooth audio connection will be possible for devices other than the device connected via Apple CarPlay Hands free phoning via Bluetooth wireless technology is not available while Apple CarPlay is on If Apple CarPlay is turned on during a call on a cellular phone other than an Apple CarPlay compatible device the Bluetooth connection will be ter...

Страница 69: ...tch to the split screen view TIP Touch if you want to return to the full screen TIP The screen positions of the Apple CarPlay and of the unit depend on the Driving Position setting page 66 Using the split screen Displays the source list Touch to see the selected source Displays the control panel corresponding to the selected source NOTE The control panel is not displayed according to the source Di...

Страница 70: ... to a particular function only perform it while the car is parked No feature should be used unless it is safe to do so under the driving conditions you are experiencing Important Android Auto may not be available in your country or region For details about Android Auto please refer to the Google support site https support google com androidauto The content and functionality of the supported applic...

Страница 71: ...he item Left Select for a left hand drive vehicle Right Select for a right hand drive vehicle 1 Connect an Android Auto compatible device to this unit via USB 2 Touch the Android Auto icon The Android Auto home screen appears Before using Android Auto wirelessly turn on the Bluetooth function on the Android device 1 Turn on the Wi Fi function page 37 2 Touch then TIP You can skip the step 2 by tou...

Страница 72: ... the registered device is displayed If you want to delete the device touch Agree If you want to delete other device touch Go to DeviceList and delete the devices manually page 120 If Android Auto is turned on during a call on a cellular phone other than the Android Auto compatible device the Bluetooth connection will switch to the Android Auto compatible device after the call You can adjust the gu...

Страница 73: ...mpatible device is connected to this unit NOTE The Android Auto screen is displayed automatically only when an Android Auto compatible device is correctly connected to this product 1 Touch then swipe left on the screen 2 Touch then 3 Touch Android Auto Auto launch to switch On or Off Setting the auto launch function ...

Страница 74: ...arAVAssist and import it to this unit page 44 in advance To use the sports function you need to accept the Internet Communication Service the Terms of Use and Privacy Policy page 113 Before connecting this unit to the Internet make sure that the GPS antenna is installed properly to obtain correct time and date For details on GPS antenna installation refer to the Installation Manual 1 Touch then sw...

Страница 75: ...Service the Terms of Use and Privacy Policy page 113 Before connecting this unit to the Internet make sure that the GPS antenna is installed properly so that your correct location and time can be used for the weather service and location service For details on GPS antenna installation refer to the Installation Manual 1 Touch then swipe left on the screen 2 Touch Weather Weather Using weather Start...

Страница 76: ... 76 English NOTE If a data item is unknown or missing is displayed ...

Страница 77: ...ing call of the Drop In is not supported Important To use the Amazon Alexa function you need to connect this unit to the Internet via a Wi Fi network This function is available in the following languages and countries All of the languages supported by Amazon Alexa are currently not available but will be available soon Languages English US CA UK AU IN French FR CA Spanish ES German Italian Japanese...

Страница 78: ...uthorized TIP If you scan the displayed code in step 6 you can skip this step NOTES Make sure that you have an Amazon account Amazon Alexa cannot recognize your voice in the following cases Amazon Alexa authorization is not completed Data is being updated The unit is starting The monitor is showing the rearview camera image TIP When you receive notifications from Amazon Alexa the yellow visual ind...

Страница 79: ...t through Amazon Music Kindle books text to speech Audible or any compatible third party content service by talking to Amazon Alexa Important To use the entertainment function you need to subscribe to the Amazon service Touch operation 1 Touch then swipe left on the screen 2 Touch Alexa 3 Talk to Amazon Alexa to perform the desired AV operation Voice operation 1 Talk to Amazon Alexa to perform the...

Страница 80: ...ample Amazon Music Switches between playback and pause Skips songs forward or backward Switches the repeat function ON OFF Switches between random and normal song playback order Gives a Like to the currently playing song Gives a Dislike to the currently playing song ...

Страница 81: ...Before using this function connect your mobile device to this unit via Bluetooth 1 Touch then swipe left on the screen 2 Touch then 3 Touch Amazon Alexa setting then Main Menu 4 Touch Settings then Contact list 5 Select the desired mobile device Contact list screen Phone call control Before using phone call control Device name list Contact list upload status Select On then select Yes on the permis...

Страница 82: ...e or Alexa answer the call 1 Touch then swipe left on the screen 2 Touch then 3 Touch Amazon Alexa setting Deletes the mobile device Starting procedure Amazon Alexa settings Setup Setup Set up the Amazon Alexa function to be activated Main Menu Settings Settings for Amazon Alexa for this unit page 83 Things to try Trial and examples of uses for Amazon Alexa Help Feedback Displays the URL of Amazon...

Страница 83: ...cations Switches whether or not notifications of received messages are displayed Share location Switches whether or not Amazon Alexa has access to location information TIP When you share your location Amazon Alexa provides more accurate service and information such as weather traffic information etc NOTE You need to enable the location services for the Amazon Alexa app on your mobile device in ord...

Страница 84: ...he Radio ID The SiriusXM Radio ID can be found by tuning in to Channel 0 In addition the Radio ID is located on the bottom of the SiriusXM Connect Vehicle Tuner and its packaging You will need this number to activate your subscription NOTE The SiriusXM Radio ID does not include the letters I O S or F 4 Activate the service either online or by phone TIP In the USA you can activate online or by call...

Страница 85: ... ID is displayed when Channel 0 is selected Current channel display Live broadcast mode Listening to SiriusXM Basic operation Selects a channel directly Recalls the preset channel stored to a key from the memory Stores the current channel to a key Displays the preset channels Select an item on the list 1 to 6 to switch to the preset channel Selects a band There are 3 bands and a Featured Favorites...

Страница 86: ...d weather information for the selected city Traffic Weather Now Touch the desired city to access the latest Traffic Weather report for your favorite market To cancel Traffic Weather Now touch TIPS Grayed out Traffic and weather broadcast for your market is not yet available With green dot Latest report available but not listened to yet White Latest report available to hear again To listen to the i...

Страница 87: ...nel Name Artist Name Song Title Content Info If you touch you can scan each channel in the selected category When there is no category you can select the channel from Others NOTES The types of categories available depend on the types of channels available It may take time to display the channel list depending on the SiriusXM reception condition Switches between playback and pause Performs content ...

Страница 88: ... to tune in and hear the play unfold like it was live Continue listening to the game or you can return to your previous channel For details see SportsFlash page 90 and SportsFlash List page 90 in SiriusXM settings All preset channels will buffer the content to be used for Replay TuneStart TuneScan and TuneMix features Continues playing the current scanning song or channel Skips to the previous nex...

Страница 89: ...y list page 87 The Parental Control feature allows you to limit access to any SiriusXM channels including those with mature content When enabled the Parental Control feature requires you to enter a passcode to tune to the locked channels For details see Parental Control page 90 in SiriusXM settings 1 Touch then swipe left on the screen 2 Touch then The system setting screen appears 3 Touch AV Sour...

Страница 90: ...e is updated TIP To display Featured Band Update Message at all times Featured Favorites needs to be set to On SportsFlash On Off Set to On to activate the SportsFlash function Touch Play to listen to the notified channel Touch Ignore to stay tuned to the current channel Touch Cancel to cancel notifications regarding the game SportsFlash List Select favorite teams for SportsFlash Touch Edit List t...

Страница 91: ...XM Reset Set to restore to the default SiriusXM settings by touching Restore CAUTION Do not turn off the engine while restoring the settings NOTE The source is turned off before the process starts Menu Item Description ...

Страница 92: ...tion For details refer to the Installation Manual 1 Connect an HDMI device to this unit via a micro HDMI cable sold separately then turn on the device 2 Touch then swipe left on the screen 3 Touch HDMI The HDMI source screen appears HDMI source screen HDMI Starting procedure Basic operation Hides the touch panel keys To display the keys again touch anywhere on the screen TIP You can set the screen...

Страница 93: ...op in a safe place and apply the parking brake NOTE A Mini jack AV cable sold separately is required for connection For details refer to the Installation Manual 1 Touch then swipe left on the screen 2 Touch then 3 Touch Input Output settings 4 Confirm that AUX Input is turned on 5 Touch then swipe left on the screen 6 Touch AUX The AUX screen appears AUX Starting procedure Basic operation AUX scre...

Страница 94: ...94 English Hides the touch panel keys To display the keys again touch anywhere on the screen TIP You can set the screen size for the video image page 123 Switches between the video input and audio input ...

Страница 95: ...0NEX DMH W4660NEX DMH WC5700NEX 1 Touch then swipe left on the screen 2 Touch Camera View Video footage is displayed on the screen 1 Touch then swipe left on the screen 2 Touch then 3 Touch Input Output settings 4 Touch AV Input 5 Touch 2nd Camera 6 Touch then swipe left on the screen 7 Touch Camera View 8 Touch to switch the camera view The 2nd camera video footage is displayed on the screen Exte...

Страница 96: ...nctions and displays vary depending on the vehicle model For details on the functions available for each model refer to the information on our website For troubleshooting information about iDatalink functions visit the following website http maestro idatalink com support Limitations The data is transmitted to this product from your vehicle system via the connected iDatalink adaptor Therefore the a...

Страница 97: ... the iDatalink Maestro adaptor to this product For details refer to the Installation manual 2 Touch 3 Touch then 4 Touch Input Output settings 5 Touch AV Input 6 Confirm that Maestro is selected 7 Touch then swipe left on the screen 8 Touch Car Sources or Car Features The menu screen you touched appears NOTE The iDataLink function is available only when the input signal is received by the iDatalin...

Страница 98: ...eft side of the screen to change a feature Gauges screen Using the functions on Car Features Displays the Gauge screen Displays the Vehicle Information screen Displays the Climate screen Displays the Parking Assist screen Displays the Speed Radar Detector screen Displays rear monitor mirroring when the rear monitor is connected via iDatalink ...

Страница 99: ...English 99 Vehicle Information screen Climate screen Parking Assist screen ...

Страница 100: ...ilable for vehicles equipped with a parking sensor system 1 Touch then swipe left on the screen 2 Touch then 3 Touch OEM Settings or OEM Volume Settings The setting screen for iDatalink appears Displaying obstacle detection information iDatalink settings Menu Item Description OEM Settings Setting for iDatalink function when the iDatalink adaptor is connected to the unit OEM Volume Settings Setting...

Страница 101: ...n the functions available for each model refer to the information on our website For troubleshooting information about the Metra interface conversion functions visit the following website http www metraonline com contact us Limitations The data is transmitted to this product from your vehicle system via the connected Metra interface conversion unit Therefore the actual data contents displayed on y...

Страница 102: ... 102 English Displays the Vehicle Information screen Displays the Climate screen Displays the Radio ID screen Vehicle information screen Climate screen ...

Страница 103: ...English 103 Radio ID screen ...

Страница 104: ...age 120 The menu items vary according to the source Settings Displaying the setting screen System settings AV Source Settings Menu Item Description Suggestions On Off Select On to activate the suggested radio stations or area radio stations list function Radio settings page 53 SiriusXM settings page 89 Bluetooth Audio On Off Setting Bluetooth audio source activation Beep Tone Menu Item Description...

Страница 105: ...mera View can be displayed at all times Note that with this setting the camera image is not resized to fit and that a portion of what is seen by the camera is not viewable To display the camera image touch Camera View on the source application selection screen page 48 NOTES To set the rear view camera as the camera for Camera View mode set Back up Camera Input to On page 106 When using the 2nd cam...

Страница 106: ...screen rear view camera image during normal driving switch to the opposite setting in Camera Polarity If you touch while the camera image is displayed the displayed image turns off temporarily Menu Item Description Back up Camera Input Off On Setting rear view camera activation Camera Polarity Setting the polarity of the rear view camera Battery The polarity of the connected lead is positive Groun...

Страница 107: ...ance guidelines displayed on the rear view camera image may differ from the actual vehicle width and distance The guidelines are straight lines The image quality may deteriorate depending on the usage environment such as at night or in dark surroundings NOTES Use painter s tape or similar tape to place markings as shown below before setting up the guidelines Adjust the guidelines so that they over...

Страница 108: ...is setting is available only when you stop your vehicle in a safe place and apply the parking brake The source is turned off and the Bluetooth connection is disconnected before the process starts Before starting the restore process disconnect any device that is connected to the USB port Otherwise some settings may not be restored correctly Clock Settings Menu Item Description Clock Settings Settin...

Страница 109: ...You can use this function when Dimmer Trigger is set to Manual Day Turns the dimmer function to off Night Turns the dimmer function to on Dimmer Duration Adjust the time that the dimmer is turned on or off by dragging the cursors or touching or You can use this function when Dimmer Trigger is set to Time TIPS Each touch of or moves the cursor backward or forward in the 15 minute width When the cur...

Страница 110: ...t to on or off page 109 The picture adjustment may not be available with some rear view cameras The setting contents can be memorized separately Menu Item Description Brightness 24 to 24 Adjust the black intensity Contrast 24 to 24 Adjust the contrast Color 24 to 24 Adjust the color saturation Hue 24 to 24 Adjust the tone of color which color is emphasized red or green Dimmer 1 to 48 Adjust the br...

Страница 111: ...ed and the parking brake is engaged 1 Download the firmware update files into your computer 2 Connect a blank formatted USB storage device to your computer then locate the correct update file and copy it onto the USB storage device 3 Connect the USB storage device to this product page 55 4 Turn the source off page 48 5 Display the System setting screen page 104 6 Touch System Information 7 Touch F...

Страница 112: ...he GPS antenna Positioning Status Displays the positioning status 3D positioning 2D positioning or no positioning the number of satellites used for positioning orange and the number of satellites that have received signals yellow If signals from more than three satellites are received the current location can be measured Installation Indicates whether the installation position of this product is c...

Страница 113: ...t or withdraw from the Internet Communication Service the Terms of Use and Privacy Policy NOTES The following functions are not activated unless you agree to the Internet Communication Service the Terms of Use and Privacy Policy Sports Browser Weather Amazon Alexa If you do not agree to the Internet Communication Service the Terms of Use and Privacy Policy the Wi Fi connection cannot be used to ac...

Страница 114: ...play custom 1 Displays the background display image imported from the USB storage device off Hides the background display Illumination 2 Select an illumination color from the color list or create a defined color Colored Keys Select the desired preset color custom Displays the screen to customize the illumination color To customize the defined color touch then touch or to adjust the brightness and ...

Страница 115: ...You can also set the value by dragging the point on the displayed table NOTE This function is available when Standard Mode is selected as the speaker mode and Rear is selected in Rear Speaker Output Loudness Off Low Mid High Compensates for deficiencies in the low frequency and high frequency ranges at low volume Source Level Adjuster 4 to 4 Adjust the volume level of each source to prevent radica...

Страница 116: ...bwoofer Speaker output level 24 to 10 Adjust the speaker output level of the listening position 1 Touch or to select the listening position then select the output speaker 2 Touch or to adjust the selected speaker output level NOTE This function is available when Subwoofer is set to On Listening Position 1 Off Front Left Front Right Front All Select a listening position that you want to make as the...

Страница 117: ... Select a curve that you want to use as the basis of customizing then touch the frequency that you want to adjust TIPS If you make adjustments when a curve Super Bass S Bass Powerful Natural Vocal Flat Dynamic or Vivid is selected the equalizer curve settings will be changed to Custom1 mandatorily If you make adjustments when the Custom2 curve is selected for example the Custom2 curve will be upda...

Страница 118: ...e screen 2 Touch then 3 Touch Crossover or Subwoofer Settings 4 Touch or to switch the speaker Mute Level If an interruption caused by an audio signal occurs while Apple CarPlay or Android Auto is being used select mute or attenuate the volume of the AV source and iPhone smartphone application ATT The volume becomes 10 dB lower than the current volume Mute The volume becomes 0 Off The volume does ...

Страница 119: ...n by touching the graph lines Video settings Time Per Photo Slide Menu Item Description Time Per Photo Slide 5sec 10sec 15sec Manual Select the interval of image file slideshows on this product Video Signal Setting Menu Item Description AUX Auto PAL NTSC PAL M PAL N SECAM Select the suitable video signal setting when you connect this product to an AUX equipment Back up Camera Auto PAL NTSC PAL M P...

Страница 120: ...nually perform the following For an Apple CarPlay or Android Auto connection touch the name of the device For a Bluetooth connection touch To disconnect the device touch in the list TIP When there is not device in the list the device search list screen appears then you can connect selected device NOTE Connect the Bluetooth device manually in the following cases Two or more Bluetooth devices are re...

Страница 121: ... Right Left Setting the driving position Apple CarPlay page 66 Android Auto page 70 Android Auto Auto launch Menu Item Description Android Auto Auto launch On Off Select On to display the Android Auto screen automatically when an Android device is connected to the unit ...

Страница 122: ... the menu item for which to create a shortcut The star icon for the selected menu is filled in TIP To cancel the registration touch the star icon in the menu column again 1 Touch then swipe left on the screen 2 Touch 3 Touch 4 Touch the desired menu item 1 Touch then swipe left on the screen 2 Touch 3 Touch 4 Touch and hold the menu item that you want to remove The selected menu item is removed fr...

Страница 123: ...s The date display format day month year month day year or year month day The time display format 12hour or 24hour The UTC Universal Time Coordinated time zone difference UTC 12h to UTC 14h Day light saving time On or Off You can also configure these items in Clock Settings page 108 You can set the screen mode for AV screen and image files 1 Touch the screen display mode key Other functions Settin...

Страница 124: ...You can restore settings or recorded content to the default settings from Restore Settings in page 108 Full Displays images across the entire screen NOTE Some images may not be displayed across the entire screen Zoom Displays the images enlarging them vertically Normal Displays images without changing the ratio Trimming An image is displayed across the entire screen with the horizontal to vertical...

Страница 125: ...ake The speed sensor detects that the vehicle is moving Park your vehicle in a safe place and apply the parking brake No video output from the connected equipment The AV Input or AUX Input setting is incorrect Correct the settings The audio or video skips This product is not firmly secured Secure this product firmly No sounds are produced The volume level will not rise Cables are not connected cor...

Страница 126: ... is connected to the lead whose voltage changes when the shift lever is put in reverse Refer to the installation manual Black screen displayed when the vehicle is in reverse with no camera installed Back camera input is set to On Turn the setting to Off in the settings menu Refer to the System Settings section of this manual to adjust Back image displayed when vehicle is not in reverse The camera ...

Страница 127: ...e below to identify the problem then take the suggested corrective action If the error persists record the error message and contact your dealer or your nearest Pioneer service center AMP Error This product fails to operate or the speaker connection is incorrect the protective circuit is activated Check the speaker connection If the message fails to disappear even after the engine is switched off ...

Страница 128: ... or call 1 888 539 7474 if you have questions about your subscription Channel Not Subscribed Call SiriusXM to Subscribe The channel that you have requested is not included in your SiriusXM subscription package Check the content of your SiriusXM subscription package In the U S A visit www siriusxm com or call 1 866 635 2349 if you have questions about your subscription package or would like to subs...

Страница 129: ... connect the USB storage device to this product No Response This product cannot recognize the connected USB storage device Disconnect the device and replace it with another USB storage device The USB connector or USB cable has short circuited Check that the USB connector or USB cable is not caught in something or damaged The connected USB storage device consumes more than maximum allowable current...

Страница 130: ...ation Manual If the error message is still displayed after performing the above action please contact your dealer or an authorized Pioneer Service Station Android Auto has stopped The connected device is not compatible with Android Auto Check if the device is compatible with Android Auto The startup of Android Auto failed for some reasons Disconnect the cable from the smartphone and then connect t...

Страница 131: ...compatible with this product Firmly secure the USB storage device when driving Do not let the USB storage device fall onto the floor where it may become jammed under the brake or gas pedal There may be a slight delay when starting playback of audio files encoded with image data Some USB storage devices connected to this product may generate noise on the radio Do not connect anything other than the...

Страница 132: ...operly depending on the environment in which the file was created or on the contents of the file This product is not compatible with packet write data transfer This product can recognize up to 32 characters beginning with the first character including extension for the file and folder name Depending on the display area this product may try to CODEC FORMAT MP3 WMA WAV AAC FLAC DSD AVI MPEG PS MPEG ...

Страница 133: ...umbers Compatible video codec MPEG4 DivX H 264 H 263 Maximum resolution 1 920 1 080 Maximum frame rate 30 fps Compatible video codec MPEG2 Maximum resolution 720 576 Maximum frame rate 30 fps Compatible video codec DivX Maximum resolution 720 576 Maximum frame rate 30 fps Compatible video codec MPEG4 H 264 H 263 Maximum resolution 1 920 1 080 Maximum frame rate 30 fps Compatible video codec H 263 ...

Страница 134: ...eserved Wi Fi is a registered trademark of Wi Fi Alliance Wi Fi Protected Setup is a trademark of Wi Fi Alliance The Wi Fi CERTIFIED Logo and the Wi Fi Protected Setup Logo are registered trademarks of Wi Fi Alliance HD Radio Technology manufactured under license from iBiquity Digital Corporation U S and Foreign Patents For patents see http dts com patents HD Radio and the HD HD Radio and ARC logo...

Страница 135: ...THIS SOFTWARE IS PROVIDED BY THE COPYRIGHT HOLDERS AND CONTRIBUTORS AS IS AND ANY EXPRESS OR IMPLIED WARRANTIES INCLUDING BUT NOT LIMITED TO THE IMPLIED WARRANTIES OF MERCHANTABILITY AND FITNESS FOR A PARTICULAR PURPOSE ARE DISCLAIMED IN NO EVENT SHALL THE FOUNDATION OR CONTRIBUTORS BE LIABLE FOR ANY DIRECT INDIRECT INCIDENTAL SPECIAL EXEMPLARY OR CONSEQUENTIAL DAMAGES INCLUDING BUT NOT LIMITED TO...

Страница 136: ... trademarks of Google LLC Android Auto is a trademark of Google LLC This Product uses the Source Code of T Kernel 2 0 under T License 2 2 granted by TRON Forum www tron org Pioneer accepts no responsibility for data lost from an iPhone even if that data is lost while using this product Please back up your iPhone data regularly Do not leave the iPhone in direct sunlight for extended amounts of time...

Страница 137: ...ademark of Cisco in the U S and other countries and is used under license iTunes is a trademark of Apple Inc registered in the U S and other countries Apple Music is a trademark of Apple Inc registered in the U S and other countries Apple CarPlay is a trademark of Apple Inc Use of the Apple CarPlay logo means that a vehicle user interface meets Apple performance standards Apple is not responsible ...

Страница 138: ...nlimited data usage additional charges from your carrier may apply for accessing app based connected content via 3G EDGE and or LTE 4G networks Connection to the Internet via 3G EDGE LTE 4G or Wi Fi network Optional Pioneer adaptor cable connecting your iPhone to this product Limitations Access to app based connected content will depend on the availability of cellular and or Wi Fi network coverage...

Страница 139: ...ioneer content and services including apps and connectivity may change without notice due to changes in operating systems firmware or app versions changes to restrictions on or discontinuation of the service or service plans non Pioneer hardware changes or other events Remember that use of this system for commercial or public viewing purposes may constitute an infringement on the author s rights a...

Страница 140: ...n At low temperatures using the LED backlight may increase image lag and degrade the image quality because of the characteristics of the LCD screen Image quality will improve with an increase in temperature The product lifetime of the LED backlight is more than 10 000 hours However it may decrease if used in high temperatures If the LED backlight reaches the end of its product lifetime the screen ...

Страница 141: ...MH WT7600NEX DMH WT76NEX 9 0 inch wide 16 9 effective display area 198 72 mm 111 78 mm 7 3 4 in 4 3 8 in DMH WC6600NEX 9 0 inch wide 16 9 effective display area 198 72 mm 111 78 mm 7 3 4 in 4 3 8 in DMH W4660NEX DMH W4600NEX DMH WC5700NEX 6 78 inch wide 16 9 effective display area 152 4 mm 80 208 mm 6 in 3 1 8 in Pixels DMH WT8600NEX DMH WT7600NEX DMH WT86NEX DMH WT76NEX DMH WC6600NEX 1 280 Width ...

Страница 142: ...PF Mid ON OFF Frequency 1 25 kHz 1 6 kHz 2 kHz 2 5 kHz 3 15 kHz 4 kHz 5 kHz 6 3 kHz 8 kHz 10 kHz 12 5 kHz Slope 6 dB oct 12 dB oct 18 dB oct 24 dB oct Phase Mid Normal Reverse LPF Subwoofer ON OFF Frequency 25 Hz 31 5 Hz 40 Hz 50 Hz 63 Hz 80 Hz 100 Hz 125 Hz 160 Hz 200 Hz 250 Hz Slope 6 dB oct 12 dB oct 18 dB oct 24 dB oct 30 dB oct 36 dB oct Phase Subwoofer Normal Reverse Time alignment 0 to 210 ...

Страница 143: ...Access Profile 1 2 A2DP Advanced Audio Distribution Profile 1 3 AVRCP Audio Video Remote Control Profile 1 6 1 SPP Serial Port Profile 1 2 AVCTP Audio Video Control Transport Protocol 1 4 AVDTP Audio Video Distribution Transport Protocol 1 3 DID Device ID Profile 1 3 GAVDP Generic Audio Video Distribution Profile 1 3 IOP Interoperability Test Specification OPP Object Push Profile RFCOMM RFCOMM wit...

Страница 144: ...eception frequency 1 575 42 MHz 1 602 MHz Sensitivity 140 dBm typ Frequency Approx once per second GPS antenna Antenna Micro strip flat antenna right handed helical polarization Antenna cable 3 55 m 11ft 7in Dimensions W H D 33 mm 14 7 mm 36 mm 1 1 4 in 1 2 in 1 3 8 in Weight 73 7 g 0 2 lbs CTA2006 Specifications Power output 14 W RMS 4 Channels 4 Ω and 1 THD N S N ratio 90 dB IHF A NOTE Specifica...

Страница 145: ... 2021 PIONEER CORPORATION OPM_DMHWC6600NEXUC_O2_EN_A UC ...

Отзывы: