86
AVIC-W8400NEX/XNUC
1
2
3
4
A
B
C
D
E
F
1
2
3
4
7. DISASSEMBLY
1
2
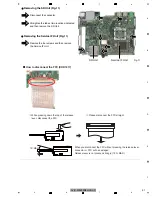
Fig.2
Panel
FFC
- Removing the Panel (Fig.2)
1
2
1
2
2
2
1
1
2
2
2
2
Remove the two screws.
Release the eight latches and then remove
the Panel.
Pass the FFC through two Hooks.
1
Hook
Collar
Fig.1
1
2
3
Pull out the Monitor Assy in the direction
indicated by an arrow.
Disconnect the connector.
Remove the two screws and then remove
the Monitor Assy.
3
3
2
1
Monitor Assy
Removing the Monitor Assy (Fig.1)
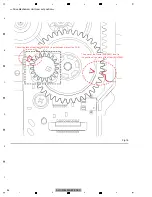
Method for opening the flap manually
Insert a tip of screwdriver whose diameter is
approximately 2mm into the slit at the bottom surface
of the product and slide the flame part to the direction
indicated by an arrow.
Mount the Collar for preventing Monitor Assy
backlash on the red circle section.
Collar
While the photograph shown is slightly different from this model in shape, the disassembly procedure is the same.
Attention at assembly
Attention at assembly


