


< CRD4849-A >
English
26
Chapter
59
En
m/d/y
:
Changes the date display format to
month/date/year.
y/m/d
:
Changes the date display format to year/
month/date.
Time Format
12hour
(default):
Changes the display to 12-hour format
with am/pm.
24hour
:
Changes the display to 24-hour format.
Setting the “Sound Retriever”
function
The “
Sound Retriever
” function automat-
ically enhances compressed audio and
restores rich sound.
Touch the following key repeatedly
until the desired setting appears on
the AV operation screen.
Sets the “
Sound Retriever
”
function.
(Mode1) (default):
Activates the “
Sound Retriever
”
function.
(Mode2):
Activates the “
Sound Retriever
”
function.
(Off):
Deactivates the “
Sound Retriever
”
function.
p
Mode2 has a stronger effect than Mode1.
Changing the wide screen
mode
You can set the screen size for the video,
JPEG images and TV (RGB).
p
This setting is available only when you
stop your vehicle in a safe place and apply
the parking brake.
p
The default setting is “
Full
” for video
and TV (RGB), and “
Normal
” for JPEG
images.
1 Touch the following key.
Displays the setting screen to
select the appropriate screen
ratio for the playback video.
p
The appearance of this key changes
according to the current setting.
2 Touch the desired mode.
Full
A 4:3 picture is enlarged in the horizontal
direction only, enabling you to enjoy a 4:3
TV picture (normal picture) without any
omissions.
p
This setting is for video and TV (RGB).
Zoom
A 4:3 picture is enlarged in the same pro-
portion both vertically and horizontally;
ideal for a wide screen picture.
p
This setting is for video only.
Normal
A 4:3 picture is displayed normally, giving
you no sense of disparity since its propor-
tions are the same as those of the normal
picture.
Trimming
An image is displayed across the entire
screen with the horizontal-to-vertical
ratio left as is. If the horizontal-to-vertical
ratio differs between the display and the
image, the image may be displayed partly
cut off either at the top/bottom or sides.
p
This setting is for JPEG images only.
p
Different settings can be stored for each
video source.
p
When a video is viewed in a wide screen
mode that does not match its original
aspect ratio, it may appear different.
p
The video image will appear coarser when
viewed in “
Zoom
” mode.
Other functions
Selecting the video for the
rear display
You can choose either to show the same
image as the front screen or to show the
selected source on the rear display.
p
This function is not available during a call
via this product or while using the voice
recognition function.
1 Press the HOME button to display
the Top menu screen.
2 Touch the following key.
Displays the AV source
selection screen.
3 Touch [Rear].
The “
Rear
” screen appears.
4 Touch the source you want to show
on the rear display.
The source you can select is as follows.
Mirror
The video on the front screen of this
product is output to the rear display.
—
Not all videos or sounds can be output to
the rear display.
DVD/CD
The video and sound of DVDs are output
to the rear display.
—
Compatible file types are DVD-V,
Video-CD, DivX, MPEG-1, MPEG-2, and
MPEG-4 only.
USB/iPod
The video and sound of the USB storage
device or iPod are output to the rear
display.
—
The port that supports the rear display will
only be USB port 1.
—
Compatible file types are MPEG-4, H.264,
WMV, MKV, and FLV only.
SD
The video and sound of the SD memory
cards are output to the rear display.
—
Compatible file types are MPEG-4, H.264,
WMV, MKV, and FLV only.
AV
The video and sound of the AV input are
output to the rear display.
—
The video image and sound are output
only when “
AV
” has both video and
sound.
—
The video image and sound are output
only when “
AV Input
” is set to “
Source
”.
For details, refer to Setting AV input on
page 44.
OFF
Nothing is output to the rear display.
Touch the following key.
Closes the “
Rear
” screen.
You can also select “
Rear
” on the source
list.
For details, refer to Selecting a front
source on the source list on page 11.
p
Video files on the external storage device
(USB, SD) are not available as a source
for the rear display when
Android Auto
is on.
Setting the anti-theft function
You can set a password for this product. If
the back-up lead is cut after the password is
set, this product prompts for the password
at the time of next boot up.
■
Setting the password
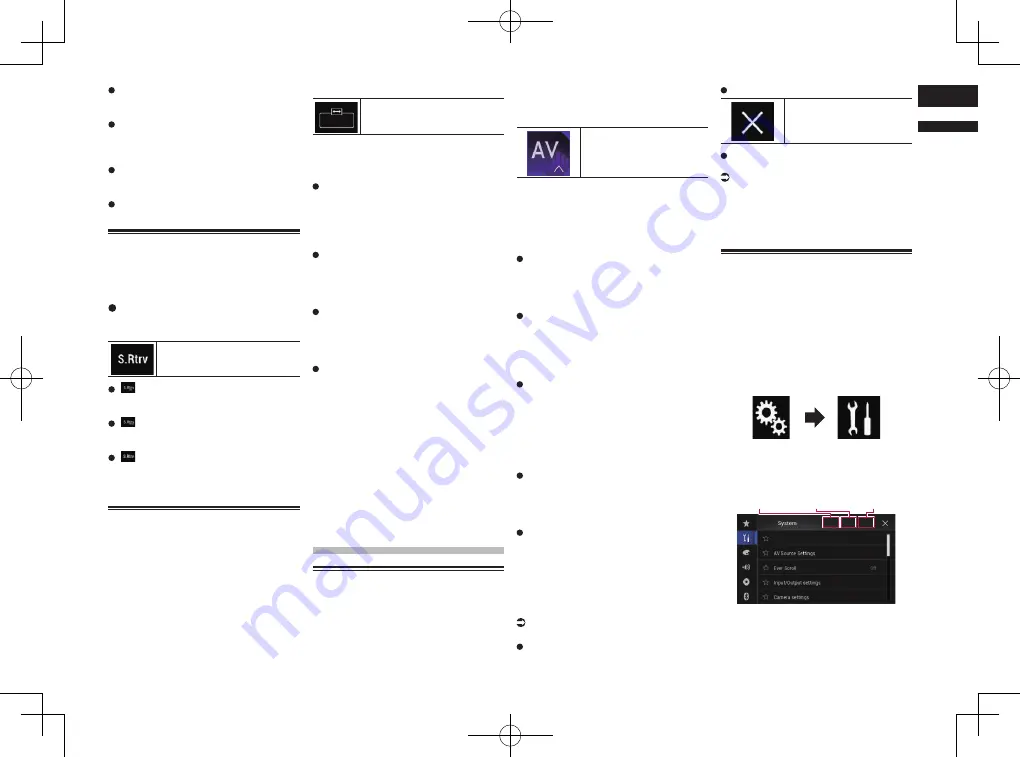
1 Press the HOME button to display
the Top menu screen.
2 Touch the following keys in the
following order.
The “
System
” screen appears.
3 Touch Area1, followed by Area2,
and then touch and hold Area3.
Area1
Area2
Area3
The “
Anti-theft Setting Menu
” screen
appears.
4 Touch [Set Password].
The “
Password Entry
” screen appears.
Содержание AVH-X8750BT
Страница 167: ... CRD4849 A ...


