1
3135 035 20212
ANTENNA IN 75
Ω
MONITOR OUT
AV1 IN
AV2 IN
S-VIDEO
Y
Pb
Pr
VIDEO
MONO/L
AUDIO
R
ANTENNA IN 75
Ω
MONITOR OUT
AV1 IN
AV2 IN
S-VIDEO
Y
Pb
Pr
VIDEO
MONO/L
AUDIO
R
ANTENNA IN 75
Ω
1
2
IN
OUT
Y
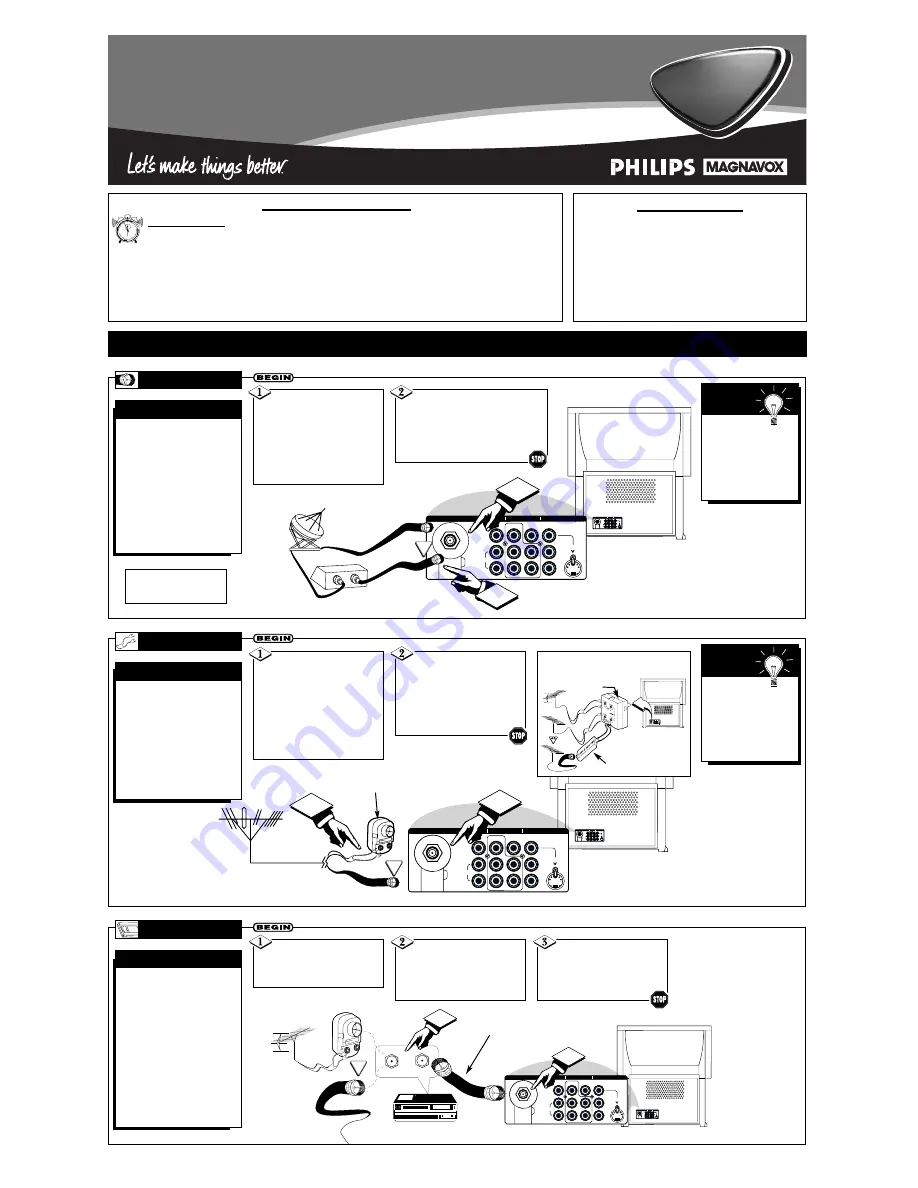
our Cable TV input into
your home may be a
single (75 ohm) cable or a
converter box installation.
In either case, the connec-
tion to the TV is very easy.
Just put the threaded end of
the cable signal to the TV’s
antenna plug and screw it
down tightly.
C
ABLE
TV
C
ABLE
I
NPUT
/C
ONVERTER
OR
OUT TO TV
IN FROM ANT.
1
ANTENNA IN 75
Ω
MONITOR OUT
AV1 IN
AV2 IN
S-VIDEO
Y
Pb
Pr
VIDEO
MONO/L
AUDIO
R
ANTENNA IN 75
Ω
MONITOR OUT
AV1 IN
AV2 IN
S-VIDEO
Y
Pb
Pr
VIDEO
MONO/L
AUDIO
R
2
F
ollow the steps to the
right to connect a
basic antenna or cable TV
signal to a VCR, and then
the VCR to the TV. For
information on other
hookups (possible when
cable/descrambler boxes
are included), refer to the
owner’s manuals for the
VCR and the cable con-
verter.
TV
TO
VCR
B
ASIC
C
ONNECTION
If your Cable TV signal
comes from a single round
cable (75 ohm), then you're
ready to connect to the TV.
If you have a cable converter
box, connect the cable TV signal
to the cable signal IN(put) plug
on the converter.
Connect the cable TV cable to
the ANTENNA IN 75
Ω
plug on the TV.
If you have a cable converter box,
connect the OUT(put) plug from the
converter to the ANTENNA IN 75
Ω
(ohm) plug on the TV.
Connect your antenna
or cable TV signal to the IN
FROM ANT(enna) plug on the
VCR.
Connect the OUT TO
TV plug on the VCR to the
ANTENNA IN 75
Ω
plug on
the TV (connecting cable sup-
plied with the VCR).
Back of TV
Round Cable
75
Ω
(Ohm)
Cable TV
Converter Box
Connection
Cable TV Company
Cable TV Signal Input
Round Cable
75
Ω
(Ohm) Supplied with VCR
Outdoor
VHF/UHF
Antenna
300
Ω
(Ohm) to
75
Ω
(Ohm) Adapter
Cable TV signal
Back of TV
Refer to the owner's
manual included with your
VCR for other possible connec-
tions and TV/VCR operating
details.
OR
NOTE: The connecting cable
for the converter is supplied
by the cable TV company.
VCR
1
ANTENNA IN 75
Ω
MONITOR OUT
AV1 IN
AV2 IN
S-VIDEO
Y
Pb
Pr
VIDEO
MONO/L
AUDIO
R
ANTENNA IN 75
Ω
MONITOR OUT
AV1 IN
AV2 IN
S-VIDEO
Y
Pb
Pr
VIDEO
MONO/L
AUDIO
R
ANTENNA IN 75
Ω
2
A
combination antenna
receives normal broad-
cast channels (VHF 2–13
and UHF 14–69). Your con-
nection is easy because
there is only one ANTENNA
IN 75
Ω
(ohm) plug on the
back of your TV, and that’s
where the antenna goes.
A
NTENNA
C
OMBINATION
UHF/VHF
To get optional
accessories to make
the connections shown
here, contact your
dealer, or our Parts
Information Center at
1-800-851-8885.
S
MART
H
ELP
If your antenna has a
round cable (75 ohm) on the
end, then you're ready to con-
nect it to the TV.
If your antenna has flat, twin-
lead wire (300 ohm), you first
need to attach the antenna wires
to the screws on a 300- to 75-
ohm adapter.
Push the round end of
the adapter (or antenna) onto
the ANTENNA IN 75
Ω
plug on
the back of the TV. If the
round end of the antenna wire
is threaded, screw it down fin-
ger tight.
300
Ω
(Ohm) to
75
Ω
(Ohm) Adapter
Combination VHF/UHF
Antenna
(Outdoor or Indoor)
Twin–Lead
Wire
Round Cable
75
Ω
(Ohm)
Back of TV
OR
NOTE: For homes with separate UHF and
VHF antennas, you will need an optional com-
biner to connect to the TV.
ANTENNA IN 75
Ω
MONITOR OUT
AV1 IN
AV2 IN
S-VIDEO
Y
Pb
Pr
VIDEO
MONO/L
AUDIO
R
U/V
Combiner
300- to 75-Ohm Adapter
Back of TV
T
ABLE OF
C
ONTENTS
Getting Started
Warning/Important Notice . . . . . . . . . . . . . .1
Making Basic Antenna/Cable Hookups . . . .1
Using the TV Buttons . . . . . . . . . . . . . . . . . . . . . . . .2
Using the Remote Control Buttons . . . . . . . . . . . . . .2
Setting the TV’s On-screen Menu Language . . . . . . .3
Setting the Tuner Mode Control . . . . . . . . . . . . . . . .3
Running Auto Program . . . . . . . . . . . . . . . . . . . . . . .3
Editing Channels . . . . . . . . . . . . . . . . . . . . . . . . . . .4
Using AutoChron to Set the TV’s Clock . . . . . . . . . .4
Naming Channels . . . . . . . . . . . . . . . . . . . . . . . . . . .4
Projection
Television
Projection
Television
Quick Use and Setup Guide
12
1
2
3
4
5
6
7
8
9
10
11
H
OOKING
U
P
Y
OUR
TV (B
ASIC
TV C
ONNECTIONS
)
Quick Use and Setup Guide
IMPORTANT
NOTE: This owner's manual is used with several
different television models. Not all features (and
drawings) discussed in this manual will necessar-
ily match those found with your television set.
This is normal and does not require you contact-
ing your dealer or requesting service.
WARNING: TO PREVENT FIRE OR SHOCK
HAZARD DO NOT EXPOSE THIS UNIT TO
RAIN OR EXCESSIVE MOISTURE.
AutoChron, Incredible Surround, SmartPicture, and SmartSound are trademarks of Philips Consumer Electronics Company. Copyright © 2001 Philips Consumer
Electronics Company. All rights reserved.
Use the Auto
Program feature to
store in the TV’s mem-
ory only the channels
with active broadcast
stations. See page page
3 for details.
S
MART
H
ELP


