Flirt
HP6406
ENGLISH
2
4203 000 30882
Introduction
.
With your new Flirt, which has been specially
developed for the underarms
and bikini line, you can remove unwanted hairs
quickly, easily and effectively. The rotating discs
catch even the shortest hairs (down to 0.5mm) and
pull them out by the root.The hairs that grow back
are soft and thin. So no more stubble! Epilating with
this new appliance leaves your skin smooth and
hair-free for several weeks.
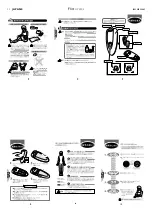
General description (fig. 1)
.
A
Epilating discs
B
Massage element
C
On/off slide
D
Batteries (LR6 AA 1.5V alkaline)
Important
.
Read these instructions for use carefully before
using the appliance and save them for future
reference.
◗
Regular cleaning and proper maintenance
ensure optimal results and a longer life for
your appliance.
◗
Make sure the appliance does not come into
contact with water.
◗
Do not use the appliance on irritated skin or
skin with varicose veins, rashes, spots, moles
(with hairs) or wounds without consulting your
doctor first. People with a reduced immune
response, e.g. during pregnancy, or people
suffering from diabetes mellitus, Raynaud's
disease or immunodeficiency should also
consult their doctor first.
◗
Your skin may become a little red and irritated
the first few times you use the epilator. This
phenomenon will soon disappear as your skin
gets used to epilation and the hairs that grow
back become thinner and softer. If the
irritation has not disappeared within three
days, we advise you to consult your doctor.
◗
To prevent damage and injuries, keep the
running appliance away from your hair,
eyebrows, eyelashes, clothes, threads, cords,
brushes etc.
◗
Keep the appliance out of the reach of
children.
◗
Only use the appliance with LR6 AA 1.5V
alkaline batteries.
Using the appliance
.
B
Make sure your skin is clean, entirely dry and free
from grease. Do not use any cream before you
start epilating.
B
When you use the appliance for the first time, we
advise you to try it out on an area with only light
hair growth to get accustomed to the epilation
process.
B
As the hairs are removed by the root, epilation may
cause some skin discomfort the first few times you
use the appliance. This effect will diminish with
each use.
1
Remove the lid of the battery compartment
by moving it downwards until it comes loose
from the appliance and can easily be taken off
(fig. 2).
2
Insert two LR6 AA 1.5V alkaline batteries as
shown in the figure (fig. 3).
3
Switch the appliance on by means of the
on/off slide (fig. 4).
4
Place the epilating head perpendicularly onto
the skin so that the epilating head and
massage element are in proper contact with
the skin and stretch the skin with your free
hand to make the hairs stand upright (fig. 5).
Move the appliance slowly, with the massage
element pointing forwards, against the direction of
hair growth. Do not exert any pressure.
B
The massage element stretches the skin during
epilation, which makes the appliance ideal for the
more delicate areas of the body.
◗
Epilate your bikini line as shown in the figure
(fig. 6).
◗
Epilate your underarms as shown in the figure
(fig. 7).
◗
The appliance is also suitable for epilating the
legs (fig. 8).
Cleaning
.
Never try to remove the epilating discs from the
epilating head.
Do not use aggressive cleaners, scouring agents,
petrol, acetone etc. to clean the plastic housing of
the appliance.
B
Clean the epilating discs after each use.
B
Switch the appliance on and blow forcefully on the
epilating discs or wipe them with a dry cloth.
B
The massage element can be removed for easier
cleaning of the discs.
Environment
.
Batteries contain substances that may pollute the
environment.
◗
Do not throw empty batteries away with the
normal household waste, but hand them in at
an official collection point.
- Make sure the batteries are completely empty
when you dispose of them.
- When discarding the appliance in due course,
put the motor unit and other metal parts in a
scrap metal bank.
- All plastic parts are marked with recycle
symbols.
Guarantee & service
.
If you need information or if you have a problem,
please visit the Philips website at
www.philips.com
or call the Philips Customer Care Centre in your
country.
Содержание Flirt HP6406
Страница 7: ...Flirt HP6406 7 4203 000 30882 1 A B C D B B B B B B B ...
Страница 8: ...Flirt HP6406 8 4203 000 30882 1 A B C D B B B B B B B ...
Страница 9: ...Flirt HP6406 9 4203 000 30882 1 A B C D B B B B B B B ...
Страница 10: ...Flirt HP6406 JAPANS 10 4203 000 30882 ...
Страница 11: ...Flirt HP6406 JAPANS 11 4203 000 30882 ...
Страница 12: ...Flirt HP6406 JAPANS 12 4203 000 30882 ...
Страница 13: ...Flirt HP6406 JAPANS 13 4203 000 30882 ...


