background image

Discover Your Phone

Philips continuously strives to improve its products.
Therefore, Philips reserves the rights to revise this user
guide or withdraw it at any time without prior notice.
Philips provides this user guide “as is” and does not
accept, except as required by applicable law, liability for
any error, omission or discrepancy between this user
guide and the product described. The device is meant to
be connected to GSM/GPRS networks.

How to ...

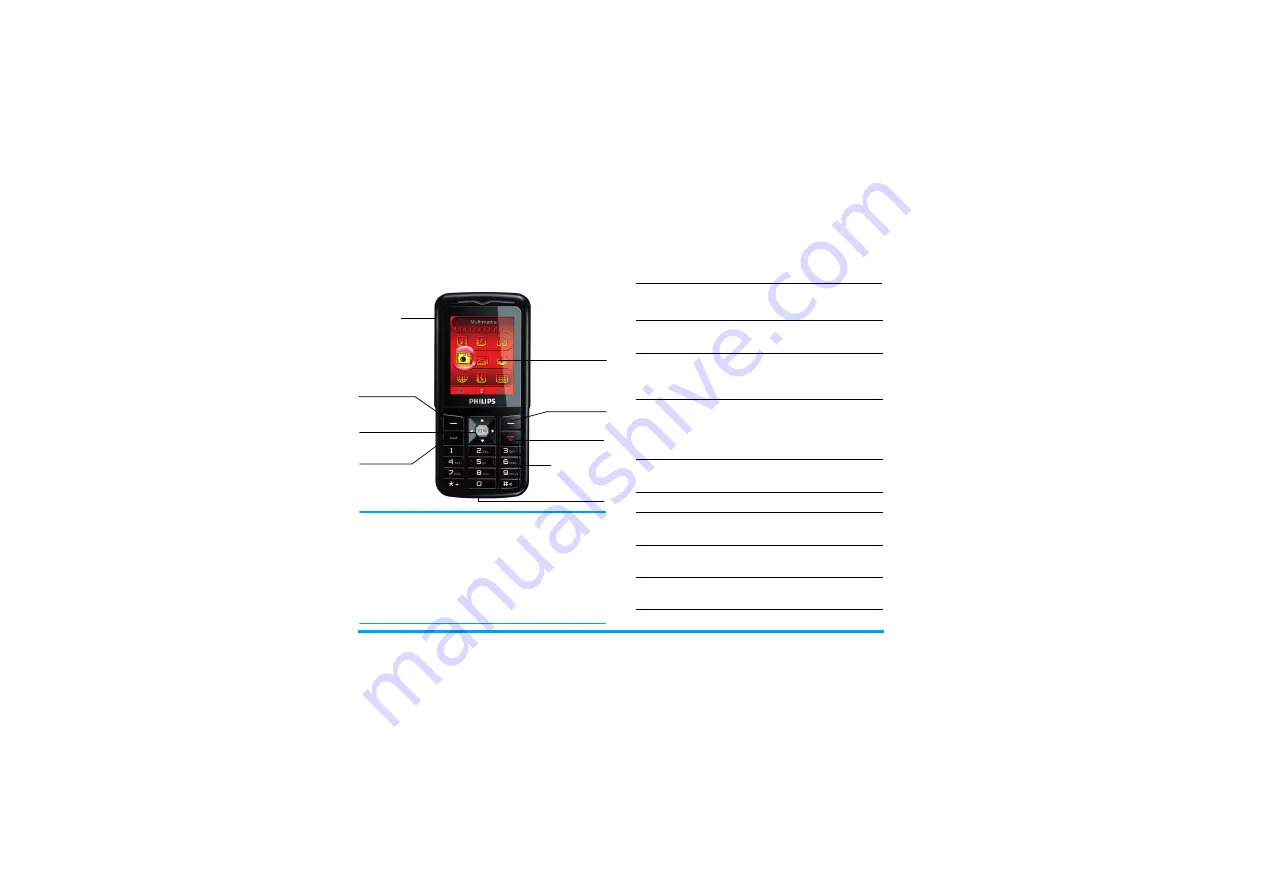
Alphanumeric

keypad

Microphone

262,000 colour

main screen

Navigation 
and 

,

 key

Hang up and

on/off key

Left softkey

Pick up key

Right softkey

Back of the phone:

camera lens

Headset/
charger and 
USB 
connector

Switch the phone 
On/Off

Long press 

)

.

Store numbers in 
Phonebook

Enter the phone number and
press 

L

 to save.

Make a call

Enter the phone number with
the keypad and press 

(

 to

dial.

Access 

Call logs

Press 

(

 in idle mode. 

Call

logs


display your recent

Missed Calls

Dialed Calls


and

Received Calls

.

Answer a call

Press 

(

  when  your  phone

rings.

End a call

Press 

)

.

Reject a call

Press 

)

 when your phone

rings.

Access 

Main Menu

Press 

L


Menu


or press 

,

 in

idle mode.

Switch to silent 
mode

Long press 

#

 key in idle

mode.

Содержание CT0292BLK

Страница 1: ...rophone 262 000 colour main screen Navigation and key Hang up and on off key Left softkey Pick up key Right softkey Back of the phone camera lens Headset charger and USB connector Switch the phone On Off Long press Store numbers in Phonebook Enter the phone number and press L to save Make a call Enter the phone number with the keypad and press to dial Access Call logs Press in idle mode Call logs ...

Страница 2: ...ement of the Main Menu Press L in idle mode to access the Main Menu and use the navigation keys of which the directions are represented in this user guide as or to browse the icons and lists Within lists press L to access the options associated with the selected item press R Back to go back one level Access camera Press in idle mode Access Phone Book List Press R in idle mode Turn Audio Player on ...

Страница 3: ... keys 10 Multitap ABC abc Input 10 Smart ABC abc Input 11 Symbol Input 11 4 Phone Book 12 Search for a contact in the phonebook 12 Manage contacts 12 Add new entry 12 Copy all 13 Copy or move a phonebook entry 13 Delete 13 Caller Group 13 Extra Number 14 Settings 14 Caller Picture 15 Caller Ring Tone 15 Caller Video 15 5 Messages 16 SMS 16 MMS 19 Chat 22 Voice Mail Server 22 Broadcast Message 22 6...

Страница 4: ...37 Melody Compose 37 Key operations when composing a melody 38 File Manager 38 9 Fun Games 40 Games 40 Stopwatch 40 Game Setting 40 10 User Profiles 41 11 Organizer 42 Calendar 42 To Do List 42 Alarm 43 Calculator 43 Currency Converter 43 World Clock 44 Shortcuts 44 12 Services 45 STK 45 WAP 45 Data Account 46 Icons symbols 47 Precautions 49 Troubleshooting 54 Philips Authentic Accessories 56 Spec...

Страница 5: ...ion information your mobile phone number and a memory in which you can store phone numbers and messages For more information see Phone Book on page 12 Insert the SIM card and Battery Follow the steps below to insert your new SIM card Remember to switch off your mobile phone before removing the battery Remove the battery To insert the SIM card you must first remove the battery Lift up the battery f...

Страница 6: ... card locks into its place Switch on the phone To switch on the phone long press key Enter the PIN code if required The PIN code is a 4 to 8 digit secret code of your SIM card It is preconfigured and communicated to you by your network operator or retailer For more information on PIN codes see Security Setup on page 29 If you enter an incorrect PIN code three times in succession your SIM card will...

Страница 7: ...ed to the mobile phone when the battery is fully charged will not damage the battery The only way to turn off the charger is to unplug it so use an easily accessible AC power socket If the mobile phone automatically shuts down or indicates Battery is low you should immediately charge the battery If the battery power has not been entirely used up before recharging the recharging duration will be au...

Страница 8: ...is or her identity If the number is stored in the phonebook the corresponding name will be displayed instead of the number To answer the call press or To reject the call press If you have activated Call Divert the call will be diverted to another number or your voice mail To hang up press The phone will not ring when it is in silent mode If you have selected Any Key you can answer a call by pressi...

Страница 9: ... during a call Press L Option to carry out the following operations during a call Put the call on Hold make a New call access Phone Book to search for an entry send or read SMS Speed Dial Speed dial via SIM phonebook If you know the memory location number of the contact you wish to call for example memory location 5 you can simply enter 5 in idle mode to automatically dial the pre set contact Spee...

Страница 10: ...the second number is dialled You can then press L to access the following options Swap to toggle between 2 calls Conference to introduce the caller into a conference call Answer a second call When you receive a second call while already in communication the phone will emit a beep tone and the screen displays information about the incoming call You can then To receive a second call you must first d...

Страница 11: ...etter you wish to enter and the one you have just entered are on the same key just wait for a few seconds for the cursor to re appear 2 Press R to delete the characters on the left of the cursor You can press key 0 to insert a space in ABC abc Multitap input mode The letters located on each key are as follows R Delete the characters on the left of the cursor or exit from editing mode Move the curs...

Страница 12: ...dingly 2 Press R to delete the entries on the left of the cursor 3 Use the navigation key to select the desired word and press L to enter it Numeric input 1 Press the numeric keys 0 to 9 to enter the numbers corresponding to the keys 2 To delete a number press R Symbol Input Select Input Symbols from the input method list or press to enter punctuation or symbols Use the navigation keys to select t...

Страница 13: ...press L Option and press L Phone Book List Press R in idle mode to access phone book list and press the key that corresponds to the letter you wish to search e g press 8 key three times to access the letter U The first record starting with this letter in the list will be selected Manage contacts Select a name from the phone book list and press L Option to access the following options Add new entry...

Страница 14: ...tion or select R No to cancel the operation When you copy telephone number entries from your mobile phone onto your SIM card only the names and telephone numbers will be copied Copy or move a phonebook entry 1 Select a contact from the Phone Book List and press L Option 2 Select Copy Move Duplicate and press L Delete You can select From SIM or From Phone to delete all the entries in the SIM card o...

Страница 15: ... most cases you can call this number even if you have not yet inserted a SIM card or entered your PIN Depending on your network operator you may be able to dial the emergency number even without inserting the SIM card Settings Memory Status Displays the total number of contacts you have stored in each phonebook and the total memory used Preferred Storage Allows you to set the default phonebook in ...

Страница 16: ...ard Allows you to edit or send your personal details Caller Picture Allows you to assign a picture from the picture folder in File Manager menu as the caller picture Caller Ring Tone Allows you to assign a ring tone saved in the mobile phone or delivered to you and saved in the User Profiles menu as the caller ring tone Caller Video Allows you to assign a video from the video folder in File Manage...

Страница 17: ...n to access the following options Reply Reply to the sender Delete Delete the selected message Edit Edit modify and re send the SMS to another recipient Forward Forward the selected message Delete Same Number Delete messages received from the same phone number Copy to Phone SIM Copy the selected message stored in SIM phone to phone SIM Move to Phone SIM Move the selected message stored in SIM phon...

Страница 18: ... SIM phone to phone SIM Move All Move all the messages stored in SIM phone to phone SIM Use Number Extract and save the number of the recipient or the number displayed in the message to the SIM card or phone or dial the number Use URL Extract the URL displayed in the message to connect the website Done Send the message Use Template Insert a preset message Insert Object Insert picture animation and...

Страница 19: ...ns include Profile Setting Common Setting Send To Many Sendthemessage tomultiple recipients Send By Group Send the message to all the contacts in a caller group Edit Enter a new message or edit the selected preset message Erase Delete the selected preset message Profile Name Edit the name of the current profile SC Address Select your default SMS centre If not available on your SIM card you must en...

Страница 20: ...elect Write Message and enter the following 2 Press R to access the following options when you have finished editing To Set the number or E mail of the recipient Cc Set the number or E mail of other recipients you wish to send a copy of the message to Bcc Set the number or E mail of the recipients you wish to send a copy of the message to by which the recipients in the Bcc list will be invisible t...

Страница 21: ...Properties View the sender subject date and size Reply Reply to the sender Reply to all Reply to the sender and all recipients in the To and Cc list Forward Send the MMS to other recipients Delete Delete the selected MMS Delete All Delete all the MMS in the Inbox Use Number Extract the number in the MMS View View the MMS Properties View the recipient subject date and size Send to others Send the M...

Страница 22: ...e the selected message Forward Forward the selected message Move to my folder Move the selected message to My folder Delete all Delete all messages in the Outbox Delete Delete the selected message Forward Forward the selected message View View the template Properties View the from subject and size of the MMS Write Message Edit the template Compose Set Creation Mode Image Resizing and Auto Signatur...

Страница 23: ...ong pressing 1 key in idle mode Broadcast Message Broadcast messages are public messages broadcasted to a group of mobile users The messages are broadcasted on coded channels Generally one broadcast channel can transmit one type of message Please contact your network operator for a list of channel numbers and their respective broadcast information Receive Mode This menu allows you to set the recep...

Страница 24: ... This menu allows you to view the recent dialled calls including dialling attempts or calls that were successfully connected Received Calls This menu allows you to view the recent calls received Delete Call Log This menu allows you to delete Missed Calls Dialed Calls Received Calls or Delete All Call Time This menu allows you to view Last Call Time Total Sent and Total Received displayed in hours ...

Страница 25: ...set Cost Reset the cost counter You need to enter your PIN2 code and confirm Max Cost Set the maximum cost of your calls PIN2 code is required Price Per Unit Allows you to set the unit price for the call cost This unit price shall be used for calculating the cost of your calls PIN2 code is required SMS Counter Displays the number of messages that have been sent and received GPRS Counter Tabulates ...

Страница 26: ... BIG5 traditional Chinese encode type Select GB2312 simple Chinese encode type If some Chinese can t be displayed please convert the encoding type then view it Note When traditional Chinese and simple Chinese both can be displayed you need to select theencoding type Greeting Text Turn On or Off and edit the greeting text of the phone Speed Dial This menu allows you to quickly dial the number store...

Страница 27: ...er when the phone is powered on If Flight Mode is activated network function will be closed and all related network operations will be prohibited Misc Setting This menu allows you to set the Brightness and Time of the LCD Backlight Display Characteristics Add To add a new shortcut Edit To edit an existing shortcut Delete To delete an existing shortcut Delete All To delete all the shortcuts Disable...

Страница 28: ...er Select Setting to set the status and waiting time of the screen saver Enter Select to choose System or User Define The operation of this function is similar to Wallpaper Power On Display Allows you to set the image displayed during power on Choose System to select a predefined image or choose User Define to select a downloaded image Power Off Display The operation is the same as Power On Displa...

Страница 29: ...r not the phone will emit a beep tone after a certain call duration You can select Off does not emit a beep tone Single select a value from 1 to 3000 seconds which is the duration after which the phone will emit a beep tone or Periodic select a value from 30 to 60 seconds which is the periodic time after which the phone will emit a beep tone The phone will emit a beep tone after each periodic time...

Страница 30: ...tworks Allows you to build a network list in order of preference Once defined the phone will try to register to the network according to your preference GPRS Connection This menu allows you to set the GPRS connection mode You can select Always or When Needed Security Setup SIM Lock When SIM Lock is activated you must enter the PIN code PIN code is supplied by your network operator together with th...

Страница 31: ...rent types of outgoing calls You can activate or deactivate this feature if your SIM card supports it Change Password This menu allows you to change the PIN code PIN2 code and Phone Lock Password PIN It is supplied together with the SIM card The default PIN code is supplied by your network operator If you enter an incorrect PIN code three times in succession the PIN code of your SIM card will be l...

Страница 32: ...k operator or retailer Phone Lock Password It protects your phone against unauthorised use by other parties To protect your data you need to enter the phone lock password before you restore factory settings The default phone lock password is 0000 Restore Factory Settings This menu allows you to reset your phone to its factory settings Enter the phone lock password and press L to confirm Once you h...

Страница 33: ...the picture is taken the image will be displayed Press L to save the picture or press R to clear the picture Options menu of the Camera This section describes the Option menu of the Camera Zoom in out Increase decrease exposure compensation Take a picture Exit Camera mode and return to main screen L Access Option menu R Return to previous screen 1 Effects Setting 2 Set White Balance 3 Set Delay Ti...

Страница 34: ...ance Select the appropriate White Balance for different locations Auto Daylight Tungsten Fluorescent Cloud or Incandescence Scene Mode Set the Scene mode to Auto or Night Effect Setting Set special effects for the picture Add Frame Add a frame to the picture Some frames are available only to certain picture sizes Storage Set the storage location to Phone or Memory Card Restore Default Reset the ca...

Страница 35: ...es the Option menu of the Video Recorder Read Read the selected file Rename Rename the selected file Delete Delete the selected file Delete All Files Delete all files under eBook Sort Select to sort the files by type by time by sizeornone nosortingorrandomsorting Storage Set the storage location to Phone or Card Zoom in out Increase decrease exposure compensation Start Pause recording Exit video r...

Страница 36: ...cess the following options Storage Set the storage location to Phone or Memory Card Restore Default Reset the video recorder settings to their default values Play Play the selected video Forward Apply the selected video to other options such as To Phonebook To Screen Saver To Power On Display and To Power Off Display Rename Rename the selected video Delete Delete the selected video Delete All File...

Страница 37: ...gation keys to move the selected icon Then press and L Done Add Text Use the navigation keys to move to the location where the text will be added Press and press L Done Adjustment Adjust the image and colour of the picture Flip Usethenavigationkeystoflipthepicture Expand Canvas Adjust the size of the picture if it is not displayed in full screen i e 176 x 220 Help Obtain information on Add Effect ...

Страница 38: ...y you can press L Add to create a melody and press L to access Option menu when composing the melody If you have selected an existing melody you can press L to access Option menu Refresh List Refresh the play list in Audio Player Settings Include Play List List Auto Gen Repeat Repeat mode Shuffle Play order Background Play Whether or not to continue playing when you exit from the audio player Equa...

Страница 39: ...1 7 Enter Do Si 8 Insert vibra effect vibrating note 9 Insert backlight effect Change pitch of the note to high middle or low Switch the status of the note to high normal or low Change the tempo Play Play the melody Play Speed Select playback speed Select Instrument Select a musical instrument Save Save the melody Play Play the selected melody Edit Edit the selected melody Add Create a new melody ...

Страница 40: ...le or folder to carry out the following operations File operations Play for music file View for image file Forward Detail Rename Copy Move Delete Delete All Files and Sort Folder operations Open Create Folder Rename Delete and Sort Create Folder Create a new folder You can also organize your files into subfolders Select a folder under which you want to create a subfolder Press L Edit and select Cr...

Страница 41: ...e indicated by the and navigation keys The selected time will display in red colour Game Setting This menu allows you to turn the audio and vibration effect of the games on or off Select BGM Background music Sound Effect or Game Vibration then press the to select On or Off and press L to confirm Split Timing Press L Start Stop Resume to start stop resume counting and press R Split to split the tim...

Страница 42: ...de is available only when the phone is in Headset Mode Headset mode need not be activated The phone will switch to headset mode automatically when you plug the headset into your phone Activate Activate the selected profile Customize Allows you to set the selected mode including Tone Setup Incoming Call Alarm Power On Power Off Cover Open Cover Close Message Tone and Keypad Tone Volume Ring Tone an...

Страница 43: ...s no task in your phone the screen displays Empty You can press L Add to create a new task After you have edited the task press R Done If you have selected an existing task you can press L Option to access the option menu Add a task Task List Allows you to set date time notes alarm and send the vcalendar for the task Press L to add new tasks or edit and view existing task for details please refer ...

Страница 44: ...ng the keypad and insert operators with the navigation keys as indicated in the following table The result of the calculator is indicative only The calculation accuracy is 10 decimal places The result is then truncated after the 10th decimal digit for the next operation Currency Converter This menu allows you to convert a sum from one currency into another using the exchange rate of your choice Yo...

Страница 45: ...to check the time of the main cities around the world Press the navigation keys to select the city The local date and time will be displayed at the bottom of the screen Shortcuts This menu allows you to quickly enter the 10 preset menu items You can also modify the preset menu items according to your needs For more information please refer to the section Shortcuts on page 26 ...

Страница 46: ... will be displayed first Bookmarks You can save the URL as a bookmark in your phone Select a bookmark and press L Option to access the following options Recent pages This menu allows you to view the websites which you have visited recently Enter address Enter a web address and confirm connection to the website Service Inbox The WAP push messages you have received are saved in the Pushbox WAP push ...

Страница 47: ...t and Active Background Advanced Setting This option allows you to manage your Cache Setting Cookie Setting and Display Setting Data Account This menu allows you to set your account information The existing account information is supplied by the manufacturer GSM Data You can set Account Name Number User Name Password Line Type Speed and DNS GPRS You can set Account Name APN User Name Password Auth...

Страница 48: ...incoming call Vibration only The phone will vibrate when there is an incoming call Vibra and ring The phone will vibrate and ring when there is an incoming call Vibra then ring The phone will vibrate then ring when there is an incoming call Roaming Displayed when your phone is registered to a network other than your own especially when you re abroad GPRS attach Your phone is connected to the GPRS ...

Страница 49: ...48 Icons symbols Stopwatch Stopwatch has been activated Chat Chatroom has been activated Silent Silent mode has been activated ...

Страница 50: ...phone in a safe place and keep it out of small children s reach Avoid writing down your PIN code Try to remember it instead Switch off the phone and remove the battery if you are going to leave it unused for a long time Change your PIN code after purchasing the phone and to activate call restriction options The design of your phone complies with all applicable laws and regulations However your pho...

Страница 51: ...the applicable safety rules In areas where you are requested to turn off radio transmitting devices such as quarries or other areas where blasting operations are in progress Check with the vehicle manufacturer that electronic equipment used in your vehicle will not be affected by radio energy Pacemakers If you have a pacemaker Always keep the phone more than 15 cm from your pacemaker when the phon...

Страница 52: ...as avoiding unnecessary navigating in the menus will also help to save the battery s energy for longer phoning and stand by performances Battery information Your phone is powered by a rechargeable battery Use specified charger only Do not incinerate Do not deform or open the battery Do not allow metal objects such as keys in your pocket to short circuit the battery contacts Avoid exposure to exces...

Страница 53: ...ially when featuring a metallic finish Be very careful in this case when picking up your phone and also avoid using it with an ambient temperature over 40 C or below 5 C Environmental care Remember to observe the local regulations regarding the disposal of the packaging materials exhausted batteries and old phone and please promote their recycling Philips has marked the battery and packaging with ...

Страница 54: ...ase inform yourself about the local separate collection system for electrical and electronic products Please act according to your local rules and do not dispose of your old products with your normal household waste The correct disposal of your old product will help prevent potential negative consequences for the environment and human health ...

Страница 55: ... at very low temperatures This is normal and does not affect the operation of the phone Take the phone to a warmer place and try again In other cases please contact your phone supplier Your battery seems to over heat You might be using a charger that was not intended for your phone Make sure you always use the Philips authentic accessory shipped with your phone Your phone doesn t display the phone...

Страница 56: ...nu the mobile displays NOT ALLOWED Some features are network and subscription dependent They are only available therefore if the network or your subscription supports them Contact your network operator for more information Your phone is not charging If your battery is completely flat it might take several minutes of pre charge up to 5 minutes in some cases before the charging icon is displayed on ...

Страница 57: ...the headset And you can select auto option in answer mode If this option s status is on your phone will automatically answer the incoming call in 5 or 10 seconds USB cable The USB cable enables high speed communication between your phone and your computer You can then manage the information stored in your phone such as image animation photo video and music You can also use the cable to connect you...

Страница 58: ... VGA Auto exposure Auto control voltage Improve the view effect by adjusting the option menu in the computer such as brightness contrast colour effects saturation sharpness gamma white balance and backlight contrast The actual refresh rate is dependent on the connection speed of your computer and not your phone ...

Страница 59: ...sue by IEEE SA IEEE Std 1528 for the head Tests for SAR have been conducted using recommended operating positions with the mobile phone transmitting at its highest certified power level in all tested frequency bands Although the SAR is determined at the highest certified power level the actual SAR levels of the mobile phone while operating are generally below the maximum SAR value This is because ...

Страница 60: ... from the date of purchase 3 What Will Philips Do if The Product is Not Free From Material Defects in Materials and Workmanship During The Limited Warranty Period During the limited warranty period Philips or its authorized service representative will at its option either repair or replace without charge for parts or labour a materially defective Product with new or refurbished parts or Product an...

Страница 61: ...f Philips You may contact the local Philips office for the location of the nearest authorized service center b The SIM card must be removed from the Product before it is given to Philips Philips assumes no liability for damaged or loss of the SIM card or the data contained therein c If the Product failure is not covered by this limited warranty or this limited warranty is inapplicable void or inva...

Страница 62: ...OSS OF DATA AND CLAIMS BY THIRD PARTIES RESULTING FROM PURCHASE OR USE OF THE PRODUCT TO THE FULLEST EXTENT ALLOWED BY LAW WHETHER OR NOT PHILIPS HAS BEEN ADVISED OF THE POSSIBILTY OF SUCH DAMAGES THESE LIMITATIONS SHALL APPLY NOTWITHSTANDING THE FAILURE OF THE ESSENTIAL PURPOSE OF ANY LIMITED REMEDY This limited warranty represents the complete and exclusive agreement between the Consumer and Phi...

Страница 63: ...ety ETSI EN 60950 1 2001 EMC ETSI EN 301 489 1 V1 6 1 and ETSI EN 301 489 7 V1 3 1 Radio ETSI EN 301 511 V9 0 2 Health EN 50361 2001 IEC 62209 1 2005 We hereby declare that all essential radio test suites have been carried out and that the above named product is in conformity to all the essential requirements of Directive 1999 5 EC The conformity assessment procedure referred to in Article 10 and ...

Отзывы: