background image

ombi 3000

0,5

10

1

1/2

20

35

25

20

15

10

0.5

25

poi
Phkjds

Содержание Combi 3000

Страница 1: ...ombi 3000 0 5 10 11 2 20 35 25 20 15 10 0 5 25 poi Phkjds ...

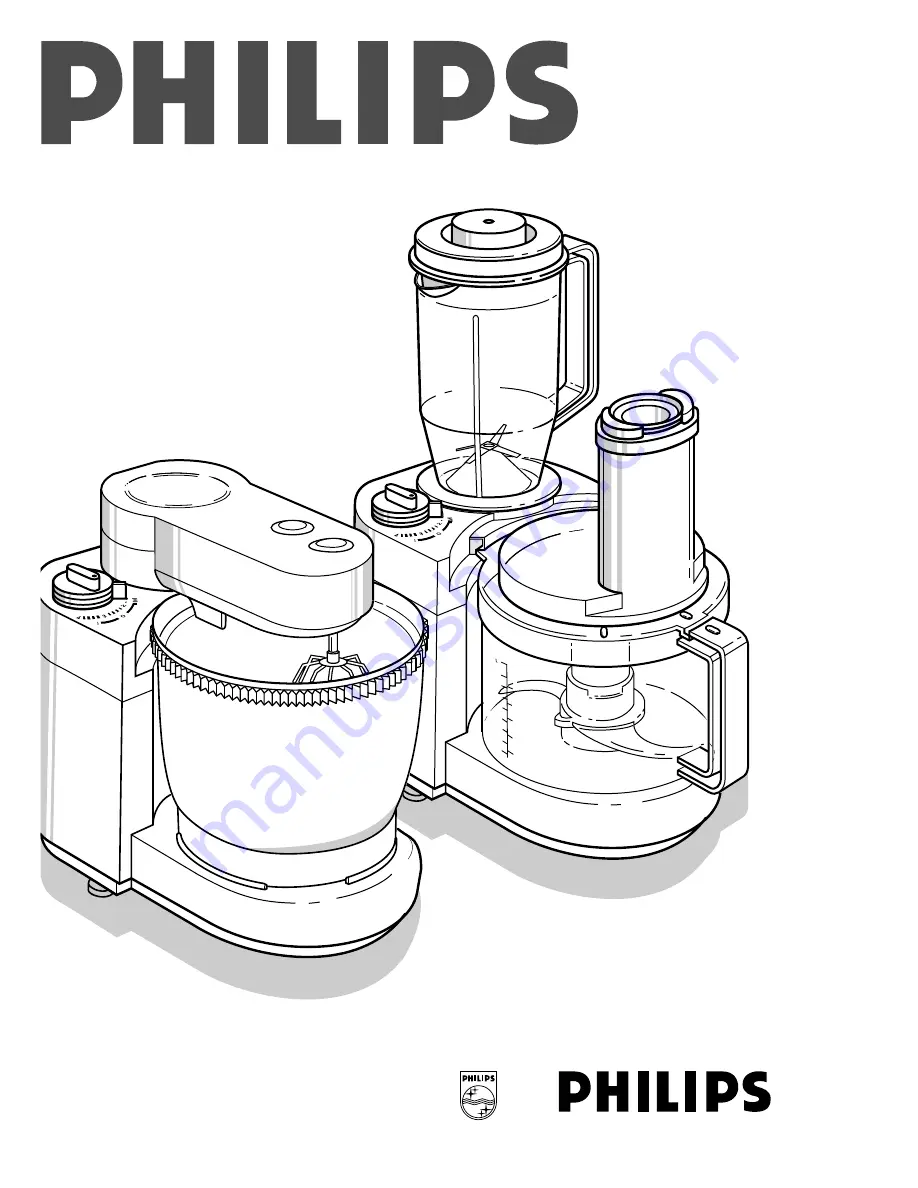
Страница 2: ...English Page 3 Français Page 16 Deutsch Seite 29 Nederlands Pagina 43 Italiano Pagina 56 Português Página 70 2 ...

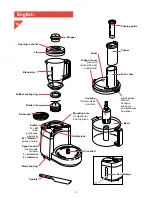
Страница 3: ...o handgrip spacing to guarantee safe operation Bowl Cord storage Cover Ridge of cover locks and unlocks the built in safety lock Coupling for metal blade and discs Lid Blender jar Rubber sealing ring Blade unit Screw cap Switch O off on continuous operation M Moment release stop Speed control continuously variable 1 minimum 4 maximum Spatula Motor housing 1a ...

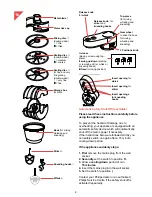
Страница 4: ... the switch to position Contact your Philips dealer or an authorised Philips Service Centre if the safety shut off is activated repeatedly Metal blade Protective cap Slicing disc double sided thin thick Grating disc double sided medium coarse Grating disc for fine and very fine grating double sided very fine fine Storage box for discs Bowl for mixing whisking and kneading Stirrer Kneading hooks ƒ ...

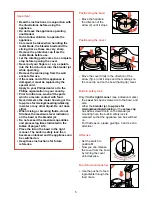
Страница 5: ...fill above the maximum level indication on the bowl or the blender jar Do not exceed the maximum quantities and processing times indicated in the tables of pages 12 14 Place the lid on the bowl in the right manner The built in safety lock then becomes unlocked and the appliance can be switched on Keep these instructions for future reference Positioning the bowl Move the handle in the direction of ...

Страница 6: ... grating disc medium coarse double sided grating disc fine very fine double sided whisk kneading hooks coupling spatula pusher with pushing guide blender accessory storage box for discs stirrer Also available as optional extras Please ask your dealer if the extra accessories are available in this country grating slicing combined disc medium medium grating disc single sided extra fine chipper disc ...

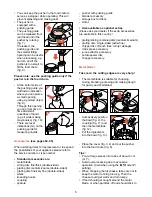
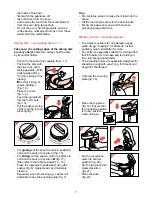
Страница 7: ...switch to position M fig 17 Also refer to the table on pages 12 14 Press the ingredients downwards using the pusher fig 6 Apply steady and moderate pressure Especially when processing e g carrots it is advisable to use the pushing guide fig 7 Tips Pre cut large pieces to make them feed into the chute Fill the food chute evenly for the best results Empty the bowl every now and then when processing ...

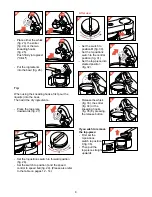
Страница 8: ... switch to position and the speed control to speed 3 4 fig 29 Please also refer to the table on pages 12 14 After use Set the switch to position O fig 30 Set the 3 positions switch to the central position fig 31 Set the top piece into slanted position fig 32 Release the whisk fig 33 the stirrer fig 34 or the kneading hooks fig 35 by pressing the release button If you wish to remove the top piece F...

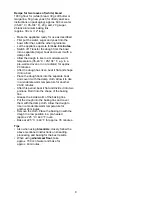
Страница 9: ...fter the dough has risen beat it flat and shape it into a ball Place the dough back into the separate bowl and cover it with the damp cloth Allow it to rise in a moderate warm temperature for another 20 30 minutes After this period beat it flat and divide it into two portions Roll it into the shape of the baking tins Grease the inside walls of the baking tins Put the dough into the baking tins and...

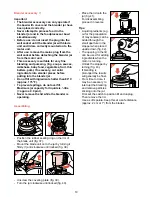
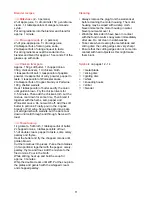
Страница 10: ... liquids is 1 2 litre approx 0 9 pint Never remove the lid while the blender is operating Assembling Position the rubber sealing ring on the rim of the blade unit fig 37 Mount the blade unit on to the jar by turning it firmly anti clockwise until locked fig 38 Unscrew the covering plate fig 39 Turn the jar clockwise until locked fig 40 Place the lid onto the jar fig 41 For disassembling proceed in...

Страница 11: ...coop the paté into a paté pot and garnish with walnuts Let the paté cool down until cold through and through Serve with toast MTomato soup 1 kg tomato 5 dl broth 1 tablespoonful of butter 2 chopped onions 3 tablespoonfuls of flour 11 4 dl double cream pepper to taste some celery parsley and thyme Heat the butter and fry the chopped onions until golden brown Cut the tomatoes into pieces Purée the t...

Страница 12: ...12 ...

Страница 13: ...13 ...

Страница 14: ...14 ...

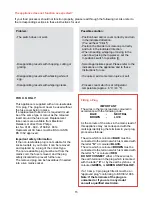
Страница 15: ...available from Electrical Retailers or direct from Philips tel No 0181 689 2166 Ext 8014 Replacement 3A fuses must be BSI or ASTA BS 1362 approved Important safety information If the non rewireable plug is not suitable for the socket outlets in your home it can be removed and replaced by a plug of the correct type The non rewireable plug must be cut from the mains cord the fuse removed and the plu...

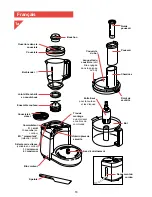
Страница 16: ...rité Bol Rangement du cordon Couvercle du bol Languette du couvercle doit être engagée dans la poignée du bol Entraîneur pour le couteau et les disques Couvercle Bol blender Joint d étanchéité en caoutchouc Ensemble couteau Couvercle à visser Commutateur O arrêt I marche en continu M momentané relâché arrêt Sélecteur de vitesse variable en continu 1 minimum 4 maximum Spatule Bloc moteur 1a ...

Страница 17: ... Veuillez contacter votre revendeur Philips ou un réparateur indépendant agréé Philips en cas de répétition intempestive du dispositif de sécurité automatique Couteau Gaine de protection Disque à trancher réversible I fin épais Disque à râper réversible I moyen gros Disque à râper fin et très fin réversible très fin fin Boîte de rangement des disques Bol Mélangeur Crochets à pétrir ƒ Fouet Bouton ...

Страница 18: ...père de remplissage maximum du bol Ne dépassez pas les quantités maximum et les temps d utilisation indiqués dans les tableaux des pages 25 27 Placez correctement le couvercle du bol avec le bloc moteur pour qu il déverrouille l interrupteur de sécurité permettant ainsi la mise en marche du moteur Gardez ce mode d emploi pour usage ultérieur Mise en place du bol Poussez la poignée dans le sens de ...

Страница 19: ...réversible fouet crochets à pétrir entraîneur mélangeur spatule poussoir avec guide poussoir accessoire mixer coffret de rangement des disques D autres accessoires sont disponibles en option Demandez à votre revendeur si ces accessoires sont disponibles dans votre pays disque double combiné pour émincer râper moyen disque à 1 face utile pour râper extra fin disque coupe frites accessoire presse ag...

Страница 20: ...tion 2 ou 3 et le commutateur sur M fig 17 Voir aussi tableau pages 25 27 Appuyez de façon régulière et modérée sur le poussoir fig 6 Il est conseillé d utiliser le guide poussoir spécialement quand vous préparez des carottes fig 7 Conseils Coupez les aliments grossièrement pour les introduire dans la cheminée de remplissage Remplissez la cheminée de façon régulière pour obtenir de meilleurs résul...

Страница 21: ...e commutateur sur I et le sélecteur de vitesse sur la position 3 4 fig 29 Voir également tableau pages 25 à 28 Après utilisation Mettez le commutateur sur O fig 30 Mettez le commutateur 3 positions au centre fig 31 Relevez le bloc de commande fig 32 Retirez le fouet fig 33 le mélangeur fig 34 ou les crochets fig 35 en appuyant sur le bouton de déverrouillage Si vous désirez retirer le bloc de comm...

Страница 22: ...dant 20 minutes Une fois la pâte levée étalez la et roulez la en boule Remettez la pâte dans un plat et couvrez la avec un torchon humide Laissez la lever à température moyenne pendant encore 20 30 minutes Ensuite étalez la et séparez la en deux portions Roulez la dans la forme des plats de cuisson Graissez l intérieur des plats Mettez la pâte dans les plats de cuisson et couvrez la avec un torcho...

Страница 23: ...in d éviter les débordements Assemblage Mettez en place le joint en caoutchouc sur le bord de l ensemble couteau fig 37 Montez l ensemble couteau sur le bol en tour nant fermement dans le sens inverse des aiguil les d une montre jusqu au verrouillage fig 38 Dévissez le couvercle fig 39 Tournez le bol dans le sens horaire jusqu au verrouillage fig 40 Placez le couvercle sur le bol fig 41 Pour désas...

Страница 24: ...terrine et garnissez de noix Laissez le pâté refroidir uniformément Servez avec des toasts MSoupe à la tomate 1 kg de tomates 5 dl de bouillon 1 cuillère à soupe de beurre 2 oignons hachés 3 cuillères à soupe de farine 11 4 dl de crème double poivre céleri persil et thym Faites fondre le beurre et frire les oignons jusqu à ce qu ils brunissent Coupez les tomates Mixez les avec le poivre le céleri ...

Страница 25: ...25 ...

Страница 26: ...26 ...

Страница 27: ...27 ...

Страница 28: ...ez la crème Solution possible Positionnez le bol et ou le couvercle correctement et tournez dans le sens indiqué Vous entendrez un clic Positionnez le blender ou le bouchon à vis correctement et tournez dans le sens indiqué Quand vous pétrissez fouettez ou mélangez dans le bol ouvert avec le bloc de commande mettez le commutateur 3 posi tions sur III Sélectionnez la vitesse appropriée Référez vous...

Страница 29: ...nsatz Stopfer Einfüllstutzen Haken greift zur Sicherung in den Handgriff Schüssel Kabelfach Deckel der Schüssel Antriebsachse für Messer und Scheiben Deckel des Mixbechers Mixbecher Dichtungsring Messereinheit Schraubdeckel mit Hinweisen für Schalterstellungen und Wahl des Zubehörs Schalter O Aus Ein Dauerbetrieb M Momentschalter Loslassen Aus Geschwindigkeits regler stufenlos regelbar 1 Minimum 4...

Страница 30: ...nden Sie sich an Ihren Philips Händler oder die Philips Service Centre in Ihrem Lande wenn sich das Gerät häufiger automatisch ausgeschaltet Messer Schneidschutz Schneideinsatz zweiseitig dünn dick Raspeleinsatz zweiseitig mittelfein grob Raspeleinsatz für feines und sehr feines Raspeln zweiseitig fein sehr fein Kassette für die Schneide Raspeleinsätze Arbeitsschüssel zum Mixen Kneten und Schlagen...

Страница 31: ...er ab Füllen Sie die Schüssel und den Mixbecher niemals höher als bis zur Maximum Markierung wenn Sie Flüssigkeiten mischen oder rühren Überschreiten Sie nicht die Mengen und die Zeiten die in den Tabellen auf den Seiten 39 bis 41 angegeben sind Setzen Sie den Deckel genau auf die Schüssel Die Sicherheitsverriegelung wird dadurch entriegelt und das Gerät kann eingeschaltet werden Bewahren Sie dies...

Страница 32: ...einsatz fein grob zweiseitig Raspeleinsatz mittel grob zweiseitig Raspeleinsatz fein sehr fein zweiseitig Antriebsachse Aufsatz zum Mixen Kneten und Schlagen Arbeitsschüssel zum Mixen Kneten und Schlagen Schneebesen Knethaken Rühreinsatz Spatel Stopfer mit Stopfereinsatz Mixbecher Kassette für die Schneide Raspeleinsätze Außerdem sind lieferbar Bitte fragen Sie Ihren Händler ob diese Teile in Ihre...

Страница 33: ...en Geschwindig keitsregler auf Position 3 oder 4 und den Schalter auf Position Abb 16 Zum Schneiden stellen Sie den Geschwindig keitsregler auf Position 2 oder 3 und den Schalter auf Position M Abb 17 Vgl die Tabelle auf den Seiten 39 bis 41 Drücken Sie die Zutaten mit dem Stopfer langsam und stetig abwärts Abb 6 Besonders bei der Verarbeitung von Möhren o ä ist die Verwendung des Stopfereinsatzes...

Страница 34: ...erunter Abb 27 Stellen Sie den Schalthebel auf die vordere Position III Abb 28 Stellen Sie den Schalter auf Position und den Geschwindigkeitsregler auf die Position 3 bis 4 Abb 29 vgl die Tabelle auf Seite 39 bis 41 Nach Gebrauch Stellen Sie den Schalter auf die Position O Abb 30 Stellen Sie den Schalthebel auf die mittlere Position II Abb 31 Kippen Sie den Aufsatz hoch Abb 32 Entfernen Sie den Sc...

Страница 35: ...genau so vor wie oben beschrieben Wenn Sie Vollkornmehl verwenden nehmen Sie 700 ml Wasser und backen Sie den Teig ca 40 Minuten lang Rosinenbrot Kastenform 35 cm 1000 g Weizenmehl 2 Päckchen Trockenhefe 1 2 Liter Milch handwarm 80 g Butter oder Margarine weich 160 g Zucker 15 g Salz 1 Ei 400 g Rosinen Knethaken einsetzen Geben Sie zuerst die Milch dann Mehl Butter bzw Margarine Zucker das Ei Hefe...

Страница 36: ...rden wenn die Schüssel und der Deckel der Küchenmaschine richtig aufgesetzt sind Verwenden Sie die Küchenmaschine und den Mixbecher niemals gleichzeitig Vor Gebrauch beachten Stecken Sie den Stecker erst dann in die Steckdose wenn der Mixbecher mit der Messereinheit und dem Deckel fest mit dem Motorgehäuse verbunden ist Der Mixbecher ist zum feinen Mischen und Pürieren geeignet z B für Suppen Soße...

Страница 37: ...M Geflügelleberpastet Ca 150 g weiche Butter 1 gehackte Zwiebel 350 g Geflügelleber 100 ml Hühnerbrühe 1 4 Teelöffel Salz 1 2 Teelöffel Paprika 1 2 Teelöffel Currypulver Pfeffer nach Belieben 1 2 Teelöffel Worcester Sauce 2 Eßlöffel Weinbrand oder Portwein 100 g geschälte Walnüsse Erhitzen Sie 1 Eßlöffel Butter und braten Sie die Zwiebeln goldbraun Braten Sie die Geflügelleber 3 bis 5 Minuten Füge...

Страница 38: ...d sofort nach Gebrauch in warmem Wasser dem Sie etwas Spülmittel zugesetzt haben Reinigen Sie diese Teile nicht in einer Geschirrspülmaschine Geben Sie acht bei der Reinigung des Messers der Messereinheit und des Schneideinsatzes Die Schneiden sind sehr scharf Achten Sie darauf daß die Schneiden nicht mit harten Gegenständen in Berührung kommen die sie schartig und stumpf machen können Symbole auf...

Страница 39: ...39 ...

Страница 40: ...40 ...

Страница 41: ...41 ...

Страница 42: ...ht optimal Lösungsversuch Schüssel und oder Deckel fest in die richtige Richtung drehen Sie hören dann Klick Mixbecher oder Schraubdeckel fest in die angegebene Richtung drehen Beim Mischen Kneten oder Schlagen in offener Schüssel Schalthebel auf die vordere Position III stellen Wählen Sie die richtige Geschwindigkeit nach den Angaben auf dem Gerät oder in der Gebrauchsanweisung Fügen Sie ggf etwa...

Страница 43: ...n deksel past in uitsparing van handgreep voor veiliger gebruik Kom Snoeropberging Deksel Nok van deksel schakelt ingebouwde beveiliging in en uit Koppelstuk voor sikkelmes en schijven Deksel Mengbeker Rubber afsluitring Messenblok Draaideksel Schakelknop O uit aan continu Snelheids regelaar steeds regelbaar 1 minimum 4 maximum M moment Loslaten motor stopt Spatel Motorhuis 1a ...

Страница 44: ...kelaar in stand Neem contact op met uw Philips leverancier of met een erkend Philips Service Centrum als de automatische beveiliging telkens opnieuw in werking treedt Sikkelmes Beschermkap Snijschijf dubbelzijdig dun dik Raspschijf dubbelzijdig middel grof Raspschijf voor fijn en zeer fijn raspen dubbelzijdig zeer fijn fijn Opbergdoos voor schijven Kom voor mengen kneden en kloppen Roerder Kneedha...

Страница 45: ...ok niet af Als u vloeistoffen klopt of mengt vul dan de kom of de mengbeker niet hoger dan de bovenste streep van de maatverdeling Overschrijd niet de maximale hoeveelhe den en bewerkingstijden zoals aangegeven in de tabellen op pag 52 54 Plaats het deksel op de juiste manier op de kom Dan wordt de ingebouwde beveiliging ontgrendeld en kan het apparaat worden ingeschakeld Bewaar deze gebruiksaanwi...

Страница 46: ...ijdig raspschijf fijn zeer fijn dubbelzijdig klopper kneedhaken koppelstuk spatel stamper met aandrukhulpje mengbeker hulpstuk opbergdoos voor schijven roerder Als extra hulpstukken verkrijgbaar Vraag uw leverancier of de extra hulpstukken in uw land leverbaar zijn rasp snijschijf dubbelzijdige combinatieschijf middel middel raspschijf enkelzijdig extra fijn fritesschijf frites koolraap vruchtenpe...

Страница 47: ... de snelheidsregelaar in stand 2 of 3 en de schakelknop in stand M fig 17 Zie ook de tabel op pag 52 54 Druk de ingrediënten rustig en gelijkmatig omlaag met de stamper fig 6 Vooral wanneer u bijvoorbeeld worteltjes verwerkt is het aan te raden het aandrukhulpje te gebruiken fig 7 Tips Snijd te grote stukken voedsel vóór zodat ze in de vulopening passen Vul de opening gelijkmatig voor de beste res...

Страница 48: ... 28 Zet de schakelknop in stand en de snelheids regelaar in stand 3 4 fig 29 Zie ook de tabel op pag 52 54 Na gebruik Zet de schakelknop in stand O fig 30 Zet de 3 standen knop in de middelste stand fig 31 Draai het opzetstuk omhoog fig 32 Maak de klopper fig 33 roerder fig 34 of kneedhaken fig 35 los door de ontgrendelknop in te drukken Als u het opzetstuk van zijn plaats wilt nemen Eerst de 3 st...

Страница 49: ...p een radiator Als het deeg is gerezen slaat u het plat en vormt u het tot een bal Doe het deeg terug in de aparte kom en dek het af met de vochtige doek Laat het opnieuw 20 30 minuten rijzen in een matig warme omgeving Hierna slaat u het deeg plat Maak er twee porties van en rol deze tot de vorm van de bakblikken Vet de binnenkanten van de bakblikken in Doe het deeg in de bakblikken Dek ze af met...

Страница 50: ...oit het deksel terwijl de mengbeker werkt In elkaar zetten Breng de rubber afsluitring aan op de rand van het messenblok fig 37 Draai het messenblok linksom vast aan de mengbeker Stevig vastdraaien fig 38 Draai de afdekplaat los fig 39 Draai de mengbeker vast rechtsom fig 40 Doe het deksel op de mengbeker fig 41 Het verwijderen verloopt in omgekeerde volgorde en richting Tips Als u het dekseltje o...

Страница 51: ...walnoten Laat de pastei door en door koud worden Serveer met toastjes MTomatensoep 1 kg tomaten 5 dl bouillon 1 eetlepel boter 2 gehakte uien 3 eetlepels bloem 1 dl slagroom peper naar smaak takjes selderij peterselie en tijm Smelt de boter en fruit de gehakte uien goudbruin Snijd de tomaten in stukken Pureer de tomaat in twee porties samen met bouillon peper selderij peterselie tijm en bloem Doe ...

Страница 52: ...52 ...

Страница 53: ...53 ...

Страница 54: ...54 ...

Страница 55: ...niet optimaal Mogelijke oplossing Kom en of deksel goed plaatsen en zo ver mogelijk draaien in de aangegeven richting U hoort dan Klik Mengbeker of draaideksel goed plaatsen en zo ver mogelijk draaien in de aangegeven richting Bij mengen kneden of kloppen in de open kom met behulp van het opzetstuk zet de 3 standen knop in stand Kies de juiste snelheid Zie de aanwijzingen op het apparaat en in dez...

Страница 56: ...tire la sicurezza Contenitore Coperchio Linguetta del coperchio per bloccare e sbloccare il dispositivo di sicurezza incorporato Adattatore per bilama ricurva e dischi Coperchio Vaso frullatore Guarnizione di gomma Lama Coperchio a vite Interruttore O spento I acceso M posizione di funzionamento a intermittenza Regolazione della velocità continuamente variabile 1 velocità minima 4 velocità massima...

Страница 57: ...Centro di Assistenza Philips Bilama ricurva Cappuccio di protezione Disco per affettare da usare da entrambi i lati sottile spesso Disco per grattugiare da usare da entrambi i lati medio grosso Disco per grattugiare da usare da entrambi i lati sottile o extrasottile extra fine fine Scatola per dischi Contenitore per mescolare sbattere e impastare Agitatore Ganci per impasto ƒ Frusta Pulsante di ri...

Страница 58: ...uperate l indicazione del livello massimo indicato Non superate le quantità massime e i tempi indicati sulla tabella pagg 66 67 e nelle ricette Sistemate in modo corretto il coperchio sul contenitore Solo in questo modo il dispositivo di sicurezza incorporato si sblocca e l apparecchio può essere messo in funzione Conservate queste istruzioni per ulteriore consultazione Per montare il contenitore ...

Страница 59: ...ni del vostro apparecchio ricordate di fornire il rispettivo numero di codice Gli accessori standard sono bilama ricurva disco per affettare sottile grosso da usare su entrambi i lati disco per grattugiare medio grosso da usare su entrambi i lati disco per grattugiare fine extra fine da usare su entrambi i lati frusta ganci per impastare adattatore spatola pestello con guida pestello frullatore sc...

Страница 60: ...estello nell apertura di inserimento e pre mete delicatamente fig 6 Per grattugiare è preferibile selezionare una velocità di 3 o 4 e posizionare l interruttore su I fig 16 Per affettare vi consigliamo di far funzionare l apparecchio a velocità 2 o 3 con l interruttore su M fig 17 fate riferimento alla tabella illustrata a pagg 66 67 Premete gli ingredienti verso il basso usando il pestello fig 6 ...

Страница 61: ...ltri ingredienti quando l apparecchio è già in funzione Abbassare l unità superiore fig 27 Il pulsante a tre posizioni dev essere spostato in avanti fig 28 Spostare l interruttore su I e impostare la velocità 3 4 fig 29 fate anche riferimento alla tabella illustrata a pagg 66 67 Dopo l uso Riportate l interruttore su O fig 30 Spostate il pulsante a tre posizioni al centro fig 31 Sollevate leggerme...

Страница 62: ...ate lievitare l impasto a temperatura moderata 35 40 C ad esempio nel forno precedentemente riscaldato o sul calorifero per circa 20 minuti Quando l impasto sarà lievitato lavoratelo rapidamente e fatene una palla Rimettete l impasto nella terrina e ricopritelo con il panno umido Lasciatelo lievitare per altri 20 30 minuti a temperatura moderata Trascorso tale periodo dividetelo in due porzioni Im...

Страница 63: ... vaso in senso orario finché non si blocca fig 40 Mettete il coperchio sul vaso fig 41 Per smontare procedete al contrario Consigli Gli ingredienti liquidi es l olio per la maionese possono essere versati dal foro che si trova sul tappo posizionato al contrario fig 42 L apertura nel coperchio può essere utile per aggiungere altri ingredienti mentre il frullatore è in funzio ne Togliete il tappo ru...

Страница 64: ...fate cuocere nella parte centrale del forno precedentemente riscaldato Temperatura del forno 150 C Tempo di cottura 70 90 minuti MTorta alle fragole 750 g di fragole 2 cucchiai di zucchero 2 cucchiai di kirsch o Grand Marnier Pasta 250 g di farina 125 g di burro 60 g di zucchero 1 pizzico di sale 1 uovo Crema 300 cc di latte 2 uova 75 g di zucchero 50 g di farina 25 g di burro Sistemate i ganci da...

Страница 65: ...o dopo averli utilizzati Non metteteli in lavastoviglie Fate attenzione quando pulite la bilama ricurva e il disco per affettare grattugiare le lame sono molto taglienti Assicuratevi che i bordi taglienti degli accessori non urtino oggetti duri Ciò li potrebbe danneggiare diminuendo la loro efficienza L ingranaggio della frusta può essere facilmente smontato per la pulizia Simboli a pagg 66 67 bil...

Страница 66: ...66 ...

Страница 67: ...67 ...

Страница 68: ...68 ...

Страница 69: ...tore o il coperchio a vite e ruotate nella direzione indicata Mentre impastate o mescolate a contenitore aperto con l unità superiore il pulsante a tre posizioni dev essere su III Selezionate la giusta velocità Fate riferimento alle istruzioni sull apparecchio e a quelle sulle istruzioni Aggiungete del sale o del succo di limone La panna dev essere usata a temperatura di frigorifero circa 6 C L ap...

Страница 70: ...a para garantir a segurança do funcionamento Tigela Compartimento do cabo Tampa Saliência da tampa bloqueia e desbloqueia o fecho de segurança incorporado Acoplador para a lâmina e discos Tampa Copo liquidificador Anel vedante de borracha Lâmina Tampa de enroscar Comutador O desligado Ligado funcionamento contínuo M Momentâneo solto parar Comando da velocidade continuamente variável 1 mínimo 4 máx...

Страница 71: ...da de parede 5 Coloque o comutador na posição I Contacte o seu fornecedor Philips ou um Centro de Assistência Philips se o corte automático de segurança se ligar repetidamente Lâmina de metal Capa de protecção Disco de cortar face dupla fino grosso Disco de ralar face dupla médio grosso Disco de ralar fino e muito fino face dupla muito fino fino Caixa para guardar discos Tigela para misturar bater...

Страница 72: ...o encha a tigela ou o copo liquidificador para além da indicação de nível máximo Não exceda as quantidades máximas e os tempos de processamento indicados nas tabelas pág 79 82 Coloque a tampa da tigela na posição correcta Deste modo o fecho de segurança incorporado ficará solto e o aparelho poderá ser ligado Guarde estas instruções para uma consulta futura Colocação da tigela Desloque a pega na di...

Страница 73: ...e os números de referência ou o número do tipo Os acessórios standard são lâmina de metal disco de corte fino grosso de dupla face disco para ralar médio grosso de dupla face disco para ralar fino muito fino de dupla face misturador varas para amassar acoplador espátula pressor com condutor acessório de mistura caixa para os discos batedor Também disponíveis como acessórios extra Queira por favor ...

Страница 74: ...dor na posição I fig 16 Para cortar coloque o comando de velocidade na posição 2 ou 3 e o comutador na posição M fig 17 Consulte igualmente a tabela nas últimas páginas 79 82 Empurre os ingredientes para baixo com o pressor fig 6 Faça uma pressão moderada Especialmente quando estiver a processar por exemplo cenouras é aconselhável utilizar o condutor do pressor fig 7 Sugestões Corte previamente os...

Страница 75: ...fig 28 Coloque o comutador na posição I e o comando de velocidades na posição 3 4 fig 29 Por favor consulte a tabela nas páginas 79 82 Depois de utilizar Coloque o comutador na posição O fig 30 Coloque o comutador de 3 posições na posição do meio fig 31 Coloque a peça de cima em posição inclinada fig 32 Solte o misturador fig 33 o batedor fig 34 ou as varas de amassar fig 35 carregando no botão de...

Страница 76: ...rno pré aquecido durante cerca de 20 minutos Depois da massa ter levedado bata a e estenda a fazendo depois uma bola Volte a colocar a massa na tigela e tape a com um pano húmido Deixe levedar numa temperatura moderada durante cerca de 20 a 30 minutos Passado este período de tempo bata a e estenda a Divida em duas porções Enrole com o formato das formas Unte o interior das formas Coloque a massa n...

Страница 77: ...ador está em funcionamento Montagem Coloque o anel vedante de borracha no rebordo da unidade de lâminas fig 37 Instale a unidade de lâminas no copo rodando o com firmeza no sentido contrário ao dos ponteiros do relógio até ficar preso fig 38 Desenrosque a tampa da cobertura fig 39 Rode o copo no sentido dos ponteiros do relógio até prender fig 40 Coloque a tampa no copo fig 41 Para desmontar proce...

Страница 78: ...e o paté para uma taça adequada para o efeito e guarneça o com as nozes Deixe que arrefeça muito bem e sirva com tostas MSopa de tomate 1 kg de tomate 5 dl de caldo 1 colher de sopa de manteiga 2 cebolas picadas 3 colheres de sopa de farinha de trigo 1 1 4 de natas pimenta aipo salsa e tomilho Aqueça a margarina e frite as cebolas picadas até ficarem bem louras Corte o tomate em pedaços e faça um ...

Страница 79: ...79 ...

Страница 80: ...80 ...

Страница 81: ...81 ...

Страница 82: ...ar bater ou misturar na tigela aberta usando a peça de cima coloque o comutador de 3 posições na posição III Seleccione a velocidade apropriada Consulte as indicações do aparelho e deste manual Se necessário adicione um pouco de sumo de limão ou de sal De preferência bata as natas saídas do frigorífico a uma temperatura de aproximadamente 6 C O aparelho não funciona convenientemente Se o seu Robot...

Отзывы: