background image

3

English

EN

Contents

1 Important 

4

Safety 4
Notice 4

2  Your in-car entertainment system 

6

Introduction 6
What’s in the box 

6

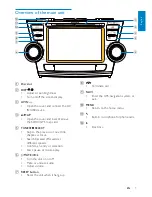
Overview of the main unit 

7

3 Get 

started 

8

Install the car audio 

8

Turn on 

11

Set date and time 

11

4 Use 

map 

12

Upgrade the map 

12

5  Listen to radio 

13

Tune to a radio station 

13

Store radio stations in memory 

14

Tune to a preset station 

14

Play with RDS (Optional) 

14

6 Play 

17

Load discs 

17

Connect USB device 

17

Insert USB or SD/MMC card 

18

Play/Pause 18
Skip/search 18
Search within a title/folder 

18

Repeat 19
Repeat a section 

19

Random play 

20

Select audio language 

20

Select audio mode 

20

Select subtitle language 

20

Rotate pictures 

20

Zoom 20
Select slide show duration 

21

7  Play with Bluetooth device 

21

Pair the Bluetooth-enabled devices 

21

Make a call 

22

Receive call 

22

Listen to music from Bluetooth device 

23

Adjust Bluetooth settings 

23

8 Adjust 

sound 

24

Adjust volume 

24

Mute 24
Select preset equalizer 

24

Adjust fader/balance 

24

Set Dynamic Bass Boost (DBB) 

25

9 Adjust 

settings 

25

Display system setup menu 

25

Adjust general settings 

25

Adjust sound settings 

26

Adjust video settings 

27

Adjust Bluetooth settings 

27

Adjust language settings 

28

Adjust volume settings 

28

Adjust DVD rating 

29

10 Others 

29

Listen to other devices 

29

Reset 29
Remove the unit 

30

Replace fuse 

30

11 Product information 

31

12 Troubleshooting 

32

About Bluetooth device 

33

13 Glossary 

34

Содержание CID3687

Страница 1: ...Register your product and get support at www philips com welcome EN User manual ES Manual del usuario PT BR Manual do Usuário ZH HK Ԛ ʹ ZH CN Ⴌ߀ Ҭ CID3687 ...

Страница 2: ......

Страница 3: ... Select audio mode 20 Select subtitle language 20 Rotate pictures 20 Zoom 20 Select slide show duration 21 7 Play with Bluetooth device 21 Pair the Bluetooth enabled devices 21 Make a call 22 Receive call 22 Listen to music from Bluetooth device 23 Adjust Bluetooth settings 23 8 Adjust sound 24 Adjust volume 24 Mute 24 Select preset equalizer 24 Adjust fader balance 24 Set Dynamic Bass Boost DBB 2...

Страница 4: ...environment and human health 1 Important Safety Read and understand all instructions before you use the apparatus If damage is caused by failure to follow instructions the warranty does not apply Use of controls or adjustments or performance of procedures other than herein may result in hazardous radiation exposure or other unsafe operation This unit is designed for negative ground earth 12 V DC o...

Страница 5: ...rm yourself about the local rules on separate collection of batteries The correct disposal of batteries helps prevent potentially negative consequences on the environment and human health This product complies with the radio interference requirements of the European Community The making of unauthorized copies of copy protected material including computer programs files broadcasts and sound recordin...

Страница 6: ... Your in car entertainment system Congratulations on your purchase and welcome to Philips To fully benefit from the support that Philips offers register your product at www philips com welcome Introduction With the car entertainment system you can quickly find routine through the navigation system enjoy audio video JPEG pictures from DVD VCD or CD USB devices SD SDHC MMC cards External devices liste...

Страница 7: ...splay c AV IN Open the cover and connect the AV IN USB device d MAP Open the cover and insert remove the SDHC GPS map card e TUNE SELECT Skip to the previous or next title chapter or track Search backward forward at different speeds Confirm an entry or selection Start pause or resume play f MUTE VOL Turn the unit on or off Mute or unmute audio Adjust volume g RESET button Reset the unit when it han...

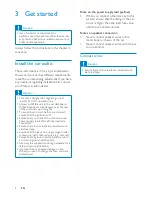
Страница 8: ...f your car has different requirements make the corresponding adjustment If you have any questions regarding installation kits consult your Philips car audio dealer Caution This unit is designed for negative ground earth 12 V DC operation only Always install this unit in the car dashboard Other locations can be dangerous as the rear of the unit heats up during use To avoid short circuit before you ...

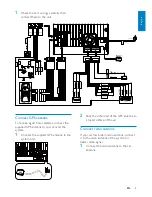
Страница 9: ...r s wirings carefully then connect them to the unit Connect GPS antenna To receive signal from satellites connect the supplied GPS antenna to your car and the system 1 Connect the supplier GPS antenna to the system first GPS antenna Amplifier Radio antenna White White Red Red Brown Yellow Black Yellow Green Blue Yellow Blue white Pink Green white Gearbox AV system AUX Red White Yellow Touch control...

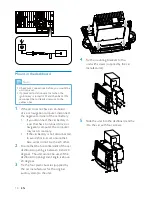
Страница 10: ...ave an on board drive or navigation computer disconnect the negative terminal of the car battery If you disconnect the car battery in a car that has an on board drive or navigation computer the computer may lost its memory If the car battery is not disconnected to avoid short circuit ensure that bare wires do not touch each other 2 Ensure that the horizontal slant of the car dashboard opening is b...

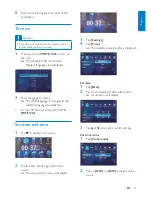
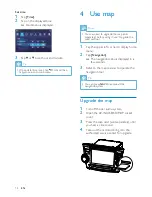
Страница 11: ...l of the car battery Turn on Caution Risk of road accidents Never watch video or adjust settings while you drive 1 Press and hold MUTE VOL to turn on the unit The available OSD On Screen Display languages are displayed 2 Tap a language to select The OSD language is changed to the selected language immediately To turn off the unit press and hold MUTE VOL Set date and time 1 Tap to display main menu...

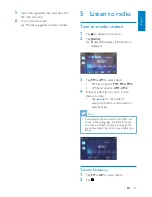
Страница 12: ...on tool Tip You can press NAVI to enter exit the navigation system Upgrade the map 1 Turn off the car audio system 2 Open the AV IN USB SD MAP socket cover 3 Press the map card sold separately until you hear a click sound 4 Take out the card and bring it to the authorized service center for upgrade Set time 1 Tap Time 2 Tap on the displayed time A submenu is displayed 3 Tap or to set hour and minu...

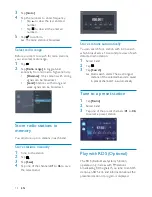
Страница 13: ...tion by step Tap or for more than 1 second to tune to a radio station automatically Note If simplified Chinese is selected as OSD on screen display language the RDS functions see Play with RDS Optional on page 15 are not available The tuner screen displays as below Tune by frequency 1 Tap FM or AM to select band 2 Tap 5 Insert the upgraded map card back into the map card slot 6 Turn on the car audi...

Страница 14: ...RDS station an RDS icon and information about the presenter station or program is displayed 3 Tap Goto 4 Tap the numbers to enter frequency Tap to clear the last entered number Tap to clear all the entered numbers 5 Tap to confirm The radio station is broadcast Select radio range Before you start to search for radio stations you can select radio range 1 Tap 2 Tap Radio range to toggle tuner sensiti...

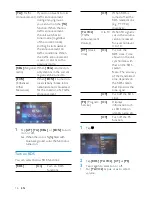
Страница 15: ... signal but with the same program identification Select program type Before tuning to RDS stations you can select program type and let the unit search only for programs of the selected category 1 Tap FM band to select FM1 FM2 or FM3 2 Tap PTY List of available program type is displayed 3 Tap or to display the next previous screen 4 Tap on the selected program and then tap to activate searching Item...

Страница 16: ...ap or to select volume TA Traffic Announcement If you do not want to miss traffic announcement during enjoying music you can turn on the TA function When there is traffic announcement the unit switches to tuner mode regardless of the current mode and begins to broadcast the announcement on traffic conditions When the traffic announcement is over it returns to the previous mode REG Regional radio When R...

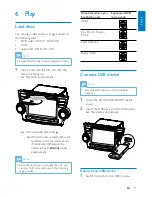
Страница 17: ...ource 6 Play Load discs You can play video audio or images stored on the following discs DVD video DVD R DVD RW VCD Audio CD CD R CD RW Note Ensure that the disc contains playable content 1 Insert a disc into the disc slot with the label side facing up Play starts automatically To remove the disc press When the disc is ejected the unit switches to the previous source if connected Otherwise the uni...

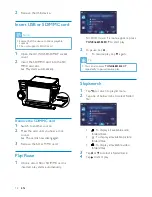
Страница 18: ...l available video folders files 3 Tap or to select a folder track 4 Tap to start play 2 Remove the USB device Insert USB or SD MMC card Note Ensure that the device contains playable content The unit supports SDHC card 1 Open the AV IN USB SD MAP socket cover 2 Insert the SD MMC card into the SD MMC card slot Play starts automatically Remove the SD MMC card 1 Switch to another source 2 Press the car...

Страница 19: ... video file repeat A B 1 During play tap anywhere except for the upper left corner to display menu on the screen if necessary 2 Tap to display the 2nd menu if necessary 3 Tap repeatedly to mark Search within a title folder Direct search 1 Tap anywhere except for the upper left corner to display menu on the screen if necessary 2 Tap The search screen is displayed For video files tap first then tap 3 T...

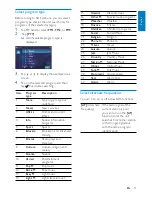
Страница 20: ...cture Repeat A the start of the section to repeat Repeat A B the end of the section to repeat The selected section plays repeatedly 4 To exit A B repeat mode tap repeatedly until Repeat A B off is displayed Random play You can play audio tracks files in random order 1 During play tap repeatedly to turn random play on or off is highlighted start random play turns gray cancel random play Select audio...

Страница 21: ...nit familiarize yourself with the Bluetooth capabilities of the device Compatibility with all Bluetooth devices is not guaranteed Any obstacle between this unit and a Bluetooth device can reduce the operational range Keep this unit away from any other electronic device that may cause interference 1 Turn on the Bluetooth function on the device 2 Search for Bluetooth device with the device 3 Select ...

Страница 22: ...hear your incoming call you can switch the call to the mobile Disconnect Bluetooth devices 1 To disconnect one device tap red green is displayed Tip The device will also be disconnected when the device is moved beyond the operational range If you want to reconnect the device to the unit place it within the operational range If you do not want to reconnect the device to the unit automatically tap A...

Страница 23: ...ed on the device through the unit If the device also supports AudioVideo Remote Control Profile AVRCP profile you can use the control on the unit to play music stored in the device 1 Pair the phone with the unit 2 Tap to return to home menu 3 Tap Bluetooth The Bluetooth menu is displayed 4 Start to play music stored in the device If your device supports AVRCP 1 Tap 2 Tap to start play Adjust Bluetoo...

Страница 24: ... except for the upper left corner to display menu on the screen if necessary 2 Tap 3 Tap Below options are displayed 4 Tap or to select subwoofer volume Sub subwoofer volume 0 to 24 8 Adjust sound Adjust volume 1 Turn MUTE VOL button clockwise to increase volume 2 Turn MUTE VOL button anti clockwise to reduce volume Mute 1 During play press MUTE VOL To restore the sound press MUTE VOL again Tip Yo...

Страница 25: ...is completed tap first and then tap to return to main menu Adjust general settings 1 Tap General if necessary 5 Tap F R L or R to adjust fader balance value Fade fader range 24 to 24 F front speaker R rear speaker Balance balance range 24 to 24 L left speaker R right speaker 6 Tap to exit Set Dynamic Bass Boost DBB 1 Tap to toggle between the settings DBB on The icon is illuminated DBB off default ...

Страница 26: ...g others Off The DRC function is off 2 Tap or to highlight a setting 3 Tap on the option to display select an option General settings Options Description Radio region USA S Amer 1 Arabia China S Amer 2 Europe Korea OIRT Select one that matches your location Radio range Local Only stations with strong signals can be broadcast Distance Stations with strong and weak signals can be broadcast Blackout ...

Страница 27: ...nually 3 Tap to exit Adjust video settings 1 Tap Video 2 Tap an option repeatedly to select Video settings Options Description Aspect ratio Full For widescreen display Normal For normal display Video input Auto The correct format is set automatically Select this option if you are not sure which format should be selected NTSC Used in the United States Canada Japan Mexico the Philippines South Korea...

Страница 28: ...gn a value 0 to 12 When you switch to the source the volume increases automatically 4 Tap to exit Pairing code View code for pairing the unit with other Bluetooth devices 3 Tap to exit Adjust language settings 1 Tap Language 2 Tap an option repeatedly to select Language settings Options Description OSD English Select on screen display language ࡩ ᇓ໗ ْ ᇓ໗ Español Português DVD audio English Select D...

Страница 29: ... the RESET button with a ball point pen or similar tool AV IN Adjust DVD rating 1 Tap DVD rating 2 Tap an option repeatedly to select DVD rating Options Description Set password Set password to restrict the play of discs The default password is 0000 Rating level Kid safe Acceptable for children G Acceptable for general viewers PG Parental guidance suggested PG 13 Unsuitable for children under age ...

Страница 30: ...tion In such case consult your Philips dealer Tip When the unit is reset all the settings remain unchanged Remove the unit To repair replace fuse or replace the unit remove it from the dashboard 1 Screw off the four 4 screws on the left right side of the unit 2 Pull the unit out from the dashboard Replace fuse If there is no power the fuse may be damaged and need to be replaced 1 Take out the unit...

Страница 31: ...Codec SBC Sub Band Codec Compatible USB devices USB flash memory USB 2 0 or USB1 1 USB flash players USB 2 0 or USB1 1 memory cards SD MMC SDHC 11 Product information Note Product information is subject to change without prior notice General Power supply 12 V DC 11 V 16 V negative ground Fuse 15 A Suitable speaker impedance 4 8 Maximum power output 50 W x 4 channels Continuous power output 24 W x 4 ...

Страница 32: ...the center Disc is defective Try another disc incompatible disc is used Try another disc Disc rating exceeds the restrict setting Change the rating settings to lower one Disc region code is not compatible with the unit Use disc with proper region code No image Parking brake wire connection is incorrect Check the parking wiring Supported formats USB or memory file format FAT16 FAT32 MP3 bit rate dat...

Страница 33: ...too weak Select other stations with stronger signals Check the connection of the car antenna Change broadcast from stereo to mono Preset stations lost Battery cable is not correctly connected Connect the battery cable to the terminal that is always live Fuse is broken The Fuse type is incorrect Replace it with a 15A fuse Speaker wire or power wire is grounded Check the connections Display show ERR...

Страница 34: ...hat is meant to allow mobile devices to share information and applications without the worry of cables or interface incompatibilities The name refers to a Viking King who unified Denmark Operate at 2 4GHz For more information see www bluetooth com M MMC MultimediaCard A type of memory card with a flash memory MP3 A file format with a sound data compression system MP3 is the abbreviation of Motion Pic...

Страница 35: ......

Страница 36: ... 2010 Koninklijke Philips Electronics N V All rights reserved CID3687_00_UM_V1 0 ...

Отзывы: