background image

GC4700 SERIES

Содержание Azur Ionic GC4700 Series

Страница 1: ...GC4700 SERIES ...

Страница 2: ...2 ...

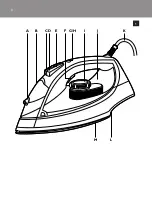
Страница 3: ...3 A B C D E G H F I M L J K 1 ...

Страница 4: ...4 ...

Страница 5: ...GC4700 SERIES English 6 Deutsch 13 Français 21 Italiano 29 Nederlands 37 ...

Страница 6: ... If the mains cord is damaged you must have it replaced by Philips a service centre authorised by Philips or similarly qualified persons in order to avoid a hazard Never leave the appliance unattended when it is connected to the mains This appliance is not intended for use by persons including children with reduced physical sensory or mental capabilities or lack of experience and knowledge unless ...

Страница 7: ...ged 2 Set the steam control to position 0 no steam Fig 2 3 Open the cap of the filling opening Fig 3 4 Tilt the iron backwards and fill the water tank with tap water up to the maximum level with the filling cup Fig 4 Do not fill the water tank beyond the MAX indication Do not put perfume vinegar starch descaling agents ironing aids or other chemicals in the water tank 5 Close the cap of the fillin...

Страница 8: ...apter Preparing for use section Selecting temperature and steam setting Steam ironing Note The iron may give off some smoke when you use it for the first time This ceases after a short while 1 Make sure that there is enough water in the water tank 2 Set the required ironing temperature see chapter Preparing for use section Selecting temperature and steam setting Fig 7 3 Set the appropriate steam s...

Страница 9: ... Fig 15 Drip stop This iron is equipped with a drip stop function the iron automatically stops producing steam when the temperature is too low to prevent water from dripping out of the soleplate When this happens you may hear a sound Automatic shut off function The automatic shut off function automatically switches off the iron if it has not been moved for a while Specific types only The tank ligh...

Страница 10: ...n your area is very hard i e when flakes come out of the soleplate during ironing use the Calc Clean function more frequently 1 Fill the water tank to the maximum level Do not put vinegar or other descaling agents in the water tank 2 Set the temperature dial to MAX Fig 18 3 Put the plug in an earthed wall socket 4 Unplug the iron when the temperature light goes out 5 Hold the iron over the sink Pu...

Страница 11: ...work properly first check the list below If the problem is not mentioned in this list the appliance probably has a defect In that case we advise you to take the appliance to your dealer or to an authorised Philips service centre Problem Possible cause Solution The iron is plugged in but the soleplate is cold There is a connection problem Check the mains cord the plug and the wall socket The temper...

Страница 12: ...ank before you store the iron Store the iron on its heel Flakes and impurities come out of the soleplate during ironing Hard water forms flakes inside the soleplate Use the Calc Clean function one or more times see chapter Cleaning and maintenance section Using the Calc Clean function The red auto off light flashes specific types only The automatic shut off function has switched off the iron see c...

Страница 13: ...bnahme des Geräts ob die auf demTypenschild angegebene Betriebsspannung mit der örtlichen Netzspannung übereinstimmt Benutzen Sie das Gerät nicht wenn der Netzstecker das Netzkabel oder das Gerät selbst beschädigt ist oder wenn das Gerät heruntergefallen ist bzw wenn Flüssigkeit aus dem Gerät austritt Ist das Netzkabel defekt darf es nur von einem Philips Service Center oder einer von Philips auto...

Страница 14: ... Den Wasserbehälter füllen Zu verwendende Wasserart Sie können zum Füllen des Wasserbehälters normales Leitungswasser verwenden Tipp Wenn das Leitungswasser in Ihrer Gegend sehr hart ist empfiehlt es sich Leitungswasser und destilliertesWasser zu gleichenTeilen oder ausschließlich destilliertesWasser zu verwenden 1 Ziehen Sie den Netzstecker aus der Steckdose 2 Stellen Sie den Dampfregler auf 0 ke...

Страница 15: ...fordern etwa mit synthetischen Stoffen 4 Wählen Sie die gewünschte Dampfeinstellung Siehe Tabelle Temperatur und Dampfeinstell ungen Abb 8 Hinweis Vergewissern Sie sich dass diese Einstellung zur gewähltenTemperatur passt 5 Stecken Sie den Netzstecker in eine geerdete Steckdose Die gelbe Temperaturanzeige leuchtet auf Abb 9 6 Wenn die gelbe Temperaturanzeige erloschen ist sollten Sie noch einen Mo...

Страница 16: ...pSteam Funktion nicht bei einer niedrigen Bügeltemperatur und oder ohne Dampfeinstellung Das Bügeleisen nimmt jedoch keinen Schaden wenn die Funktion bei niedriger Bügeltemperatur ohne Dampf aktiviert bleibt Hinweis Der Ausstoß an ionisierendem DeepSteam Dampf ist je nach Bügeltemperatur unterschiedlich stark Produktmerkmale Sprühfunktion Sie können die Sprühfunktion zum Anfeuchten der Wäsche verw...

Страница 17: ...das Bügeleisen auf den Hitzeschutz für empfindliche Textilien hörbares Einrasten Abb 17 Reinigung und Wartung Ziehen Sie den Netzstecker aus der Steckdose stellen Sie den Dampfregler auf Position 0 und lassen Sie das Bügeleisen vor dem Reinigen abkühlen Geben Sie keinen Essig oder andere Entkalkungsmittel in den Wasserbehälter Nach dem Bügeln 1 Wischen Sie Kalkpartikel und andere Ablagerungen mit ...

Страница 18: ...eicht über ein altes Tuch um Wasserflecken von der Bügelsohle zu entfernen 4 Lassen Sie das Bügeleisen abkühlen bevor Sie es wegstellen Aufbewahrung 1 Stellen Sie den Dampfregler auf 0 ziehen Sie den Netzstecker aus der Steckdose und lassen Sie das Bügeleisen abkühlen 2 Entleeren Sie den Wasserbehälter und stellen Sie das Bügeleisen aufrecht auf einer stabilen Fläche ab Abb 20 3 Wickeln Sie das Ne...

Страница 19: ...ampfeinstellung vonl oder siehe Kapitel Für den Gebrauch vorbereiten Abschnitt Temperatur und Dampfeinstellung wählen Das Bügeleisen ist nicht heiß genug bzw die Tropf Stopp Funktion wurde aktiviert Wählen Sie eine Bügeltemperatur die für das Dampfbügeln geeignet ist 2 bis MAX Stellen Sie das Bügeleisen aufrecht und warten Sie bis die gelbeTemperaturanzeige erlischt bevor Sie mit dem Bügeln beginn...

Страница 20: ...er Calc Clean Funktion Die rote Kontrollanzeige der Abschaltautomatik blinkt nur bestimmte Gerätetypen Die automatische Endabschaltung hat das Bügeleisen ausgeschaltet siehe Kapitel Produktmerkmale Bewegen Sie das Bügeleisen hin und her um die Abschaltfunktion zu deaktivieren Die rote Kontrollanzeige erlischt Die blaue Kontrollanzeige am Wasserbehälter blinkt nur bestimmte Gerätetypen Die Abschalt...

Страница 21: ... vérifiez que la tension indiquée sur la plaque signalétique correspond à la tension secteur locale N utilisez pas l appareil si la fiche le cordon d alimentation ou l appareil lui même est endommagé ou s il est tombé et ou si de l eau s en écoule Si le cordon d alimentation est endommagé il doit être remplacé par Philips un Centre Service Agréé Philips ou un technicien qualifié afin d éviter tout...

Страница 22: ...oir Type d eau préconisé Vous pouvez utiliser de l eau du robinet pour remplir le réservoir Conseil Si l eau du robinet dans votre région est très calcaire il est conseillé de la mélanger avec de l eau déminéralisée ou d utiliser de l eau déminéralisée 1 Assurez vous que l appareil est débranché 2 Réglez la commande de vapeur sur la position 0 pas de vapeur fig 2 3 Ouvrez le bouchon de l orifice d...

Страница 23: ...nstant avant de commencer à repasser Le voyant de température s allume de temps en temps pendant le repassage Utilisation de l appareil Repassage sans vapeur 1 Réglez la commande de vapeur sur la position 0 pas de vapeur 2 Sélectionnez la température de repassage recommandée voir le chapitre Avant utilisation section Réglages de la température et de la vapeur Repassage à la vapeur Remarque Lors de...

Страница 24: ...peur émis par la pointe à vapeur additionnelle spéciale permet d éliminer les faux plis Il améliore la distribution de la vapeur vous pouvez ainsi atteindre les moindres recoins La fonction Jet de vapeur peut être utilisée uniquement à des températures situées entre 3 et MAX 1 Assurez vous qu il y a suffisamment d eau dans le réservoir 2 Appuyez sur le bouton Effet pressing puis relâchez le fig 14...

Страница 25: ...pour nettoyer la semelle 2 Nettoyez la partie supérieure du fer à repasser avec un chiffon humide 3 Rincez régulièrement le réservoir avec de l eau Videz le réservoir après l avoir rincé Système anticalcaire double action Ce système est constitué d une tablette anticalcaire située dans le réservoir et de la fonction anticalcaire 1 La tablette anticalcaire empêche l accumulation de dépôts sur les é...

Страница 26: ...uyez sur le talon du fer 2 fig 21 Environnement Lorsqu il ne fonctionnera plus ne jetez pas l appareil avec les ordures ménagères mais déposez le à un endroit assigné à cet effet où il pourra être recyclé Vous contribuerez ainsi à la protection de l environnement fig 22 Garantie et service Si vous souhaitez obtenir des informations supplémentaires ou faire réparer l appareil ou si vous rencontrez ...

Страница 27: ...tion Jet de vapeur 3 to MAX Placez le fer sur son talon et attendez que le voyant de température orange s éteigne avant d utiliser la fonction Jet de vapeur Des gouttes d eau tombent sur le tissu lors du repassage Vous n avez pas fermé correctement le bouchon de l orifice de remplissage Appuyez sur le bouchon jusqu à ce que vous entendiez un clic Vous avez ajouté un additif dans le réservoir d eau...

Страница 28: ...lignote certains modèles uniquement La fonction d arrêt automatique a éteint l appareil voir le chapitre Caractéristiques section Fonction d arrêt automatique Remuez le fer doucement pour désactiver la fonction d arrêt automatique Le voyant bleu du réservoir cesse de clignoter Le fer émet un bourdonnement La fonction Ionic DeepSteam est activée Si vous entendez un bourdonnement alors que vous repa...

Страница 29: ...mentazione o l apparecchio stesso siano danneggiati o in presenza di rotture o perdite dall apparecchio Nel caso in cui il cavo di alimentazione fosse danneggiato dovrà essere sostituito presso i centri autorizzati Philips i rivenditori specializzati oppure da personale debitamente qualificato per evitare situazioni pericolose Non lasciate mai l apparecchio incustodito quando è collegato alla pres...

Страница 30: ...a della vostra zona fosse particolarmente dura vi consigliamo di mescolarla con la stessa quantità di acqua distillata o di usare solo acqua distillata 1 Verificate che l apparecchio sia scollegato dalla presa di corrente 2 Impostate il regolatore di vapore in posizione 0 assenza di vapore fig 2 3 Aprite il tappo del foro di riempimento fig 3 4 Inclinate il ferro all indietro e servendovi del misu...

Страница 31: ...ia della temperatura si accende regolarmente Modalità d uso dell apparecchio Stiratura senza vapore 1 Impostate il regolatore di vapore in posizione 0 assenza di vapore 2 Selezionate la temperatura di stiratura consigliata vedere Predisposizione dell apparecchio sezione Selezione della temperatura e regolazione del vapore Stiratura a vapore Nota La prima volta che si utilizza il ferro si potrebbe ...

Страница 32: ...SteamTip consente di eliminare le pieghe più ostinate uniformando la distribuzione del vapore nei tessuti Il getto di vapore può essere utilizzato solo a temperature comprese tra 3 e MAX 1 Verificate il livello di riempimento del serbatoio dell acqua 2 Premete e rilasciate il pulsante colpo di vapore fig 14 Il colpo di vapore può essere utilizzato anche tenendo il ferro in posizione verticale per ...

Страница 33: ...periore del ferro utilizzate un panno umido 3 Risciacquate regolarmente il serbatoio con acqua pulita Dopo la pulizia svuotate sempre il serbatoio dell acqua Doppio sistema anticalcare Il doppio sistema anticalcare è composto da una pastiglia anticalcare posta all interno del serbatoio dell acqua e dalla funzione Calc Clean 1 Le pastiglie anticalcare evitano che il calcare si depositi nei fori Le ...

Страница 34: ...subito dopo la stiratura Non è necessario far raffreddare il ferro prima non utilizzate il coperchio di protezione termoresistente durante la stiratura 1 Inserite la punta della piastra nella copertura di protezione termoresistente 1 quindi premete verso il basso la base di appoggio del ferro 2 fig 21 Tutela dell ambiente Per contribuire alla tutela dell ambiente non gettate l apparecchio tra i ri...

Страница 35: ...te il ferro in posizione verticale e aspettate che la spia arancione si spenga prima di iniziare a stirare Il ferro non produce il getto di vapore La funzione colpo di vapore è stata usata troppo frequentemente in un breve lasso di tempo Continuate a stirare in posizione orizzontale e attendete qualche minuto prima di utilizzare nuovamente il getto di vapore Il ferro non è abbastanza caldo Selezio...

Страница 36: ...tico rossa lampeggia solo modelli specifici Il ferro si è spento a causa della funzione di spegnimento automatico vedere il capitolo Caratteristiche Muovete leggermente il ferro per disattivare la funzione di spegnimento automatico La spia rossa si spegnerà La luce blu del serbatoio lampeggia solo modelli specifici La funzione di spegnimento automatico ha spento il ferro vedere il capitolo Caratte...

Страница 37: ... aangegeven op het typeplaatje overeenkomt met de plaatselijke netspanning voordat u het apparaat aansluit Gebruik het apparaat niet indien de stekker het netsnoer of het apparaat zelf zichtbaar beschadigd is Gebruik het apparaat ook niet meer als het is gevallen of als het lekt Indien het netsnoer beschadigd is moet u het laten vervangen door Philips een door Philips geautoriseerd servicecentrum ...

Страница 38: ...es van de zoolplaat voordat u het strijkijzer voor de eerste keer gaat gebruiken Het waterreservoir vullen Te gebruiken watersoort U kunt gewoon kraanwater gebruiken voor het vullen van het waterreservoir Tip Als het kraanwater in uw woongebied erg hard is raden wij u aan het water te mengen met een gelijke hoeveelheid gedistilleerd water of alleen gedistilleerd water te gebruiken 1 Zorg ervoor da...

Страница 39: ...gemaakt van synthetische stoffen 4 Stel de gewenste stoomstand in zie de tabel Temperatuur en stoomstanden fig 8 Opmerking Zorg ervoor dat de stand die u instelt geschikt is voor de ingestelde strijktemperatuur 5 Steek de stekker in een geaard stopcontact Het oranje temperatuurlampje gaat aan fig 9 6 Wanneer het oranje temperatuurlampje uit is gegaan wacht dan even voordat u begint te strijken Het...

Страница 40: ...t echter niet schadelijk voor het strijkijzer Opmerking Hoeveel Ionic DeepSteam wordt geproduceerd kan van tijd tot tijd variëren en hangt af van de strijktemperatuur Functies Sproeifunctie U kunt de sproeifunctie gebruiken om de stof te bevochtigen Zo kunt u hardnekkige kreuken verwijderen 1 Zorg ervoor dat er voldoende water in het waterreservoir zit 2 Druk een paar keer op de sproeiknop om de s...

Страница 41: ...athuls ter bescherming van tere stoffen klik fig 17 Schoonmaken en onderhoud Haal de stekker uit het stopcontact zet de stoomregelaar op stand 0 en laat het strijkijzer afkoelen voordat u het schoonmaakt Doe geen azijn of andere ontkalkingsmiddelen in het waterreservoir Na het strijken 1 Veeg schilfertjes en andere verontreinigingen van de zoolplaat met een vochtige doek en een niet schurend vloei...

Страница 42: ...d 0 haal de stekker uit het stopcontact en laat het strijkijzer afkoelen 2 Leeg het waterreservoir en berg het strijkijzer op door het op zijn achterkant op een stevige ondergrond te plaatsen fig 20 3 Rol het netsnoer op en maak het vast met het snoerbindertje Hittebestendige beschermhoes alleen bepaalde typen U kunt het strijkijzer na het strijken onmiddellijk op de hittebestendige beschermhoes p...

Страница 43: ... en of de druppelstopfunctie is geactiveerd Stel het strijkijzer in op een temperatuur in het stoomgebied 2 tot MAX Plaats het strijkijzer op zijn achterkant en wacht tot het oranje temperatuurlampje is uitgegaan voordat u gaat strijken Het strijkijzer produceert geen stoomstoot U hebt de stoomstootfunctie te vaak achter elkaar gebruikt Ga verder met strijken met het apparaat in horizontale stand ...

Страница 44: ...ypen De automatische uitschakelfunctie heeft het strijkijzer uitgeschakeld zie hoofdstuk Functies Beweeg het strijkijzer even heen en weer om de automatische uitschakelfunctie te deactiveren Het rode controlelampje van de automatische uitschakelfunctie stopt met knipperen Het blauwe lampje in het waterreservoir knippert alleen bepaalde typen De automatische uitschakelfunctie heeft het strijkijzer ...

Страница 45: ...45 ...

Страница 46: ...46 46 0 2 3 4 5 6 7 0 8 9 10 11 12 13 14 15 16 17 18 0 19 20 21 ...

Страница 47: ...47 22 ...

Страница 48: ...4239 000 7338 1 ...

Отзывы: