background image

9

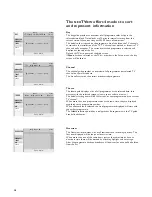
Auto Format

Selecting 

Auto Format Yes

, the screen will automatically be filled as much as

possible with the picture in case of no PALplus transmission or when TV
programmes are not carrying special signals detecting the correct screen
format.
With the 

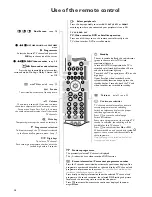
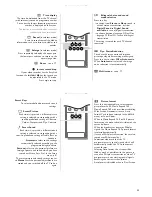
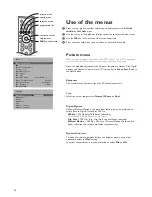
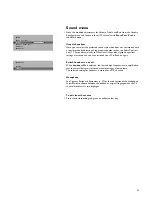
q

key on the remote control you can still select other picture

formats (see p. 11).

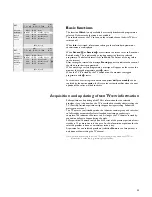
Surround Sound

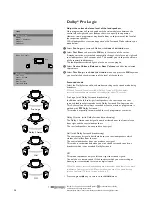
To make use of the wireless surround loudspeakers, use the cursor left/right
to select the same channel as you selected on the active loudspeaker. (Ex
factory, channel 6 has been selected as default.)
A disturbance free sound reproduction will be guaranteed under most
circumstances.
To avoid interferences from external RF (wireless) equipment such as a
headphone, RF audio, remote controls for light, ... it may be necessary to shift
to another channel number.
In practice only 3 or 4 channels are available because at least a step of two
channels are necessary to have enough separation.
Always be sure that the active surround speaker and the Surround Sound
setting are switched to the same transmitting channel. Otherwise no sound or
only a distorted sound will be heard on the surround speakers.

When the TV is tuned to a channel in the neighbourhood of 359 or 433 MHz, then
the transmitter is switched off because no RF surround sound is possible. This is 
necessary to avoid disturbed picture.
You can improve the picture quality by using the suppressor aerial cable supplied.

When no RF surround sound is possible or when there is too much
interference, use the wired back up solution. In this case select 

off

in the

Surround Sound menu item.
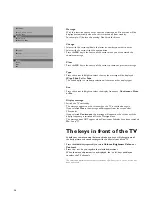
Connect the supplied cinch cable with the 

PRE-AMP IN (TV)

connector at the

back of the active surround loudspeaker and with the black and red 

REAR R

or 

L

connector clips at the back of the TV.

NEX

TV

IEW

provider

NEX

TV

IEW

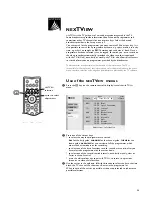
enables you to see a television programme guide on the screen

instead of in a weekly magazine. See 

NEX

TV

IEW

, p. 19.

NEX

TV

IEW

functionality is based on extended teletext services offered by TV

channels, providers. Normally you will select as 

NEX

TV

IEW

provider the TV

channel that transmits most information in your language. You can make the
best selection via info from TV announcements or from the newspapers.

Select the programme number of the desired TV channel as stored in the
favourite programme list, with the cursor left/right or with the digit keys. The
selected TV channel will provide a programme guide and additional info of its
own broadcasts as well as from other (non selected) TV channels.

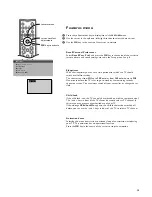
Select 

None 

if you only want the programme guide of the watched TV

channel.

Important:
In order to have the actual time and date displayed in the 

NEX

TV

IEW

screen and

NEX

TV

IEW

working properly, the first TV channel from the favourite list should also

broadcast teletext.
Please check at startup if the time and date are correct in the 

NEX

TV

IEW

screen.

Not all TV channels support 

NEX

TV

IEW

How to make use of 

NEX

TV

IEW

, see p. 19.

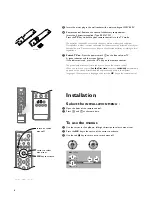
Installation

Select 

Installation 

and press the 

OK

key in the centre of the cursor to return

immediately to the 

INSTALLATION 

menu.

To exit from the menu

Keep the red 

®

key on the remote control pressed.

FRONT

REAR

R

L

,,

,,

,

,

,,,

,,,

,

,

PRE-AMP

IN (TV)

4800.1 gb  19-02-1999  16:51  Pagina 9

Содержание 32PW9763

Страница 1: ...__________10 11 Use of the menus Picture menu __________________________________________12 Sound menu___________________________________________13 Features menu ______________________________________15 16 Dual Screen ______________________________________________18 NEXTVIEW______________________________________________19 22 Teletext_______________________________________________23 24 Connect perip...

Страница 2: ...ng start stop b teletext on off p 23 j continuous subtitles p 11 cursor to select your choice p 4 OK activate your choice Installation p 4 V volume up down p 10 temporarily sound switch off p 10 P programme selection p 10 Peripherals p 28 w selection of EXT1 EXT2 EXT3 or FRONT TV TV selection VCR Video recorder selection DVD DVD selection SAT Satellite selection Colour keys PICTURE SOUND FEATURES ...

Страница 3: ... chosen as the default channel See also Install Setup p 8 Connect the active to the passive loudspeaker with the supplied speaker cable Push the connector clip down insert one end of the wire into the opening of one connector clip 2 and push it up again Insert the other end of the same wire in the same colour connector clip of the other loudspeaker Do the same with the other wire in the other conn...

Страница 4: ...every time you press a key on the remote control When you switch on your set for the first time the menu LANGUAGE automatically appears on the screen Alternatively the explanation appears in the different languages Choose your own language and press the OK key on the remote control RO6 AA Installation Select the INSTALLATION MENU Open the door of the remote control é Press U and f at the same time...

Страница 5: ...nnel Select your choice and press the OK key in the centre of the cursor Automatic installation In the Automatic Installation menu select Start and press the OK key in the centre of the cursor to activate the searching All TV channels are searched for and stored automatically If a cable system which broadcasts ACI Automatic Channel Installation or a TV channel transmitting a teletext page with the...

Страница 6: ...ber with the digit keys Search for a TV channel The frequency or the channel number increases until a TV channel is found In case of poor reception you can improve the reception by adjusting the frequency with the P key Direct selection of a TV channel If you know the frequency or the C or S channel number enter it directly with the digit keys 0 to 9 Ask for a list from your cable company or deale...

Страница 7: ...ION menu A space numbers or other special characters are located between Z and A Give name After leaving the installation you can browse through the TV channels by pressing the P key Only those TV channels which are in the favourite list will be displayed The non favourite TV channels can still be selected with the digit keys Select Favourite programmes in the INSTALLATION menu and press the OK ke...

Страница 8: ...e Tilt with the cursor up down Keep the cursor left right pressed to adjust the rotation of the picture Information Line After the selection of a TV programme or after pressing the i key on the remote control a TV channel which broadcasts teletext may transmit the name of the TV channel or the programme name or another message which appears briefly in the information line on the screen When select...

Страница 9: ...oo much interference use the wired back up solution In this case select off in the Surround Sound menu item Connect the supplied cinch cable with the PRE AMP IN TV connector at the back of the active surround loudspeaker and with the black and red REAR R or L connector clips at the back of the TV NEXTVIEW provider NEXTVIEW enables you to see a television programme guide on the screen instead of in...

Страница 10: ...DVD SAT TV Video recorder DVD or Satellite operation Press one of this keys to use the remote control directly in the TV video recorder DVD or satellite mode B Standby The set is switched off and the red indicator green in the case of NEXTVIEW info acquisition lights up In case of NEXTVIEW acquisition the TV is switched to full standby after about 30 min and the red indicator lights up To switch t...

Страница 11: ...ic predefined setting of Contrast Colour Sharpness and Dyn Contrast M Smart Sound Each time it is pressed a different sound setting is selected corresponding with a specific predefined setting of Treble Bass or Loudness Automatic refers to the settings automatically selected according to the programme being broadcast Personal refers to the personal preference setting of picture and sound which you...

Страница 12: ...he most ideal setting it may be preferred to switch back to Digital Scan and or 100 Hz 100 Hz 100 Hz only Field flicker reduction Not available in Movie Expand picture format Dig Scan 100 Hz Dig Scan Field and line flicker reduction Natural Motion 100 Hz Dig Scan Natural Motion Field and line flicker reduction and smooth movement reproduction Dynamic Contrast To make the contrast between darker an...

Страница 13: ...ntrols key M The sound style is set to Manual until the personal graphic equalizer settings are stored and you have switched your TV off and on again Switch Loudness on or off When Loudness On is selected the low and high frequencies are amplified so that the natural balance is restored when listening at a low volume The selected setting for Loudness is stored for all TV channels Headphone See Con...

Страница 14: ...rround Pro Logic sounds This 4 channel sound is always recorded when the movie or programme is marked with Dolby Surround This mode is especially recommended for such programmes as movies Dolby 3 Stereo with Dolby Surround broadcasting The Dolby 3 Stereo sound signal is now distributed over the front left the front right and the centre loudspeakers The rear loudspeakers do not produce any signal H...

Страница 15: ...pear on screen You can always switch off your set earlier or change the set time Child Lock If the child lock is on the TV can only be switched on with the remote control The and keys in front of the TV cannot be used to select a TV channel In this way you can prevent unauthorised use of your TV If the message Child Lock On appears the child lock must be switched off before you can use the and key...

Страница 16: ...e TV to standby The message appears on the screen when the TV is switched on again If you selected Once the message will disappear from the screen after 30 seconds If you selected Continuous the message will appear on the screen until the display frequency is switched off in the Message menu The message does NOT appear when Continuous Subtitles have been switched On See p 11 FEATURES Recall Pers P...

Страница 17: ...enu line MOSAIC appears Select the desired function with the cursor left right and press the OK key in the centre of the cursor Scan a scan of the TV channels placed in the favourite list is performed Press the OK key again to have the continuation of the list Photo Finish the main picture is displayed in successive frozen pictures Press the OK key again to have a new sequence of frozen pictures S...

Страница 18: ...u is displayed on the screen Programmes via a decoder descrambler can not be reproduced in the right picture The sound of the right picture can be heard via a headphone Only programmes via a peripheral can be heard in stereo Zooming is reset to 1x when Dual Screen is switched on PALplus is disabled in Dual Screen mode Switch screens Press the c key to swap the right and left picture The sound is s...

Страница 19: ...ded by the TV software Use of the NEXTVIEW menus Press the æ key on the remote control to display cancel the NEXTVIEW menu é Press one of the colour keys to select the way the programmes are sorted DAY for the daily guide CHANNEL for the channel guide THEME for the theme guide OVERVIEW for an overview of all the programmes which are marked as reminders or for recording to select one of the basic f...

Страница 20: ...elected category news sport culture movies The default starting item will be the current or next programme on the current TV channel When more than one programme starts at the same time they are displayed according to the programme number When another date is selected the list of programmes displayed will start with the earliest programme The THEME selection possibility is only present if programm...

Страница 21: ...en watching a certain programme a message will appear on the screen the moment the tagged programme with starts When the TV is in standby the TV switches on the moment the tagged programme with starts In case where a series tag is broadcast the options daily and weekly can be replaced by the option series In this case the system identifies when the next episode of the series will be broadcast Full...

Страница 22: ...he item Record in the menu will be removed Upload video recorder overview When the TV is switched on the programmed record blocks are uploaded to the TV to check whether any manual addition or deletions have been done This is shown in the overview The video recorder manages and removes timer recordings when performed Some NEXTVIEWLink video recorders do not allow a daily programming of recording t...

Страница 23: ...or an incorrect page number Page numbers beginning with 0 or 9 do not exist Choose another number With the option line Select with the colour keys corresponding to the coloured options at the bottom of the screen the desired subject Select Picture Teletext Select a TV channel which broadcasts teletext Press the b key The screen is divided into two parts the left side for the normal main picture th...

Страница 24: ...they are available while the teletext page is on screen Select with the cursor left right the previous or the following subpage 2 With the U key Enter the subpage number yourself Press U Enter the desired subpage with the digit keys e g 3 for the third page of seven subpages The TV searches for the selected subpage Automatically rotating subpages Press U again to cancel the entered digit key for t...

Страница 25: ...cted a Non PALplus or PALplus video recorder You have to do the following if you do not connect the eurocable 3 Search for and store the test signal of the video recorder Unplug the aerial cable 1 from the aerial socket x of your video recorder Switch on your TV and put the video recorder on the test signal See the handbook for your video recorder Search for the test signal of your video recorder ...

Страница 26: ...eo equipment also connect AUDIO R 1 S VHS quality with a S VHS camcorder is obtained by connecting the S VHS cables with the S VIDEO input 3 and AUDIO inputs 1 Other equipments Connect the eurocable 1 to EXTERNAL 1 as shown opposite Only for DVD Press U and f at the same time Select DVD Present in the Setup menu of the INSTALLATION menu This offers you optimum picture quality for your DVD Keep the...

Страница 27: ...eakers of your set by two extra loudspeakers min 8 Ohm Connect the two loudspeakers to the connector clips at the back of the TV Connect the left front loudspeaker at FRONT L the right front loudspeaker at FRONT R Push the connector clip down and insert the end of the wire into the opening the positive wire the one with the black line to the red loudspeaker connection the negative wire to the blac...

Страница 28: ...ucts can be operated with the remote control of your TV Press the VCR DVD or SAT key according to the equipment you want to operate with this remote control Video recorder DVD and Satellite keys Video recorder Press one of the video recorder keys after you pressed the VCR key for record Ò for rewind for stop π for play for fast forward for selecting 1 or 2 digit programme numbers from the video re...

Страница 29: ...order Set your video recorder to record You record what you are watching on the screen Do not switch programme numbers or do not switch off your TV when you are recording using a eurocable connected to the euroconnector EXTERNAL 1 With a video recorder connected to EXTERNAL 1 you can only record a TV channel Select the programme number on the TV Select the right external on your video recorder Swi...

Страница 30: ...key again to stop the recording When recording a programme from a peripheral connected to EXTERNAL 1 3 or FRONT you can not select another TV programme on the screen To watch TV programmes again press the programme number you want to select twice Then the recording is stopped and your video recorder switches to standby If you switch to standby during recording of a programme from a peripheral conn...

Страница 31: ... possible or when there is too much interference use the wired back up solution See Install TV Setup p 8 No solution Switch your TV off and then on again Never attempt to repair a defective TV yourself Check with your dealer or call a TV technician End of life directives Your new TV contains materials which can be recycled and reused At the end of life specialised companies can dismantle the disca...

Страница 32: ...l intelligent ESI bus system between audio components in HiFi systems and between TV and VCR Scart connection required Turns source selection and control into a one button operation Easy Text Teletext memory that automatically memorises Teletext pages and gives you instant access to them Euroconnector A 21 pins connector system enabling you to simply connect various types of audio video and comput...

Отзывы: