background image

Thank you for choosing this Perlesmith product! At Perlesmith we strive 
to provide you with the best quality products and services in the industry. 
Please share your experience of our product with others at

www.perlesmith.com/pages/reviews if you are satisfied. Should you have 

any issues, please don't hesitate to contact us.

Technical Support: 

1-800-556-6806 Mon-Fri 10am - 5pm (PST) (USA) (CAN)

Other Info: 

[email protected] (US/CA/DE/UK/FR/IT/ES/AU)

Website:

www.perlesmith.com

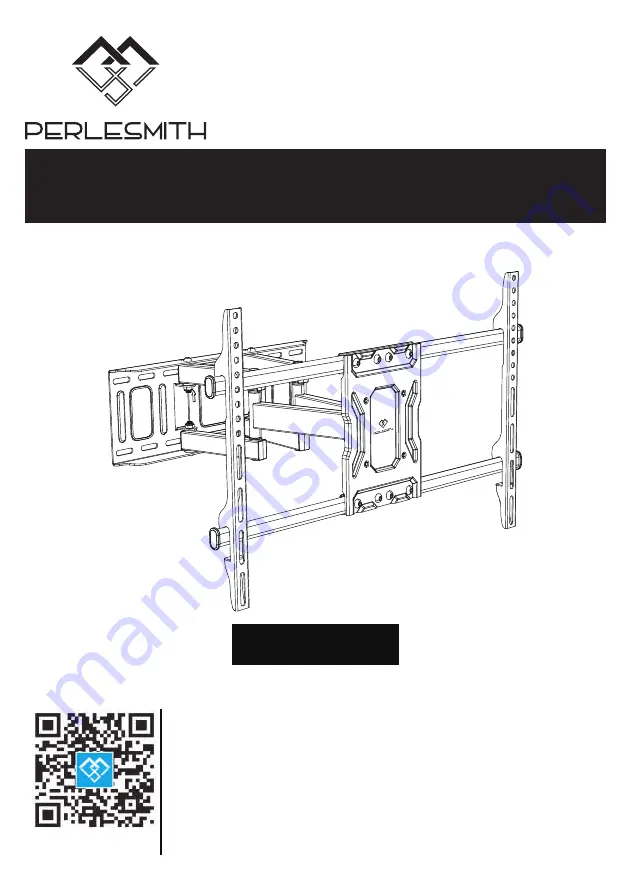
Full Motion Mount Instruction 

Manual

V1.0

Model: PSLF7

Содержание PSLF7

Страница 1: ...ur experience of our product with others at www perlesmith com pages reviews if you are satisfied Should you have any issues please don t hesitate to contact us Technical Support 1 800 556 6806 Mon Fri 10am 5pm PST USA CAN Other Info supportus perlesmith com US CA DE UK FR IT ES AU Website www perlesmith com Full Motion Mount Instruction Manual V1 0 Model PSLF7 ...

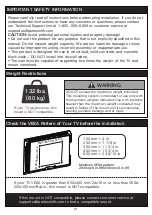
Страница 2: ...e times the weight of the TV and mount combined Weight Restrictions IMPORTANT SAFETY INFORMATION DO NOT exceed the maximum weight indicated This mounting system is intended for use only with the maximum weights indicated Use with products heavier than the maximum weights indicated may result in failure of the mount and its accessories causing possible damage and or injury WARNING 132 lbs 60 kg If ...

Страница 3: ...t support line at 1 800 556 6806 or customer service at supportus perlesmith com Warning This product contains small items that could be a choking hazard if swallowed Before starting assembly verify all parts are included and undamaged Do not use damaged or defective parts lf you require replacement parts contact our Product Support line at 1 800 556 6806 or customer service at supportus perlesmit...

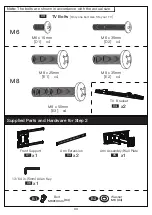
Страница 4: ...B1 Bolt B2 X4 M6 Washer Supplied Parts and Hardware for Step 2 04 x2 TV Bracket M6 M8 Note The bolts are shown in accordance with the actual size M6 x 15mm D1 x4 M6 x 35mm D2 x4 Only one bolt size fits your TV TV Bolts 09 M8 x 50mm E3 x4 M8 x 25mm E1 x4 M8 x 35mm E2 x4 03 01 x1 Front Support ...

Страница 5: ...M8 Only one bolt size fits your TV Step 1 Secure the TV Brackets to Your TV Bolt length Verify adequate thread engagement with bolts or bolts spacers combination We recommend thread engagement by at least 5 turns Too short will not hold the TV Too long will damage the TV Too Short Too Long Correct Correct Note If necessary the spacers can be used in multi layer If the installation fails after tryin...

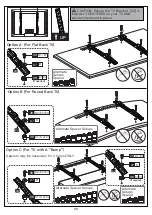
Страница 6: ... Option B For Round Back TV Alternate Spacer Setups UP Option A For Flat Back TV Alternate Spacer Setups Spacers may be necessary for 2 holes ONLY Option C For TV with A Bump Alternate Spacer Setups 05 08 If needed C1C2 09 D1 E1 07 B 04 08 If needed C1C2 09 D1 E1 07 B 04 07 B D2 E2 E3 09 C1 C2 C3 08 04 Alternate Spacer Setups ...

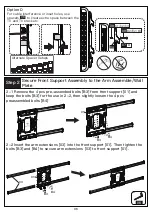
Страница 7: ...s 08 Alternate Spacer Setups 07 B D2 E2 E3 09 C1 C2 C3 08 2 1 Remove the 4 pcs pre assembed bolts B3 from front support 01 and keep the bolts B3 for the use in 2 2 then slightly loosen the 4 pcs preassembled bolts B4 2 2 Insert the arm extensions 03 into the front support 01 Then tighten the bolts B3 and B4 to secure arm extensions 03 to front support 01 04 06 03 B3 B3 B4 B4 01 01 ...

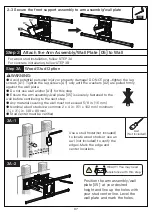
Страница 8: ...ial personal injury or property damage DO NOT over tighten the lag screws A1 Tighten the lag screws A1 only until the washers A2 are pulled firmly against the wall plate Do not use wall anchor A3 for this step 06 3A 1 3A 2 Position the arm assembly wall plate 05 at your desired height and line up the holes with your stud center line Level the wall plate and mark the holes 2 3 Secure the front suppo...

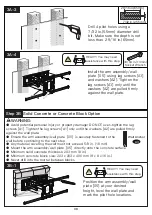
Страница 9: ... covering the wall must not exceed 5 8 in 16 mm Mount the arm assembly wall plate 05 directly onto the concrete surface Minimum solid concrete thickness 203 mm 8 in Minimum concrete block size 203 x 203 x 406 mm 8 x 8 x 16 in Never drill into the mortar between blocks Wall Anchor A3 33 64 in 13mm Socket Wrench Install the arm assembly wall plate 05 using lag screws A1 and washers A2 Tighten the la...

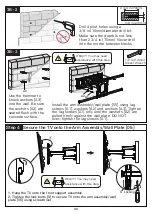
Страница 10: ...late 05 using lag screws A1 washers A2 and anchors A3 Tighten the lag screws A1 only until the washers A2 are pulled firmly against the wall plate DO NOT over tighten the lag screws A1 3B 2 3B 3 A3 A2A1 Step 4 Secure the TV onto the Arm Assembly Wall Plate 05 1 Hang the TV onto the front support assembly 2 Tighten the lock bolts S to secure TV onto the arm assembly wall plate 05 using screwdriver L...

Страница 11: ... four tilt bolts T to fix the tilt angle If needed the TV can be levelled Level Adjustment 06 1 Loosen the four bolts B1 2 Level your TV 3 Retighten four bolts B1 to hold TV in place B1 10 Tilt adjustment T Loosen Tighten Note Please do not over tighten or over loosen the bolts Note Please do not over tighten or over loosen the bolts ...

Страница 12: ...ou with the best quality products and services in the industry Please share your experience of our product with others at www perlesmith com pages reviews if you are satisfied Should you have any issues please don t hesitate to contact us Technical Support 1 800 556 6806 Mon Fri 10am 5pm PST USA CAN Other Info supportus perlesmith com US CA DE UK FR IT ES AU Please check www perlesmith com for more...

Отзывы: