background image

 2

0

2

0

-0

3

20

WCS-PNG410

Commissioning

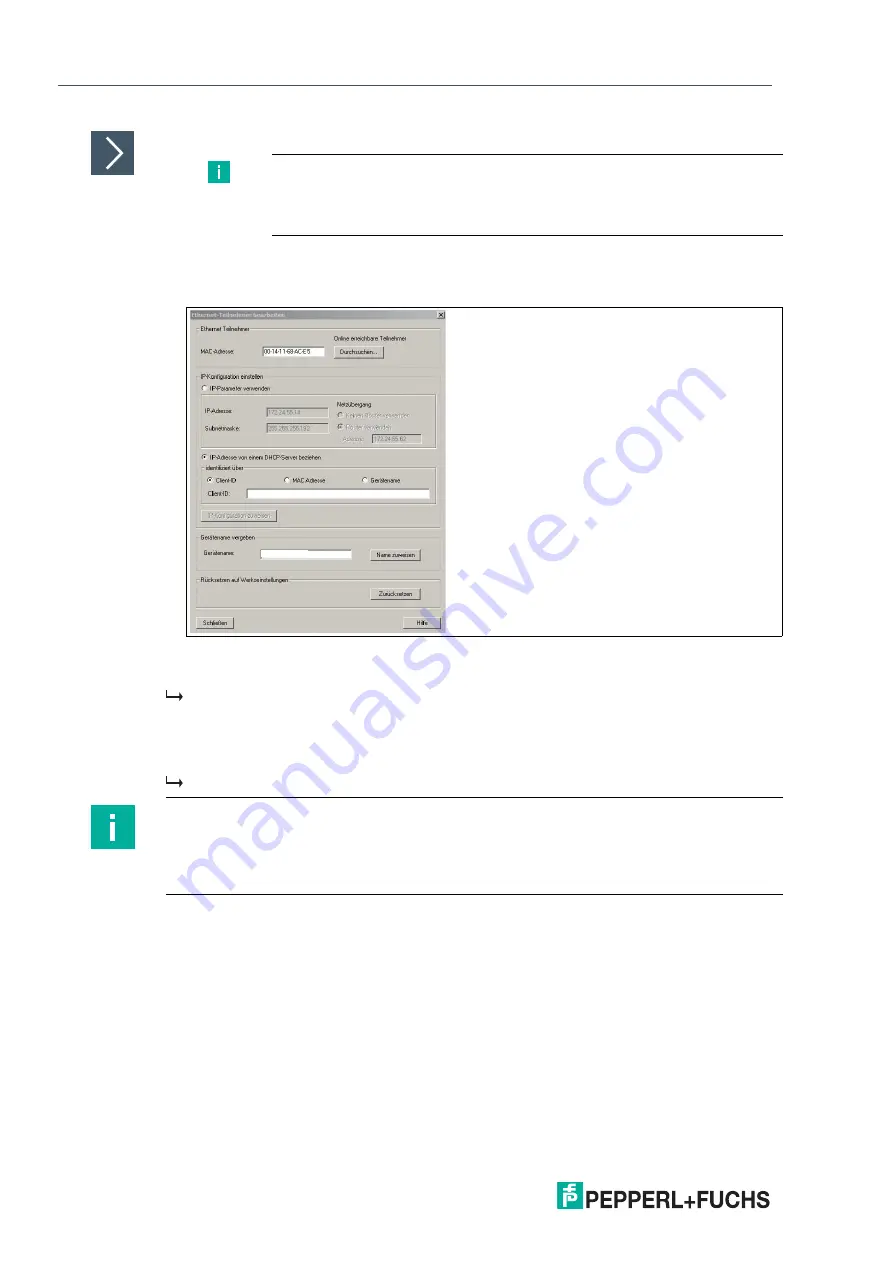
Changing the device name

1.

Stop PROFINET communication if it is active.

2.

Select 

Fuchs WCS

 from the list of nodes and click on 

OK

.

3.

In the field 

Assign device name

, enter the device name for the interface module. Click on 

Assign Name

.

 The interface module is given the name you entered and can then be uniquely identified by 

the PLC.

4.

In the WCS module 

Properties

 window, enter the new device name and save the 

configuration.

 The PLC will recognize the name of the device and will be able to communicate with it.

Depending on your application, select one, two, three, or four connected WCS read heads and 
the operating mode. When in the "only Position" operating mode, the WCS read heads output 
their position. In the "Position and Speed" operating mode, the WCS read heads output their 
position and the speed at which they are currently moving.

Regardless of the number of WCS read heads, 1 byte is reserved for querying the diagnostics 
for the WCS read heads in the master. For the response data, 4 bytes are reserved for each 
WCS read head in the "only Position" operating mode (configuration data for four WCS read 
heads: 0x20, 0xD1, 0xD1, 0xD1, 0xD1). In the "Position and Speed" operating mode, 6 bytes 
are reserved for each WCS read head (configuration data for four WCS read heads: 0x20, 
0xD2, 0xD2, 0xD2, 0xD2).

Note

The PLC must not communicate with the device via PROFINET while you are 
changing the device name. An error message will be output if you try to 
change the device name while the plant is in operation.

Note

An LED on the device can be made to flash using the configuration tools. If you have a number 
of WCS-PNG410 interface modules on the network, this function will enable to you to uniquely 
identify each device. Select the device from the list of Ethernet modules and click 

Flash

. The 

"State" LED on the relevant WCS-PNG410 interface module will start to flash.

Содержание WCS-PNG410

Страница 1: ...R WCS PNG410 Interface Module PROFINET Manual ...

Страница 2: ...sion as well as the supplementary clause Expanded reservation of proprietor ship Worldwide Pepperl Fuchs Group Lilienthalstr 200 68307 Mannheim Germany Phone 49 621 776 0 E mail info de pepperl fuchs com North American Headquarters Pepperl Fuchs Inc 1600 Enterprise Parkway Twinsburg Ohio 44087 USA Phone 1 330 425 3555 E mail sales us pepperl fuchs com Asia Headquarters Pepperl Fuchs Pte Ltd P F Bu...

Страница 3: ...3 1 Mounting 10 3 2 Electrical Connection 11 3 3 Dismounting 13 4 Commissioning 14 4 1 Introduction 14 4 2 Connecting the WCS Read Head 15 4 3 Connection to the Network 16 4 4 Integrating the Interface Module into the Network 17 4 5 Data Format for Modules 20 5 Communication with WCS read heads 22 5 1 Data Protocols 22 5 2 Option E Extended Type WCS3B LS2 E RS 485 25 6 Appendix 28 6 1 Cable Routin...

Страница 4: ... EU type examination certificate EU declaration of conformity Attestation of conformity Certificates Control drawings Instruction manual Other documents 1 2 Target Group Personnel Responsibility for planning assembly commissioning operation maintenance and dismount ing lies with the plant operator Only appropriately trained and qualified personnel may carry out mounting installation com missioning...

Страница 5: ...d in descending order as fol lows Informative Symbols Action This symbol indicates a paragraph with instructions You are prompted to perform an action or a sequence of actions Danger This symbol indicates an imminent danger Non observance will result in personal injury or death Warning This symbol indicates a possible fault or danger Non observance may cause personal injury or serious property dam...

Страница 6: ...e data from the interface module to the controller is transferred via the PROFINET protocol You can connect a maximum of four LS221 and or LS121 WCS read heads to one WCS PNG410 interface module If you connect several WCS read heads they must have different addresses The number of connected WCS read heads is configured in the hardware project planning The interface module supports the operation of...

Страница 7: ...omponents Figure 2 2 Interface module overview 1 RS 485 bus termination slide switch 2 X1 RS 485 interface 3 Mounting bracket 4 X2 Connection for power supply 5 X3 PROFINET IO communication interface 6 Front panel with rotary coding switch and LED status indicator 3 4 5 6 2 1 ...

Страница 8: ...ng The interface module displays the binary coded error and or warning number via the Error No Select ID LEDs Error No Select ID Read head address 8 4 2 1 0 0 0 1 0 0 0 1 0 1 0 1 0 0 2 1 0 0 0 3 Table 2 1 Display via the four ErrorNo Select ID LEDs when the State LED lights up green Error No 1 5 Switch the interface module off and back on If the error occurs again the module must be replaced Warni...

Страница 9: ...re error or incorrect fieldbus ID 0 1 0 1 5 Script error 0 1 1 0 6 Reserved 0 1 1 1 7 WCS read head communication RS send buffer overflow 1 0 0 0 8 WCS read head communication RS receive buffer overflow 1 0 0 1 9 WCS read head communication RS timeout 1 0 1 0 10 General fieldbus error 1 0 1 1 11 Parity error or frame check error 1 1 0 0 12 Reserved 1 1 0 1 13 Fieldbus configuration error 1 1 1 0 1...

Страница 10: ...he LED flashes green at the same speed as the sent received data Link Activity P2 The Link Activity LED on port 2 is controlled directly by the PROFINET processing unit and is green if Ethernet link pulses are found When there is data traffic on the network the LED flashes green at the same speed as the sent received data State LED PROFINET interface state Lights up green Data exchange in progress...

Страница 11: ...nto place The module is mounted 2 You must connect the DIN mounting rail to the switch cabinet s equipotential busbar The connection wire must have a cross section of at least 10 mm2 2 1 Note Heat Dissipation You may place other modules to the left and right of the module Above and below the modules there must be at least 5 cm of free space for heat dissipation Note Vertical Installation You can a...

Страница 12: ...in incorrectly Danger Device damage due to incorrect installation Incorrect installation of cables and connection lines can endanger the function and the electri cal safety of the device Observe the permissible core cross section of the conductor If you are using stranded conductors crimp the stranded conductors with wire end fer rules Make sure that conductors are insulated all the way up to the ...

Страница 13: ...ttaching to the DIN mounting rail PROFINET IO Communication Interface This interface can be found on the module in the form of two 8 pin RJ45 sockets on the bottom of the housing Insert the PROFINET connector into the RJ45 socket s labeled RJ45 PROFINET IO Terminal Description 1 UB Pwr Operating voltage for interface module operating voltage for WCS read head 2 0 V Pwr Ground for interface module ...

Страница 14: ...inal on plug X1 must be connected Connect the read head to the terminal Use the enclosed jumper to connect the terminals to each other Figure 3 3 Terminal X1 RS485 Termination T1 Always Off T2 On enabled T2 Off disabled 1 2 3 4 5 6 7 Service Rx Service Tx Service GND RS485 RS485 RS485 RS485 RS485 RS485 T1 On Off On Off X1 T2 ...

Страница 15: ...dule 1 Disconnect all the supply and signal lines Figure 3 4 Dismounting 2 Insert the screwdriver 2 into the groove of the mounting bracket 3 3 Press the screwdriver 2 in the specified direction until the lock on the DIN mounting rail 4 opens see figure 4 Then press the module 1 upwards and lift it out of the DIN mounting rail 4 3 2 1 ...

Страница 16: ...nd the DIN mounting rail onto which the assembly is clipped 6 Connect the direct current to the terminals provided 7 Use any programming tool for project planning The GSDML file can be downloaded from our website www pepperl fuchs com Simply enter the product name or item number in the product keyword field and click Search Warning Danger to life due to defective work Errors during installation an...

Страница 17: ...s file can be down loaded from our website http www pepperl fuchs com Rotary Coding Switch S4 Rotary switch S4 has no function Make sure that the rotary switch is in switch position 0 Rotary Coding Switch S5 The Extended protocol traverse distance 629 146 meters is set on the interface module using rotary switch S5 The WCS read heads are addressed via a modified prompt bit A total of one byte more...

Страница 18: ... and 5 of plug X1 Activating the RS 485 Bus Termination If the interface module is operated as the first or last physical device in an RS 485 bus or if you operate one read head on the interface module a bus termination must be performed on this interface module Figure 4 1 RS 485 bus termination Set the T2 slide switch 1 to On to activate the bus termination 150 Note The T1 slide switch 2 has no f...

Страница 19: ...ut X3 P1 X3 P2 Connecting the Device to the Controller Plug the PROFINET connector into the RJ45 socket Use a data cable of at least Category 5 Note The cable to the surrounding Ethernet devices must be at least 0 6 m long Terminal Designation 1 TD Transmission line 2 TD Transmission line 3 RD Receive line 4 n c Not connected 5 n c Not connected 6 RD Receive line 7 n c Not connected 8 n c Not conn...

Страница 20: ...PROFINET Address In normal operation data exchange mode the IP address is usually assigned to the module by the PROFINET controller PLC For this purpose the module has a device name that is used to address it Adding the Device to the Network 1 Open SIMATIC Manager and select the PROFINET IO system 2 Install the GSDML file by clicking Options and Install GSD File The device data is added to the har...

Страница 21: ... IO system 5 Double click the device symbol The Properties window opens 6 Enter the required network configuration Searching for a device on the network To see which devices are on the network click on Browse in the Edit Ethernet Node window The PLC interrogates the network to see which PROFINET nodes are present Broadcast query A list of the connected devices is displayed in the window 4 ...

Страница 22: ...hich they are currently moving Regardless of the number of WCS read heads 1 byte is reserved for querying the diagnostics for the WCS read heads in the master For the response data 4 bytes are reserved for each WCS read head in the only Position operating mode configuration data for four WCS read heads 0x20 0xD1 0xD1 0xD1 0xD1 In the Position and Speed operating mode 6 bytes are reserved for each ...

Страница 23: ...pperl Fuchs WCS 2 Click next to the WCS PNG410 symbol to expand the tree structure 3 Select the module with the appropriate number of read heads and operating mode and drag it into the window where the modules are listed The selected module is added to the list 4 To change the input and output address of the module double click the module and enter the addresses in the Properties window 5 Click Tr...

Страница 24: ... bits A1 and A0 Bit 7 6 5 4 3 2 1 0 Byte 0 0 0 0 0 0 P18 P17 P16 Byte 1 P15 P14 P13 P12 P11 P10 P09 P08 Byte 2 P07 P06 P05 P04 P03 P02 P01 P00 Byte 3 0 0 0 DB ERR OUT A1 A0 Table 4 3 Data format for each connected WCS reader in only Position operating mode reader address 0 3 Bit 7 6 5 4 3 2 1 0 Byte 0 0 0 0 0 0 P18 P17 P16 Byte 1 P15 P14 P13 P12 P11 P10 P09 P08 Byte 2 P07 P06 P05 P04 P03 P02 P01 P...

Страница 25: ... outside of the code rail not a position value Good P0 P18 0 WCS reader partly outside the code rail P0 1 P2 P18 0 WCS reader completely outside of the code rail 1 0 0 Current position value binary coded in P00 P18 Poor 1 0 1 No position value WCS reader outside of the code rail Poor X 1 X No position value error message from WCS reader error number binary coded in P00 P18 ...

Страница 26: ... P06 P05 P04 P03 P02 P01 P00 Byte 4 0 OUT ERR A1 A0 DB P18 P17 P16 Byte 5 0 P15 P14 P13 P12 P11 P10 P09 P08 Byte 6 0 P07 P06 P05 P04 P03 P02 P01 P00 Request byte for read head Byte Bit 8 Bit 7 Bit 6 Bit 5 Bit 4 Bit 3 Bit 2 Bit 1 Bit 0 1 1 0 0 0 0 0 A1 A0 Response telegram from the read head Byte Bit 8 Bit 7 Bit 6 Bit 5 Bit 4 Bit 3 Bit 2 Bit 1 Bit 0 Byte 1 0 OUT ERR A1 A0 DB P18 P17 P16 Byte 2 0 P1...

Страница 27: ...ion State of the read head lens 0 0 0 x Current position value in P00 P18 binary coded Good 0 0 1 x Read head outside the code rail no position value see OUT message Good 0 1 0 x Current position value in P00 P18 binary coded Poor 0 1 1 x No position value read head outside the code rail see OUT message Poor 1 x x x No position value error message from read head error number in P00 P04 binary code...

Страница 28: ...ve lenses the read head automatically increases the light intensity If the level of con tamination is too high a warning message is sent to the higher level control panel diagnostic bit DB 1 The automatic light adjustment in the read head allows you sufficient time to clean the read head as part of the next servicing procedure The WCS3B read head emits a visual signal for the contamination detecte...

Страница 29: ...erformed If these measures do not solve the problem the read head must be sent for inspection Function number for read head F0 0 send position value ERR DB OUT SST Description State 0 x 1 x P00 P18 0 read head is partially outside the code rail OUT P00 1 P02 P18 0 read head is completely outside the code rail OUT A Result of the check Remedy The upper edge of the code rail is outside the tolerance...

Страница 30: ...utput Request byte for read head Byte Bit 8 Bit 7 Bit 6 Bit 5 Bit 4 Bit 3 Bit 2 Bit 1 Bit 0 1 0 1 1 0 0 1 A1 A0 Response telegram from the read head Byte Bit 8 Bit 7 Bit 6 Bit 5 Bit 4 Bit 3 Bit 2 Bit 1 Bit 0 Byte 1 0 A1 A0 OVL VAL DB OUT ALL OUT ERR Byte 2 0 0 0 0 0 XP19 XP18 XP17 XP16 Byte 3 0 XP15 XP14 XP13 XP12 XP11 XP10 XP09 XP08 Byte 4 0 XP07 XP06 XP05 XP04 XP03 XP02 XP01 XP00 Byte 5 0 xor B1...

Страница 31: ...lt the diagnostic bit is not set 1 Diagnostic bit read head dirty OUT ALL 0 Read head in code rail 1 Read head completely outside of the code rail OUT 0 Read head in code rail 1 Read head partially outside the code rail No valid posi tion available ERR 0 No error 1 Error message possible errors in XP00 XP01 binary coding Byte 2 4 XP00 XP19 Current position value binary coding Byte 5 1 1 For data p...

Страница 32: ...ighlighted in yellow in the figure below Start up behavior of the read head After the supply voltage has been connected the X position is set to the last valid X position and the VAL bit is set to 1 The speed value is 127 and the SST bit is set to 1 After the read head moves by approx 5 mm the VAL bit is set to 0 and the X position is assigned a new calculated X position The last valid X position ...

Страница 33: ...is connected at the beginning and one device is connected at the end of the data line Figure 6 1 Connection of one reading head If two WCS readers are connected to one interface module there are two wiring versions Version A One WCS reader is located at the beginning and one WCS reader at the end of the data line For both WCS readers the RS 485 terminator is activated The interface module is locat...

Страница 34: ...ing of the data line one WCS reader is located at the end of the data line Both need the RS 485 terminator The second WCS reader is connected to the line connection between the interface module and the first WCS reader through a short spur length 1 m Use a bus terminal to connect the spur Interface or control PLC Reading head Reading head ...

Страница 35: ...sion B The wiring version used depends on which is best suited for the application If three or four WCS readers are used on the same interface module connect these using spurs as shown in variant B Reading head Reading head Interface or control PLC Spur line max 1 m Bus terminal ...

Страница 36: ...ielded data cable including analog Unshielded cable for DC and AC voltages 0 60 V Shielded cable for DC and AC voltages 0 230 V Coaxial cables for monitors Group B Unshielded cable for DC and AC voltages 60 400 V Group C Unshielded cable for DC and AC voltages greater than 400 V Shielding Cables The shielding of cables is required to suppress electromagnetic interference Establishing a low resista...

Страница 37: ... WCS2 read heads with a heater 6 wire data cables 3 x 2 can be used These data cables use two pairs for the voltage supply doubling the cable cross section and one pair for the RS 485 data line The table below shows the possible cable lengths depending on the cable capacitance core core The number of connected read heads is of no significance Cable cross section AWG 1 1 American Wire Gauge a syste...

Страница 38: ... female cordset 5 pin straight 5 m PUR cable shielded V15 G 10M PUR ABG M12 single ended female cordset 5 pin straight 10 m PUR cable shielded Field attachable single ended female cordsets and available by the meter V15 G ABG PG9 M12 single ended female cordset 5 pin straight field attachable shielded V15 G ABG PG9 FE M12 single ended female cordset 5 pin straight field attachable shielded with gr...

Страница 39: ...Pepperl Fuchs Quality Download our latest policy here www pepperl fuchs com quality www pepperl fuchs com Pepperl Fuchs Subject to modifications Printed in Germany DOCT 6500 ...

Отзывы: