background image

156

8

Settin

g

s

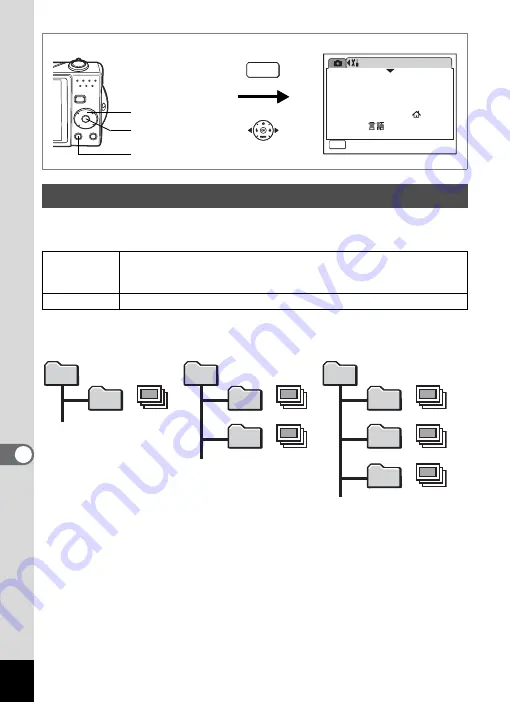
You can change the name of the folder where images are saved.

Folder Name

1

Use the four-way controller (

23

) to select [Folder 

Name] on the [

u

Setting] menu.

2

Press the four-way controller (

5

).

A pull-down menu appears.

3

Use the four-way controller (

23

) to select [Standard] or [Date].

4

Press the 

4

 button.

The Folder Name setting is saved.

Changing the Image Folder Name

Date

(default setting)

XXX_mmdd (3-digit folder number_month day)
* xxx_ddmm (3-digit folder number_day month) when the date style 

is set to [dd/mm/yy].

Standard

XXXPENTX (where XXX is the 3-digit folder number)

S e t t i n g

1 0 / 1 0 / 2 0 0 7

Language/

MENU

1 / 3

F o r m a t
S o u n d

E n g l i s h

D a t e   A d j u s t
Wo r l d  Ti m e

E x i t

How to display the [

u

Setting] menu

MENU

3

 button

4

 button

Four-way controller

DCIM

100PENTX

101_0325

102_0401

DCIM

100PENTX

101_0325

DCIM

100PENTX

100

100

101

100

101

102

Picture taken with 

standard folder name

(Example: March 25)

Folder name changed to 

date setting

(Example: March 25)

Next time a picture 

is taken

(Example: April 1)

Содержание Optio V10

Страница 1: ...ough Berks SL3 8PN U K http www pentax co uk PENTAX France S A S 112 Quai de Bezons B P 204 95106 Argenteuil Cedex FRANCE http www pentax fr PENTAX Italia S r l Via Dione Cassio 15 20138 Milano ITALY...

Страница 2: ...Image Matching is a trademark of Seiko Epson Corporation The PRINT Image Matching logo is a trademark of Seiko Epson Corporation All other brands or product names are trademarks or registered tradema...

Страница 3: ...camera around your neck is also dangerous Please take care that small children do not hang the strap around their necks Use an AC adapter that is of the power and voltage specified for exclusive use...

Страница 4: ...e in contact with your eyes do not rub them Flush your eyes with clean water and get medical attention immediately If any leakage from the battery should come in contact with skin or clothes wash the...

Страница 5: ...ified power supply cord set cord is Type SPT 2 or heavier minimum NO 18 AWG copper one end with a molded on male attachment plug cap with a specified NEMA configuration and the other is provided with...

Страница 6: ...2 years in order to maintain high performance If the camera is subjected to rapid temperature changes condensation may form on the inside and outside of the camera Therefore put the camera in a bag or...

Страница 7: ...Adapter with a Household Power Supply 25 Installing the SD Memory Card 26 Recorded Pixels and Quality Level of Still Pictures 29 Recorded Pixels Quality Level and Frame Rate of Movies 30 Turning the...

Страница 8: ...f Dark Scenes Night Scene Mode 68 Framing Your Pictures Frame Composite Mode 69 Taking Pictures of Your Pet Pet Mode 71 Using the Self timer 72 Taking a Series of Pictures 73 Using the Zoom 74 Setting...

Страница 9: ...in Playback Mode 113 Slideshow 114 Playing Back Movies 116 Playing Back a Movie 116 Connecting the Camera to AV Equipment 117 Deleting Images 118 Deleting a Single Image Sound File 118 Deleting Select...

Страница 10: ...mory 148 Changing the Sound Settings 149 Changing the Date and Time 151 Setting the World Time 153 Changing the Display Language 155 Changing the Image Folder Name 156 Changing the USB Connection Mode...

Страница 11: ...res and recording movies and sound files In this manual the mode for taking still pictures is referred to as the Still Picture Capture Mode the mode for recording movies is referred to as the d mode a...

Страница 12: ...10 Memo...

Страница 13: ...ges and how to set the relevant functions 5 Playing Back and Deleting Images This chapter explains how to view still pictures and movies on the camera or on a TV and how to delete images from the came...

Страница 14: ...to navigate Simply select icons that appear on the LCD monitor If you are unsure of which shooting mode to use first select b Auto Picture p 60 The camera selects the appropriate shooting mode dependi...

Страница 15: ...that supports PictBridge using the USB cable you can print images directly from the camera Gone are the days of not being able to print out pictures at home because operating the computer was too diff...

Страница 16: ...in the battery charger kit K BC63 For details on other optional accessories refer to Optional Accessories p 171 Checking the Contents of the Package Camera Optio V10 Strap O ST20 Software CD ROM S SW7...

Страница 17: ...5 Front Back Names of Parts Shutter release button Flash Self timer lamp red Lens Microphone Strap lug Power switch LCD monitor DC terminal cover Battery card cover Tripod socket PC AV terminal Speake...

Страница 18: ...s Refer to Understanding the Button Functions p 43 p 46 for an explanation of the function of each button Monitor Indications Shutter release button Power switch 4 W button Four way controller Q butto...

Страница 19: ...rs black the indicated area blinks yellow as a warning 1 Shooting mode p 52 8 Remaining image storage capacity 2 Flash mode p 81 3 Drive mode p 72 p 73 9 Battery indicator p 23 4 Focus mode p 79 10 Fo...

Страница 20: ...67 A3 File number B1 Bright portion blinks red p 17 A4 Protect icon p 123 A5 Voice memo icon p 147 B2 Recorded pixels p 83 A6 Battery indicator p 23 B3 Quality p 85 A7 Volume icon p 116 p 145 p 147 B...

Страница 21: ...rted Getting Started Attaching the Strap Attach the strap O ST20 supplied with the camera 1 Pass the narrow end of the strap through the strap lug 2 Pass the other end of the strap through the loop an...

Страница 22: ...harging is finished 4 Remove the battery from the battery charger when charging is finished Charging the Battery The time required to fully charge the battery is about 120 minutes max The appropriate...

Страница 23: ...f the battery to press the battery lock lever in the direction of 3 insert the battery with the PENTAX logo pointing toward the LCD monitor Push the battery in until it is locked in place 3 Close the...

Страница 24: ...use the camera for a long time remove the battery If the battery has been removed from the camera for a long time when it is reinserted and the camera is turned on the message Battery depleted may app...

Страница 25: ...try of your destination see Main Socket Types in the Major Countries and Regions of the World p 24 and take an appropriately shaped adapter plug with you The socket shape does not affect the charging...

Страница 26: ...n Japan 9 Sri Lanka Maldives 9 Nepal Bangladesh Mongolia 9 Vietnam 9 9 India Indonesia Pakistan Macau 9 9 Thailand 9 9 9 Korea 9 9 9 Philippines 9 9 9 Singapore Hong Kong 9 9 China 9 9 9 9 9 Malaysia...

Страница 27: ...e power outlet Using the AC Adapter with a Household Power Supply Make sure that the camera is turned off before connecting or disconnecting the AC adapter Make sure that the AC plug cord and the conn...

Страница 28: ...on another camera Refer to Formatting an SD Memory Card or the Built in Memory p 148 for instructions on formatting Make sure that the camera is turned off before inserting or removing the SD Memory C...

Страница 29: ...the SD Memory Card socket so that the label is facing toward the lens Push the card in until it clicks Images and sound may not be recorded correctly if the card is not inserted all the way 3 Close th...

Страница 30: ...le The data on the SD Memory Card may be deleted in the following circumstances PENTAX does not accept any liability for data that is deleted 1 when the SD Memory Card is mishandled by the user 2 when...

Страница 31: ...the appropriate settings according to use Appropriate Number of Recorded Pixels According to Use The default setting is a 3264 2448 Appropriate Quality Level According to Use The default setting is D...

Страница 32: ...Best D Better E Good Built in Memory 256 MB Built in Memory 256 MB Built in Memory 256 MB a 3264 2448 13 pictures 62 pictures 26 pictures 121 pictures 40 pictures 186 pictures f 2592 1944 21 pictures...

Страница 33: ...able for posting on a website or attaching to e mail C Best Images will be clearer but file size will be larger D Better E Good Images will be grainier but file size will be smaller 30fps Produces hig...

Страница 34: ...the camera In this case images and sound files will be saved in the built in memory r appears instead of a when the write protect switch on the SD Memory Card is in the locked position Images and soun...

Страница 35: ...taking any more pictures 1 Press the power switch while holding down the Q button The LCD monitor turns on with the lens retracted and the camera turns on in Playback Mode Turning the Camera On in Pl...

Страница 36: ...Date Adjust screen appears 1 Use the four way controller 2345 to choose the desired display language Language Date and Time can be changed Refer to the pages below for instructions To change the langu...

Страница 37: ...er 2345 to select the language and press the 4 button When the Screen After Step 2 Appears in Another Language 1 Press the 4 button 2 Press the 3 button 3 Press the four way controller 5 4 Use the fou...

Страница 38: ...hoose the city 6 Press the four way controller 3 The frame moves to DST Daylight Saving Time 7 Use the four way controller 45 to select P Off 8 Press the 4 button The Initial Setting screen appears 9...

Страница 39: ...r 3 The frame moves to Date 7 Press the four way controller 5 The frame moves to the month 8 Use the four way controller 23 to change the month Change the day and year in the same manner Next change t...

Страница 40: ...the Date Adjustment screen the camera enters Shooting mode without setting the date Restart the camera to set the date The Date Adjust screen reappears Alternatively you can display the Date Adjustme...

Страница 41: ...e LCD monitor indicates the zone of automatic focusing You can change the captured area by turning the Zoom w x lever to the left or right x enlarges the subject w widens the area that is captured by...

Страница 42: ...mode is set to b Auto Picture mode in the default settings p 60 Turn the power on to enable taking still pictures in b mode Press the Green button to switch to s Green mode and let the camera set all...

Страница 43: ...single image display Press the Q button again in Q mode or press the shutter release button halfway to switch to A mode 1 Press the Q button after taking a picture The image appears on the LCD monitor...

Страница 44: ...direction and press the 4 button The rotated image appears Press the i button while the image is displayed to display the Delete screen Use the four way controller 2 to select Delete and press the 4...

Страница 45: ...the subject when pressed halfway in Still Picture Capture Mode Except in s 3 and modes p 40 Takes the still picture when pressed down fully p 39 Starts and stops movie recording in d mode p 99 Starts...

Страница 46: ...mode p 81 5 Changes the focus mode p 79 23 Adjusts in mode p 80 6 4 W button Changes the information displayed on the LCD monitor p 77 7 Green button Switches to s Green mode p 66 Calls up the assigne...

Страница 47: ...y during single image display Returns to the previous display when turned toward f p 111 Turn toward f during nine image display to change to folder or calendar display p 110 Turn toward y during fol...

Страница 48: ...ation displayed on the LCD monitor p 113 Returns zoom display or nine image display to single image display p 109 p 111 Changes to nine image display of the selected folder during folder display p 110...

Страница 49: ...0 2007 14 25 14 25 14 25 100 100 0038 0038 100 0038 38 38 38 10 10 2007 10 10 2007 14 25 14 25 14 25 10 10 2007 10 10 2007 14 25 14 25 14 25 100 100 0038 0038 100 0038 Rec Mode MENU Exit MENU 1 3 8M A...

Страница 50: ...Use the four way controller 23 to change the setting The quality level changes each time the four way controller 23 is pressed A guide to available button operations appears on the LCD monitor during...

Страница 51: ...eturns to Step 3 6 Press the 3 button The changes are canceled and the screen returns to Step 3 The 3 button function differs depending on the screen Refer to the guide indications Exit Exits the menu...

Страница 52: ...he picture p 76 Movie Recorded Pixels For choosing the number of recorded pixels of movies p 101 Quality Level For choosing the quality level of movies p 103 Frame Rate For setting the frame rate numb...

Страница 53: ...B cable connection to PC or printer p 157 Video Out For setting the output format to the AV equipment p 158 Brightness Level For setting the brightness of the LCD monitor p 159 Power Saving For settin...

Страница 54: ...ette appears 2 Use the four way controller 2345 to choose a shooting mode A guide of the selected shooting mode appears after approximately two seconds when a shooting mode is selected p 59 You can al...

Страница 55: ...also be set with this mode p 62 A Night Scene Used for night scenes Use a tripod etc to prevent shaking and use a flash for portraits p 68 d Movie For capturing movies Sound is also recorded p 99 O V...

Страница 56: ...tion is automatically activated in b Auto Picture mode z Natural Skin Tone mode and e Portrait mode This function recognizes the subject s face focuses and performs exposure compensation when capturin...

Страница 57: ...th the current setting Calling Up a Specific Menu The following functions can be assigned to the Green button Green Mode Recorded Pixels Quality Level White Balance Focusing Area Sensitivity EV Compen...

Страница 58: ...he Green Button If the Green Mode has been assigned to the Green button the camera enters the Green Mode p 66 1 5 seconds after the Green button is pressed If a function other than the Green Mode has...

Страница 59: ...the 4 button Setting the Playback Mode SHUTTER OK MENU 10 10 2007 10 10 2007 14 25 14 25 14 25 100 100 0038 0038 100 0038 38 38 38 10 10 2007 10 10 2007 14 25 14 25 14 25 OK OK OK Cancel Cancel Quali...

Страница 60: ...l Filter For modifying images with a Color filter or Soft filter p 130 q Brightness Filter For modifying the brightness of the images p 131 Y Frame Composite For merging a frame onto an image Select t...

Страница 61: ...ck Mode if the camera is in Q mode A guide of the selected mode appears after approximately two seconds when a mode is selected 3 Press the 4 button The camera returns to capture status with the selec...

Страница 62: ...ppears 2 Use the four way controller 2345 to select b Auto Picture 3 Press the 4 button The shooting mode is selected and the camera returns to capture status 4 Press the shutter release button halfwa...

Страница 63: ...ode Focusing Area is set to Multiple p 89 The continuous shooting function is not available in b mode Face Recognition is automatically activated when e mode is selected in b mode p 54 The shooting mo...

Страница 64: ...elect R Program 3 Press the 4 button The shooting mode is selected and the camera returns to capture status 4 Set the functions you want to use Refer to Setting the Shooting Functions p 79 p 96 for de...

Страница 65: ...ect c Digital SR 3 Press the 4 button The shooting mode is selected and the camera returns to capture status 4 Set the functions you want to use Refer to Setting the Shooting Functions p 79 p 95 for d...

Страница 66: ...he four way controller 2345 to select d Natural Skin Tone and press the 4 button When c Portrait is displayed in the location for d Natural Skin Tone select c and press the 4 button 3 Use the four way...

Страница 67: ...e shutter release button halfway The focus frame on the LCD monitor turns green if the subject is in focus 6 Press the shutter release button fully The picture is taken In z and e modes Face Recogniti...

Страница 68: ...on in A mode The camera switches to the s mode Press the Green button again to return to the status before the s mode was selected 2 Press the shutter release button halfway The focus frame on the LCD...

Страница 69: ...e A Rec Mode menu or Capture Mode Palette key lock icon and a message appear If you switch to Q mode from s mode you cannot display the u Setting menu by pressing the 3 button If you try to display th...

Страница 70: ...shooting mode is selected and the camera returns to capture status 4 Press the shutter release button halfway The focus frame on the LCD monitor turns green if the subject is in focus 5 Press the shut...

Страница 71: ...345 to choose the frame you want to use 5 Press the 4 button The selected frame appears in single image display You can choose another frame using either of the following operations Use the four way c...

Страница 72: ...he focus frame on the LCD monitor turns green if the subject is in focus 8 Press the shutter release button fully The picture is taken The number of recorded pixels is fixed at h and the quality level...

Страница 73: ...G or G There are two types of icons a cat and dog icon Choosing either the cat or dog icon does not affect the resulting picture Choose whichever you prefer Choose an icon white gray or black whose to...

Страница 74: ...ater Using the Self timer g Use this mode when you want to be included in a group picture The picture is taken approximately ten seconds after the shutter release button is pressed Z Use this mode to...

Страница 75: ...ter release button pressed Taking a Series of Pictures 1 Continuous Shooting Each time a picture is taken the image is saved in the memory before the next image is taken The higher the image quality t...

Страница 76: ...3 magnification using the optical zoom When the digital zoom function is set to O On you can combine it with the optical zoom to enlarge the subject to a maximum magnification equivalent to 12 Using t...

Страница 77: ...ears 2 Use the four way controller 23 to select Digital Zoom 3 Use the four way controller 45 to select O On or P Off The selected setting is saved 4 Press the 3 button The setting is complete and the...

Страница 78: ...2 0 EV to 2 0 EV in 1 3 EV steps 4 Press the 3 button The setting is complete and the camera returns to capture status Setting the Exposure EV Compensation If you use the EV compensation function freq...

Страница 79: ...2 In s mode the Green Mode screen appears p 66 You cannot change the information displayed on the LCD monitor by pressing the 4 W button Only z or e and the focus frame are displayed on the LCD monito...

Страница 80: ...too bright the peak is on the right side When the image is too dark the part to the left is cut off dark portions and when the image is too bright the part to the right is cut off bright portions Brig...

Страница 81: ...ect is approx 10 cm to 1 m 3 9 in to 39 4 in The camera is focused on the subject in the autofocus area when the shutter release button is pressed halfway r Super Macro This mode is used when the dist...

Страница 82: ...and the camera returns to capture status The focus position is fixed five seconds after you remove your finger from the four way controller After the focus is fixed you can press the four way controll...

Страница 83: ...reflected in the subject s eyes The flash discharges automatically d Flash On Red eye This mode reduces the phenomenon of red eyes caused by the light from the flash being reflected in the subject s e...

Страница 84: ...the Playback mode to reduce Red Eye refer to p 134 Auto Auto Auto Flash Mode Flash Mode Flash Mode OK OK OK OK About the red eye phenomenon Taking pictures using the flash may cause the subject s eye...

Страница 85: ...larger the picture and the bigger the file size The file size also varies depending on the quality level setting p 85 Recorded Pixels 1 Press the 3 button in A mode The A Rec Mode menu appears 2 Use...

Страница 86: ...returns to capture status with the current setting When shooting mode is set to Y recorded pixels is fixed at h When shooting mode is set to d the number of recorded pixels set in Movie on the record...

Страница 87: ...cted quality level is displayed when the Quality Level setting is changed 5 Press the 4 button The Quality Level setting is saved 6 Press the 3 button The camera returns to capture status with the cur...

Страница 88: ...at D When shooting mode is set to d the quality level set in Movie on the recording mode menu is set p 103 If you use the Quality Level function frequently you can save time by assigning it to the Gr...

Страница 89: ...adjusts the white balance automatically G Daylight Use this mode when taking pictures outside in sunlight H Shade Use this mode when taking pictures outside in the shade I Tungsten Light Use this mode...

Страница 90: ...ent so that it fits the frame at the center of the LCD monitor 3 Press the shutter release button fully The white balance is automatically adjusted 4 Press the 4 button The setting is saved and the sc...

Страница 91: ...nt setting Changing the Focusing Area J Multiple default setting Normal range K Spot The autofocus range becomes smaller W Automatic Tracking AF Keeps moving subjects in focus In d and Y modes Focusin...

Страница 92: ...tting Setting the Sensitivity Auto default setting Sensitivity is automatically adjusted to between ISO 50 and 800 50 The lower the sensitivity the less noise that affects the image The shutter speed...

Страница 93: ...ooting mode is set to c the sensitivity is automatically adjusted to between ISO 50 and 3200 If you use the Sensitivity function frequently you can save time by assigning it to the Green button p 55 S...

Страница 94: ...5 Press the 4 button The Instant Review setting is saved 6 Press the 3 button The camera returns to capture status with the current setting Setting the Instant Review Time Instant Review Instant Revi...

Страница 95: ...F Soft G Normal default setting H Hard 4 Press the 3 button The Sharpness setting is saved and the camera returns to capture status Setting the Image Sharpness Sharpness If you use the Sharpness funct...

Страница 96: ...Normal default setting H High 4 Press the 3 button The Saturation setting is saved and the camera returns to capture status Setting the Color Saturation Saturation If you use the Saturation function...

Страница 97: ...ow G Normal default setting H High 4 Press the 3 button The Contrast setting is saved and the camera returns to capture status Setting the Image Contrast Contrast If you use the Contrast function freq...

Страница 98: ...Imprint b appears on the LCD monitor when Date Imprint is set to O On However b does not appear when Date Imprint is set to O On in z or e mode The date imprinted with the Date Imprint function canno...

Страница 99: ...turned off The table below also shows whether the Memory default setting for each item is on or off Item Description Default Setting Flash Mode The flash mode set with the four way controller 4 p 81 O...

Страница 100: ...n item 5 Use the four way controller 45 to select O On or P Off 6 Press the 4 button The Memory setting is saved 7 Press the 3 button The camera returns to capture status with the current setting Rec...

Страница 101: ...ears on the LCD monitor 1 Movie mode icon 2 Focus mode icon 3 Recording indicator appears when recording begins in Step 4 and blinks during recording 4 Recording time 5 Movie anti shake icon appears w...

Страница 102: ...s up to 2 GB remaining recording time appears on the recording screen For SD Memory Cards whose capacity is 4 GB or more the remaining recording time with 2 GB as the maximum appears on the recording...

Страница 103: ...r 5 The Movie screen appears 4 Use the four way controller 23 to select Recorded Pixels 5 Press the four way controller 5 A pull down menu appears Selecting the Recorded Pixels for Movies m 640 480 de...

Страница 104: ...time for the selected recorded pixels is displayed when the Recorded Pixels setting is changed 7 Press the 4 button The Recorded Pixels setting is saved 8 Press the 3 button twice The camera returns...

Страница 105: ...r the selected quality level is displayed when the Quality Level setting is changed 7 Press the 4 button The Quality Level setting is saved 8 Press the 3 button twice The camera returns to capture sta...

Страница 106: ...enu appears 6 Use the four way controller 23 to select 30fps default setting or 15fps Recording time for the selected frame rate is displayed when the Frame Rate setting is changed 7 Press the 4 butto...

Страница 107: ...5 A pull down menu appears 6 Use the four way controller 23 to choose a color 7 Press the 4 button The Color Mode setting is saved 8 Press the 3 button twice The camera returns to capture status with...

Страница 108: ...er 23 to select Movie SR 5 Use the four way controller 45 to select O On default setting or P Off The Movie SR movie anti shake setting is saved 6 Press the 3 button twice The camera returns to captur...

Страница 109: ...Q button for approximately two seconds to display the pictures stored in the built in memory with the SD Memory Card inserted Browse built in memory 1 Press the Q button or shutter release button half...

Страница 110: ...108 5 Playing Back and Deleting Images Refer to Playing Back Images p 41 for instructions Playing Back Still Pictures...

Страница 111: ...e appears Similarly if you choose image 2 and press the four way controller 35 the next page appears The icons that appear on the images indicate the following No icon Still picture without sound O wi...

Страница 112: ...format The first image recorded on a date is displayed for that date on the calendar O appears for dates on which a sound file was first recorded Use the four way controller 2345 to move the selection...

Страница 113: ...hanges the magnification continuously You can use the guide at the bottom left of the screen to check which portion of the image is magnified The following operations can be performed while the magnif...

Страница 114: ...er 23 to select Quick Zoom 3 Use the four way controller 45 to select O On or P Off O Jumps to 8 magnification P Turning the Zoom f y lever toward y once magnifies the image in stages from 1 1 to 8 0...

Страница 115: ...18 for details of each display mode Displaying Shooting Information in Playback Mode Displaying Shooting Information 1p 77 OK OK OK 14 25 14 25 14 25 100 100 0026 0026 100 0026 F3 3 F3 3 1 250 1 250...

Страница 116: ...the slideshow To resume the slideshow press the 4 button while the slideshow is paused 5 Press any button other than the 4 button or the power switch The slideshow stops You can set the playback inter...

Страница 117: ...reen effect is set to Off you can choose O On or P Off for the sound that is played when one image changes to the next 10 Press the 4 button The slideshow starts using the selected interval and effect...

Страница 118: ...be performed during playback Four way controller 4 Reverse playback Four way controller 2 Pause Zoom w x lever x Increases the volume Zoom w x lever w Reduces the volume The following operations can...

Страница 119: ...evice that plays back images are different turn both devices on When viewing images on AV equipment with multiple video input terminals such as a TV refer to the operation manual of the device and sel...

Страница 120: ...ton The confirmation screen appears 3 Use the four way controller 23 to select Delete 4 Press the 4 button The image or sound file is deleted Deleting a Single Image Sound File Protected images and so...

Страница 121: ...2 Press the i button The confirmation screen appears 3 Use the four way controller 23 to select Delete Sound 4 Press the 4 button The sound file is deleted Deleting a Sound File Select Delete in Step...

Страница 122: ...on O appears on the selected images and sound files If you select an image and turn the Zoom f y lever toward y the selected image appears in single image display as long as the lever is turned enabli...

Страница 123: ...n A confirmation dialog appears 5 Use the four way controller 23 to select Select Delete 6 Press the 4 button The selected images and sound files are deleted Cancel MENU Delete all selected images sou...

Страница 124: ...2 Press the i button A confirmation dialog appears 3 Use the four way controller 23 to select Delete All 4 Press the 4 button All the images and sound files are deleted Deleting All Images and Sound...

Страница 125: ...und appears To protect another image or sound file use the four way controller 45 to select another image or sound file 6 Use the four way controller 23 to select Protect 7 Press the 4 button The sele...

Страница 126: ...electing Protect or Unprotect appears 6 Use the four way controller 23 to select Protect 7 Press the 4 button All the images and sound files are protected Protecting All Images and Sound Files Protect...

Страница 127: ...e and use the four way controller 45 to choose the image you want to resize 2 Press the four way controller 3 The Playback Mode Palette appears 3 Use the four way controller 2345 to select n Resize 4...

Страница 128: ...ity Level 6 Press the 4 button A confirmation dialog for overwriting the image appears If the image is protected a confirmation screen does not appear The image is automatically saved with a new file...

Страница 129: ...he Cropping screen appears 5 Choose the cropping conditions Zoom f y lever Changes the size of the cropped section Four way controller 2345 Moves the cropping position up down left and right Green but...

Страница 130: ...Press the 4 button The copying method selection screen appears All the images and sound files in the built in memory are copied to the SD Memory Card at once Before copying the images make sure that t...

Страница 131: ...Memory Card to the Built in Memory If you press the four way controller 2 in Step 6 playback of movies sound or picture with sound begins Press the four way controller 3 during playback to stop You ca...

Страница 132: ...s 5 Use the four way controller 23 to choose a digital filter If you choose a Color extract filter use the four way controller 45 to select the color to extract You can preview the results of the filt...

Страница 133: ...rightness adjustment 6 Press the 4 button A confirmation dialog for overwriting the image appears 7 Use the four way controller 23 to select Overwrite or Save as If the image is protected a confirmati...

Страница 134: ...on A 9 frame display of the frame selection screen appears 5 Use the four way controller 2345 to choose a frame 6 Press the 4 button or turn the Zoom f y lever toward y The selected frame appears in s...

Страница 135: ...e is saved with the recorded pixels of h Frames downloaded from a website or other source can be used when taking pictures To display the frames available in the built in memory or the SD Memory Card...

Страница 136: ...er 23 to select Overwrite or Save as If the image is protected a confirmation screen does not appear The image is automatically saved with a new file name 6 Press the 4 button The edited image is save...

Страница 137: ...nnot store print order data for movies or sound only files Set the following items for each image 1 Press the four way controller 3 in Q mode The Playback Mode Palette appears 2 Use the four way contr...

Страница 138: ...the four way controller 45 to choose another image and repeat Steps 6 and 7 8 Press the 4 button The DPOF settings are saved and the screen returns to the DPOF menu Depending on the printer or printin...

Страница 139: ...ies and whether to insert the date or not Refer to Steps 6 and 7 in Printing Single Images p 136 for details of how to make the settings 5 Press the 4 button The DPOF settings for all the images are s...

Страница 140: ...ection screen appears You are recommended to use the AC adapter kit K AC64 when the camera is connected to the printer The printer may not work properly or the image data may be lost if the battery ru...

Страница 141: ...o the print settings on the printer press the 4 button To change the print settings go to Step 7 7 Press the Green button The screen for changing the print settings appears 8 Select Paper Size and pre...

Страница 142: ...nted according to the settings made on the printer Paper Type with more E supports higher quality paper Quality with more E indicates higher print quality The print settings screen appears after each...

Страница 143: ...ls of how to make the settings 4 Press the 4 button A confirmation dialog appears Refer to Steps 7 to 11 of Printing Single Images p 139 p 140 for details of changing print settings 5 Press the 4 butt...

Страница 144: ...log appears Refer to Steps 7 to 11 of Printing Single Images p 139 p 140 for details of changing print settings 4 Press the 4 button on the print settings confirmation screen The images are printed ac...

Страница 145: ...the four way controller 3 in A mode The Capture Mode Palette appears 2 Use the four way controller 2345 to select O Voice Recording 3 Press the 4 button The remaining recordable time and the recording...

Страница 146: ...Green button is pressed during recording an index is added to the current sound file 5 Press the shutter release button fully Recording stops If you press and hold down the shutter release button for...

Страница 147: ...Four way controller 5 Fast forwards playback If there are recorded indexes Four way controller 4 Plays back starting from the previous index Four way controller 5 Plays back starting from the next in...

Страница 148: ...3 Use the four way controller 2345 to select Voice Memo 4 Press the 4 button Recording starts You can record a voice memo until the built in memory SD Memory Card is full or up to 24 hours consecutiv...

Страница 149: ...ice memos in single image display 2 Press the four way controller 2 Playback starts The following operations can be performed during playback Zoom w x lever x Increases the volume Zoom w x lever w Red...

Страница 150: ...amera returns to Capture mode or Playback mode Formatting an SD Memory Card or the Built in Memory Do not remove the SD Memory Card during formatting as this may damage the card and render it unusable...

Страница 151: ...lt setting is 3 Set the volume to 0 to mute the start up sound shutter sound operation sound and self timer sound 5 Use the four way controller 23 to select Start up Sound 6 Press the four way control...

Страница 152: ...press 4 button The selected sound type is saved 8 Set Shutter Sound and Operation Sound in the same way as in Steps 5 to 7 Use the four way controller 45 to select O On or P Off for the self timer so...

Страница 153: ...oller 23 to choose the date display style Choose mm dd yy dd mm yy or yy mm dd 5 Press the four way controller 5 The frame moves to 24h 6 Use the four way controller 23 to select 24h 24 hour display o...

Страница 154: ...h 11 Press the four way controller 5 The frame moves to the day field Use the four way controller 23 to change the day After changing the day change the year in the same manner 12 Change the time in t...

Страница 155: ...tination screen appears The city that is currently selected blinks on the map 5 Use the four way controller 45 to change the Destination city The current time location and time difference of the selec...

Страница 156: ...as the Destination city W Displays the time in the city selected as the Hometown city 6 Press the 4 button The Select time setting is saved 7 Press the 3 button twice The camera returns to A mode or Q...

Страница 157: ...23 to select Language on the u Setting menu 2 Press the four way controller 5 The Language screen appears 3 Use the four way controller 2345 to select the language 4 Press the 4 button The selected la...

Страница 158: ...XXX_mmdd 3 digit folder number_month day xxx_ddmm 3 digit folder number_day month when the date style is set to dd mm yy Standard XXXPENTX where XXX is the 3 digit folder number Setting 10 10 2007 La...

Страница 159: ...necting the camera to a PictBridge compatible printer 4 Press the 4 button The USB Connection setting is saved Changing the USB Connection Mode Refer to the PC Connection Manual for instructions on co...

Страница 160: ...ton The Video Out setting is saved Changing the Video Output Format Depending on the country or region images and sound files may fail to be played back if the video output format is set different fro...

Страница 161: ...he 3 button The camera returns to Capture mode or Playback mode The LCD monitor is displayed with the set brightness To change the brightness setting perform the above steps again Adjusting the Bright...

Страница 162: ...ct 2min 1min 30sec 15sec 5sec default setting or Off 4 Press the 4 button The Power Saving setting is saved Using the Power Saving Function Power Saving does not function in the following situations i...

Страница 163: ...ting or Off 4 Press the 4 button The Auto Power Off setting is saved Setting Auto Power Off Auto Power Off does not function in the following situations during a slideshow and movie or sound playback...

Страница 164: ...f The following setting is saved O On Display P Off default setting Hide 3 Press the 3 button The camera returns to Capture mode or Playback mode To change the setting perform the above steps again Se...

Страница 165: ...ears 3 Use the four way controller 23 to select Reset 4 Press the 4 button The settings return to the defaults Resetting to Default Settings Reset The following settings are not affected by resetting...

Страница 166: ...appears 5 Use the four way controller 45 to choose an image for the start up screen 6 Press the 4 button The Start up Screen setting is saved Changing the Start up Screen Once the start up screen has...

Страница 167: ...o NTSC Dubai PAL New York NTSC Karachi PAL Halifax NTSC Kabul PAL Central and South America Mexico City NTSC Male PAL Lima NTSC Delhi PAL Santiago NTSC Colombo PAL Caracas NTSC Kathmandu PAL Buenos Ai...

Страница 168: ...oumea PAL Wellington PAL Auckland PAL Pago Pago NTSC The video output mode shown in the Video output column in the table above is selected when Hometown is selected in Initial Setting p 34 Change the...

Страница 169: ...No The setting is saved even after reset A Rec Mode Menu Items Item Default Setting Last Memory Setting Reset Setting Page Recorded Pixels a 3264 2448 Yes Yes p 83 Quality Level D Better Yes Yes p 85...

Страница 170: ...timer Sound O On Yes Yes Date Adjust Date Style date According to initial setting Yes No p 37 Date Style time According to initial setting Yes No Date According to initial setting Yes No Time Accordin...

Страница 171: ...O On Yes Yes Start up Screen Optio Logo screen 1 Yes Yes p 164 Item Function Default Setting Last Memory Setting Reset Setting Page Q button Operation Mode Q mode Zoom w x lever Zoom Position Wide Ye...

Страница 172: ...es No Yes s Infinity No Yes Yes Yes Yes No Yes Yes Yes Yes Yes 3 Pan Focus Yes Yes Yes Yes Yes No Yes Yes Yes Yes Yes Manual Focus No Yes Yes Yes Yes No Yes Yes Yes Yes Yes Recorded Pixels Yes Yes Yes...

Страница 173: ...geable lithium ion battery D LI63 Battery charger kit K BC63 including Battery charger D BC63 and AC plug cord AC adapter kit K AC64 including AC adapter D AC64 and AC plug cord The battery charger an...

Страница 174: ...ion of images has failed Change the quality level size and record or save again No image sound There are no image sound files on the SD Memory Card Movie recording stopped This message appears when th...

Страница 175: ...message appears when there is not enough memory to copy to the SD Memory Card built in memory Insert a new SD Memory Card or delete unwanted images p 26 p 118 The built in memory is not enough to copy...

Страница 176: ...rk Adjust the brightness level in Brightness Level in the Setting menu p 159 Power Saving function is on When the Power Saving function is on the LCD monitor automatically darkens after a certain amou...

Страница 177: ...t is not in the focusing area Locate the desired subject in the focus frame focusing area in the center of the LCD monitor If it is difficult to do so first lock the focus on the desired subject focus...

Страница 178: ...ture JPEG Exif 2 2 DCF DPOF PictBridge PRINT Image Matching III Movie AVI Motion JPEG approx 30fps 15fps PCM system with monaural sound full color sepia black and white Movie anti shake function Sound...

Страница 179: ...6 mm 108 mm in 35 mm format Aperture f 3 1 f 5 9 Lens Composition 6 elements in 5 groups four aspherical elements Zoom Type Electrically driven Picture Range Approx 47 mm 35 2 mm screen is filled Supe...

Страница 180: ...n be set in 1 3 EV steps Shooting Modes Green Auto Picture Program Night Scene Movie Voice Recording Landscape Flower Natural Skin Tone Portrait Surf Snow Sport Digital SR Blur reduction Kids Pet Food...

Страница 181: ...min In Out Port PC AV terminal DC input terminal Video Output Format NTSC PAL monaural PictBridge Printer PictBridge compatible printer Print Modes Print One Print All DPOF AUTOPRINT Paper Size Card...

Страница 182: ...facturer If there is no representative of the manufacturer in your country send the equipment to the manufacturer with postage prepaid In this case it will take a considerable length of time before th...

Страница 183: ...rs in some countries can supersede this warranty policy Therefore we recommend that you review the warranty card supplied with your product at the time of purchase or contact the PENTAX distributor in...

Страница 184: ...nterference to radio communications However there is no guarantee that interference will not occur in a particular installation If this equipment does cause harmful interference to radio or television...

Страница 185: ...pliant with the standards Records maintained continue to reflect the equipment being produced can be expected to be within the variation accepted due to quantity production and testing on the statisti...

Страница 186: ...In some countries your local retailer may also take back your old product free of charge if you purchase a similar new one Please contact your local authority for further details By disposing of this...

Страница 187: ...54 71 D Food 54 Y Frame Composite 54 69 A AC adapter 25 Adapter plug 23 Adding sound Voice Memo 146 Auto 81 Auto F 87 Auto Power Off 161 Autofocus 89 AV equipment 117 B B W 105 130 Basic mode 66 Batt...

Страница 188: ...togram 78 I Infinity s 79 Installing battery 21 Instant Review 40 92 L Language 34 155 M 3 button 44 46 Macro q 79 Magnify y 111 Manual Focus 79 Manual K 87 Memory 97 Movie SR 106 N Nine image display...

Страница 189: ...ct time 154 Self timer g 72 Sensitivity 90 Sepia 105 130 Setting the exposure 76 Shade H 87 Sharpness 93 Shooting information 77 113 Shooting mode 52 Shutter release button 40 43 45 Slideshow 114 Soft...

Страница 190: ...Memo...

Страница 191: ...Memo...

Страница 192: ...ough Berks SL3 8PN U K http www pentax co uk PENTAX France S A S 112 Quai de Bezons B P 204 95106 Argenteuil Cedex FRANCE http www pentax fr PENTAX Italia S r l Via Dione Cassio 15 20138 Milano ITALY...

Отзывы: