background image

AIR10-1420A Operation Manual 

Performance  of  AIR10-1420A  Manipulator 


27 


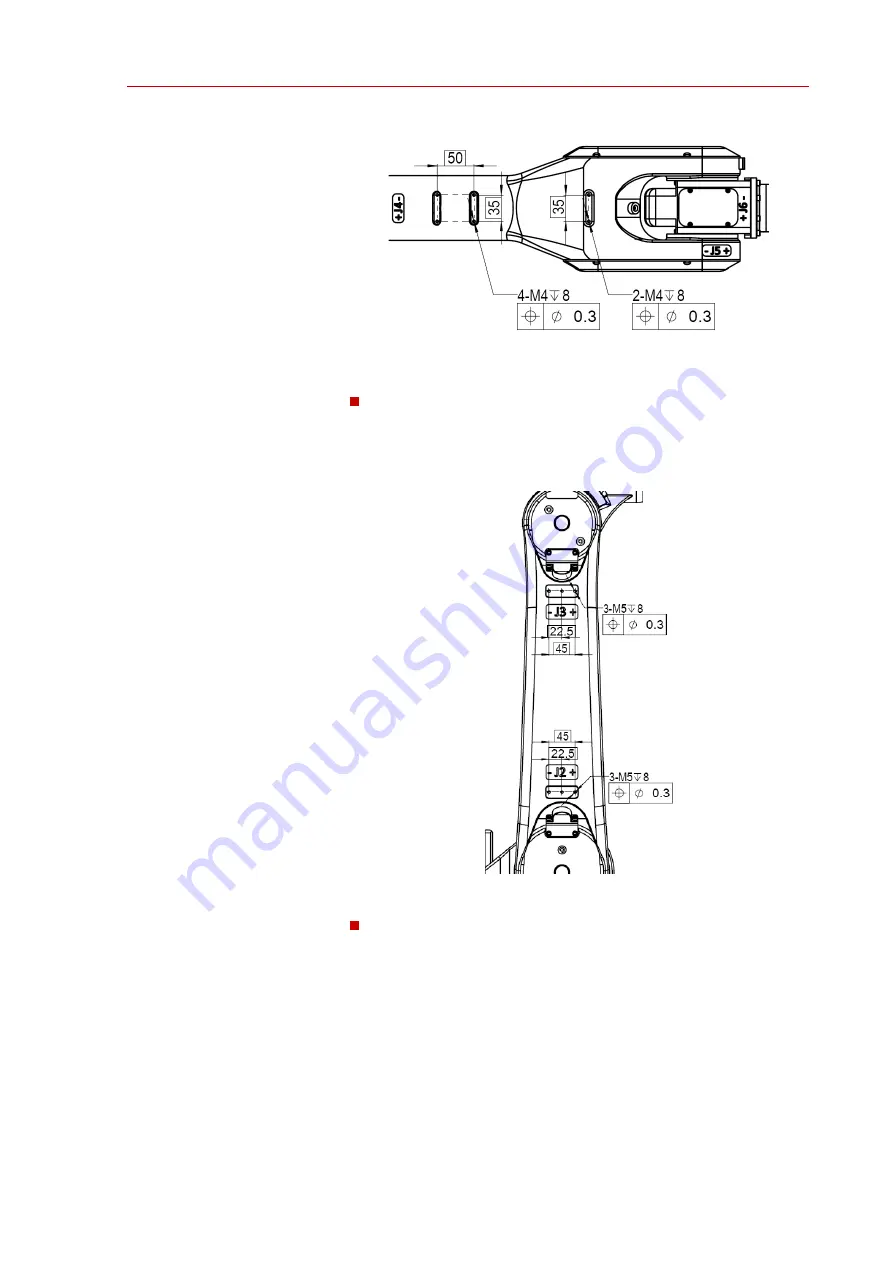
Fig. 9-6 Diagram of AIR10-1420A Manipulator Forearm Interface 


Fixing Location of Manipulator Upper arm 

Interface specification and size of manipulator upper arm is as shown in 

Fig. 9-7. 


Fig. 9-7 Diagram of AIR10-1420A Manipulator Upper Arm 


Fixing Location of Manipulator Shoulder 

Interface specification and size of manipulator shoulder is as shown in 

Fig. 9-8. 

Содержание AIR10-1420A

Страница 1: ...AIR10 1420A Manipulator Manual Peitian Robot A solution provider for intelligent equipment manufacturing industry ...

Страница 2: ......

Страница 3: ...ibe as much information as possible in this manual However we haven t described those unnecessary and impossible situations for various reasons Therefore those information which are not described in the manual can be seen as impossible The products described in the manual is in accordance with Foreign Trade Law of the People s Republic of China If the products are exported to other countries the p...

Страница 4: ...re to follow these instructions may lead to accident and cause serious or fatal personnel injury or severe articles damage Electric shock This electrical hazard may result in severe personal injury or death Caution It indicates the environmental conditions and important matters or shortcut operation methods needed to be noticed Prompt It indicates that other references or instructions shall be rea...

Страница 5: ...d notices This manual contains various attentions including operating personnel safety and preventing manipulator damage The significance of safety is described in form of Warning and Caution and other supplementary instructions are stated in form of Notices Please thoroughly read the these matters described in Warning Caution and Notices Warning Faulty operation may lead to death or serious injur...

Страница 6: ...tor Any operation in wrong methods may lead turnover of the manipulator and then result in injury and death of operating personnel Warning Please operate the manipulator in low speed and then increase the speed gradually to ensure whether it is abnormal when the manipulator is used for the first time upon installation Attentions during the operation Warning During the manipulator operation please ...

Страница 7: ...o proper training through the course provided by the company Attentions during the maintenance Warning Some maintenances have electric shock hazard when powered on thus it shall be carried out under the disconnection of the manipulator and system power supply Professional maintenance personnel shall be designated to take maintenance as required other personnel shall be avoided to switch on power i...

Страница 8: ...ment shall be used to prevent overlarge operation burden for operating personnel Meanwhile any mistake shall be avoided otherwise it will cause injury and death of operating personnel Warning Don t tumble due to the lubricating oil scattered on the floor and wipe it off for ruling out the possibility of danger Warning During the operation any part of the body cannot be put on the manipulator and c...

Страница 9: ...l debris water etc scattered on the floor around the manipulator and in the safety barriers shall be swept thoroughly Warning Dust and other foreign matters are not allowed in the manipulator during the components replacement Warning Operating personnel who are in charge of maintenance and repair shall accept the company s training and pass the examination Warning During the maintenance appropriat...

Страница 10: ...ons except for that of the operator Carry out demonstration etc in the safety barrier Maintenance engineer Carry out operations except for that of the operator Carry out demonstration etc in the safety barrier Perform manipulator maintenance repair regulation replacement etc Operator cannot operate in the safety barrier Programmer and maintenance engineer can operate in the safety barrier The oper...

Страница 11: ...ide the manipulator motion range as far as possible The motion range of the manipulator shall be marked with a line on the ground and other ways thus the operator knows clearly about the motion range including mechanical arm and other tools fitted on the manipulator The ground shall be set with cushion switch or fitted with photoelectric switch etc so as to sound alarm through buzzer or to glows e...

Страница 12: ...ntermediate speed to ensure there is no abnormal sign 5 Execute programming under automatic operation mode Programmer shall evacuate to the outer place of the safety barrier during automatic operation of the manipulator The safety of maintenance engineer To ensure the safety of maintenance engineer the following items shall be fully noticed During the manipulator operation don t enter into its mot...

Страница 13: ...d peripheral equipment operate synchronously In order to control status of all equipment from manipulator the manipulator and peripheral equipment can be mutually locked and the operation of manipulator can be stopped according to the needs Attentions on machinery Keep the system of the manipulator clear and use it under environment without influence from grease water dust etc Cutting fluid and cl...

Страница 14: ...g environment of the manipulator clear and use it under environment without influence from grease water and dust etc Safety for end effector Time difference before the command reaches the actual operation shall be fully considered and exercise the control with some extension and contraction after sending control command out when controlling all actuators pneumatic hydraulic and electric Set the de...

Страница 15: ...nological Specifications 7 4 2 Fixing Mode 8 5 AIR10 1420A Manipulator Electrical Connections 11 5 1 Electrical Interface Type for Manipulator 11 5 2 Definitions of Heavy duty Connector of Manipulator 11 6 Transport and Handling 13 6 1 Handling posture 13 6 2 Handling dimensions 14 6 3 Handling with Forklift 15 6 4 Handling with Swing Ring 16 7 Accessories and Connectors on Manipulator 18 7 1 Exam...

Страница 16: ...e 34 13 Project maintenance process 37 13 1 operator cleaning 37 13 2 cable maintenance 37 13 3 Battery replacement 40 13 4 changing grease 41 13 5 replace synchronous belt 45 14 Common faults and handling 48 15 Storage condition 54 15 1 Environmental conditions for long term storage of the operator 54 15 2 Precautions for storage of operator 54 Appendix A Appendix A periodic maintenance form of A...

Страница 17: ...Product Standards The requirements for industrial robot system design are detailed in Table 1 2 Table 1 2 Declaration of Applicable Safety Standards Standard Description Version 2006 42 EC Machinery directive Machinery directive 2006 42 EC new version issued by European Parliament and Council on May 17 2006 to modify 95 16 EC 2006 2014 30 EU Electromagnetic compatibility directive 2014 30 EU direc...

Страница 18: ...000 6 2 Electromagnetic compatibility EMC Part 6 2 Generic standards Immunity for industrial environments 2005 61000 6 4 A1 Electromagnetic compatibility EMC Part 6 4 Generic standards Emission standard for industrial environments 2011 60204 1 A1 Safety of machinery Electrical equipment of machines Part 1 General requirements 2009 IEC 60529 IP rating provided by enclosures IP Code This standard ap...

Страница 19: ...mechanism of robot system to grab or move the objects tools or workpieces also known as the robot body This manipulator is the 6 DOF tandem industrial robot that consists of three swing axes and three rotating axes AIR10 1420A robot manipulator and the names of its various parts are as shown in Fig 2 2 Fig 2 2 AIR10 1420A Robot Body and Its Various parts 2 inCube10 3 AIR TP 1 AIR10 1420A J6 flange...

Страница 20: ...600 s Transport capacity Wrist 10kg Elbow 12kg Drive mode Electrical servo drive with AC servo motor Repeated positioning accuracy 0 02mm Robot weight 160kg Noise 70dB IP rating IP54 wrist IP67 Mounting conditions Ambient temperature 0 45 Humidity not more than 95 at constant temperature without condensation Allowable altitude not more than 1000m above sea level No corrosive flammable or explosive...

Страница 21: ... manipulator shall not be more than 95 as specified in IEC 60721 3 3 2002 Classification of environmental conditions Altitude The altitude of normal operation environment for manipulator shall not exceed 1 000 m and the manipulator shall be derated from 1 000 m to 4 000 m Anti vibration Robot manipulator shall be used in an environment where there is no vibration The limit frequency of ambient vib...

Страница 22: ...tion site can withstand the pressure or pull from the manipulator and its load 3 2 Installation Tool and Required Connectors for Robot Body The following tools may be required to install the manipulator more tools may be required depending on the installation method A set of Internal hexagonal wrench Adjustable wrench Torque wrenches of different specifications etc The following connectors may be ...

Страница 23: ...oundation installation surface for the installation of manipulator The installation ground inclination shall be less than 5 for manipulator Table 4 1 Force in Relation to the Installation Ground Force Value Force Z Fv 2071N Force XY Fh 2892N Torque XY Mk 2618Nm Torque Z Mr 1563Nm Manipulator Mass 160kg Max Load 22kg 10kg 12kg Dimensions of AIR10 1420A manipulator base are shown in Fig 4 1 Fig 4 1 ...

Страница 24: ...Chemical bolt Eight M20 Not Less than Grade 4 8 Fixing Plate of Robot 25mm 1 piece Installation Bracket 25mm 4 piece Prompt Mark means that the part is in need There shall be no insulating materials between the fixing plate and mounting bracket of robot and the manipulator and concrete Bracket shall be firmly installed on the ground with the strength not less than the fixing strength between the f...

Страница 25: ...eet certain flatness requirements as shown in Fig 4 3 Warning Fixing screw M20 of manipulator shall not be shorter than 40 mm and the insufficient length will cause the poor fixing and other accidents When installing the manipulator ceiling the length of fixing screws for manipulator shall be increased to 45 mm and the thickness of mounting plate shall be not less than 30 mm Manipulator base M20X4...

Страница 26: ...AIR10 1420A Operation Manual Installation of Robot Body 10 a b Fig 4 3 Schematic Diagram of Bracket Fixing for Manipulator Manipulator Base M20X40 Screw Installing Bracket M20 Chemical Bolt Concrete 0 5 ...

Страница 27: ...r plug and heavy duty are provided on the AIR10 1420A manipulator base shown in Fig 5 1 Fig 5 1 Heavy duty Connector on AIR10 1420A Manipulator 5 2 Definitions of Heavy duty Connector of Manipulator Heavy duty interface of AIR10 1420A manipulator power line is defined as shown in Fig 5 2 and Table 5 1 Fig 5 2 Heavy duty interface of AIR10 1420A Manipulator HDD 072 MC HDD 072 ...

Страница 28: ...2 J5_PS 8 PE 32 PE 56 PE 9 GND 33 GND 57 GND 10 U1 34 U3 58 U5 11 V1 35 V3 59 V5 12 W1 36 W3 60 W5 13 J2_5V 37 J4_5V 61 J6_5V 14 J2_0V 38 J4_0V 62 J6_0V 15 J2_PS 39 J4_PS 63 J6_PS 16 J2_PS 40 J4_PS 64 J6_PS 20 20 PE 44 PE 68 21 A1 A2_ BR_24V 45 A3 A4_ BR_24V 69 A5 A6_ BR_24V 22 U2 46 U4 70 U6 23 V2 47 V4 71 V6 24 W2 48 W4 72 W6 Caution When the robot is connected pay attention to the one to one co...

Страница 29: ...siderations are as shown in Fig 6 1 during transporting the manipulator Fig 6 1 Considerations during transporting manipulator During transporting manipulator the followings shall be paid attention Do not pull eyebolt sideways Do not have impact on this part by grabber of forklift Do not chain or strap on the transport component 6 1 Handling posture AIR10 1420A manipulator during handling shall be...

Страница 30: ...osture of AIR10 1420A Manipulator Warning Manipulator shall be handled in strict accordance with the posture in the Table 6 1 otherwise it may fall due to unstable center of gravity 6 2 Handling dimensions The manipulator dimensions during handling are as shown in Fig 6 3 a ...

Страница 31: ...ndling 15 b c Fig 6 3 Handling Dimensions 6 3 Handling with Forklift Handling with forklift is as shown in Fig 6 4 Forklift shall meet the requirement for the weight of manipulator The total weight of manipulator and handling device is about 170kg ...

Страница 32: ...cause the damage to manipulator Manipulator posture during handling is subject to the description in Chapter 6 1 of this manual 6 4 Handling with Swing Ring Fig 6 5 Schematic Diagram of AIR10 1420A Manipulator Handling with Swinging Ring Handling with swinging ring is as shown in Fig 6 5 Lifting device shall meet the requirement for the weight of manipulator The total weight of manipulator and han...

Страница 33: ...ween the sling and manipulator to avoid the scratching on the manipulator body by sling Manipulator may turn over when transported with swinging ring During the handling please take special care to keep the manipulator steady Do not pull the swinging ring to the side to avoid the damage to the manipulator and the unpredictable failure ...

Страница 34: ... Accessories Accessories of manipulator are mainly including mechanical Grabber as shown in Fig 7 1 hydraulic or pneumatic suction cup as shown in Fig 7 2 welding torch as shown in Fig 7 3 infrared device visual device cutting off machine etc Fig 7 1 Mechanical Grabber Fig 7 2 Hydraulic or Pneumatic Suction Cup Fig 7 3 Welding Torch ...

Страница 35: ...n the payload and manipulator It is detailed in Chapter 9 6 of this manual Connecting with the Control Cabinet As Chapter 5 1of this manual defined the manipulator is connected with the control cabinet by one cable Definition of the control cabinet connector is shown in Fig 7 4 More details are included in Incube10 20 manual if necessary please see Power Encoder Body IO interface Fig 7 4 Definitio...

Страница 36: ...lator arm Fig 8 1 No Approaching Sign of Manipulator Danger The sign reminds the operators to stay away from the working area of manipulator Otherwise the injuries and deaths may be caused by manipulator 8 2 Manipulator Nameplate Manipulator nameplate is as shown in Fig 8 2 and usually located on the base The nameplate indicates the type range serial number date etc ...

Страница 37: ... at the rotating or swinging joints of axes 1 6 of manipulator as shown in Fig 8 3 to indicate the moving direction of each axle J1 in sign represents the axle 1 other axes are represented by the corresponding numbers indicates the positive direction and indicates the negative direction Fig 8 3 Direction Sign of Each Axle J1 J2 J3 J5 J6 J4 ...

Страница 38: ...e of Robot Body Range of manipulator is as shown in Table 9 1 the working envelope is as shown in Fig 9 1 Table 9 1 Motion Ranges of AIR10 1420A Manipulator Axle Axle Number Range J1 170 170 J2 85 150 J3 95 170 J4 195 195 J5 135 135 J6 360 360 If the mechanical limit of J1 axle is removed the range may reach 180 to 180 Care shall be taken when installing peripheral equipment to avoid the interfere...

Страница 39: ...n is lost due to the servo system abnormality and system error In addition an optional mechanical brake is also available on some axle to limit the movable range in order to further ensure the safety Fig 9 2 Mechanical Limits of AIR10 1420A Manipulator The position of mechanical Limits is as shown in Fig 9 2 Do not modify the mechanical limits Otherwise the robot may not stop properly J5 Mechanica...

Страница 40: ...e The flange interface specifications of AIR10 1420A manipulator are as shown in Table 9 3 and Fig 9 3 Please see Appendix B table of screw strength and tightening torque nm about screw tightening torque Fig 9 3 Diagram of AIR10 1420A Manipulator Flange Table 9 3 Specification of AIR10 1420A Manipulator Flange Orientation circle diameter 31 5mm or 63mm Reference circle diameter of screw hole 50mm ...

Страница 41: ...ist load diagram is as shown in Fig 9 4 Load shall be inside the range as shown in the diagram Allowable torque of J4 shall be less than 22Nm while J5 less than 22Nm and J6 less than 9 8Nm Allowable moment of inertia of J4 shall be less than 0 63kgm while J5 0 63kgm and J6 0 15kgm See table 2 1 for more manipulator specification a b Fig 9 4 Diagram of AIR10 1420A Manipulator Wrist Load External De...

Страница 42: ...ong time running Warning Do not machine holes or thread holes on the manipulator body otherwise the safety and function of manipulator may be destroyed The depth of screw shall be sufficiently considered during installing external device The depth of screw is not more than 10mm otherwise manipulator elbow may be hurt Elbow load centroid must be not out of the aforesaid value otherwise manipulator ...

Страница 43: ...r Forearm Interface Fixing Location of Manipulator Upper arm Interface specification and size of manipulator upper arm is as shown in Fig 9 7 Fig 9 7 Diagram of AIR10 1420A Manipulator Upper Arm Fixing Location of Manipulator Shoulder Interface specification and size of manipulator shoulder is as shown in Fig 9 8 ...

Страница 44: ... damaged The parts stated above are designed for fixing cable If it is used to install external device follows shall be guaranteed Forearm Load Wrist Load 10kg Shoulder Load Upper Arm Load Elbow Load 12kg Reliability shall be considered sufficiently when the external device is installed The screw grade 12 9 is proposed to use according to defined torque Thread locker shall be daubed on the thread ...

Страница 45: ...tuations occur in the manipulator recalibration is required There have been motor replacement or pulley removal and other maintenance Replaced the encoder battery Motor s encoder wire is loose or reinstalled The operator has experienced a strong collision Replaced the control cabinet or control system for example industrial computer 10 3 Calibration position of each axis The position of each axis ...

Страница 46: ...ement for the path positioning accuracy as long as it has a high repeated positioning accuracy the zero point of each axis can be calibrated according to the zero point of each axis shown in Fig 10 1 and the zero point of each axis can be aligned through visual observation as shown in Fig 10 2 Fig 10 2 Zero point calibration by naked eye Warning During the calibration of the operator speed shall b...

Страница 47: ...observe whether the zero scale on the axis position is aligned Caution When the calibration block is used for the calibration of the operator first observe the basic alignment of the calibration tank with the naked eye reduce the operating speed of the operator fine tune the shaft position and then use the calibration block for calibration The calibration block can be inserted into two calibration...

Страница 48: ... the device it is unnecessary maintenance and waste Robots are used to work in very demanding conditions and require minimal maintenance However daily inspection and regular maintenance must be carried out at given intervals The time interval in the maintenance table is the recommended value The actual time interval required for maintenance of the operator may change due to the actual working envi...

Страница 49: ...oints 1 Whether the cable and cable sheath of the operator are damaged abnormally and whether the motor connector is loose Observe the cable moving part of the operator check whether the cable is damaged whether there is local bending or twisting check whether the cable sheath is damaged check whether the motor connector is loose Note 1 2 Tighten the main external bolts Use a torque wrench to tigh...

Страница 50: ...his manual for tightening torque Note 3 About cleanliness Regularly clean the parts to be cleaned the accumulation of dust and splashes on the plane Special attention shall be paid to cleaning the rotating parts of J5 shaft and sundries shall be removed in time Confirm whether there is oil leakage from the reducer or gearbox After wiping off the oil when the oil can be seen after 1 day there may b...

Страница 51: ...e Every 3840 hours or 1 year of operation whichever is shorter the operator shall carry out the inspection and maintenance of the following items As shown in Table 12 5 Table 12 5 3840 hours 1 year maintenance items of the operator Serial number Inspection items Checkpoints 1 Whether the cable and cable sheath of the operator are damaged Refer to 12 2 first maintenance 2 Tighten the main external ...

Страница 52: ...r is shorter the operator needs to carry out the inspection and maintenance of the following items As shown in Table 12 8 Table 12 8 15360 hours 4 years maintenance items of the operator Serial number Inspection items Checkpoints 1 Replace the internal cable of the operator Please consult our company to replace the cable of the operator 19200 hours 5 years regular maintenance Every 5 years or 1920...

Страница 53: ...cted to the robot Clean the operator with a vacuum cleaner or wipe with a cloth After ensuring all safety conditions are met carry out follow up work of the operator Warning It is forbidden to use water jet on the operator especially the connector seal or cable inlet and outlet Do not use compressed air to clean the operator Do not remove any operator protection Do not use solvent to clean the ope...

Страница 54: ...tenance process of substructure Remove the electrical installation board as shown in Figure 13 2 and pull out the internal cable of the base Check whether the bracket can fix the cable on the operator in good condition Check whether there is abrasion or damage at the fixing place of cable and bracket Check the internal cable for wear or damage In case of any crack wear or damage the company shall ...

Страница 55: ...brasion or damage at the fixing place of cable and bracket Check the internal cable for wear or damage In case of any crack wear or damage the company shall be contacted in time for replacement Check whether the internal cable surface grease disappears If the lubricating grease on the cable surface disappears it shall be supplemented in time Install the cable inside the elbow Install the cable ret...

Страница 56: ...le Warning Please entrust the service department of our company to replace the internal cable of the operator The use of unqualified cable may cause the robot to fail to work normally 13 3 Battery replacement The position data of each axis of the operator shall be saved by the encoder battery The battery shall be replaced in time every 7860 hours or 2 years whichever is shorter The process is as f...

Страница 57: ...type and quantity of lubricating grease of the operator Model of operator Replacement of grease Grease content Grease model AIR10 1420A J1axis reducer 290g VIGOGREASE RE0 J2 shaft reducer 250g J3 shaft reducer 145g When changing the lubricating grease please refer to Table 13 2 for the operator attitude Table 13 2 Operator s attitude of changing lubricating grease Replacement of grease J1 J2 J3 J4...

Страница 58: ...the amount of grease injected both of which shall be equal if the amount of grease discharged is less than the amount of grease injected inflate the grease injection port to discharge the excess amount if the amount of grease discharged is greater than the amount of grease injected inject the amount of grease from the grease injection port in shortage Remove the grease injection nozzle install the...

Страница 59: ...3 3 Weigh the amount of grease discharged and the amount of grease injected both of which shall be equal if the amount of grease discharged is less than the amount of grease injected inflate the grease injection port to discharge the excess amount if the amount of grease discharged is greater than the amount of grease injected inject the amount of grease from the grease discharge port to be insuff...

Страница 60: ...13 3 Weigh the amount of grease discharged and the amount of grease injected both of which shall be equal if the amount of grease discharged is less than the amount of grease injected inflate the grease injection port to discharge the excess amount if the amount of grease discharged is greater than the amount of grease injected inject the amount of grease from the grease discharge port to be insuf...

Страница 61: ... supply operation the pressure in the reducer or gearbox may rise sharply and the internal parts such as the sealing ring may be damaged resulting in oil leakage or poor operation The following precautions must be observed Before supplying grease always remove the sealing screw of the grease outlet Use manual pump to slowly supply grease Always use the specified grease After the grease supply rele...

Страница 62: ... Move the motor pulley assembly remove the old synchronous belt and install the new one Install the motor base screw M4 preliminarily The Allen wrench is equipped with adjusting screw to adjust the synchronous belt to the appropriate tension the frequency of synchronous belt is 108 114hz which can also be measured by pressure method with pressure g 5N and deformation f 2 55mm Install the motor bas...

Страница 63: ...anual Project maintenance process 47 Fig 13 11 installation deflection of synchronous belt Warning After replacing the synchronous belt the J5 axis of the operator shall be calibrated See Chapter 10 of this manual for details ...

Страница 64: ...the workshop pedestal 2 It may be because the base is floated from the workshop pedestal and the impact vibration is generated when the manipulator moves due to loose screws insufficient flatness of the base and inclusion of foreign objects 1 When the screws are loose tighten them at an appropriate torque with a torque wrench 2 Trim the flatness of the base to meet the tolerance requirements 3 Che...

Страница 65: ... runs under overload for a long time vibration occurs when the grease has not been changed for a long time 1 It may be because the mechanical transmission system suffers excessive external force due to collision or overload which causes damage to the gear or rolling surfaces of gears bearings and reducers or peeling off due to fatigue 2 It may be because any foreign matter is trapped in the gear b...

Страница 66: ... 1 For faults of the control device please refer to the operation instructions for control device 2 Replace the motor on the vibration axis and check whether there is any vibration 3 Check whether the cables on the manipulator body the cables between the manipulator body and the control cabinet and the cables inside the control device are damaged and if yes replace them 4 Check whether the cable c...

Страница 67: ...f the power supply of the manipulator and after checking that the screws are tightened shake the whole head of the manipulator by hand 1 It may be because the internal gear of the manipulator is worn or damaged due to overload collision having a wide backlash 1 If you want to replace the internal gear please contact the company Motor overheating The temperature in the manipulator installation envi...

Страница 68: ... body of the motor fails and the motor loses its original performance which causes excessive current to flow through the motor which causes the motor to overheat 1 Please refer to vibration abnormal noise and looseness items to eliminate the mechanical fault 2 Please check whether the brake is released when the motor is powered on 3 When the motor overheating is eliminated after replacing the moto...

Страница 69: ...accuracy is stable It may be because the base surface and the joint surface between the castings of the axes and the reducer slide due to excessive loads such as collision 3 It may be because the motor encoder is faulty 1 When the repositioning accuracy is unstable please refer to the vibration abnormal noise and shaking items to eliminate the mechanical fault 2 When the repositioning accuracy is ...

Страница 70: ...uring long term storage Before long term storage the operator s posture shall be in the handling posture and placed on the horizontal plane See Chapter 4 of this manual for details When the operator is not in use for a long time cut off all the power supply unplug the heavy duty connector on the body and cover the protective cover of the heavy duty connector The paper or wooden packing box and oth...

Страница 71: ...ent 0 1h 〇 〇 〇 〇 〇 〇 〇 〇 〇 〇 〇 〇 〇 〇 〇 〇 〇 〇 〇 〇 〇 3 Check whether the timing belt is worn 0 5h 〇 〇 〇 〇 〇 〇 〇 〇 〇 〇 〇 4 Check whether the manipulator cable is damaged 3h 〇 〇 〇 〇 〇 〇 〇 〇 〇 〇 〇 5 Whether the manipulator wire tube is damaged 2h 〇 〇 〇 〇 〇 〇 〇 〇 〇 〇 〇 6 Check whether the connecting cables between the teach pendant control cabinet and manipulator are damaged 0 2h 〇 〇 〇 〇 〇 〇 7 Check whe...

Страница 72: ...0 70 M12 78 104 125 M14 113 165 195 M16 195 250 305 M20 370 500 600 Prompt All screws must be tightened with proper torque In addition to the torque specified in the text the corresponding tightening torque shall be selected according to the screw performance level Remove foreign matters from screws and threaded holes Torque applies to lightly lubricated screws Screws shall be tightened evenly and...

Страница 73: ......

Отзывы: