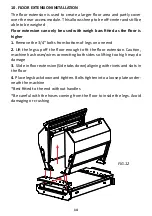
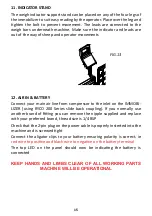
Peak Hill Industries IMMOBILIZER SHEEP WORKER Скачать руководство пользователя страница 22

22

TROUBLESHOOTING

SOLUTION

POSSIBLE CAUSE

PROBLEM

No power to machine

(No LED power on indica-

tion)

• Battery is flat/faulty

•  Aligator  clips  on  wrong 

terminal

•  2-Pin  power  plug  not 

inserted  properly  into 

machine/loose

• Charge/replace battery

• Ensure correct polarity i.e. red to 

red/black to black

• Check 2-pin plug is interted and 

tighten if needed

Battery low LED indicator Battery  is  low  in  power/ 

faulty

• Charge/replace battery

• Charge/replace battery

Sensor not triggering

• Battery is low

• Lens is dirty

• Incorrect adjustment

• Plug is loose

• Charge battery

• Clean lens of dirt and debris

• Aim sensor track into the path of 

oncoming sheep

•  Check  if  a  red  light  is  emitting 

from lens when power is on. If not, 

undo  the  sensor  cover  on  panel 

and tighten if plug is loose

Pads not clamping

• Air pressure set too low

• No power/air

•  Problem  with  air 

compressor 

• Raise pressure on regulator

• Connect battery/air in

• Check air compressor

Sheep is clamped in 

wrong position

• Pressure too low

• Sensor positioned wrong

• Sides set too wide allow-

ing  sheep  to  run  too  far 

through

• Raise pressure

•  Slide  sensor  to  desired  stop 

position

•  Adjust  width  so  sheep  are 

rubbing as they walk through

Sheep are jumping when 

entering machine

•  Jump  stop  set  too  far 

back

•  Move  jump  stop  up  and  over 

Rear Access Module if used or over 

the entry of the Immobilizer

Drafting  gates  triggering 

in  the  non-preferred 

direction

•  Switch  is  connected  to 

opposite  boosters  under 

Draft Module

•  Swap  the  8mm  hoses  around 

underneath Draft Module

Содержание IMMOBILIZER SHEEP WORKER

Страница 1: ...he Sheep Handling Equipment Specialists ABN 75 066 093 294 ACN 066 093 294 IMMOBILIZER SHEEP WORKER OPERATIONS MANUAL 3 METRE NON BACK LEADUP RAMP REAR ACCESS CRUTCH MODULE DRAFT MODULE FLOOR EXTENSIO...

Страница 2: ......

Страница 3: ...rking Height 10 Rear Access Module 10 Ramps 11 Jump Stop 11 Plant Stand 12 Draft Module 12 Weigh Bar Install 13 Floor Extension Install 14 Indicator Stand 15 Air In Battery 15 Adjustment 16 Sensor 16...

Страница 4: ...ting and crutching etc Sheep are gently immobilized and safely restrained suitable for handling all sized lambs and grown sheep including rams Automatic clamping of sheep means a stress free and fast...

Страница 5: ...ocation and can be quickly and easily set up or broken down for transport It will t in a 6 x 4 box trailer or can be easily loaded into a Ute or tray back The unit has 6 rubber wheels and fold out han...

Страница 6: ...6 684 mm 488 mm 865 mm 639 mm 1089 mm 1056 mm 3145 mm DRAFT MODULE IMMOBILIZER REAR ACCESS MODULE PLANT STAND RAMPS 2x1 5m DRAFT CONTROLLER IMMOBILIZER DIMENSIONS FIG 1 FIG 2...

Страница 7: ...ill be reduced Ensure the polarity is correct ie Red wire to positive Black wire to nega tive 6 Adjust machine correctly Width of pads adjusted so sheep are just rubbing as they enter machine pg 17 Bo...

Страница 8: ...rks best so sheep cannot turn around Have the panels set up so the last sheep can be seen by new sheep coming into leadup system The more sheep in single le the better Keep good access for dogs and pe...

Страница 9: ...9 4 10 m 400 mm 8 15 m 400 mm SINGLE DUAL HOLDING PEN FORCING PEN EXIT HOLDING PEN HOLDING PEN FORCING PEN EXIT HOLDING PEN Operator Position RECOMMENDED LEADUP SYSTEMS...

Страница 10: ...MODULE towards the machine lining up the anti luce with the two holes under the base sliding through until the REAR ACCESS MODULE sits fully onto the machine Lock the anti luce into position by ipping...

Страница 11: ...inverted channel at the exit end of ramp 1 c When the IMMOBILIZER is lined up and correctly positioned place the exit end of ramp 2 on the two vertical hooks on the machine or REAR ACCESS MODULE if yo...

Страница 12: ...the machine in a similar way to the REAR ACCESS MODULE Adjust the wheels so it is the same height as the machine unlock the anti luce fasteners and align them into the holes under the DRAFT MODULE ba...

Страница 13: ...se and replace them with your weigh scales Run the leads down through the base and zip tie to prevent pulling FIG 10 3 Line the scales with the mounting holes Using washers on both sides x with 3 8 x...

Страница 14: ...olts from bottom of legs on one end 2 Lift the legs up o the oor enough to t the oor extension Caution machine has hoses wires connecting both sides so lifting too high may do damage 3 Slide in oor ex...

Страница 15: ...sor to the inlet on the IMMOBI LIZER using RYCO 200 Series slide back coupling If you normally use another brand of tting you can remove the nipple supplied and replace with your preferred brand threa...

Страница 16: ...loosening the bolts either end of the track with a 9 16 spanner The sensor should point into the direct path of the incoming sheep FIG 14 The sensor can be seen running by a red glow emitting from in...

Страница 17: ...and rmly re tighten For width adjustment adjust so sheep are just rubbing pads as they walk through This minimises the time taken to clamp and fast sheep will not get further than slow seep Adjust he...

Страница 18: ...he grab pads can be adjusted by two turnbuckles behind each pad A softer more baggy grab and less air pressure may be better if han dling heavily pregnant ewes Turnbuckles may be xed with wire from fa...

Страница 19: ...es to familiarize yourself with the operation 2 Test the operation of the drafting gates by moving the switch from the closed position to the open position Move the switch back to the closed position...

Страница 20: ...e position the sheep if they are too far forward or too far back press the red button brie y to move the sheep in the machine and let go to re clamp 8 If the REAR ACCESS MODULE is being used open the...

Страница 21: ...to the thread to keep it working freely RAMPS A little oil on gates hinges and moving parts underneath will assist in smooth operation of the gates REAR ACCESS MODULE Oil on the latch and hinges will...

Страница 22: ...light is emitting from lens when power is on If not undo the sensor cover on panel and tighten if plug is loose Pads not clamping Air pressure set too low No power air Problem with air compressor Rai...

Страница 23: ...23 NOTES...

Страница 24: ...PEAK HILL INDUSTRIES PO Box 82 176 Caswell Street PEAK HILL NSW 2869 Phone 02 6869 1700 Fax 02 6869 1492 Mobile 0428 638 922 Email billbyrne peakhillindustries com au www peakhillindustries com au...

Отзывы: