background image


MODEL:


med

TAB

19D/


med

TAB

16D


/


med

TAB

14D


Document Number:


PD196-434R1 


User Manual 

 medTAB

®

 with GENiO


Page 13 of 21 


PDi Communication Systems, Inc. 

 40 Greenwood Ln 

 Springboro, Ohio 45066 USA 


www.pdiarm.com

 an

www.mymedTV.com


 Phone 800.628.9870 


NOTE:

 If the SETUP screen goes blank while you are changing any settings, simply touch the screen or press SETUP on the 

programming remote PD108-420. 
 

Accessing TV Settings and Setup 

To make changes to the television settings, you must first open the green TV app found on the Main Menu.  Touch the screen to get 
the pop-

up TV remote or if using a 14” or 16” TV you can press SETUP on the PD108

-420 programming remote. Touch Settings 

sprocket to open TV Settings on the TV app user controls.  Enter the Settings menu password (See pg. 10 for default password) 

then touch the blue checkmark on the touchscreen or press “OK” on remote.  


From the onscreen user interface, press Settings on the TV app user controls or press SETUP on the PD108-420 remote.  The 
Settings menus are password protected.  Enter password (See pg. 10 for default password) then touch the blue checkmark on the 

touchscreen or press “OK” on remote.  


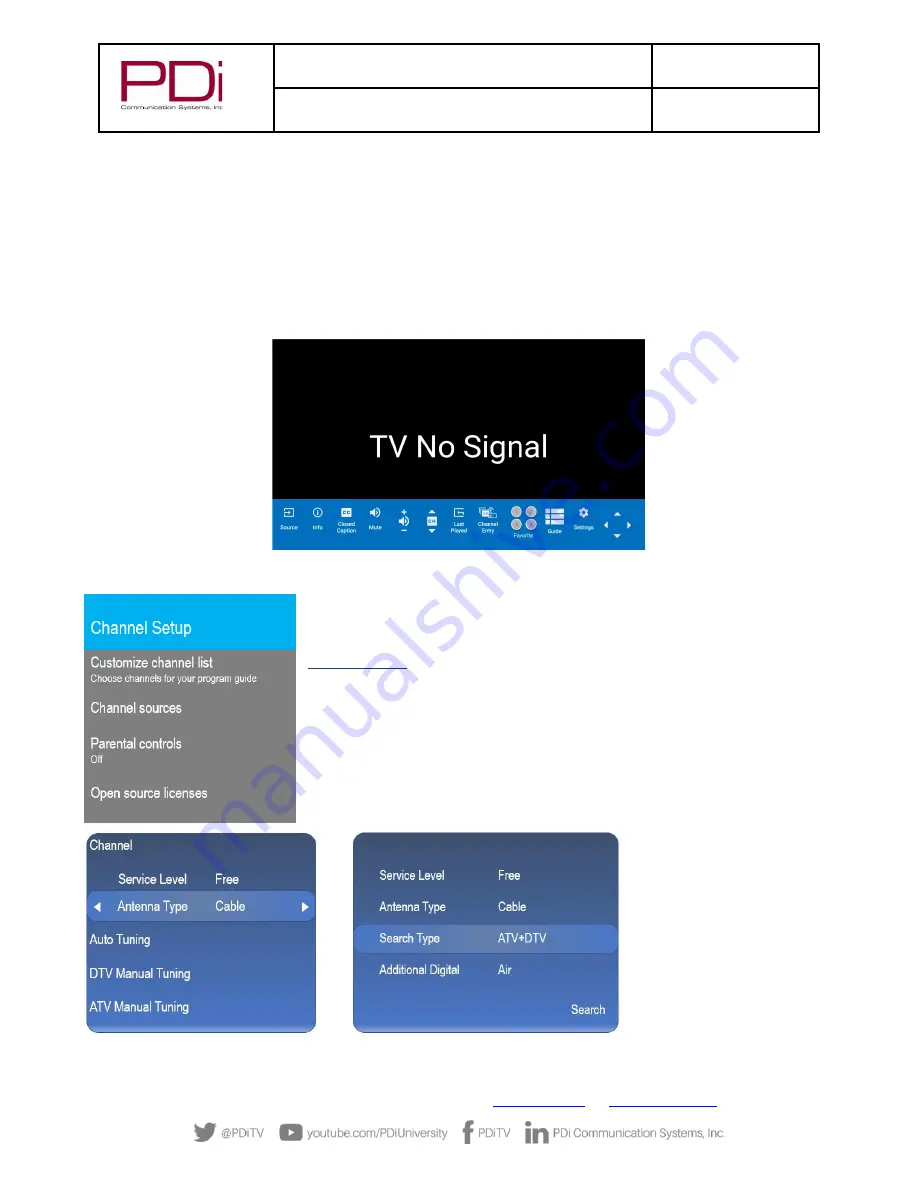
CHANNEL SETUP  

 
This TV offers three different programmable service levels:  Free, Basic, and Premium.  Only 
one service level is usable at a time. 
 

Auto Program 

During Auto Program, the TV scans each available channel for activity.  Channels that 
display activity are memorized into the selected Service Level.   


From the TV app: 
1.


Select Settings. Enter Password (See pg. 10 for default password) 

2.


Select Channel Setup 

3.


Select Channel sources to open the menu to set up your sources 

4.


Select TV  


1.


Set the Service Level you are programming 

(Free, Basic, Premium).


Содержание medTAB14D

Страница 1: ...ymedTV com USER MANUAL Document Number PD196 434R1 Model Numbers medTAB14D medTAB16D medTAB19D Arm Mounted Healthcare grade Touchscreen LED Smart HDTV with Android OS and GENiO Remote Device Managemen...

Страница 2: ...S 6 INITIAL SETUP 7 CHANGE USER INTERFACE 9 UNLOCK ANDROID SETTINGS MENU 10 DEVICE INTERNAL SETTINGS 10 ANDROID SETTINGS 10 Android Device Settings 11 Settings Preferences UPDATE IMAGE 12 TELEVISION S...

Страница 3: ...Update 18 Signal Information 18 ADVANCED OPTIONS HDMI 18 ADVANCED OPTIONS TIME 19 Time Source 19 Date and Current Time 19 Off Time 19 Scheduled Time 19 Sleep Time 19 ADVANCED OPTIONS FEATURES 20 Auto...

Страница 4: ...f the TV does not operate properly unplug it and call an authorized service center or PDi Cleaning and Disinfection Clean the exterior of this television by removing dust with a lint free cloth Spot t...

Страница 5: ...nstallation instructions TV s can pose a striking hazard when mounted at an elevated level 16 Power Sources This product should be operated only from the type of power source indicated on the marking...

Страница 6: ...28VAC or 24VDC and RF signal to the television For models powered by ethernet PoE use only UL listed power sourcing equipment that offers 60W per port using all 4 pairs for power delivery This is some...

Страница 7: ...CONFIRM Online Internet the 6 icon image for full internet access now including cdc gov weblink for patient education You must connect to the Internet via ANDROID SETTINGS shown below before you choos...

Страница 8: ...id Network Settings below The Education icon defaults to the website cdc gov for general patient education information The Social icon defaults to Facebook Instagram LinkedIn Pinterest Twitter and You...

Страница 9: ...LOCK ANDROID SETTINGS For GENiO or Online Interface you will need to click thru to SETTINGS to make a network connection to enable the Internet 2 Touch the screen outside of the pop up keyboard to cle...

Страница 10: ...ly for GENiO or Online Interface you will need to click thru here to SETTINGS to make a network connection to enable the Internet This screen shows two way information so once you connect to the netwo...

Страница 11: ...ts to access the web and the GENiO servers The only external port used is 443 HTTPS As some websites still use port 80 HTTP PDi recommends allowing it as well 2 Settings Inputs Identify your HDMI inpu...

Страница 12: ...on 2 Settings Language Default language is English US If you choose an alternate language it will change the menu and the web browser language 3 Settings Keyboard Device includes AOSP keyboard and Gbo...

Страница 13: ...s menu password See pg 10 for default password then touch the blue checkmark on the touchscreen or press OK on remote From the onscreen user interface press Settings on the TV app user controls or pre...

Страница 14: ...ect Channel Setup 3 Select Customize channel list 4 Scroll thru the channel list and uncheck any channels you want to exclude from the channel list 5 Touch BACK or press LAST on TV remote to exit sett...

Страница 15: ...lence Scenes US Ratings TV Y Young Children Content designed to be appropriate for all children TV Y7 Children 7 and over Considered suitable for children age 7 and above TV G General Audience Conside...

Страница 16: ...ng applies to all TV and Android screens Picture Mode includes 8 automated options to adjust the picture quality Dynamic Standard Soft User Game Vivid Natural and Sports Picture Mode The picture setti...

Страница 17: ...mum volume level the unit can reach Setting this to any value other than 0 guarantees that some level of sound will always be heard when the TV is operating Touch the sliding scale to adjust volume fr...

Страница 18: ...to another service level ie Free copied to Basic Power on Channel Power on Channel will display a certain channel each time the TV is turned on This feature is useful for hospitals that have a Welcome...

Страница 19: ...ord See pg 10 for default password 2 Select Advanced Option 3 Select Time Time Source You may choose to use network provided time or DTV time source Date and Current Time Displays current date and Cur...

Страница 20: ...he TV from being turned off by the TV power button or the remote control Bed A B C D The TV can be controlled by a patient IR remote The TV offers selectable codes Bed A Bed B Bed C and Bed D for inde...

Страница 21: ...e into the cloning port and open USB Cloning The USB Cloning Menu will appear 3 Select Restore Setting to TV 4 Press Save Remove USB RF Cloning The difference between Auto RF cloning and Manual RF clo...

Отзывы: