


15
GB / IE / NI
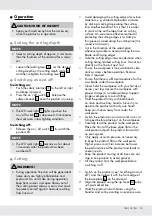
Q
Operation
CAuTION! rISK OF INJurY!
u
Keep your hands away from the accessory
when the product is in operation.
Q
Setting the cutting depth
NOTe
u
Select a cutting depth of approx. 3 mm more
than the thickness of the material for a clean
cut.
1. Loosen the locking lever
5
, set the desired
cutting depth on the cutting depth scale
3
and then retighten the locking lever
5
.
Q
Switching on and off
Switching on:
1. Push the safety interlock
1
to the left or right
and keep it pressed.
2. Press the on / off switch
2
. Release the
safety interlock
1
once the product is running.
NOTe
u
The LED work light
11
lights up when the
on / off switch
2
is depressed. It illuminates
the work area in low lighting condition.
Switching off:
1. Release the on / off switch
2
to switch the
product off.
NOTe
u
The LED work light
11
remains on for about
10 seconds after the product has been
switched off.
Q
Cutting
WArNING!
u
During operation fine dust will be generated!
Some dusts are highly inflammable and
explosive! Do not smoke during operation,
keep heat sources and open flames out of
the working area! Always wear a dust mask
to protect yourself against hazards resulting
from fine dust.
o
Avoid damaging the cutting edge of sensitive
materials, e.g. coated chip boards or doors,
by sticking masking tape along the cutting
line. Another benefit of this is that it is easier
to mark a line on the tape than on a shiny
surface. An even more effective method of
protecting the cutting edges is to clamp a
thin piece of wood along the cutting line (this
wood is also sawn).
o
Cut in the direction of the wood grain
whenever possible to avoid jamming the saw
blade and fraying edges.
o
Take the cutting edge into consideration when
cutting along marked cutting lines. Do not cut
directly on the line but next to it.
o
Ensure the workpiece is free of obstacles like
nails or screws before operation. Remove
them if required.
o
Ensure that there is sufficient clearance for the
saw blade under the workpiece.
o
Never hold the workpiece with your hands or
across your leg. Secure the workpiece with
proper clamps to a stable worktop. Support
longer workpieces to avoid tilting.
o
Hold the product firmly with both hands
on main and auxiliary handle. Never try to
operate the product with only one hand!
Keep your hands away from under the
workpiece.
o
Switch the product on and wait until it runs at
full speed before placing it on the workpiece.
o
Carefully lead the product to the workpiece.
Place the front of the base plate flat on the
workpiece and push the product forward at
an even speed.
o
Only apply as much pressure as necessary
to keep the product flat on the workpiece.
Higher pressure will not increase but lower
the performance of the product and leads to
uneven results.
o
Keep the product moving at all times, do not
stop in one position to avoid grooves.
o
Lift the product from the workpiece before
switching it off.
1. Switch on the product (see “Switching on and
off”) and then place it with the front edge of
the base plate
6
on the material.
2. Align the product using the rip fence
14
or by
using a marked line.
3. Hold the product in both hands using the
handles and cut by exerting an even pressure.