background image

Introduction

  . . . . . . . . . . . . . . . . . . . . . . . . . . . . . . . . . . . . . . . . . . . . . . . . . . .

Introduction

Introduction

2

115 – 230v AC Selector Switch

  . . . . . . . . . . . . . . . . . . . . . . . . . . . . . . . . . . . . . . .

115 – 230v AC Selector Switch

115 – 230v AC Selector Switch

2

Ventilation Requirements

  . . . . . . . . . . . . . . . . . . . . . . . . . . . . . . . . . . . . . . . . . .

Ventilation Requirements

Ventilation Requirements

3

Rack Mounting

  . . . . . . . . . . . . . . . . . . . . . . . . . . . . . . . . . . . . . . . . . . . . . . . . .

Rack Mounting

Rack Mounting

3

Rear Panel Connections and Controls

  . . . . . . . . . . . . . . . . . . . . . . . . . . . . . . . . . .

Rear Panel Connections and Controls

Rear Panel Connections and Controls

4

Front Panel Controls and Indicators

 . . . . . . . . . . . . . . . . . . . . . . . . . . . . . . . . . . . .

Front Panel Controls and Indicators

Front Panel Controls and Indicators

7

Remote Control Handset

  . . . . . . . . . . . . . . . . . . . . . . . . . . . . . . . . . . . . . . . . . . .

Remote Control Handset

Remote Control Handset

8

Typical Problems and Remedies

 . . . . . . . . . . . . . . . . . . . . . . . . . . . . . . . . . . . . . .

Typical Problems and Remedies

Typical Problems and Remedies

9

If You Require Assistance

  . . . . . . . . . . . . . . . . . . . . . . . . . . . . . . . . . . . . . . . . . .

If You Require Assistance

If You Require Assistance

9

Warranty Repair

  . . . . . . . . . . . . . . . . . . . . . . . . . . . . . . . . . . . . . . . . . . . . . . . .

Warranty Repair

Warranty Repair

9

Specifications

 . . . . . . . . . . . . . . . . . . . . . . . . . . . . . . . . . . . . . . . . . . . . . . . . .

Specifications

Specifications

10

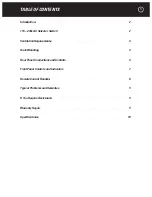
TABLE OF CONTENTS

1

Содержание Zpre2

Страница 1: ......

Страница 2: ...g will only fit into a grounding power outlet If you are unable to insert the plug into the outlet contact your electrician to replace your obsolete outlet Do not defeat the safety purpose of the grounding plug 11 Power Cord Protection Power supply cords should be routed so that they are not likely to be walked on or pinched by items placed upon or against them 12 Lightning Unplug the unit from th...

Страница 3: ...ntrols Rear Panel Connections and Controls 4 Front Panel Controls and Indicators Front Panel Controls and Indicators Front Panel Controls and Indicators 7 Remote Control Handset Remote Control Handset Remote Control Handset 8 Typical Problems and Remedies Typical Problems and Remedies Typical Problems and Remedies 9 If You Require Assistance If You Require Assistance If You Require Assistance 9 Wa...

Страница 4: ... you begin installation Unpacking Carefully unpack your Zpre2 and these accessories Detachable AC power cord Remote control handset with two AAA batteries Two trigger wires one with 2 5 mm sub mini plugs one with a 2 5mm and a 3 5mm mini plug Please inspect the unit now and contact your Parasound Dealer promptly if you see evidence of shipping damage Save the carton and packing inserts in case you...

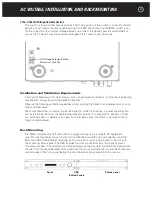
Страница 5: ... other enclosed space We recommend that you place the Zpre2 beneath rather than above a power amplifier Do not install the Zpre2 in an unventilated equipment cabinet or compartment Pockets of heat can build up even in cabinets with open front and back sides Therefore a ventilation fan is highly recommended Rack Mounting The Zpre2 occupies only half the width of a single rack space in a standard 19...

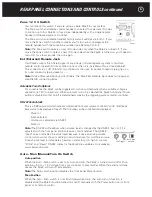
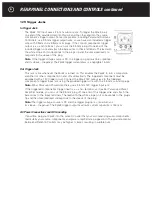
Страница 6: ...ucts Inc San Francisco CA USA ZPre2 Zone Preamplifier 1 Priori Fixed Rec Vari Audio Out 1 Video In 2 Video Out Video In Jacks The Zpre2 has input jacks to accommodate up to four composite video sources The video inputs correspond to the same numbered audio input and are switched at the same time Audio Out Jacks Main Variable Out jacks connect to your power amplifier Their output level is controlle...

Страница 7: ...ommands from your system controller write and feeds back status to be displayed read The following can be controlled and displayed Power on Input selected Volume was adjusted via RS 232 Mute on Note The RS 232 will feedback when volume level is changed by the RS 232 but not if it is Note The RS 232 will feedback when volume level is changed by the RS 232 but not if it is Note adjusted with the fro...

Страница 8: ... component s trigger input jack using the provided trigger wire with the 2 5 mm sub mini plugs Note Most Parasound Power Amplifiers use a 2 5mm 12V trigger input jack Most Parasound Power Amplifiers use a 2 5mm 12V trigger input jack If the triggered component s trigger input is a and terminal as in earlier Parasound Power Amplifier models you can cut the 2 5 mm plug off one end of this trigger wi...

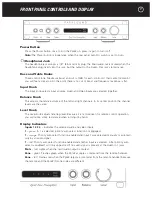
Страница 9: ...b This adjusts the relative volume of the left and right channels In its center position the channel levels are the same Level Knob The Level knob adjusts listening level Because it is motor driven for remote control operation you will notice some resistance when turning it by hand Display Indicators Inputs 1 2 3 4 Indicates the selected audio and video inputs 1 green In 1 is selected priority aut...

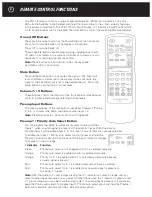
Страница 10: ... Audio and Video source inputs 1 4 Note Preamp buttons 5 7 do not function with the Zpre2 Note Preamp buttons 5 7 do not function with the Zpre2 Note Preamp 1 Priority Auto Select Button You can program the Zpre2 to automatically select Audio and Video Inputs 1 when an audio signal is present at the Audio In 1 jacks With this priority Preamp Input 1 will override inputs 2 3 or 4 even if one of the...

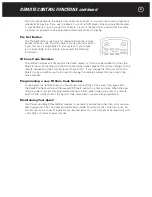
Страница 11: ...setting and the front panel Zone flashes green The factory settings for the remote handset and the unit s Zone switch are both 1 If you change the Zone switch on the Zpre2 to a new number you ll also need to change the remote handset IR zone code to the same number Programming a new IR Zone Code Number To reprogram the remote press you must press two buttons at the same time press both the Zpre2 P...

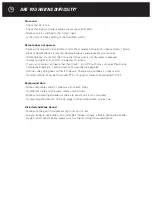
Страница 12: ...Input 1 turn off the Priority auto select feature by holding the Preamp In 1 button down for 4 seconds see page 8 IR zone code setting does not match the unit Change zone numbers so they match Incorrect remote Must be Parasound PTZ 1 or using IR codes corresponding to PTZ 1 Background Hum Move audio cables and AC cords away from each other Try different routes for the audio cables and AC cords Mak...

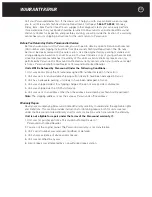
Страница 13: ...sound Authorized Reseller Units Will Be Refused by Parasound Under the Following Conditions 1 Unit was sent without the Parasound assigned RA number marked on the carton 2 Unit was sent in an unsuitable shipping carton likely to have been damaged in transit 3 Unit has inadequate packing unit likely to have been damaged in transit 4 Unit was shipped collect for shipping charges We do not accept col...

Страница 14: ...00 Hz Treble 10 dB at 10 kHz AC Power Requirement 110 120 V 220 240 V 50 60 Hz 2 watt standby 20 watts when turned on Dimensions 91 1 1 2 2 Wide 10 Deep with connectors 2 High with feet 13 3 3 4 4 panel only 241 x 254 x 50mm 44 1mm panel only Net Weight 4 6 lbs 2 1 kg Rack Mount Accessory May be Purchased Separately SBS Bracket and bolts to attach any two Z Custom units side by side in a standard ...

Страница 15: ...NOTES Notes 13 ...

Страница 16: ...Rev 0 92 Parasound Products Inc 2005 ...

Отзывы: