background image

8

Installation Guide

AT-OME-MH21

INPUT

2

1

AT-OME-MH21

DC 5V

LAN

IR OUT

RS-232

HOST USB

USB HUB

L

R

-

-

+

+

TX

RX

TX

OUTPUT

PWR

IP MODE

DISPLAY

AT-OME-MH21

OMEGA

TM

RESET

SHOW IP

INPUT

2

1

INPUT

2

1

AT-OME-MH21

DC 5V

LAN

IR OUT

RS-232

HOST USB

USB HUB

L

R

-

-

+

+

TX

RX

TX

OUTPUT

PWR

IP MODE

DISPLAY

AT-OME-MH21

OMEGA

TM

RESET

SHOW IP

INPUT

2

1

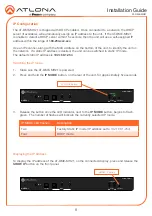
IP Configuration

1.  Make sure the AT-OME-MH21 is powered
2.  Press and hold the 

IP MODE

 button, on the rear of the unit, for approximately five seconds.  

The AT-OME-MH21 is shipped with DHCP enabled.  Once connected to a network, the DHCP 

server (if available), will automatically assign an IP address to the unit.  If the AT-OME-MH21 

is unable to detect a DHCP server within 15 seconds, then the unit will use a self-assigned IP 

address within the range of 

169.254.xxx.xxx

.

Use an IP scanner, along with the MAC address on the bottom of the unit, to identify the unit on 

the network.  If a static IP address is desired, the unit can be switched to static IP mode. 

The default static IP address is 

192.168.1.254

.

Switching the IP mode

IP MODE LED flashes

Description

Two

Factory Static IP mode (IP address set to 

192.168.1.254

)

Four

DHCP mode

3.  Release the button once the LED indicator, next to the 

IP MODE

 button, begins to flash 

green.  The number of flashes will indicate the currently selected IP mode.

To display the IP address of the AT-OME-MH21, on the connected display, press and release the 

SHOW IP 

button on the front panel.

Displaying the IP Address

IP MODE button

SHOW IP button

Содержание ATLONA Omega AT-OME-MH21

Страница 1: ...21 is HDCP 2 2 compliant and supports 4K HDR and 4K 60 4 4 4 at HDMI data rates up to 18 Gbps Additionally 4K downscaling to 1080p 60 30 or 24 Hz is available when connected to an HD display The OME MH21 includes USB 3 0 and USB C interfaces for two host PCs plus two peripheral devices such as a camera microphone speakerphone touch enabled display or keyboard and mouse IMPORTANT Visit http www atl...

Страница 2: ...tton next to the green LED indicator to switch the IP mode between DHCP and static IP modes The LED indicator will provide the current IP mode Refer to IP Configuration page 8 for more information 5 RESET Press and release this button to reset the unit to factory default settings Refer to Resetting to Factory Defaults page 9 for more information 6 SHOW IP Press and release this button to display t...

Страница 3: ... Connect to a computer using a USB B to USB A cable 5 RS 232 IR OUT Connect the included 4 pin captive screw block to this receptacle The RS 232 port provides RS 232 control for the AT OME MH21 and the connected display Refer to RS 232 and IR page 5 for more information 6 LAN Connect an Ethernet cable to this port to control the unit and or to pass Ethernet to a local device 7 DC 5V Connect the in...

Страница 4: ...nced Balanced 1 Use wire strippers to remove a portion of the cable jacket 2 Remove at least 3 16 5 mm of insulation from each of the wires 3 Insert the wires into the correct terminals using the included 5 pin captive screw connector 4 Attach the 5 pin connector block to the OUTPUT audio port on the AT OME MH21 GND Side View Side View GND 2 1 3 2 1 3 GND GND Rear View Rear View ...

Страница 5: ... 4 Repeat step 2 for the S and GND wires for the IR connection 5 Insert the S signal wire in to the TX terminal and the ground wire to the GND terminal 6 Tighten the captive screws to secure the wires in place Do not over tighten or use high torque devices to prevent damage to the connector block NOTE Typical DB9 connectors use pin 2 for TX pin 3 for RX and pin 5 for ground On some devices functio...

Страница 6: ... device to this port using the included captive screw block Refer to Audio Output Connector page 4 for wiring information 5 Connect up to two USB devices to the USB HUB ports 6 Connect a computer to the HOST USB port using a USB A to USB B cable 7 OPTIONAL Connect a serial cable from RS 232 port to a display device Refer to RS 232 and IR page 5 for wiring information Connect an IR emitter to the I...

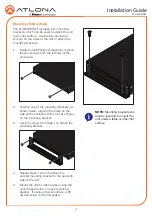
Страница 7: ... the enclosure with one set of holes on the mounting bracket 3 Use the screws from Step 1 to attach the mounting bracket 4 Repeat steps 1 and 2 to attach the second mounting bracket to the opposite side of the unit 5 Mount the unit to a flat surface using the oval shaped holes on each mounting bracket If using a drywall surface a 6 drywall screw is recommended OMEGA TM PW R LINK FW 1 2 3 INPU T TE...

Страница 8: ...MH21 is unable to detect a DHCP server within 15 seconds then the unit will use a self assigned IP address within the range of 169 254 xxx xxx Use an IP scanner along with the MAC address on the bottom of the unit to identify the unit on the network If a static IP address is desired the unit can be switched to static IP mode The default static IP address is 192 168 1 254 Switching the IP mode IP M...

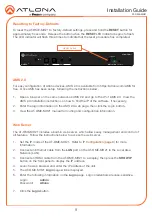
Страница 9: ...n press the SHOW IP button on the front panel to display the IP address 4 Launch a web browser and enter the IP address of the unit 5 The AT OME MH21 Login page will be displayed 6 Enter the following information on the Login page Login credentials are case sensitive Login admin Password Atlona 7 Click the Login button INPUT 2 1 AT OME MH21 DC 5V LAN IR OUT RS 232 HOST USB USB HUB L R TX RX TX OUT...

Страница 10: ...er supply Off Unit is not powered 1 2 Description Solid green The input is the currently selected input Off The input is not selected IP MODE Description Flashes green 4x Flashes four times to indicate that the unit is being set to DHCP mode Refer to IP Configuration page 8 for more information Flashes green 2x Flashes four times to indicate that the unit is being set to DHCP mode Refer to IP Conf...

Страница 11: ...11 Installation Guide AT OME MH21 Notes ...

Страница 12: ... Actual products product images and online product images may vary from images shown here Toll free US International atlona com 877 536 3976 41 43 508 4321 English Declaration of Conformity Chinese Declaration of Conformity 中国RoHS合格声明 The English version can be found under the resources tab at https atlona com product at ome mh21 由SKU列出於 https atlona com about us china rohs The terms HDMI HDMI Hig...

Отзывы: