15
Front view
①
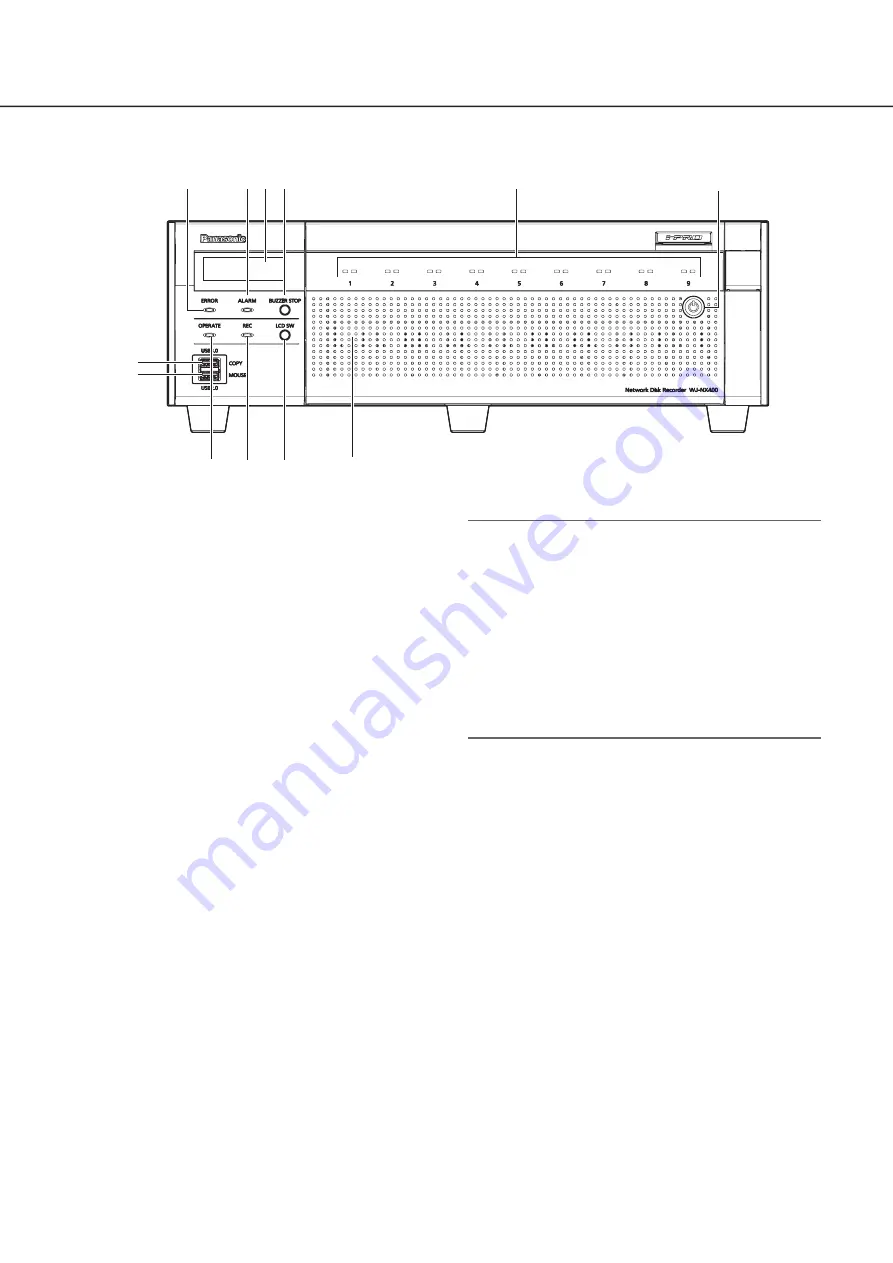
Error indicator [ERROR]
Blinks when an error that can become a problem for the
recorder to run the system occurs.
Blinks red:
System error (Network link error, HDD error,
Recording error, etc.)
Blinks orange:
Thermal error, cooling fan malfunction, etc.
Shows a solid light when automatically reset from an error status.
②
Alarm indicator [ALARM]
Blinks when an alarm occurs, and lights when the alarm
output stops. This indicator will go off when the [Reset]
button (
☞
Operating Instructions (PDF)) is clicked.
③
LCD
Indicates the day and time, the status of the recorder (error
status, etc.), or the name of the functions available using
the buttons on the front panel of the recorder. The recorder
requires a main monitor or a PC for settings. You cannot
setup the settings using the LCD of the recorder only.
④
Buzzer stop button [BUZZER STOP]
Press this button to stop the buzzer that started sounding at
an alarm/error occurrence. Refer to the Operating Instruc-
tions (PDF) for further information about alarms and errors.
⑤
HDD access indicator (1~9)
It transmits the HDD status indicator and the HDD
access indicator installed in the front cover.
HDD status indicator (left side)
Indicates the operational status of the respective hard
disk drive. (
☞
HDD access indicator (right side)
Indicates the status (access/failure) of the respective
hard disk drive. (
☞
Basically, each indicator will indicate the status of the
respective HDD units (HDD unit 1 to 9), but each
indicator will be the same when the system error occurs.
Important:
• When the indicator lights red in the RAID1/RAID5/RAID6
mode, replace the HDD unit with the error immediately.
Contact your dealer about replacing the HDD unit.
• In the RAID5 mode:
When 2 or more HDD access indicators light/blink red, it
may be impossible to recover data on the respective
hard disk drives.
• In the RAID6 mode:
When 3 or more HDD access indicators light/blink red, it
may be impossible to recover data on the respective
hard disk drives.
⑥
Key hole
Use the provided key to open/close the front cover. Keep
the key in a safe place.
Lock the front cover: Insert, push and turn the key to the
left.
Unlock the front cover: Insert, push and turn the key to
the right.
⑦
Copy port (USB3.0) [COPY]
Connect an external storage device (external Hard disk
drive, USB memory) to this port and copy images and
audio recorded on the hard disk drive. An external
storage device can also be connected to the copy port
on the rear. Use either of them.
* Mouse connection is also available.
⑧
Mouse connection port (USB2.0) [MOUSE]
The provided mouse is connected to this port. A mouse
can be connected to the mouse connection port on the
rear. Use either of them.
⑨
Operation indicator [OPERATE]
Lights when the power is on.
➀
⑦
⑧
⑨
⑩
⑪
⑫
➁
➃
⑥
➄
➂
Major operating controls and their functions


