background image

English

6

● 

 Data transmitted and received over radio waves may 
be intercepted and monitored.

● 

 The built-in wireless LAN uses 2.4 GHz and 5 GHz 
frequency bands. To avoid malfunctions or slow 
response caused by radio wave interference when 
using the built-in wireless LAN, keep the TV away 
from other devices that use 2.4 GHz and 
5 GHz signals such as other wireless LAN devices, 
microwave ovens, and mobile phones.

● 

 When problems occur due to static electricity, etc., the 
TV might stop operating to protect itself. In this case, 
turn the TV off at the Mains power On / Off switch, 
then turn it back on.


 Bluetooth

®

 wireless technology

 Caution

● 

 The TV and Touch Pad Controller use the 2.4 GHz 
radio frequency ISM band (Bluetooth

®

). To avoid 

malfunctions or slow response caused by radio wave 
interference, keep the TV and Touch Pad Controller 
away from the devices such as other wireless LAN 
devices, other Bluetooth devices, microwaves, mobile 
phones and the devices that use 2.4 GHz signal.


 Ventilation

 Caution

 Allow sufficient space (at least 10 cm) around the TV in 
order to help prevent excessive heat, which could lead 
to early failure of some electronic components.


 (cm)

 10

 10

 10

 10

● 

 Ventilation should not be 
impeded by covering the 
ventilation openings with 
items such as newspapers, 
tablecloths and curtains.


● 

 Whether you are using a pedestal or not, always 
ensure the vents at the bottom of the TV are not 
blocked and there is sufficient space to enable 
adequate ventilation.


 Moving the TV / speaker

 Caution

 Before moving the TV, disconnect all cables and remove 
the speaker from the pedestal.

● 

 At least two people are required to move the TV. 
Support the TV as shown below to prevent injury that 
may be caused by the tipping or falling of TV.

● 

 Do not hold the screen part when moving the TV.


● 

 Transport only in upright position. Transporting the TV 
with its display panel facing upwards or downwards 
may cause damage to the internal circuitry.

● 

 Do not hold the speaker in one hand.

● 

 Do not hold the speaker net part.
 Support the speaker as shown below to prevent injury 
that may be caused by the falling of the speaker.

● 

 Be careful not to nip the fingers between the speaker 
and pedestal when installing the speaker to the 
pedestal.


 When not in use for a long time

 Caution

 This TV will still consume some power even in the Off 
mode, as long as the mains plug is still connected to a 
live mains socket.

● 

 Remove the mains plug from the wall socket when 
the TV is not in use for a prolonged period of time.


 Excessive volume

 Caution

● 

 Do not expose your ears to 
excessive volume from the 
headphones. Irreversible 
damage can be caused.


● 

 If you hear a drumming noise in your ears, turn down 
the volume or temporarily stop using the headphones.

Содержание TX-65EZ1002B

Страница 1: ...is product and retain them for future reference Please carefully read the Safety Precautions of this manual before use The images shown in this manual are for illustrative purposes only English Model No TX 65EZ1002B TX 77EZ1002B For more detailed instructions please refer to eHELP Built in Operating Instructions How to use eHELP p 23 M0417 1087 English ...

Страница 2: ...ng your TV Watching TV 23 How to Use eHELP 23 Others FAQs 25 Maintenance 26 Specifications 27 When using the wall hanging bracket 29 For information about the trademarks refer to eHELP Search by Purpose Read first Before use Licence The illustration for TX 65EZ1002B is used in this manual unless otherwise mentioned Illustrations shown may be different depending on the model ...

Страница 3: ... environment Compatibility with future services is not guaranteed Panasonic does not guarantee operation and performance of peripheral devices made by other manufacturers and we disclaim any liability or damage arising from operation and or performance from usage of such other maker s peripheral devices The recording and playback of content on this or any other device may require permission from t...

Страница 4: ...g with a screwdriver and replace the fuse then press the fuse cover down securely This TV is designed to operate on AC 220 240 V 50 60 Hz Insert the mains plug fully into the mains socket To turn Off the apparatus completely you must pull the mains plug out of the mains socket Consequently the mains plug should be easily accessible at all times Disconnect the mains plug when cleaning the TV Do not...

Страница 5: ...hildren to handle any small objects such as SD Card The small object could be swallowed by young children Remove SD Card immediately after use and store out of reach of young children Pedestal Warning Do not disassemble or modify the pedestal Caution Do not use any pedestal other than the one provided with this TV Do not use the pedestal if it becomes warped or physically damaged If this occurs co...

Страница 6: ...h as newspapers tablecloths and curtains Whether you are using a pedestal or not always ensure the vents at the bottom of the TV are not blocked and there is sufficient space to enable adequate ventilation Moving the TV speaker Caution Before moving the TV disconnect all cables and remove the speaker from the pedestal At least two people are required to move the TV Support the TV as shown below to...

Страница 7: ...iance with the essential requirements and other relevant provisions of the Directive 2014 53 EU If you want to get a copy of the original DoC of this TV please visit the following website http www ptc panasonic eu doc Authorized Representative Panasonic Testing Centre Panasonic Marketing Europe GmbH Winsbergring 15 D 22525 Hamburg Germany 5 15 5 35 GHz band of wireless LAN is restricted to indoor ...

Страница 8: ...ng the pedestal speaker Assembly screw 4 M5 10 Assembly screw 5 M4 12 Assembly screw M3 5 Base FRONT Bracket L Bracket R Cable cover front Cable cover rear Cover Speaker Speaker cable Assembling the pedestal speaker R L 1 A E D F ...

Страница 9: ...English 9 2 J 3 J 4 C 5 6 G 7 ...

Страница 10: ...English 10 8 9 B When the TV is uneven horizontal loosen the assembly screws to set the TV horizontal ...

Страница 11: ...e the cable cover rear from the pedestal 2 Remove the cover from the pedestal 3 Disconnect the speaker cable 4 Remove the assembly screws from the TV 5 Lift the TV from the pedestal 6 Remove the cable cover front from the pedestal 7 Remove the speaker cable from the pedestal 8 Remove the assembly screw from the pedestal 9 Remove the speaker from the pedestal 10 Remove the assembly screws from the ...

Страница 12: ...e and cable plugs are correct for connection Use a fully wired HDMI compliant cable Keep the TV away from electronic equipment video equipment etc or equipment with an infrared sensor otherwise distortion of image sound may occur or operation of other equipment may be affected Please also read the manual of the equipment being connected Removing the terminal cover from the TV Be sure to remove the...

Страница 13: ...4 13 DIGITAL AUDIO To connect the equipment to AV the terminal adaptor supplied is necessary To watch content in 4K format use HDMI terminal p 15 Basic connections Mains lead AC 220 240 V 50 60 Hz Mains lead Cable tie Bundled the mains lead To loosen Knob Keep pushing the knob To remove from the TV Keep pushing both side snaps Snaps Aerial TV RF cable Terrestrial aerial For DVB Analogue Satellite ...

Страница 14: ...e HDMI cable RF cable Cable TV box Terrestrial aerial Network A broadband network environment is required to be able to use internet services If you do not have any broadband network services please consult your retailer for assistance Prepare the internet environment for wired connection or wireless connection Setup of the network connection will start when first using the TV p 22 Wired connectio...

Страница 15: ...ode1 For better compatibility Set to Mode1 when the image or sound in HDMI input is not played properly Mode2 For the 4K compatible equipment that has the function to output the image precisely with the expanded colour gamut To change the mode 1 Select the HDMI input mode connected to the equipment 2 Display the menu and select HDMI Auto Setting Setup Menu For information about the valid format re...

Страница 16: ...d and a CI module come as a set first insert the CI module then insert the smart card into the CI module Insert or remove the CI module completely in the correct direction as shown Normally encrypted channels will appear Viewable channels and their features depend on the CI module If encrypted channels do not appear Common Interface in the Setup Menu There might be some CI modules in the market wi...

Страница 17: ...de Cable tie Cable guide Open Close Attach the cable tie Insert the cable tie in a hole Hole Bundle the cables Hooks Set the tip in the hooks To loosen Knob Keep pushing the knob To remove from the TV Keep pushing both side snaps Snaps Fixing the cables using the cable clamp Cable clamp To release Tab Keep pushing the tab Bundle the cable Set Fix cables as necessary When using the optional accesso...

Страница 18: ...taching the terminal cover Do not apply load to the terminal cover Be careful not to nip the cables between the TV and the terminal cover When using USB 2 port USB 3 port ETHERNET terminal DIGITAL AUDIO HDMI3 terminal or HDMI4 terminal you cannot attach the terminal cover Keep the removed cover for future use ...

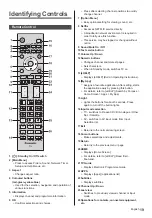
Страница 19: ...text pages Sets characters When in Standby mode switches TV on 13 eHELP Displays eHELP Built in Operating Instructions 14 My App Assigns a favourite application After setting starts the application easily by pressing this button For details refer to eHELP Search by Purpose Home Screen Apps My App 15 Light Lights the buttons for about 5 seconds Press again to turn off the button lights 16 Input mod...

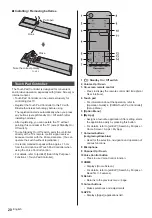
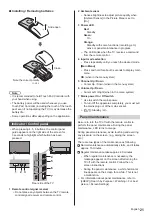
Страница 20: ...eak within approx 15 cm from the microphone of Touch Pad Controller when using the Voice Control function For details refer to eHELP Search by Purpose Functions Touch Pad Controller 1 Standby On Off switch 2 Volume Up Down 3 On screen remote control Press to display the remote control GUI Graphical User Interface 4 Touch pad For information about the operation refer to Operation Guide in VIERA Tou...

Страница 21: ... selection Press repeatedly until you reach the desired mode Main Menu Press and hold for about 3 seconds to display main menu OK when in the menu system 5 Channel Up Down Cursor Up Down when in the menu system 6 Volume Up Down Cursor Left Right when in the menu system 7 Mains power On Off switch Use to switch the mains power To turn Off the apparatus completely you must pull the mains plug out of...

Страница 22: ...he TV off with the remote control and connect the speaker at first p 11 Select Home Select Home for use in a home viewing environment Shop is for shop display To change the viewing environment later on the set will need to have all settings initialised by accessing Shipping Condition Set up the network connection Select your country Auto Setup screen varies depending on the country and the signal ...

Страница 23: ... begin from number 1 upward Analogue channel position numbers are in the 0 99 range How to Use eHELP eHELP is the detailed operating instructions built into the TV and gives a more detailed explanation for a better understanding of the operation of each feature 1 Display eHELP or Help eHELP If the eHELP has been accessed previously since the TV was turned on the confirmation screen is displayed to...

Страница 24: ...n if more than 1 page While the description is highlighted To open the reference screen To display the menu related to the description only for some descriptions red To check the features of this TV Search by Purpose Read first Features ...

Страница 25: ...tings Shipping Condition in System Menu Setup Menu The image or sound from external equipment are unusual when the equipment is connected via HDMI Set HDMI Auto Setting Setup Menu to Mode1 p 15 Parts of the TV become hot Parts of the TV may become hot These temperature rises do not pose any problems in terms of performance or quality When pushed with a finger the display panel moves slightly and m...

Страница 26: ...repellent solvent thinner or other volatile substances This may degrade surface quality or cause peeling of the paint The surface of the display panel is specially treated and may be easily damaged Take care not to tap or scratch the surface with your fingernail or other hard objects Do not allow the cabinet and pedestal to make contact with a rubber or PVC substance for a long time This may degra...

Страница 27: ... mm stereo mini Jack 1 Connection terminals AV input COMPONENT VIDEO VIDEO RCA PIN Type 1 1 0 V p p 75 AUDIO L R RCA PIN Type 2 0 5 V rms Y 1 0 V p p including synchronisation PB CB PR CR 0 35 V p p HDMI 1 2 3 4 input TYPE A Connectors HDMI1 3 4 4K Content Type Deep Colour x v Colour HDMI2 4K Content Type Audio Return Channel Deep Colour x v Colour This TV supports HDAVI Control 5 function Card sl...

Страница 28: ...Hz 5 700 GHz IEEE802 11b g n 2 412 GHz 2 472 GHz Security WPA2 PSK TKIP AES WPA PSK TKIP AES WEP 64 bit 128 bit Bluetooth wireless technology 2 Standard Compliance Bluetooth 3 0 Frequency Range 2 402 GHz 2 480 GHz 1 The frequency and channel differ depending on the country 2 Not all the Bluetooth compatible devices are available with this TV Up to 5 devices can be used simultaneously except Touch ...

Страница 29: ...ch damage will void your warranty Accessories wall hanging parts Speaker Speaker Attach the speaker after hanging the TV on the wall Speaker cable Accessories for pedestal The pedestal is used in step 1 to 7 to attach the speaker bracket and connect the speaker cable into the TV Assembly screw 4 M5 10 Base FRONT Bracket L Bracket R ACCESSORIES FOR SPEAKER WALL HANGING Assembly screw 8 M4 12 Speake...

Страница 30: ...English 30 Assembling procedure Please note the procedure to attach the speaker after hanging the TV on the wall You cannot attach the speaker before hanging the TV C E D F 1 2 ...

Страница 31: ...English 31 3 G H 4 I G A 5 A J 6 To remove from the TV Keep pushing both side snaps Snaps To attach the cable clamp Insert the cable clamp in a hole Hole ...

Страница 32: ... In order to maintain the unit s performance and safety be absolutely sure to ask your dealer or a licensed contractor to secure the wall hanging brackets Any damage caused by installing without a qualified installer will void your warranty Carefully read the instructions accompanying optional accessories and be absolutely sure to take steps to prevent the TV from falling off Handle the TV careful...

Страница 33: ...English 33 11 Attach the speaker 12 I 13 G 14 15 K ...

Страница 34: ...anging bracket wall hanging parts in the reverse order of installing Before removing the TV from the wall remove the speaker from the TV first Removing the TV with speaker from the wall may cause deformation or breakage of the brackets Keep the removed parts for future use ...

Страница 35: ......

Страница 36: ...89 8333 Monday Friday 9 00am 5 00pm Excluding public holidays For further support on your product please visit our website www panasonic co uk Direct Sales at Panasonic UK Order accessory and consumable items for your product with ease and confidence by phoning our Customer Communications Centre Monday Friday 9 00am 5 00pm Excluding public holidays Or go on line through our Internet Accessory orde...

Отзывы: