


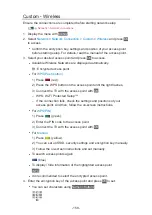

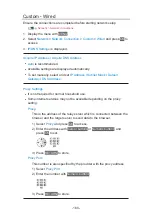


Custom - Wireless
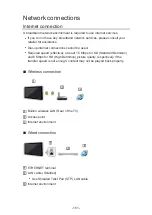
Ensure the connections are completed before starting network setup.
1. Display the menu with
MENU
.
2. Select
Network
>
Network Connection
>
Custom
>
Wireless
and press
OK
to access.
●
Confirm the encryption key, settings and position of your access point
before starting setup. For details, read the manual of the access point.
3. Select your desired access point and press
OK
to access.
●
Available Wireless Networks are displayed automatically.
: Encrypted access point
●
For
WPS(Push button)
1) Press
(red).
2) Press the WPS button on the access point until the light flashes.
3) Connect the TV with the access point with
OK
.
– WPS: Wi-Fi Protected Setup™
– If the connection fails, check the settings and positions of your
access point. And then, follow the on-screen instructions.
●
For
WPS(PIN)
1) Press
(green).
2) Enter the PIN code to the access point.
3) Connect the TV with the access point with
OK
.
●
For
Manual
1) Press
(yellow).
2) You can set up SSID, security settings and encryption key manually.
3) Follow the on-screen instructions and set manually.
●
To search access points again
(blue)
●
To display / hide information of the highlighted access point
INFO
●
It is recommended to select the encrypted access point.
4. Enter the encryption key of the access point and press
OK
to set.
●
You can set characters using
Numeric buttons
.
- 158 -
Содержание TH-32FS500Z
Страница 1: ...TH 32FS500A TH 40FS500A TH 32FS500Z TH 40FS500Z TH 50FS500Z eHELP English ...
Страница 35: ... Use a fully wired HDMI compliant cable Check the terminal type and cable plugs are correct for connection 35 ...
Страница 100: ...Add TV Signal Adds the TV mode Allows you to add any TV mode which was skipped during initial Auto Tuning 100 ...
Страница 168: ... Note Depending on the area this function may not be available For details consult your local Panasonic dealer 168 ...
Страница 170: ...Mirroring Settings Settings for the mirroring function Functions Mirroring Mirroring Settings 170 ...
Страница 210: ... Note For Digital TV New Zealand only 210 ...
Страница 224: ...Picture Viewing Mode Selects your favourite picture mode for each input Watching For best picture Viewing Mode 224 ...
Страница 233: ...Reset Picture Defaults Resets the current Picture Viewing Mode to the default settings 233 ...
Страница 234: ...Sound Mode Selects your favourite sound mode for each input Watching For best audio Sound mode 234 ...
Страница 240: ...Reset Sound Defaults Resets the current Sound Mode to the default settings 240 ...
Страница 243: ...TV Name Sets your favourite name for this TV Network Network settings TV Name 243 ...
Страница 247: ...Mirroring Settings Settings for the mirroring function Functions Mirroring Mirroring Settings 247 ...
Страница 255: ...USB Device Setup Formats the USB HDD or safely removes USB device Recording USB HDD setup Setting for USB HDD 255 ...
Страница 262: ...HDMI HDR Setting Set to On when the HDR device is connected to the TV Watching External equipment HDMI HDR Setting 262 ...
Страница 266: ...Other Settings Power Save On Off Reduces brightness of the picture to economise on power consumption 266 ...
Страница 279: ...ver 4 000 ...