

Wireless Speaker System
System g
ł
o
ś
ników bezprzewodowych
Bezdrátový reproduktorový systém
Model No.
SC-NP10
Operating Instructions
Instrukcja obs
ł
ugi
Návod k obsluze
Panasonic Corporation 2013
WEB Site
: http://panasonic.net
Panasonic Corporation
EU
Manufactured by:
Importer:
Panasonic Corporation Kadoma, Osaka, Japan
Panasonic Marketing Europe GmbH
Panasonic Testing Centre:
Winsbergring 15, 22525 Hamburg, Germany
VQT4Y22
F0313DT0
Model number suffix “EB” denotes UK model.
EB EG GN GS
[For[the[United[Kingdom]and]Ireland]customers]
Caution for AC Mains Lead
(For the AC mains plug of three pins)
For your safety, please read the following text carefully.
This appliance is supplied with a moulded three pin mains plug for your safety and
convenience.
A 5-ampere fuse is fitted in this plug.
Should the fuse need to be replaced please ensure that the replacement fuse has a
rating of 5-ampere and that it is approved by ASTA or BSI to BS1362.
Check for the ASTA mark
Ï
or the BSI mark
Ì
on the body of the fuse.
If the plug contains a removable fuse cover you must ensure that it is refitted when the
fuse is replaced.
If you lose the fuse cover the plug must not be used until a replacement cover is
obtained.
A replacement fuse cover can be purchased from your local dealer.
Before use
Remove the connector cover.
How to replace the fuse
The location of the fuse differ according to the type of AC mains plug (figures A and B).
Confirm the AC mains plug fitted and follow the instructions below.
Illustrations may differ from actual AC mains plug.
1. Open the fuse cover with a screwdriver.
2. Replace the fuse and close or attach the fuse cover.
Limited Warranty (ONLY FOR AUSTRALIA)
Sales and Support Information
Customer Communications Centre
• For customers within the UK: 0844 844 3899
• For customers within Ireland: 01 289 8333
• Monday–Friday 9:00 am - 5:00 pm
(Excluding public holidays).
• For further support on your product, please visit our website: www.panasonic.co.uk
Direct Sales at Panasonic UK
• Order accessory and consumable items for your product with ease and confidence by
phoning our Customer Communications Centre
Monday–Friday 9:00 am - 5:00 pm
(Excluding public holidays).
• Or go on line through our Internet Accessory ordering application at
www.pas-europe.com.
• Most major credit and debit cards accepted.
• All enquiries transactions and distribution facilities are provided directly by Panasonic
UK.
• It couldn’t be simpler!
• Also available through our Internet is direct shopping for a wide range of finished
products. Take a browse on our website for further details.
Figure A
Figure B
Fuse cover
Figure A
Fuse
(5 ampere)
Figure B
Fuse
(5 ampere)
Panasonic Warranty
1. The product is warranted for 12 months from the date of purchase. Subject to the conditions of this warranty
Panasonic or its Authorised Service Centre will perform necessary service on the product without charge for
parts or labour, if in the opinion of Panasonic, the product is found to be faulty within the warranty period.
2. This warranty only applies to Panasonic products purchased in Australia and sold by Panasonic Australia or
its Authorised Distributors or Dealers and only where the products are used and serviced within Australia or
it's territories. Warranty cover only applies to service carried out by a Panasonic Authorised Service Centre
and only if valid proof of purchase is presented when warranty service is requested.
3. This warranty only applies if the product has been installed and used in accordance with the manufacturer’s
recommendations (as noted in the operating instructions) under normal use and reasonable care (in the
opinion of Panasonic). The warranty covers normal domestic use only and does not cover damage,
malfunction or failure resulting from use of incorrect voltages, incorrect installation, accident, misuse, neglect,
build-up of dirt or dust, abuse, maladjustment of customer controls, mains supply problems, thunderstorm
activity, infestation by insects or vermin, tampering or repair by unauthorised persons (including unauthorised
alterations), introduction of sand, humidity or liquids, commercial use such as hotel, offi ce, restaurant, or other
business or rental use of the product, exposure to abnormally corrosive conditions or any foreign object or
matter having entered the product.
4. This warranty does not cover the following items unless the fault or defect existed at the time of purchase:
(a) Cabinet Part(s)
(e) DVD, Blu-ray or Recordable Discs
(b) Video or Audio Tapes
(f) Video / Audio Heads from wear and tear in normal use
(c) SD cards or USB devices
(g) Information stored on Hard Disk Drive, USB stick or SD card
(d) User replaceable Batteries
(h) DTV reception issues caused by TV Aerial / Cabling / Wall socket(s)
etc
5. Some products may be supplied with Ethernet connection hardware. The warranty is limited on such products
and will not cover
(a) Internet and or DLNA connection / setup related problems
(b) Access fees and or charges incurred for internet connection
(c) The use of incompatible software or software not specifi cally stipulated in the product operations manual;
and
(d) Any indirect or consequential costs associated with the incorrect use or misuse of the hardware, its
connection to the internet or any other device.
6. To claim warranty service, when required, you should:
• Telephone Panasonic’s Customer Care Centre on 132600 or visit our website referred to below and use
the Service Centre Locator for the name/address of the nearest Authorised Service Centre.
• Send or take the product to a Panasonic Authorised Service Centre together with your proof of purchase
receipt as a proof of purchase date. Please note that freight and insurance to and / or from your nearest
Authorised Service Centre must be arranged by you.
• Note that home or pick-up/delivery service is available for the following products in the major metropolitan
areas of Australia or the normal operating areas of the nearest Authorised Service Centres:
-
Plasma/LCD televisions / displays (screen size greater than 103 cm)
7. The warranties hereby conferred do not extend to, and exclude, any costs associated with the installation, de-
installation or re-installation of a product, including costs related to the mounting, de-mounting or remounting
of any screen, (and any other ancillary activities), delivery, handling, freighting, transportation or insurance of
the product or any part thereof or replacement of and do not extend to, and exclude, any damage or loss
occurring by reason of, during, associated with, or related to such installation, de-installation, re-installation or
transit.
Panasonic Authorised Service Centres are located in major metropolitan areas and most regional centres of
Australia, however, coverage will vary dependant on product. For advice on exact Authorised Service Centre
locations for your product, please telephone our Customer Care Centre on 132600 or visit our website and use
the Service Centre Locator.
In addition to your rights under this warranty, Panasonic products come with consumer guarantees that cannot be
excluded under the Australian Consumer Law. If there is a major failure with the product, you can reject the
product and elect to have a refund or to have the product replaced or if you wish you may elect to keep the goods
and be compensated for the drop in value of the goods. You are also entitled to have the product repaired or
replaced if the product fails to be of acceptable quality and the failure does not amount to a major failure.
If there is a major failure in regard to the product which cannot be remedied then you must notify us within a
reasonable period by contacting the Panasonic Customer Care Centre. If the failure in the product is not a major
failure then Panasonic may choose to repair or replace the product and will do so in a reasonable period of time
from receiving notice from you.
THIS WARRANTY CARD AND THE PURCHASE DOCKET (OR SIMILAR PROOF OF PURCHASE)
SHOULD BE RETAINED BY THE CUSTOMER AT ALL TIMES
If you require assistance regarding warranty conditions or any other enquiries, please visit the
Panasonic Australia
website
www.panasonic.com.au
or contact by phone on
132 600
If phoning in, please ensure you have your operating instructions available.
Panasonic Australia Pty. Limited
ACN 001 592 187 ABN 83 001 592 187
1 Innovation Road, Macquarie Park NSW 2113
PRO-031-F11 Issue: 4.0
01-01-2011
Thank you for purchasing this product. Please read these instructions carefully before using
this product, and save this manual for future use.
Check the supplied accessories before using this unit.
[Except[for]Asia[and[the]Middle]East]
1 AC mains lead
(
[For[the[United[Kingdom]and]Ireland]
K2CT2YY00097
)
[For]Asia[and[the]Middle]East]
3 AC mains lead
• Product numbers provided in these operating instructions are correct as of March 2013. These may
be subject to change.
• Do not use AC mains lead with other equipment.
•
[For]Asia[and[the]Middle]East]
Please use the supplied AC mains lead suitable for the household mains
socket. In Saudi Arabia, please use the moulded three pin mains plug.
To clean this unit, wipe with a soft, dry cloth.
Note
• Never use alcohol, paint thinner or benzine to clean this unit.
• Before using chemically treated cloth, read the instructions that came with the cloth carefully.
Preparation
After inserting the AC mains lead to this unit, turn on the Bluetooth
®
feature of the device and
place the device near this unit.
If you intend to use an NFC (Near Field Communication)-compatible Bluetooth
®
device,
proceed to “One-Touch Connection (Connecting by NFC)”.
For each Bluetooth
®
device you want to connect to via Bluetooth
®
, perform pairing first.
Pairing with Bluetooth
®
device
1
Press [
Í
/I] to turn this unit on.
• The Bluetooth
®
indicator blinks slowly.
•
If this unit is being used for the first time (factory preset state):
The Bluetooth
®
indicator blinks fast.
→
The unit will enter pairing standby.
→
Skip to step 3.
2
Press and hold [-PAIRING] until the Bluetooth
®
indicator blinks fast.
• The unit will enter pairing standby.
3
Select “SC-NP10” from the Bluetooth
®
device’s Bluetooth
®
menu.
• When the Bluetooth
®
device is paired and connected,
the Bluetooth
®
indicator on the unit lights up.
• If prompted for a passkey, input “0000”.
• After the connection is established, proceed to “Selecting Transmission mode setting” (below).
Connecting a paired Bluetooth
®
device and listening to audio
When this unit is turned on, it searches for the last-used Bluetooth
®
device. If a connection to
the last-used one is successful, the Bluetooth
®
indicator on the unit lights up.
If the Bluetooth
®
indicator blinks, you need to connect the Bluetooth
®
device.
1
Select “SC-NP10” from the Bluetooth
®
device’s Bluetooth
®
menu.
• When the Bluetooth
®
device is connected,
the Bluetooth
®
indicator on the unit lights up.
2
Start playing back music, a movie, etc. on your Bluetooth
®
device.
• Adjust the volume using the [- VOL +] buttons on the unit.
When the maximum or minimum volume is reached, you will be notified by a beep sound.
For NFC-compatible Android
TM
devices only
By simply touching this unit to an NFC (Near Field Communication)-compatible Bluetooth
®
device, this unit automatically turns on, and performs the starting operation, from pairing the
Bluetooth
®
device to establishing a connection. Designed to skip the starting operation, this
feature is very convenient.
About NFC (Near Field Communication)
It is a short range wireless technology that makes use of interacting radio communications.
Preparation
Turn on the NFC feature of the device. And connect the device to the internet to install a
dedicated app. Separate data charges apply for the internet use.
1
Download the app “Panasonic Music Streaming” (free of charge) to
your Bluetooth
®
device from Google Play
TM
.
• Enter “Panasonic Music Streaming” in the search box of Google Play
TM
and search.
Select “Panasonic Music Streaming” to download the app.
2
Start the app “Panasonic Music Streaming” on your Bluetooth
®
device.
• Follow on-screen instructions on your device.
• Always use the latest version of the app.
3
Touch and hold your device on the NFC touch area of this unit.
(Until a pop-up window on your device indicates that the connection is established.)
• When this unit turns on and a connection is established, the Bluetooth
®
indicator lights up.
• When the Bluetooth
®
indicator does not light up even if you have touched the NFC
touch area, change the touching position.
4
Start playing back music, a movie, etc. on your Bluetooth
®
device.
Connecting to another device
• If you touch another device to this unit, you can update the Bluetooth
®
connection. The previously
connected device will be disconnected automatically.
Disabling some of the NFC functions of this unit
This operation prevents unintended use of the One-Touch Connection.
Perform the step below while this unit is turned on.
Disabling (Automatic power-on, device pairing and connection cancellation are disabled):
1
While pressing and holding [- VOL], press and hold [VOL +] until the
Bluetooth
®
indicator and the “D.SURROUND” indicator blink once.
• Only a connection with a paired device while this unit is turned on remains possible.
• This operation automatically turns off the Bluetooth
®
Standby function.
Enabling all the functions again: Refer to “Reset (To the factory preset state)” (back side)
• This unit returns to the factory preset state by resetting it.
This unit has two transmission modes: “Connectivity Priority MODE” and “Sound Quality Priority
MODE”. After confirming that audio can be played back, select the mode while this unit is turned on.
1
Set either of the following modes.
■
Connectivity Priority MODE:
While pressing and holding [D.SURROUND], press and hold [VOL +] until
the Bluetooth
®
indicator and the “D.SURROUND” indicator blink once.
■
Sound Quality Priority MODE:
While pressing and holding [LIGHT], press and hold [VOL +] until
the Bluetooth
®
indicator and the “D.SURROUND” indicator blink once.
2
Press [
Í
/I] to turn this unit off, and press [
Í
/I] again to turn on.
• The Bluetooth
®
connection is automatically established, and the Bluetooth
®
indicator lights up.
If you connect with Bluetooth
®
from a paired Bluetooth
®
device while this function is turned on,
this unit will turn on automatically. Turn off this unit, and perform the following operation.
Turning on
1
While pressing and holding [LIGHT], press and hold [
Í
/I] until the
Bluetooth
®
indicator and the “D.SURROUND” indicator blink once.
• This operation enables all NFC functions of this unit.
Checking if the function is turned on: Press [LIGHT]. (The Bluetooth
®
indicator blinks three times)
Turning off: While pressing and holding [D.SURROUND], press and hold [
Í
/I] until the
Bluetooth
®
indicator and the “D.SURROUND” indicator blink once.
• Switch off this unit or the device.
• Stop / disable the Bluetooth
®
transmission of the device.
• (For NFC-compatible devices only) Touch and hold your device to NFC touch area of this unit again.
Note
• This unit can only be connected to one device at a time.
• This unit can register up to 8 devices. If a 9th device is paired, the device that has not been used for
the longest time will be replaced.
• This unit automatically turns off if no operation is performed for approximately 30 minutes when not
connected to Bluetooth
®
.
• If the image and sound are out of sync during playback, restart the playback app you are using. If the
problem persists, connect the Bluetooth
®
device and this unit with an audio cable.
• The One-Touch Connection may not work properly depending on the type of device being used.
• Standby power consumption increases when the Bluetooth
®
standby function is turned on.
You can enjoy movies and other visual content with powerful sounds while the dialog clarity is
maintained. (“Direct-Dialog Surround”)
1
Press [D.SURROUND] of this unit to switch the effect on/off.
ON:The “D.SURROUND” indicator lights up (default setting).
OFF:The “D.SURROUND” indicator lights off, and the effect is cancelled.
Enjoying monaural sound with an expansive sound field
(“Surround Expansive Effect” for Monaural Source)
1 Press and hold [D.SURROUND] until the “D.SURROUND”
indicator blinks once.
If you press [D.SURROUND] after the operation above, the “D.SURROUND” indicator lights
off, and the “Surround Expansive Effect” is cancelled.
Note
• If you turn off this unit, the "Surround Expansive Effect” is automatically cancelled.
• If sound is distorted during playback, switch off the “Direct-Dialog Surround”.
(
→
Continued overleaf)
Dzi
ę
kujemy za nabycie tego produktu. Przed przyst
ą
pieniem do eksploatacji opisywanego produktu
nale
ż
y dok
ł
adnie przeczyta
ć
niniejsze zalecenia i zachowa
ć
instrukcj
ę
obs
ł
ugi do wgl
ą
du.
Sprawd
ź
dostarczone akcesoria przed rozpocz
ę
ciem u
ż
ytkowania urz
ą
dzenia.
1 Kabel zasilania pr
ą
dem przemiennym
• Numery produktów podane w niniejszej instrukcji obs
ł
ugi wed
ł
ug stanu na marzec 2013. Mog
ą
ulec zmianie.
• Nie u
ż
ywaj kabla zasilaj
ą
cego do zasilania innych produktów.
Aby wyczy
ś
ci
ć
urz
ą
dzenie, wytrzyj je mi
ę
kk
ą
, such
ą
ś
ciereczk
ą
.
Uwaga
• Nigdy nie u
ż
ywaj alkoholu, rozcie
ń
czalnika ani benzyny do czyszczenia tego urz
ą
dzenia.
• Zanim u
ż
yjesz
ś
cierki zawieraj
ą
cej
ś
rodki chemiczne, uwa
ż
nie przeczytaj do
łą
czone do niej informacje.
Przygotowanie
Po pod
łą
czeniu kabla zasilaj
ą
cego do zestawu w
łą
cz funkcj
ę
Bluetooth
®
w urz
ą
dzeniu i
umie
ść
urz
ą
dzenie w pobli
ż
u zestawu.
Je
ż
eli chcesz u
ż
y
ć
kompatybilnego z NFC (Komunikacja bliskiego zasi
ę
gu) urz
ą
dzenia
Bluetooth
®
, przejd
ź
do “Po
łą
czenie One-Touch (Po
łą
czenie za pomoc
ą
NFC)”.
Dla ka
ż
dego urz
ą
dzenia Bluetooth
®
, które ma zosta
ć
pod
łą
czone poprzez Bluetooth
®
, nale
ż
y
najpierw przeprowadzi
ć
parowanie.
Parowanie z urz
ą
dzeniem Bluetooth
®
1
Naci
ś
nij [
Í
/I], aby w
łą
czy
ć
urz
ą
dzenie g
ł
ówne.
• Wska
ź
nik Bluetooth
®
powoli miga.
•
Je
ż
eli urz
ą
dzenie g
ł
ówne u
ż
ywane jest po raz pierwszy (znajduje si
ę
w stanie fabrycznym):
Wska
ź
nik Bluetooth
®
miga szybko.
→
Urz
ą
dzenie wejdzie w tryb u
ś
pienia parowania.
→
Przejd
ź
do kroku 3.
2
Naci
ś
nij i przytrzymaj [-PAIRING] tak d
ł
ugo, a
ż
wska
ź
nik Bluetooth
®
zacznie szybko miga
ć
.
• Urz
ą
dzenie wejdzie w tryb u
ś
pienia parowania.
3
Wybierz “SC-NP10” w menu Bluetooth
®
w urz
ą
dzeniu Bluetooth
®
.
• Kiedy urz
ą
dzenie Bluetooth
®
zostanie sparowane i pod
łą
czone,
wska
ź
nik Bluetooth
®
na urz
ą
dzeniu g
ł
ównym za
ś
wieci si
ę
.
• Gdy zostaniesz poproszony o podanie has
ł
a, wprowad
ź
“0000”.
• Po ustanowieniu po
łą
czenia przejd
ź
do “Wyboru ustawie
ń
trybu przesy
ł
ania” (poni
ż
ej).
Pod
łą
czanie sparowanego urz
ą
dzenia Bluetooth
®
i s
ł
uchanie muzyki
Urz
ą
dzenie g
ł
ówne po w
łą
czeniu zaczyna wyszukiwa
ć
ostatnio u
ż
ywanego urz
ą
dzenia Bluetooth
®
. Je
ż
eli po
łą
czenie z
ostatnio u
ż
ywanym urz
ą
dzeniem powiedzie si
ę
, na urz
ą
dzeniu g
ł
ównym za
ś
wieci si
ę
wska
ź
nik Bluetooth
®
.
Je
ż
eli wska
ź
nik Bluetooth
®
miga, nale
ż
y pod
łą
czy
ć
urz
ą
dzenie Bluetooth
®
.
1
Wybierz “SC-NP10” w menu Bluetooth
®
w urz
ą
dzeniu Bluetooth
®
.
• Kiedy urz
ą
dzenie Bluetooth
®
zostanie pod
łą
czone,
wska
ź
nik Bluetooth
®
na
urz
ą
dzeniu g
ł
ównym za
ś
wieci si
ę
.
2
Mo
ż
esz rozpocz
ąć
s
ł
uchanie muzyki, ogl
ą
danie filmu itp. na urz
ą
dzeniu Bluetooth
®
.
• Regulacj
ę
g
ł
o
ś
no
ś
ci wykonywa
ć
mo
ż
na za pomoc
ą
przycisków [- VOL +] na urz
ą
dzeniu g
ł
ównym.
O osi
ą
gni
ę
ciu maksymalnego lub minimalnego poziomu g
ł
o
ś
no
ś
ci informuje sygna
ł
d
ź
wi
ę
kowy.
Tylko dla kompatybilnych z NFC urz
ą
dze
ń
Android
TM
Poprzez samo przy
ł
o
ż
enie urz
ą
dzenia g
ł
ównego do kompatybilnego z NFC (Komunikacja bliskiego
zasi
ę
gu) urz
ą
dzenia Bluetooth
®
, urz
ą
dzenie g
ł
ówne automatycznie w
łą
czy si
ę
i przeprowadzi operacj
ę
uruchomienia, od parowania urz
ą
dzenia Bluetooth
®
po ustanowienia po
łą
czenia. Jest to bardzo wygodna
funkcja, zaprojektowana z my
ś
l
ą
o pomini
ę
ciu r
ę
cznego wykonywania operacji uruchomienia.
Informacje o NFC (Komunikacja bliskiego zasi
ę
gu)
Jest to technologia bezprzewodowej komunikacji o krótkim zasi
ę
gu, wykorzystuj
ą
ca fale radiowe.
Przygotowanie
W
łą
cz funkcj
ę
NFC w urz
ą
dzeniu g
ł
ównym. Nast
ę
pnie pod
łą
cz urz
ą
dzenie do Internetu w celu instalacji
odpowiedniego oprogramowania. Za korzystanie z Internetu pobierane s
ą
oddzielne op
ł
aty.
1
Pobierz aplikacj
ę
“Panasonic Music Streaming” (darmowa) na
urz
ą
dzenie Bluetooth
®
z Google Play
TM
.
• Wprowad
ź
“Panasonic Music Streaming” w okienku wyszukiwarki Google Play
TM
a
nast
ę
pnie wybierz “Panasonic Music Streaming” i pobierz aplikacj
ę
.
2
Uruchom aplikacj
ę
“Panasonic Music Streaming” na urz
ą
dzeniu Bluetooth
®
.
• Post
ę
puj zgodnie z instrukcjami na ekranie urz
ą
dzenia.
• Zawsze u
ż
ywaj najnowszej wersji aplikacji.
3
Przy
ł
ó
ż
i przytrzymaj urz
ą
dzenie przy obszarze kontaktu NFC urz
ą
dzenie g
ł
ównego.
(Do momentu, kiedy na ekranie pojawi si
ę
okienko z informacj
ą
o nawi
ą
zaniu po
łą
czenia.)
• Po uruchomieniu urz
ą
dzenia g
ł
ównego i ustanowieniu po
łą
czenia zapala si
ę
wska
ź
nik Bluetooth
®
.
• Je
ś
li wska
ź
nik Bluetooth
®
nie zapala si
ę
nawet po dotkni
ę
ciu obszaru kontaktu NFC,
nale
ż
y spróbowa
ć
zmieni
ć
kierunek dotyku.
4
Mo
ż
esz rozpocz
ąć
s
ł
uchanie muzyki, ogl
ą
danie filmu itp. na urz
ą
dzeniu Bluetooth
®
.
Pod
łą
czanie innego urz
ą
dzenia
• Je
ż
eli przy
ł
o
ż
ysz inne urz
ą
dzenie do urz
ą
dzenia g
ł
ównego, po
łą
czenie Bluetooth
®
zostanie
zaktualizowane. Poprzednio nawi
ą
zane po
łą
czenie zostanie automatycznie zerwane.
Wy
łą
czanie niektórych funkcji NFC urz
ą
dzenia
Operacja ta pozwala zapobiec niezamierzonemu u
ż
yciu Po
łą
czenia One-Touch.
Poni
ż
szy krok nale
ż
y wykona
ć
przy w
łą
czonym urz
ą
dzeniu.
Wy
łą
czanie (wy
łą
czone zostaj
ą
funkcje automatycznego w
łą
czenia, parowania urz
ą
dze
ń
i anulowania po
łą
czenia):
1
Przytrzymuj
ą
c wci
ś
ni
ę
ty przycisk [- VOL], naci
ś
nij i przytrzymaj
przycisk [VOL +] a
ż
do momentu, kiedy wska
ź
nik Bluetooth
®
oraz
wska
ź
nik “D.SURROUND” mign
ą
jednokrotnie.
• Mo
ż
liwe pozostaje tylko po
łą
czenie ze sparowanym urz
ą
dzeniem przy w
łą
czonym urz
ą
dzeniu g
ł
ównym.
• Operacja ta automatycznie wy
łą
cza funkcj
ę
oczekiwania Bluetooth
®
.
Ponowne w
łą
czanie wszystkich funkcji: Patrz “Reset (do stanu fabrycznego)” (tylna strona)
• Zresetowanie urz
ą
dzenia przywraca ustawienia fabryczne.
Urz
ą
dzenie mo
ż
e pracowa
ć
w jednym z dwóch trybów przesy
ł
u: “Trybie priorytetu po
łą
czenia” oraz “Trybie priorytetu
jako
ś
ci d
ź
wi
ę
ku”. Po upewnieniu si
ę
,
ż
e d
ź
wi
ę
k jest odtwarzany, wybierz przy w
łą
czonym urz
ą
dzeniu jeden z trybów.
1
Wybierz jeden z poni
ż
szych trybów.
■
Tryb priorytetu po
łą
czenia:
Przytrzymuj
ą
c wci
ś
ni
ę
ty przycisk [D.SURROUND], naci
ś
nij i
przytrzymaj przycisk [VOL +] a
ż
do momentu, kiedy wska
ź
nik
Bluetooth
®
oraz wska
ź
nik “D.SURROUND” mign
ą
jednokrotnie.
■
Tryb priorytetu jako
ś
ci d
ź
wi
ę
ku:
Przytrzymuj
ą
c wci
ś
ni
ę
ty przycisk [LIGHT], naci
ś
nij i przytrzymaj
przycisk [VOL +] a
ż
do momentu, kiedy wska
ź
nik Bluetooth
®
oraz
wska
ź
nik “D.SURROUND” mign
ą
jednokrotnie.
2
Naci
ś
nij [
Í
/I] aby wy
łą
czy
ć
urz
ą
dzenie, a nast
ę
pnie [
Í
/I] aby w
łą
czy
ć
je ponownie.
• Po
łą
czenie Bluetooth
®
zostanie automatycznie ustanowione i za
ś
wieci si
ę
wska
ź
nik Bluetooth
®
.
Je
ż
eli nawi
ą
zujesz po
łą
czenie za pomoc
ą
Bluetooth
®
ze sparowanego urz
ą
dzenia Bluetooth
®
a funkcja ta jest
w
łą
czona, urz
ą
dzenie g
ł
ówne w
łą
czy si
ę
. Wy
łą
cz urz
ą
dzenie g
ł
ówne a nast
ę
pnie wykonaj poni
ż
sz
ą
operacj
ę
.
W
łą
czanie
1
Przytrzymuj
ą
c wci
ś
ni
ę
ty przycisk [LIGHT], naci
ś
nij i przytrzymaj przycisk [
Í
/I] a
ż
do
momentu kiedy wska
ź
nik Bluetooth
®
oraz wska
ź
nik “D.SURROUND” mign
ą
jednokrotnie.
• Operacja ta pozwala w
łą
czy
ć
wszystkie funkcje NFC urz
ą
dzenia.
Sprawdzanie, czy funkcja jest w
łą
czona: Naci
ś
nij [LIGHT]. (Wska
ź
nik Bluetooth
®
mignie trzy razy)
Wy
łą
czanie: Przytrzymuj
ą
c wci
ś
ni
ę
ty przycisk [D.SURROUND], naci
ś
nij i przytrzymaj przycisk [
Í
/I]
a
ż
do momentu kiedy wska
ź
nik Bluetooth
®
oraz wska
ź
nik “D.SURROUND” mign
ą
jednokrotnie.
• Wy
łą
cz urz
ą
dzenie g
ł
ówne lub po
łą
czone.
• Zatrzymaj/wy
łą
cz po
łą
czenie Bluetooth
®
urz
ą
dzenia.
• (Dotyczy tylko urz
ą
dze
ń
kompatybilnych z NFC) Ponownie dotknij i przytrzymaj urz
ą
dzenie przy
obszarze kontaktu NFC urz
ą
dzenia g
ł
ównego.
Uwaga
• Do zestawu mo
ż
na pod
łą
cza
ć
tylko jedno urz
ą
dzenie jednocze
ś
nie.
• Mo
ż
na zarejestrowa
ć
maksymalnie 8 urz
ą
dze
ń
w tym systemie. W przypadku sparowania dziewi
ą
tego
urz
ą
dzenia, urz
ą
dzenie, które by
ł
o najd
ł
u
ż
ej nieu
ż
ywane, zostanie zast
ą
pione.
• Urz
ą
dzenie automatycznie wy
łą
cza si
ę
je
ż
eli przez ok. 30 minut nie jest wykonywana
ż
adna
operacja i nie jest nawi
ą
zane po
łą
czenie z Bluetooth
®
.
• Je
ż
eli podczas odtwarzania obraz i d
ź
wi
ę
k nie s
ą
ze sob
ą
zsynchronizowane, nale
ż
y ponownie uruchomi
ć
aplikacj
ę
u
ż
ywan
ą
do odtwarzania. Je
ż
eli problem nie ust
ą
pi, nale
ż
y po
łą
czy
ć
urz
ą
dzenie Bluetooth
®
z
urz
ą
dzeniem g
ł
ównym za pomoc
ą
kabla audio.
• Po
łą
czenie One-Touch mo
ż
e nie dzia
ł
a
ć
prawid
ł
owo, w zale
ż
no
ś
ci od u
ż
ywanego sprz
ę
tu.
• Zu
ż
ycie energii w trybie oczekiwania zwi
ę
ksza si
ę
po w
łą
czeniu funkcji oczekiwania Bluetooth
®
.
Mo
ż
esz teraz ogl
ą
da
ć
filmy i inne materia
ł
y wizualne z towarzyszeniem pot
ęż
nego d
ź
wi
ę
ku i
wyra
ź
nych dialogów. (“Direct-Dialog Surround”)
1
Naci
ś
nij [D.SURROUND] na urz
ą
dzeniu g
ł
ównym aby w
łą
czy
ć
/ wy
łą
czy
ć
efekt.
W
łą
czone: Wska
ź
nik “D.SURROUND”
ś
wieci si
ę
(ustawienie domy
ś
lne).
Wy
łą
czone: Wska
ź
nik “D.SURROUND” ga
ś
nie i efekt jest wy
łą
czony.
Odtwarzanie d
ź
wi
ę
ku monofonicznego z ekspansywnym polem d
ź
wi
ę
kowym
(“Surround Expansive Effect” dla
ź
ród
ł
a monofonicznego)
1 Naci
ś
nij i przytrzymaj [D.SURROUND] tak d
ł
ugo, a
ż
wska
ź
nik
“D.SURROUND” mignie jednokrotnie.
Naci
ś
ni
ę
cie przycisku [D.SURROUND] po wykonaniu powy
ż
szej operacji spowoduje
zga
ś
ni
ę
cie wska
ź
nika “D.SURROUND” i wy
łą
czenie “Surround Expansive Effect”.
Uwaga
• Wy
łą
czenie urz
ą
dzenia powoduje automatyczne wy
łą
czenie “Surround Expansive Effect”.
• Je
ż
eli odtwarzany d
ź
wi
ę
k jest zniekszta
ł
cony, wy
łą
cz “Direct-Dialog Surround”.
(
→
c.d. po drugiej stronie )
D
ě
kujeme Vám za zakoupení tohoto výrobku. P
ř
ed použitím tohoto produktu si pe
č
liv
ě
p
ř
e
č
t
ě
te tyto pokyny a celý návod si uložte pro pozd
ě
jší použití.
P
ř
ed zahájením používání za
ř
ízení zkontrolujte dodané p
ř
íslušenství.
1 Sí
ť
ový kabel
•
Č
ísla výrobku uvedená v tomto návodu k obsluze p
ř
edstavují správná
č
ísla výrobku z b
ř
ezna 2013.
Mohou být p
ř
edm
ě
tem zm
ě
ny.
• Nepoužívejte napájecí kabel s jinými za
ř
ízeními.
K
č
išt
ě
ní tohoto za
ř
ízení používejte m
ě
kký suchý had
ř
ík.
Poznámka
• K
č
išt
ě
ní tohoto za
ř
ízení nikdy nepoužívejte alkohol,
ř
edidla ani benzin.
• P
ř
ed pouitím chemicky ošet
ř
eného had
ř
íku si p
ř
e
č
tete s ním dodávaný návod.
P
ř
íprava
Po p
ř
ipojení p
ř
ívodního kabelu k tomuto za
ř
ízení zapn
ě
te funkci Bluetooth
®
na za
ř
ízení a
umíst
ě
te za
ř
ízení do blízkosti tohoto za
ř
ízení.
Chcete-li použít za
ř
ízení Bluetooth
®
kompatibilní s technologií NFC (Near Field Communication),
p
ř
ejd
ě
te na
č
ást “P
ř
ipojení jedním dotykem (p
ř
ipojení pomocí technologie NFC)”.
U každého za
ř
ízení Bluetooth
®
, které chcete p
ř
ipojit prost
ř
ednictvím technologie Bluetooth
®
,
prove
ď
te nejprve spárování.
Párování se za
ř
ízením Bluetooth
®
1
Stiskem tla
č
ítka [
Í
/I] zapn
ě
te toto za
ř
ízení.
• Indikátor Bluetooth
®
za
č
ne pomalu blikat.
•
P
ř
i prvním použití tohoto za
ř
ízení (stav nastavení z výroby):
Indikátor Bluetooth
®
bliká
rychle.
→
Za
ř
ízení p
ř
ejde do pohotovostního režimu párování.
→
P
ř
ejd
ě
te na krok 3.
2
Stiskn
ě
te a p
ř
idržte tla
č
ítko [-PAIRING], dokud indikátor Bluetooth
®
neza
č
ne rychle blikat.
• Za
ř
ízení p
ř
ejde do pohotovostního režimu párování.
3
Zvolte “SC-NP10” z menu Bluetooth
®
za
ř
ízení Bluetooth
®
.
• Když je za
ř
ízení Bluetooth
®
spárováno a p
ř
ipojeno,
indikátor Bluetooth
®
na za
ř
ízení se rozsvítí.
• Budete-li požádáni o zadání hesla, vložte “0000”.
• Po navázání spojení p
ř
ejd
ě
te k
č
ásti “Výb
ě
r nastavení režimu p
ř
enosu” níže.
P
ř
ipojení spárovaného za
ř
ízení Bluetooth
®
a poslech zvuku
Když je toto za
ř
ízení zapnuté, vyhledá naposledy použité za
ř
ízení Bluetooth
®
. Pokud je spojení s
naposledy použitým za
ř
ízením navázáno, indikátor Bluetooth
®
na za
ř
ízení se rozsvítí.
Pokud indikátor Bluetooth
®
bliká, je t
ř
eba p
ř
ipojit za
ř
ízení Bluetooth
®
.
1
Zvolte “SC-NP10” z menu Bluetooth
®
za
ř
ízení Bluetooth
®
.
• Když je za
ř
ízení Bluetooth
®
p
ř
ipojeno,
indikátor Bluetooth
®
na za
ř
ízení se rozsvítí.
2
Spus
ť
te p
ř
ehrávání hudby nebo videa na za
ř
ízení Bluetooth
®
.
• Upravte hlasitost pomocí tla
č
ítek [- VOL +] na za
ř
ízení.
P
ř
i dosažení maximální nebo minimální hlasitosti za
ř
ízení upozorní na tuto skute
č
nost pípnutím.
Platí pouze pro za
ř
ízení Android
TM
podporující technologii NFC
Pouhým dotykem za
ř
ízení Bluetooth
®
podporujícího technologii NFC (Near Field Communication) se toto
za
ř
ízení automaticky zapne a provede spušt
ě
ní, od spárování se za
ř
ízením Bluetooth
®
po navázání
spojení. Tato velmi praktická funkce je ur
č
ena k tomu, aby ušet
ř
ila uživateli proces spušt
ě
ní.
Technologie NFC (Near Field Communication)
Jedná se o technologii pro komunikaci na krátké vzdálenosti, která využívá rádiové spojení.
P
ř
íprava
Zapn
ě
te funkci NFC na za
ř
ízení. Poté p
ř
ipojte za
ř
ízení k Internetu a nainstalujte specializovanou
aplikaci. Na použití p
ř
ipojení k Internetu se mohou vztahovat zvláštní poplatky.
1
Stáhn
ě
te si do svého za
ř
ízení Bluetooth
®
bezplatnou aplikaci
“Panasonic Music Streaming” z Obchodu Google Play
TM
.
• V Obchod
ě
Google Play
TM
zadejte do pole pro vyhledávání text “Panasonic Music Streaming”
a vyhledejte a stáhn
ě
te aplikaci “Panasonic Music Streaming”.
2
Spus
ť
te aplikaci “Panasonic Music Streaming” na za
ř
ízení Bluetooth
®
.
• Postupujte podle pokyn
ů
na displeji za
ř
ízení.
• Vždy používejte nejnov
ě
jší verzi aplikace.
3
P
ř
iložte za
ř
ízení k dotykové oblasti NFC na tomto za
ř
ízení. (P
ř
idržte za
ř
ízení
na míst
ě
, dokud se na za
ř
ízení nezobrazí zpráva, že spojení bylo navázáno).
• Když se toto za
ř
ízení zapne a spojení je navázáno, indikátor Bluetooth
®
se rozsvítí.
• Když se indikátor Bluetooth
®
nerozsvítí ani poté, co p
ř
iložíte za
ř
ízení k dotykové
oblasti NFC, zm
ěň
te pozici p
ř
iložení za
ř
ízení.
4
Spus
ť
te p
ř
ehrávání hudby nebo videa na za
ř
ízení Bluetooth
®
.
P
ř
ipojení k jinému za
ř
ízení
• Pokud k tomuto za
ř
ízení p
ř
iložíte jiné za
ř
ízení, lze aktualizovat p
ř
ipojení Bluetooth
®
. D
ř
íve p
ř
ipojené
za
ř
ízení bude automaticky odpojeno.
Deaktivace n
ě
kterých funkcí NFC tohoto za
ř
ízení
Tento postup zabrání neúmyslné aktivaci p
ř
ipojení jedním dotykem.
Níže provedený postup provád
ě
jte, když je toto za
ř
ízení zapnuto.
Deaktivace (platí pro funkce automatického zapnutí, párování za
ř
ízení a zrušení p
ř
ipojení):
1
Stiskn
ě
te a p
ř
idržte tla
č
ítko [- VOL] a sou
č
asn
ě
stiskn
ě
te a p
ř
idržte tla
č
ítko [VOL +],
dokud se nerozsvítí indikátor Bluetooth
®
a na displeji neblikne text “D.SURROUND”.
• Nyní lze p
ř
ipojit pouze spárované za
ř
ízení zatímco je toto za
ř
ízení zapnuto.
• Tento postup automaticky vypne funkci Bluetooth
®
v pohotovostním režimu.
Op
ě
tovná aktivace všech funkcí: viz
č
ást “Reset (obnovení nastavení z výroby)” na konci dokumentu.
• Restování obnoví nastavení tohoto za
ř
ízení z výroby.
Toto za
ř
ízení používá dva režimy p
ř
enosu: “Režim priority p
ř
ipojení” a “Režim priority kvality
zvuku”. P
ř
i zapnutém za
ř
ízení ov
ěř
te, že zvuk lze p
ř
ehrávat a poté vyberte režim.
1
Vyberte jeden z následujících režim
ů
.
■
Režim priority p
ř
ipojení:
Stiskn
ě
te a p
ř
idržte tla
č
ítko [D.SURROUND] a sou
č
asn
ě
stiskn
ě
te a p
ř
idržte
tla
č
ítko [VOL +], dokud se nerozsvítí indikátor Bluetooth
®
a na displeji
neblikne text “D.SURROUND”.
■
Režim priority kvality zvuku:
Stiskn
ě
te a p
ř
idržte tla
č
ítko [LIGHT] a sou
č
asn
ě
stiskn
ě
te a p
ř
idržte tla
č
ítko [VOL +],
dokud se nerozsvítí indikátor Bluetooth
®
a na displeji neblikne text “D.SURROUND”.
2
Stiskem tla
č
ítka [
Í
/I] vypn
ě
te toto za
ř
ízení. Dalším stiskem tla
č
ítka [
Í
/I]
za
ř
ízení op
ě
t zapnete.
• P
ř
ipojení Bluetooth
®
je automaticky navázáno a indikátor Bluetooth
®
se rozsvítí.
Pokud provedete p
ř
ipojení Bluetooth
®
ze spárovaného za
ř
ízení Bluetooth
®
, zatímco je tato funkce
zapnuta, toto za
ř
ízení se automaticky zapne. Vypn
ě
te toto za
ř
ízení a prove
ď
te následující postup.
Zapnutí
1
Stiskn
ě
te a p
ř
idržte tla
č
ítko [LIGHT] a sou
č
asn
ě
stiskn
ě
te a p
ř
idržte tla
č
ítko [
Í
/I],
dokud se nerozsvítí indikátor Bluetooth
®
a na displeji neblikne text “D.SURROUND”.
• Tento postup aktivuje všechny funkce NFC tohoto za
ř
ízení.
Kontrola zapnutí funkce: Stiskn
ě
te tla
č
ítko [LIGHT]. (Indikátor Bluetooth
®
t
ř
ikrát blikne).
Vypnutí: Stiskn
ě
te a p
ř
idržte tla
č
ítko [D.SURROUND] a sou
č
asn
ě
stiskn
ě
te a p
ř
idržte tla
č
ítko
[
Í
/I], dokud se nerozsvítí indikátor Bluetooth
®
a na displeji neblikne text “D.SURROUND”.
• Vypn
ě
te toto za
ř
ízení nebo druhé za
ř
ízení.
• Zastavte nebo deaktivujte p
ř
enos Bluetooth
®
ze za
ř
ízení.
• (Platí pouze pro za
ř
ízení podporující technologii NFC) Op
ě
t p
ř
iložte za
ř
ízení k dotykové oblasti NFC
na tomto za
ř
ízení.
Note
• Toto za
ř
ízení lze v daný okamžik p
ř
ipojit k jednomu za
ř
ízení.
• Toto za
ř
ízení m
ů
že registrovat 8 za
ř
ízení. P
ř
i spárování 9. za
ř
ízení bude nahrazeno za
ř
ízení, které
nebylo použito nejdelší dobu.
• Toto za
ř
ízení se automaticky vypne, pokud není p
ř
i p
ř
ipojení Bluetooth
®
po dobu asi 30 minut provedena žádná
č
innost.
• Pokud b
ě
hem p
ř
ehrávání není zvuk synchronizován s obrazem, restartujte aplikaci používanou pro p
ř
ehrávání. Pokud
problém p
ř
etrvává, propojte za
ř
ízení Bluetooth
®
a toto za
ř
ízení pomocí zvukového kabelu.
• U n
ě
kterých za
ř
ízení nemusí funkce p
ř
ipojení jedním dotykem pracovat správn
ě
.
• Když je funkce Bluetooth
®
v pohotovostním režimu zapnutá, je spot
ř
eba elektrického proudu v
pohotovostním režimu vyšší.
Máte možnost vychutnávat filmy a další vizuální obsah s mohutným zvukem p
ř
i zachování
z
ř
etelnosti dialog
ů
(efekt “Direct-Dialog Surround”)
1
Stiskem tla
č
ítka [D.SURROUND] na tomto za
ř
ízení tento efekt zapnete
č
i vypnete.
Zapnuto: indikátor “D.SURROUND” se rozsvítí (výchozí nastavení).
Vypnuto: indikátor “D.SURROUND” zhasne a efekt není aktivní.
Monaurální zvuk s rozší
ř
eným zvukovým polem
(efekt “Surround Expansive Effect” pro monaurální zdroje)
1 Stiskn
ě
te a p
ř
idržte tla
č
ítko [D.SURROUND] dokud indikátor
“D.SURROUND” neblikne.
Pokud po provedení výše uvedeného kroku stisknete tla
č
ítko [D.SURROUND], indikátor
“D.SURROUND” a efekt “Surround Expansive Effect” se deaktivuje.
Poznámka
• P
ř
i vypnutí tohoto za
ř
ízení dojde automaticky k vypnutí efektu “Surround Expansive Effect”.
• Pokud je zvuk p
ř
i p
ř
ehrávání zkreslený, vypn
ě
te efekt “Direct-Dialog Surround”.
(
→
Pokra
č
ování na následující stránce)
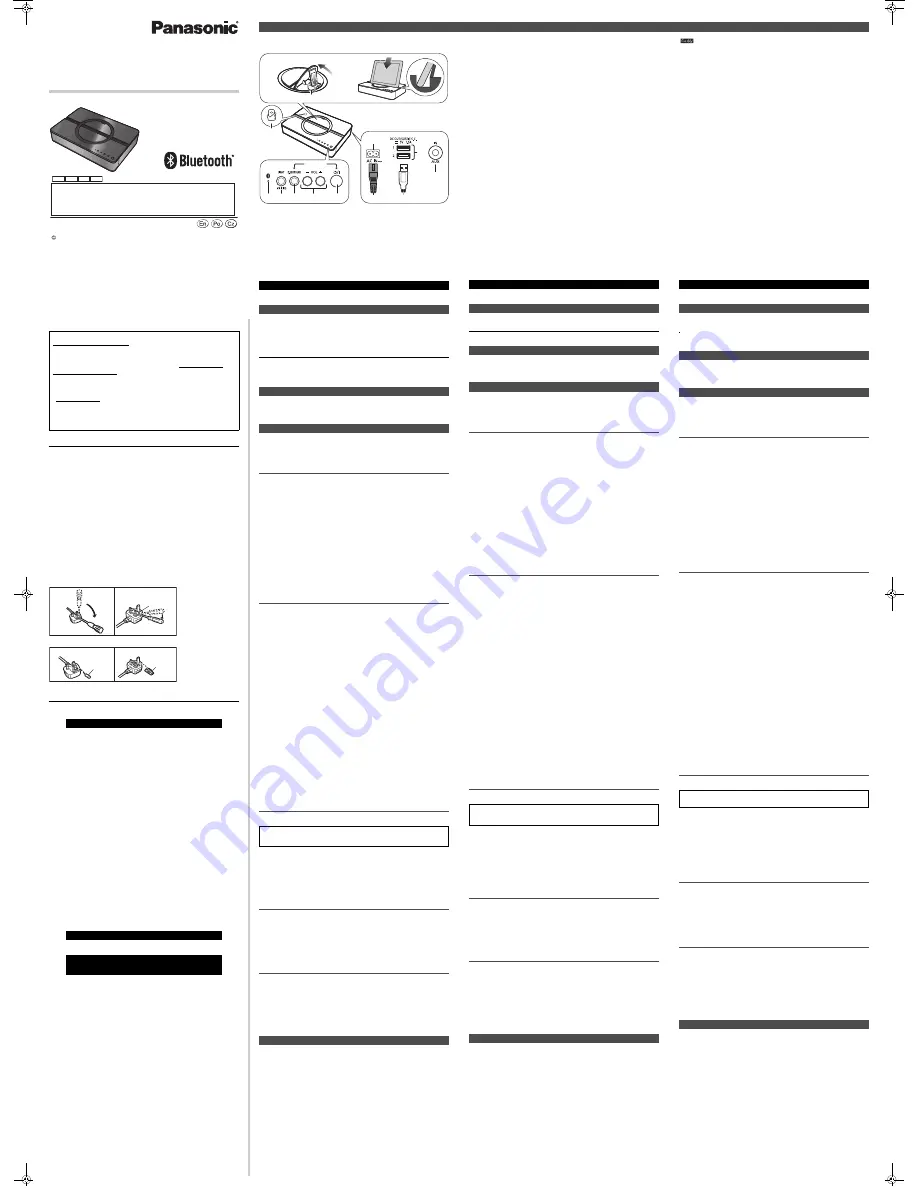
Control reference guide/ Przewodnik po funkcjach sterowania
/
Referen
č
ní p
ř
íru
č
ka ovlada
č
e
ENGLISH
Accessories
Maintenance
Listening to audio from a Bluetooth
®
device
Connecting via Bluetooth
®
menu
One-Touch Connection (Connecting by NFC)
Selecting Transmission mode setting
The default mode is set to “Connectivity Priority MODE” to facilitate checking of the
connection after a device registration. When cordless phones, wireless LAN routers, and
other wireless devices that may interfere with this unit are not present in the surrounding
area, select “Sound Quality Priority MODE”. You can enjoy audio with higher quality sound.
Setting the Bluetooth
®
Standby function
Disconnecting Bluetooth
®
Enjoying Surround Playback
9
STEP 1
STEP 2
2
1
7
6
5
8
3
4
10
11
POLSKI
Akcesoria
Konserwacja
S
ł
uchanie muzyki z urz
ą
dzenia Bluetooth
®
Po
łą
czenie poprzez menu Bluetooth
®
Po
łą
czenie One-Touch (Po
łą
czenie za pomoc
ą
NFC)
Wybór ustawie
ń
trybu przesy
ł
ania
Domy
ś
lnie ustawiony jest “Tryb priorytetu po
łą
czenia”, w celu u
ł
atwienia sprawdzania po
łą
czenia
po rejestracji urz
ą
dzenia. Je
ś
li w pobli
ż
u nie znajduj
ą
si
ę
ż
adne urz
ą
dzenia, które mog
ł
yby
zak
ł
óca
ć
prac
ę
urz
ą
dzenia g
ł
ównego, takie jak bezprzewodowe telefony, rutery LAN itp. wybierz
“Tryb priorytetu jako
ś
ci d
ź
wi
ę
ku”, pozwalaj
ą
cy na uzyskanie d
ź
wi
ę
ku o wy
ż
szej jako
ś
ci.
Ustawienie funkcji oczekiwania Bluetooth
®
Roz
łą
czanie Bluetooth
®
Odtwarzanie d
ź
wi
ę
ku przestrzennego
1
NFC touch area
• Refer to “One-Touch Connection
(Connecting by NFC)”.
2
Bluetooth
®
indicator
3
Light button/Bluetooth
®
pairing button
• You can turn on/off the circle light by
pressing this button.
4
D.SURROUND button
5
“D.SURROUND” indicator
6
Volume buttons
7
Standby/on switch [
Í
/I]
• Press to switch the unit from on to standby
mode or vice versa. In standby mode, the unit
is still consuming a small amount of power.
8
Power indicator
9
AC IN terminal
10 USB (type A) DC output ports
• When using these ports, use a USB
(type A) cable (not supplied). (See “About
the DC output ports (USB)”)
11 AUX jack
[English]
A
: You can adjust the tilt of the backrest. Align the support for the backrest with the desired
position between the lines
A
.
To close the backrest, lift up the support slowly, and push it towards the backrest.
Note
• When using the AUX input, the Bluetooth
®
and NFC features are not available.
• When using the AUX input, the volume may seem low depending on the connected device. In that case, check
if the volume limit can be changed on the device. For details, refer to the operating instructions of the device.
• When the backrest is propped up, do not move this unit or subject this unit to a strong shock.
• If the device cannot be placed securely against the backrest due to its shape, accessories, etc., avoid using the backrest.
1
Obszar kontaktu NFC
• Zobacz w “Po
łą
czenie One-Touch
(Po
łą
czenie za pomoc
ą
NFC)”.
2
Wska
ź
nik Bluetooth
®
3
Przycisk pod
ś
wietlenia/Bluetooth
®
przycisk parowania
• Poprzez naci
ś
ni
ę
cie przycisku mo
ż
na w
łą
cza
ć
/
wy
łą
cza
ć
pod
ś
wietlenie wokó
ł
przycisku.
4
Przycisk D.SURROUND
5
Wska
ź
nik “D.SURROUND”
6
Przyciski regulacji g
ł
o
ś
no
ś
ci
7
Prze
łą
cznik trybu gotowo
ś
ci/
w
łą
czania
[
Í
/I]
• Naci
ś
nij, aby prze
łą
czy
ć
urz
ą
dzenie z
trybu w
łą
czenia na tryb gotowo
ś
ci lub
odwrotnie. W trybie gotowo
ś
ci urz
ą
dzenie
wci
ąż
zu
ż
ywa niewielk
ą
ilo
ść
energii.
8
Wska
ź
nik zasilania
9
Z
łą
cze AC IN
10 USB (typ A) DC porty wyj
ś
ciowe
• Podczas korzystania z tych portów nale
ż
y
u
ż
ywa
ć
kabla USB (typ A) (wyposa
ż
enie
opcjonalne).
(
Zobacz w “Informacje o
portach wyj
ś
ciowych DC (USB)”
)
11 AUX gniazdo
[Polski]
A
: Nachylenie podpórki mo
ż
na regulowa
ć
. W tym celu nale
ż
y ustawi
ć
wspornik podpórki w
żą
danej pozycji pomi
ę
dzy liniami
A
.
Aby zamkn
ąć
podpórk
ę
, nale
ż
y delikatnie podnie
ść
wspornik i popchn
ąć
go w stron
ę
podpórki.
Uwaga
• Podczas korzystania z wej
ś
cia AUX funkcje Bluetooth
®
oraz NFC nie s
ą
dost
ę
pne.
• Podczas korzystania z wej
ś
cia AUX, poziom g
ł
o
ś
no
ś
ci mo
ż
e wydawa
ć
si
ę
niski, w zale
ż
no
ś
ci od
pod
łą
czonego urz
ą
dzenia. W takim przypadku nale
ż
y sprawdzi
ć
mo
ż
liwo
ść
zwi
ę
kszenia g
ł
o
ś
no
ś
ci na
pod
łą
czonym urz
ą
dzeniu. Informacji na ten temat nale
ż
y szuka
ć
w instrukcji obs
ł
ugi danego urz
ą
dzenia.
• Kiedy podpórka jest wysuni
ę
ta nie nale
ż
y przesuwa
ć
zestawu ani poddawa
ć
go silnym wstrz
ą
som.
• Je
ś
li urz
ą
dzenia nie mo
ż
na bezpiecznie umie
ś
ci
ć
na podpórce ze wzgl
ę
du na jego kszta
ł
t lub akcesoria itp.,
nie nale
ż
y podpórki u
ż
ywa
ć
.
Č
ESKY
P
ř
íslušenství
Údržba
Poslech zvuku ze za
ř
ízení Bluetooth
®
P
ř
ipojení pomocí nabídky Bluetooth
®
P
ř
ipojení jedním dotykem (p
ř
ipojení pomocí technologie NFC)
Výb
ě
r nastavení režimu p
ř
enosu
Výchozí režim je “Režim priority p
ř
ipojení”, který zajiš
ť
uje kontrolu p
ř
ipojení po registraci za
ř
ízení. Pokud se v okolí
nenacházejí za
ř
ízení, která by mohla zp
ů
sobovat rušení, jako jsou bezdrátové telefony, bezdrátové sm
ě
rova
č
e a
další bezdrátová za
ř
ízení, vyberte “Režim priority kvality zvuku”, který zajiš
ť
uje vyšší kvalitu zvuku.
Nastavení funkce Bluetooth
®
v pohotovostním režimu
Odpojení Bluetooth
®
P
ř
ehrávání s prostorovým zvukem
1
Dotyková oblast NFC
• Viz “P
ř
ipojení jedním dotykem (p
ř
ipojení
pomocí technologie NFC)”.
2
Indikátor Bluetooth
®
3
Tla
č
ítko osv
ě
tlení / párování
Bluetooth
®
• Stiskem tohoto tla
č
ítka zapnete
č
i vypnete
osv
ě
tlení prstence.
4
Tla
č
ítko D.SURROUND
5
Indikátor “D.SURROUND”
6
Tla
č
ítka hlasitosti
7
P
ř
epína
č
pohotovostního
režimu/zapnutí [
Í
/I]
• Stisknutím se p
ř
ístroj p
ř
epne mezi
provozním a pohotovostním režimem. V
pohotovostním režimu p
ř
ístroj stále
spot
ř
ebovává malé množství energie.
8
Indikátor napájení
9
Zásuvka sí
ť
ového vstupu
10 Výstupní porty stejnosm
ě
rného
napájení USB (typ A)
• P
ř
i použití t
ě
chto port
ů
použijte kabel USB
(typ A), který není sou
č
ástí dodávky. (Viz “Porty
výstupu stejnosm
ě
rného napájení (USB)”)
11 AUX konektor
A
: Sklon zadní op
ě
rky lze upravit. Umíst
ě
te podp
ě
ru zadní op
ě
rky do požadované polohy mezi
č
arami
A
.
Chcete.li op
ě
rku sklopit, pomalu zvedn
ě
te její podp
ě
ru a zatla
č
te ji sm
ě
rem k op
ě
rce.
Poznámka
• P
ř
i použití vstupu AUX nejsou funkce Bluetooth
®
a NFC dostupné.
• P
ř
i použití vstupu AUX se m
ů
že hlasitost u n
ě
kterých za
ř
ízení zdát nízká. V takovém p
ř
ípad
ě
zjist
ě
te, zda lze na daném za
ř
ízení zm
ě
nit omezení hlasitosti. Další informace naleznete v návodu k
obsluze daného za
ř
ízení.
• Když je zadní op
ě
rka podep
ř
ená, nep
ř
emis
ť
ujte toto za
ř
ízení ani je nevystavujte ot
ř
es
ů
m.
• Pokud nelze za
ř
ízení bezpe
č
n
ě
umístit na op
ě
rku z d
ů
vodu jeho typu, tvaru, p
ř
íslušenství atd.,
op
ě
rku nepoužívejte.
SC-NP10EBEGGNGS_eng_pol_cze.fm 1 ページ 2013年3月27日 水曜日 午後5時37分


