


61
For Y
our
Information
Selecting DISC LANGUAGES
(DVD only)
Select the desired item.
1) Press
to select.
2) Press SET
repeatedly
for language.
(Refer to
the right.)
To select and set the language of the audio soundtrack,
subtitles, or title/DVD menus for all discs to be played.
5
“AUDIO” selections
To select the audio soundtrack language.
English/French/Spanish (factory preset: English)
Original: Original disc language
OTHER
✱✱✱✱
: Other language selection*
1
“SUBTITLE” selections
To select the subtitle language.
AUTO: Same language selected for “AUDIO”
(Factory preset)
• If language set for “AUDIO” is used in
playback, subtitles will not appear.
• If another language is used during
playback, the subtitles will appear in the
language selected at “AUDIO” setup.
English/French/Spanish
OTHER
✱✱✱✱
: Other language selection*
1
“MENUS” selections
To select the language used in title menus or
DVD menus.
English/French/Spanish (factory preset: English)
OTHER
✱✱✱✱
: Other language selection*
1
To enter OTHER
✱✱✱✱
code number,
Press NUMBERED keys (Refer to the language
codes on page 66).
To make corrections, press
repeatedly to
delete language code number, and correct.
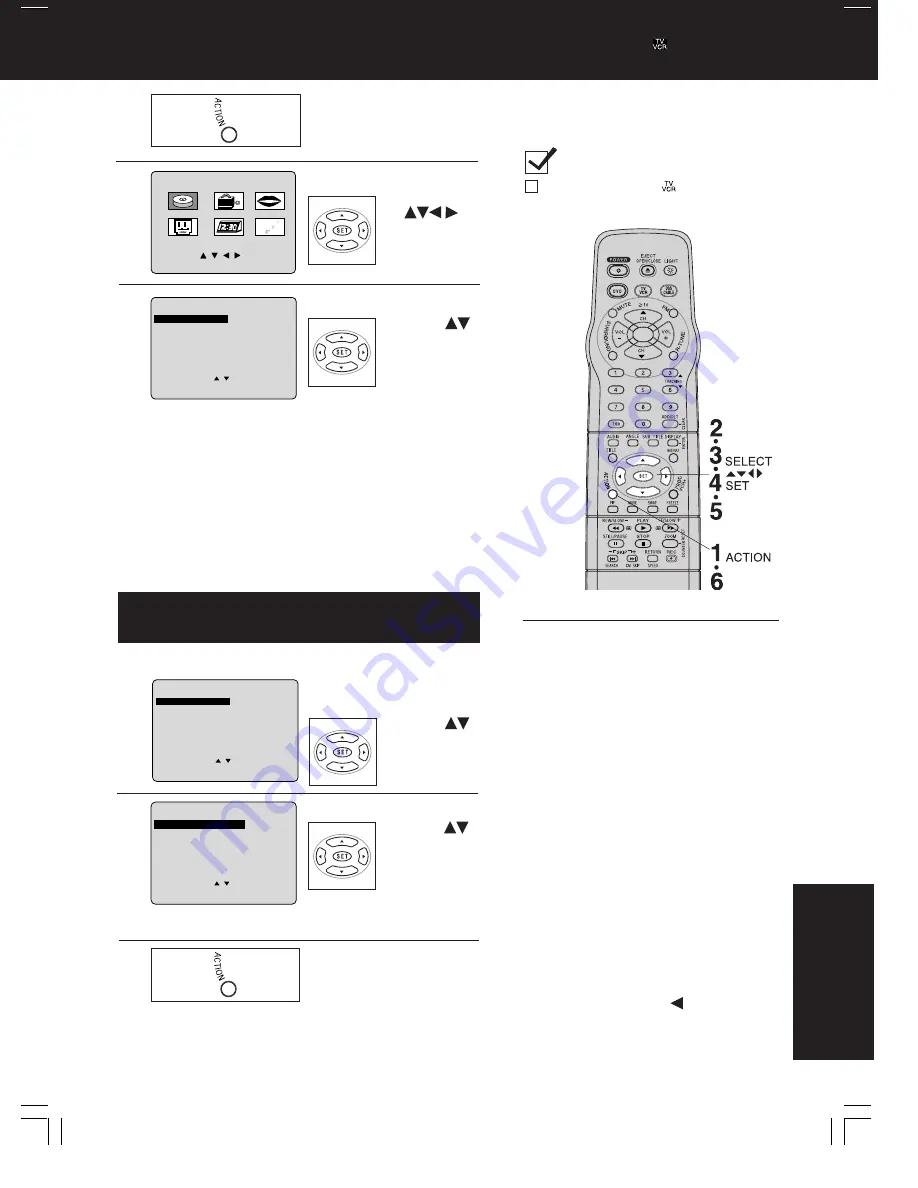
Settings for DVD Operation
1
Display MAIN MENU.
Press ACTION in stop
mode.
2
3
Once initial settings are done, they remain in
memory (even after power off) until changed. This
means the unit will always operate under the same
conditions (especially DVDs) each time.
DISC LANGUAGES (See below)
All languages offered on the disc can be set. If the language set is
not offered on the disc, the original disc language will be selected.
AUDIO OUTPUT (See page 62.)
You can set the audio output that comes from the digital
audio output terminal.
STILL MODE (See page 63.)
To select “Field still” or “Frame still” to prevent jittering from
occurring, or make small text or fine patterns clearly visible in
a still picture. When AUTO is set “Field Still” or “Frame Still” is
selected automatically.
TV MODE (See page 63.)
To select whether the video material for a wide-screen will be played
back in the Pan & Scan style or in the Letterbox style on the screen.
6
Display DVD screen.
1) Press
to
select.
2) Press SET.
Select the desired item.
1) Press
to select.
2) Press SET.
Redisplay DVD menu
to continue setup.
Press ACTION and go to
step 3 to setup another
setting.
Or, to exit, press ACTION
three times.
*
1
If the selected language is not offered, the
original disc language is selected.
M A I N MENU
DVD
LOCK
CH
CLOCK
TV
LANGUAGE
END : ACT I ON
SELECT : SET : SET
5
3
1
D I SC LANGUAGES
SELECT
:
SET
: SET
END
: ACT I ON
AU
AUDI
D I O
:
: E n g l i s h
E n g l i s h
SUBT I TLE
: AUTO
MENUS
: E n g l i s h
DVD MAIN MENU
SELECT
:
SET
: SET
END
: ACT I ON
D I
D I SC LANGUAGES
SC LANGUAGES
AUDIO OUTPUT
ST I L L MODE
: AUTO
TV MODE
: L e t t e r b o x
Check list before you begin.
It is necessary, press
to enter TV
mode.
4
Display DISC
LANGUAGES screen.
1) Press
to select.
2) Press
SET.
DVD MAIN MENU
SELECT
:
SET
: SET
END
: ACT I ON
D I
D ISC LANGUAGES
SC LANGUAGES
AUDIO OUTPUT
ST I L L MODE
: AUTO
TV MODE
: L e t t e r b o x
*Important:
if a remote control button does not work when
pressed, press the
, DVD button on the
remote and try the button again.
Содержание PV-DF2700-K
Страница 1: ...ORDER NO MKE0012601C1 B6 TV DVD VCR Combination PV DF2700 K SPECIFICATIONS 1 ...
Страница 2: ...1 1 SAFETY PRECAUTIONS 1 1 GENERAL GUIDELINES 1 IMPORTANT SAFETY NOTICE 2 ...
Страница 11: ...11 ...
Страница 12: ...Fig 1 3 12 ...
Страница 13: ...Fig 1 4 13 ...
Страница 14: ...14 ...
Страница 15: ...Fig 1 5 15 ...
Страница 23: ...5 1 8 SERVICE POSITION 5 1 8 1 Service Position 23 ...
Страница 28: ...28 ...
Страница 30: ...6 Place it along with Guide ribs on the Bottom Frame as shown Fig 7 3 3 30 ...
Страница 37: ...5 1 12 HOW TO INITIALIZE MEMORY IC 37 ...
Страница 40: ...40 ...
Страница 50: ...50 ...
Страница 55: ...55 ...
Страница 57: ...57 ...
Страница 58: ...6 1 2 Disassembly Method 58 ...
Страница 59: ...59 ...
Страница 60: ...60 ...
Страница 61: ...Fig D2 61 ...
Страница 62: ...62 ...
Страница 63: ...Fig D3 63 ...
Страница 64: ...64 ...
Страница 65: ...6 1 2 1 Notes in chart 1 Removal of VCR DVD Ass y Fig D4 2 Installation of VCR DVD Ass y 65 ...
Страница 70: ...6 2 1 Disassembly Reassembly Method 70 ...
Страница 71: ...71 ...
Страница 72: ...6 2 2 Inner Parts Location Fig J1 1 6 2 3 EJECT Position Confirmation Fig J1 2 72 ...
Страница 73: ...6 2 4 Grounding Plate Unit Full Erase Head and Cylinder Unit Fig J2 1 73 ...
Страница 74: ...74 ...
Страница 76: ...6 2 5 Capstan Belt Support Angle Intermediate Gear B and Main Cam Gear Fig J3 1 76 ...
Страница 77: ...77 ...
Страница 84: ...6 2 6 1 Reassembly Notes 1 Installation of Center Clutch Unit 84 ...
Страница 85: ...A Fit the Center Clutch Unit into the Changing Gear Fig J4 2 6 2 7 Reel Gear and Main Rod Fig J5 1 85 ...
Страница 87: ...6 2 8 Stopper Angle Capstan Rotor Unit Oil Seal Capstan Stator C B A and MR Head Fig J6 1 87 ...
Страница 88: ...88 ...
Страница 90: ...90 ...
Страница 93: ...6 2 10 T Brake Unit Tension Control Arm Unit T Reel Table S Reel Table and Tension Arm Unit Fig J8 1 93 ...
Страница 94: ...94 ...
Страница 96: ...6 2 12 Opener Piece Drive Rack Arm Pinch Arm Unit P5 Arm Unit and Intermediate Gear A Fig J10 1 96 ...
Страница 99: ...6 2 13 Motor Block Unit Audio Control Head Unit Lift Gear Capstan Holder Unit and Tension Arm Boss Fig J11 99 ...
Страница 100: ...6 3 CASSETTE UP ASS Y SECTION 100 ...
Страница 101: ...6 3 1 Top Plate Wiper Arm Unit and Holder Unit Fig K1 1 101 ...
Страница 102: ...102 ...
Страница 104: ...104 ...
Страница 106: ...6 3 2 Opener Lever and Drive Rack Unit Fig K2 7 ADJUSTMENT PROCEDURES 7 1 SERVICE FIXTURES AND TOOLS 106 ...
Страница 112: ...112 ...
Страница 122: ...7 3 3 STEREO SAP SEPARATION ADJUSTMENT Note Remove the DVD unit before performing this adjustment Purpose 122 ...
Страница 131: ...131 ...
Страница 134: ...7 3 9 1 How to adjust 134 ...
Страница 135: ...135 ...
Страница 136: ...136 ...
Страница 146: ...146 ...
Страница 150: ...150 ...
Страница 156: ...156 ...
Страница 160: ...160 ...
Страница 168: ...Fig E15 2 168 ...
Страница 171: ...7 4 TEST POINTS AND CONTROL LOCATION 171 ...
Страница 172: ...172 ...
Страница 173: ...173 ...
Страница 174: ...174 ...
Страница 175: ...8 SCHEMATIC DIAGRAMS 175 ...