


About Your Projector
ENGLISH -
25
Preparation
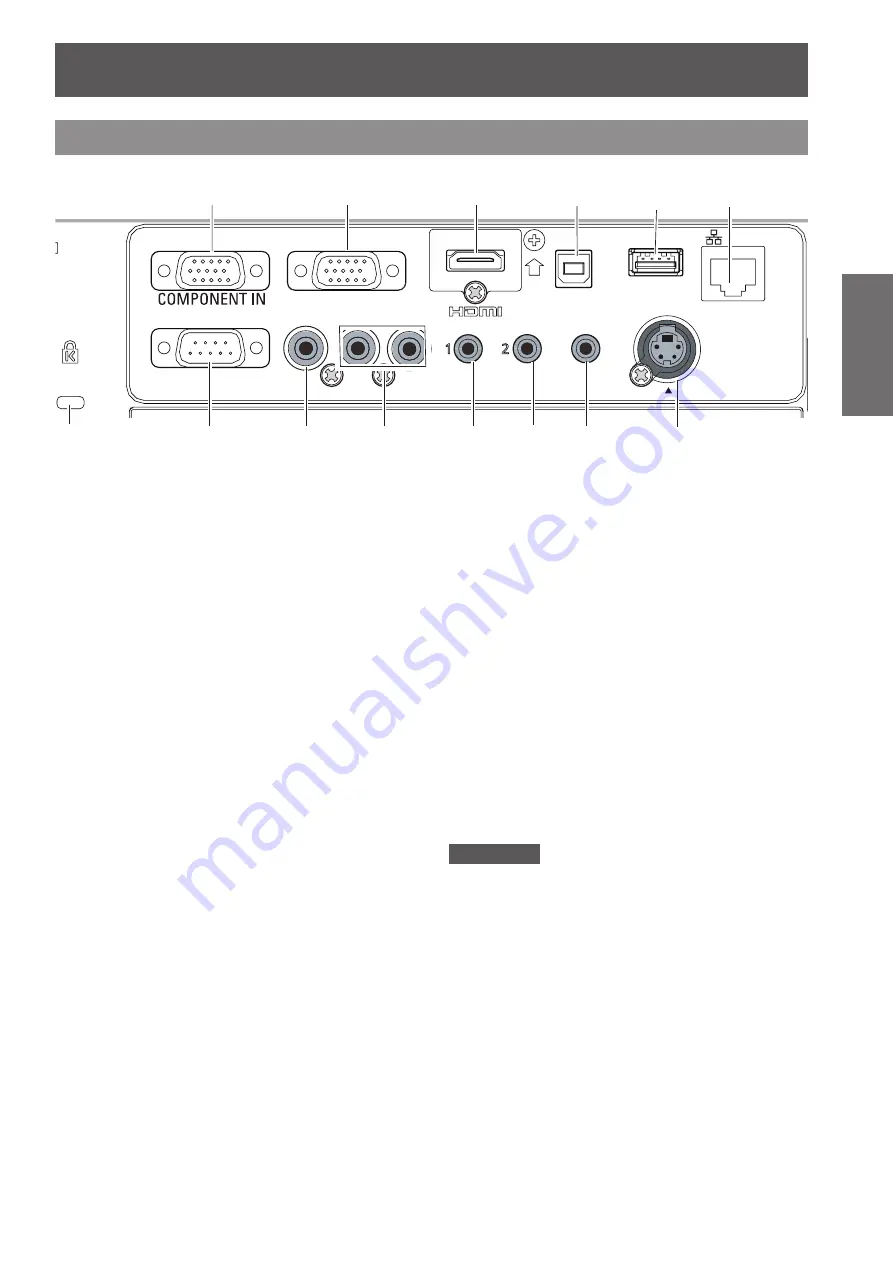
(1) COMPUTER 1 IN/ COMPONENT IN
Connect to COMPUTER 1 IN/ COMPONENT IN
input signals.
(2) COMPUTER 2 IN/
MONITOR OUT
Connect to COMPUTER 2 IN/
MONITOR OUT
input signals or outputs the analog RGB signals
input to the projector.
(3) HDMI
Connect to HDMI input signals.
(4) USB Connector (Series B)
In order to operate the computer with the remote
z
control and use the <PAGE UP/DOWN> buttons
on the remote control during a presentation,
connect the USB port of the computer to the
USB terminal with a USB cable (not supplied).
The projector provides the "USB display"
z
function that the image and sound are sent to
the projector by connecting the computer to the
projector with a USB cable.
For details, please refer to the "Operation Manual
Wireless Manager ME6.0" in CD-ROM.
(5) USB Connector (Series A)
Insert the USB thumb drive directly (
Æ
page 90).
(6) LAN
Connect to a LAN cable for network connection.
(7) Security slot
Attach the commercial shackle lock, manufactured
by Kensington, to protect your projector.
Compatible with the Kensington MicroSaver
Security System.
(8) SERIAL IN
Connect to a computer via an RS-232C cable.
(9) VIDEO IN
Connect to VIDEO input signals.
(10) AUDIO IN
Connect to the audio input signals.
AUDIO IN has left and right (L and R) terminals.
(11) COMPUTER AUDIO IN 1
Connect to the audio input signals.
(12) COMPUTER AUDIO IN 2 (MIC IN)
Connect to the audio input signals. Or connect the
MIC to this jack.
(13) VARIABLE AUDIO OUT
Output the audio signals input to the projector.
(14) S-VIDEO IN
Connect to S-VIDEO input signals.
Attention
When a LAN cable is directly connected to the projector,
z
the network connection must be made indoors.
Rear terminals
MONITOR OUT
COMPUTER 2 IN
COMPUTER 1 IN
SERIAL IN
VIDEO IN AUDIO IN
USB B
USB A
LAN
VIEWER
MOUSE CONTROL
DISPLAY/
MIC IN
S-VIDEO IN
COMPUTER
AUDIO IN
VARIABLE
AUDIO OUT
R
L
AC IN ~
(6)
(3)
(2)
(1)
(12)
(11)
(10)
(9)
(8)
(7)
(13)
(14)
(4)
(5)


