background image

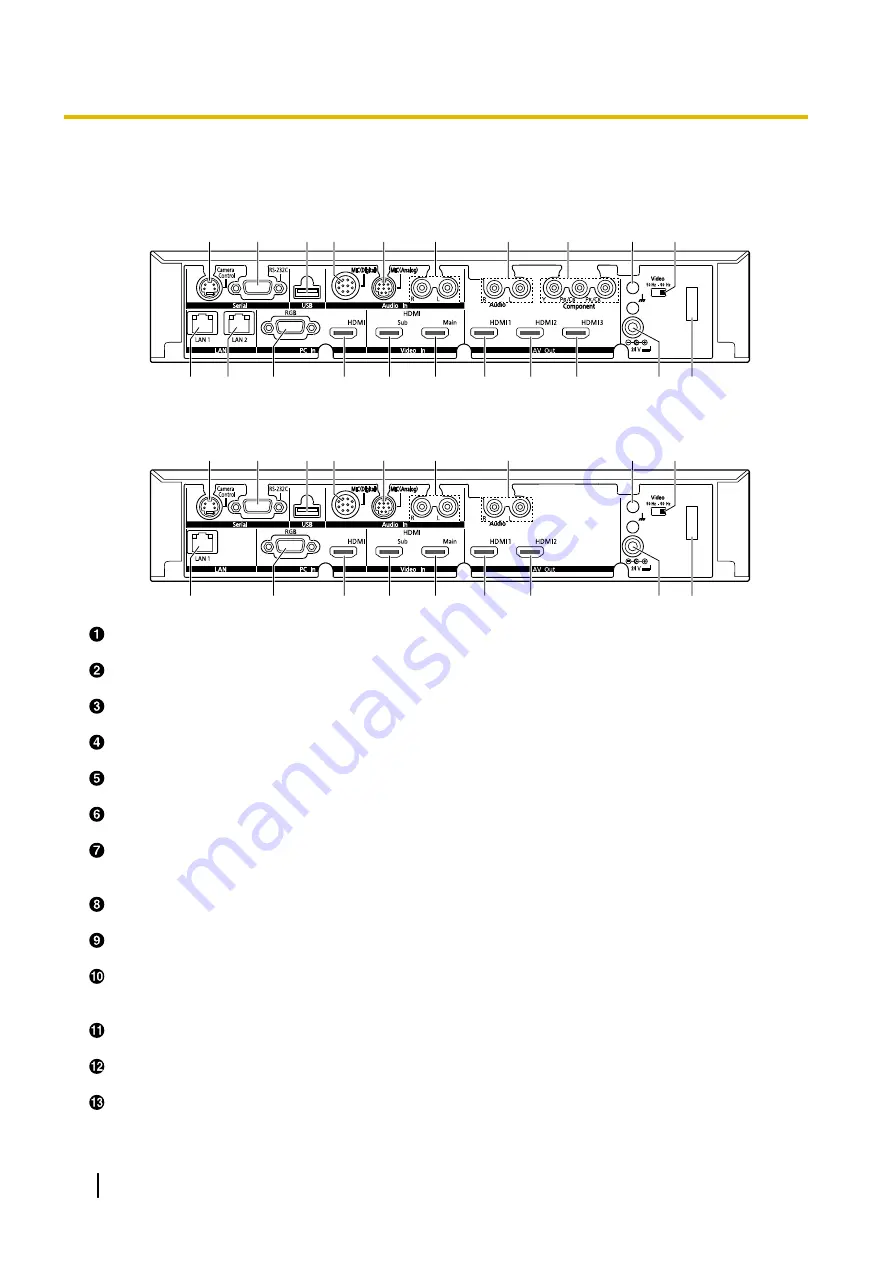
Main Unit (Back)

KX-VC1600

A

B

C D

F

K

M

T

O

N

P

Q

R

S

U

E

G

H

I

J

L

KX-VC1300

A

B

C D

F

K

M

T

O

N

P

Q

R

E

G

I

J

U

Camera Control terminal

Not used.

RS-232C terminal

Normally not used. Used to connect a computer for maintenance.

USB jack (Page 131, Page 134)

Used to connect a USB memory device for saving the operation log and for updating the software.

MIC (Digital) jack (Page 27)

Used to connect the Digital Boundary Microphone (optional) (Page 18).

MIC (Analog) jack (Page 27)

Used to connect the Analogue Boundary Microphone (optional) (Page 18).

Audio In L/R jack (Page 28)

Used to connect general-purpose microphones (not for the Boundary Microphone).

Audio Out L/R jack

Used to connect an amplifier or active speaker (Page 32). Also used to connect the speakers of a display
without an HDMI terminal for audio output (Page 33).

Component terminal (KX-VC1600 only) (Page 33)

Used to connect to the display with a component video cable.

Functional Earth terminal

Used to connect an earthing wire for when there is a lot of noise over the connection.

Video Switch

Used to set the unit’s video frequency. Sets the unit’s video frequency to be the same as the connected
device.

LAN1 jack (Page 28)

Connect a LAN cable.

LAN2 jack (KX-VC1600 only) (Page 28)

Connect a LAN cable (Used when connecting to a network other than LAN1).

RGB terminal (Page 31)

Used to connect a computer for sending screens to participants.

20

User Manual

Document Version  2015-08  

Preparation

Содержание KX-VC1600

Страница 1: ... this product and save this manual for future use KX VC1300 KX VC1600 Software File Version 4 20 or later Document Version 2015 08 In this manual HD Visual Communication is abbreviated as HDVC In this manual the suffix of each model number e g KX VCA001XX is omitted unless necessary KX VC1300SX KX VC1600SX HD Visual Communication Unit ...

Страница 2: ... Microphone together stereo output may be unavailable depending on the connection configuration Page 28 Page 30 Home Electronics style Remote Control Operation and Simple Easy to Understand Graphical User Interface You can make settings and perform operations using familiar remote control operations and a simple easy to understand interface Stabilised Communication Quality In periods of network co...

Страница 3: ...iple sites using a Profile Call Page 50 or a site that adds a site to the call during a 2 party video conference call with another site Page 62 becomes the Main Site Selectable Video Source By connecting your computer or video camera to the unit you can show your computer s screen or video camera image to video conference call participants Page 75 Encrypted Communication Packets sent for video con...

Страница 4: ... the gatekeepers that can be used Enhanced Features through the Use of Activation Keys By using an activation key sold separately you can upgrade the features of the unit Page 18 This allows enrollment in the KX VC Series NAT Traversal Service and enables Mobile Connection and Multicast features If using the KX VC1600 multiple connections can be made with up to 10 parties simultaneously Remote Vid...

Страница 5: ...Source Software Parts of this product use Open Source Software supplied based on the conditions of the Free Software Foundation s GPLs and or LGPLs and other conditions Relevant conditions apply to this software Therefore please read license information about GPLs and LGPLs and License Info of system settings of this product before using this product Also some software parts of this product are li...

Страница 6: ...tions of the Software and documentation are owned by RADVISION and are protected by United States copyright laws other applicable copyright laws and international treaty provisions RADVISION and its suppliers retain all rights not expressly granted 6 User Manual Document Version 2015 08 Introduction ...

Страница 7: ...43 Initial Settings 44 Starting a Video Conference 47 Making a Video Conference Call 47 Calling Using One Touch Connection Numbers From the Home Screen 47 Calling from the Contact List 2 party Conference 48 Calling Using Profile Multiple party Video Conference Calls 50 Calling by Entering an Address Directly 52 Calling from the Call History 55 Answering a Video Conference Call 58 Connecting to an ...

Страница 8: ... Settings 96 Registering a Local Site 96 Selecting a Local Site 97 Deleting Local Site Information 97 Changing System Settings Performing System Maintenance 99 Setting the Unit Name 102 Setting the Date and Time 102 Making Network Settings 102 Making Connection Settings 105 Setting the MCU 107 Setting One touch Connection Numbers 109 Making Screen Standby Settings 109 Making Sound Settings 109 Set...

Страница 9: ...ternet 138 Obtain a Registration Key 138 To check the MPR ID using the unit 138 To obtain a Registration Key using a computer 139 To display the Registration Key again using a computer 140 Using Mobile Connection Enhanced Features 144 Using Mobile Connection Enhanced Features 144 Using Multicast 145 Using Multicast 145 About Multicast 145 Multicast Operation 146 Starting Multicast 146 Ending the M...

Страница 10: ...ion 171 Audio 177 System Settings 178 If These Messages Appear 179 Registration Page of KX VC Series NAT Traversal Service 185 KX VC Series NAT Traversal Service for this Device 186 If a message from the KX VC Series NAT Traversal Service is displayed 187 Specifications 189 System Specifications 189 Index 192 10 User Manual Document Version 2015 08 Table of Contents ...

Страница 11: ...sures This equipment is compliant with Class A of CISPR 32 In a residential environment this equipment may cause radio interference CAUTION Before attempting to connect or operate this product please read the label on the bottom Be sure to use the specified type of batteries only Ensure that batteries are installed with correct polarity Incorrectly installed batteries can burst or leak resulting i...

Страница 12: ...us has been damaged in any way such as power supply cord or plug is damaged liquid has been spilled or objects have fallen into the apparatus the apparatus has been exposed to rain or moisture does not operate normally or has been dropped 12 User Manual Document Version 2015 08 For Your Safety ...

Страница 13: ...microphone Cards might become unusable 8 Do not bring the device near items that emit electromagnetic waves or that are magnetised high frequency sewing machines electric welders magnets etc Doing so may result in static noise or damage 9 Keep the device at least 10 cm 4 in away from all walls If placed against a wall the device may not be able to ventilate properly which may lead to a system malf...

Страница 14: ...he security of private conversations only connect the unit to a secure network To prevent unauthorised access only connect the unit to a network that is properly managed Make sure all computers connected to the unit employ up to date security measures To prevent illegal access from the Internet activate a Firewall Privacy and Right of Publicity By installing and using this device you are responsib...

Страница 15: ...s These symbols on the products packaging and or accompanying documents mean that used electrical and electronic products and batteries must not be mixed with general household waste For proper treatment recovery and recycling of old products and used batteries please take them to applicable collection points in accordance with your national legislation By disposing of them correctly you will help...

Страница 16: ...s These limits are designed to provide reasonable protection against harmful interference when the equipment is operated in a commercial environment This equipment generates uses and can radiate radio frequency energy and if not installed and used in accordance with the instruction manual may cause harmful interference to radio communications Operation of this equipment in a residential area is li...

Страница 17: ...ords may vary depending on the country area of use Please use whichever is appropriate for the country area Optional Accessory The following products are available as optional accessories Proprietary main video camera Proprietary main video camera 12x optical 10x digital zoom Pan tilt function supported Proprietary main video camera 3x optical 4x digital zoom Pan tilt function supported Model No G...

Страница 18: ...AT Traversal 1 Year KX VC1300 KX VC1600 Extends the service period of KX VC Series NAT Traversal Service KX VCS703 Activation Key Card NAT Traversal 3 Years NAT Traversal 3 Years KX VC1300 KX VC1600 Extends the service period of KX VC Series NAT Traversal Service KX VCS304 Activation Key Card 4 Point Built in MCU 4 Point Built in MCU KX VC1600 Enables the feature for making multiple party video co...

Страница 19: ...is not played through the display or speakers If a headset is connected how audio is sent to the other party differs depending on the type of devices connected as follows Connected Device Audio Sent to Other Party Boundary Microphone Audio is picked up only by the headset microphone Audio is not picked up by the Boundary Microphones General purpose microphone Both the general purpose microphones a...

Страница 20: ...he Boundary Microphone Audio Out L R jack Used to connect an amplifier or active speaker Page 32 Also used to connect the speakers of a display without an HDMI terminal for audio output Page 33 Component terminal KX VC1600 only Page 33 Used to connect to the display with a component video cable Functional Earth terminal Used to connect an earthing wire for when there is a lot of noise over the con...

Страница 21: ...ge 27 Used to connect to the display with an HDMI cable HDMI2 terminal Page 27 Used to connect to the display with an HDMI cable Settings are required to use the HDMI2 terminal Page 127 HDMI3 terminal KX VC1600 only Page 27 Used to connect to the display or a video recorder with an HDMI cable Used to switch the displayed image between your image and recorded video DC IN Page 28 Connect the AC adap...

Страница 22: ...n Tilt of a video camera and select items Press to make or manually answer video conference calls Page 47 Page 58 Press to select the feature assigned to each colour Available features are displayed in the guide area Page 39 Press to adjust the volume during a video conference call Press to increase and to decrease the volume Page 71 Press to mute the microphone during a video conference call so t...

Страница 23: ...em or entered information Press to end a video conference call Press to display the camera control screen Page 79 Press for zoom control zoom in out of the video camera either at your end or the other party s end Page 78 Document Version 2015 08 User Manual 23 Preparation ...

Страница 24: ...ideo out to the display is suspended and the status LED turns off Screen standby mode ends when the remote control is operated or when a video conference call is received Notice If screen standby mode ends and no image is visible check to see if the display or video camera s power saving settings are enabled Check each device s manual for more information about its power saving settings Note You c...

Страница 25: ... It takes about 7 seconds to return from screen standby mode The length of time may vary depending on the type of display you are using Document Version 2015 08 User Manual 25 Preparation ...

Страница 26: ...al and Component terminal connect to displays that have the same resolution Page 128 Cables Prepare the following commercially available cables HDMI cable Category 2 high speed recommended Note Use cables with the HDMI logo certified HDMI cables for HDMI connection Using non certified cables may adversely affect operation Use HDMI cables with secure connectors LAN cable 100BASE TX full duplex Cate...

Страница 27: ... recording Page 128 If your display is not compatible with HDMI use a component cable Since sound signals are not transmitted when using a component cable connect an amplifier active speaker or use the display s speakers If game mode can be selected in the display s settings set game mode It may improve voice delay 3 Connect a microphone Digital Boundary Microphone optional Connect the Digital Bou...

Страница 28: ...ocumentation for each device 5 Connect the power cord to the AC adaptor Use only the power cord included with the unit 6 Insert the AC adaptor s DC cord G into the DC IN terminal on the back of the unit Use only the AC adaptor included with the unit Wrap the DC cord around the hook to prevent it from being disconnected 7 Plug in the power cord into the power outlet Choose an outlet that is conveni...

Страница 29: ...r picked up The range of each microphone the radius of the circle with a microphone at the centre varies according to the level of surrounding and the number of microphones being used Place microphones accordingly referring to the following table Noise level Micro phone A quiet room 40 dBsplA A regular room 45 dBsplA A noisy room 50 dBsplA 1 approx 3 m approx 9 8 ft approx 2 2 m approx 7 2 ft appr...

Страница 30: ...e not using Digital Boundary Microphones and an Analogue Boundary Microphone together If a headset is connected audio from the headset microphone is given priority and audio from Analogue Boundary Microphones is no longer picked up The range of the microphone the radius of the circle with a microphone at the centre varies according to the level of surrounding noise Place the microphone accordingly...

Страница 31: ... when a headset is connected KX VC1600 only For 3 conductor stereo mini plugs only Sub Video Camera Connection This section describes how to connect a sub video camera You can transmit images taken with the sub video camera to all parties 1 Connect the sub video camera Connect the sub video camera to the Sub Camera terminal on the back of the unit using an HDMI cable Note You can connect disconnec...

Страница 32: ...ion describes how to connect an amplifier active speaker 1 Connect the amplifier active speaker to the Audio Out L R jack on the back of the unit using a stereo pin plug cable Note Connect the amplifier active speaker correctly as follows Left channel L Right channel R For more details about the amplifier or active speaker refer to the documentation for the corresponding device Layout example Plac...

Страница 33: ...the back of the unit using a component cable Note To use the display s speakers to output audio connect the display to the Audio Out L R jack Page 20 on the back of the unit using a stereo pin plug cable If displays are connected using both the HDMI terminal and Component terminal connect to displays that have the same resolution Document Version 2015 08 User Manual 33 Preparation ...

Страница 34: ...on Example Diagram when using the Internet KX VC Series NAT Traversal Service Compatible with LAN1 Router Router Router LAN1 Internet KX VC Series NAT Traversal Service 34 User Manual Document Version 2015 08 Preparation ...

Страница 35: ...only Intranet LAN2 LAN1 Router Router KX VC Series NAT Traversal Service Internet Router Note When using a dual network LAN1 and LAN2 Use LAN1 when using KX VC Series NAT Traversal Service The default gateway is in LAN1 NAT or DHCP can be used only in LAN1 Document Version 2015 08 User Manual 35 Preparation ...

Страница 36: ...Preparing the Remote Control Inserting Batteries 1 Open the cover 2 Insert batteries R6 AA dry cell minus side first then close the cover 36 User Manual Document Version 2015 08 Preparation ...

Страница 37: ...ess the Power button on the front of the unit or on the remote control for more than 1 second Both can turn the power on or off When the power is turned on the Power LED starts flashing green Then the Power LED becomes green the Status LED starts flashing blue slowly and the Home screen is displayed When the power is turned off the Power LED becomes red 1 Document Version 2015 08 User Manual 37 Pr...

Страница 38: ... local site name Terminal ID maximum bandwidth and encryption status indication icons IP NAT Traversal Mode The connection mode local site name Terminal ID LAN1 IP address LAN2 IP address KX VC1600 only maximum bandwidth encryption status indication icons and Static NAT status indication icons if using the Static NAT feature Note When selecting a local site Page 97 the selected local site s inform...

Страница 39: ...g NAT Traversal mode or IP NAT Traversal mode Encryption NAT Traversal is set to ON When using NAT Traversal mode or IP NAT Traversal mode Encryption NAT Traversal is set to OFF Static NAT Status Indication Icon Icon Status of Settings When using IP mode Static NAT is set to ON Group Site Displays the name group name assigned to One Touch Connection number 1 through 5 If the name is too long to di...

Страница 40: ...e them again by pressing FULL SCREEN on the remote control Menu Screen Idle Screen Displayed when MENU is pressed on the remote control Displays operations you can perform and settings you can change A B C Menu List Displays the various functions you can use and settings available to change Guide Displays operations you can perform with the remote control when performing features or changing setti...

Страница 41: ...nnection number is displayed Video Image Displays the other party s video your own video or video from the secondary video input such as a computer display or a sub video camera Subscreen Depending on the screen layout your own video or the other party s video is displayed here Duration Displays the duration of the current video conference call Note 99h59m is displayed for the duration even if the...

Страница 42: ...ot displayed while the combined computer video feed screen is being displayed Other Site s Audio Indication Displayed on the Main Site when Other Site s Audio is set to Mute during a multiple party video conference call using the built in MCU Page 70 Page 94 Dialling Indication Displayed when a call is incoming at another site such as when a site is added during a call or when a call is made Page ...

Страница 43: ...domain name The following characters can be used for input such as entering addresses in the contact list or directly entering the address of the party to call When using SIP alphanumeric characters symbols _ up to 189 characters When using H 323 alphanumeric characters symbols _ up to 189 characters When using SIP the user name portion before the mark can be up to 60 characters and the domain nam...

Страница 44: ...inese 3 Press ENTER 4 Press G 5 Use to select Yes and press ENTER The connection mode setting screen is displayed 6 Press ENTER use to select the desired connection mode and then press ENTER again Note Calls cannot be made with other parties whose connection mode is different from yours NAT Traversal Mode or IP NAT Traversal Mode can be used only after activating KX VC Series NAT Traversal Service...

Страница 45: ...he subnet mask Default Gateway Enter the IP address of the default gateway Note IP Address LAN 1 Subnet mask LAN 1 and Default Gateway can be entered only if IP Address LAN 1 setting is set to Manual If the value for IP Address LAN 1 Subnet mask LAN 1 or Default Gateway contains 1 or 2 digits numbers enter these numbers as they are Do not enter like 001 Example The IP address is 192 168 0 1 Correc...

Страница 46: ...8 0 1 Wrong entry 192 168 000 001 16 Press G 17 Select Yes using then press ENTER Settings become effective after the automatic restart Note If the IP address or subnet mask contains an invalid value a message will appear requiring you to enter a valid IP address or subnet mask A multicast address or broadcast address cannot be used for the IP address 46 User Manual Document Version 2015 08 Prepar...

Страница 47: ...ot call the party by entering an address directly or by using the call history If a video conference call is received during another video conference call a dialogue box is displayed to confirm whether to answer the incoming video conference call Use to select Yes or No and press ENTER Select Yes to answer the video conference call Select No to stop receiving the incoming video conference call and...

Страница 48: ... IP address from the one registered in the other party s contact list In such cases when the other party tries to call you by selecting a registered IP address from their contact list the call will not be connected For details contact your network administrator 1 Press MENU The Menu screen is displayed 1 4 5 2 3 2 Select Contact List using and press ENTER The contact list screen is displayed The e...

Страница 49: ...b assigned to that button as shown below Numeric button 1 2 3 4 5 6 7 8 9 0 Index Tab ABC DEF GHI JKL MNO PQRS TUV WXYZ 0 9 Note If the display is sorted by speed dial number in step 2 you can click a speed dial number 1 through 600 to select it 4 Press START to start the call 5 When you want to end the call press END The Home screen is displayed Document Version 2015 08 User Manual 49 Starting a ...

Страница 50: ...nd press ENTER The profile list screen is displayed 3 Select the profile you want to use to make a call using 4 Press START to start the call 5 When you want to end the call press END For ending a multiple party video conference call refer to Disconnecting Parties During Video Conference Call Page 64 Note You can make a video conference call by changing the party of the selected profile before sta...

Страница 51: ...layed 3 Select the party using then press ENTER Selecting an item will add or remove the mark for the item in the selection column The contacts with a mark will be called 4 Press START to start the call A dialogue box to confirm the start of a call is displayed 5 Use to select Yes and press ENTER Document Version 2015 08 User Manual 51 Starting a Video Conference ...

Страница 52: ...to input Connection mode 1 to Connection mode 9 and press ENTER 4 Use to select the connection mode IP Mode SIP IP Mode H 323 NAT Traversal Mode 5 Use to select the site Site 1 to Site 9 6 When using IP mode enter the IP address or host name SIP URI or SIP user name H 323 extension H 323 name or MCU s conference room number IP address When using NAT Traversal mode enter the connection number 7 dig...

Страница 53: ...main name is automatically appended to the address and the call is made Be careful as this may result in calling the wrong party See Page 43 for details about the characters that can be input for address entry Enter a standards compliant value For details contact your network administrator To initiate a video conference call by entering an MCU s conference room number IP address SIP Server and Gat...

Страница 54: ...ty is displayed When the called party was selected from the call history selecting a contact by their displayed site name in the history will display the site name for the other party For a party that is displaying a site name the site name can be changed when inputting letters and numbers directly by pressing Y to delete the site name and then input it 54 User Manual Document Version 2015 08 Star...

Страница 55: ... 52 that information is displayed instead of the contact name That information is displayed even if a matching entry exists in the contact list Even when a profile is used to make a video conference call the call will appear in the outgoing call history You can then make a video conference call with a profile from the outgoing call history If consecutive video conference calls are made to the same...

Страница 56: ...coming call history screen by pressing G When calling using a profile the Profile ID PID is displayed In the incoming call history if a party is not registered in your contact list the address information received from the party is displayed In the outgoing call history if a party is registered in your contact list the contact name is displayed However when calling by entering an IP address or hos...

Страница 57: ...ntact your network administrator 3 Select the party you want to call using Note If you press ENTER the call history details screen is displayed Not displayed when the multicast call history outgoing is selected When not selecting a local site Page 97 the values of the basic settings are displayed for Local site name Bandwidth displays the mediated bandwidth for connected sites Depending on the oth...

Страница 58: ...conference call is incoming there will be an incoming call ring and a dialogue box is displayed When the caller is registered in the contact list the caller s site is displayed When the caller is not registered the caller s IP address connection number or other caller information that is received is displayed Note If the other party uses the same SIP domain name as you only the SIP user name and n...

Страница 59: ...ed you can stop receiving a video conference call and continue making a video conference call When Automatic Answer is Set When a video conference call is incoming while the Home screen is displayed the call will be automatically answered after one ring and transmission then begins When a video conference call is incoming with a screen other than the Home screen displayed a dialogue box is display...

Страница 60: ...onnect to For details contact your dealer The procedure for connecting to an MCU differs depending on the MCU For details contact your dealer Audio sent to the other party is monaural While you are displaying a sub video camera s image you cannot send a still image from the sub video camera Encrypted communication may not be supported In such cases connect to an MCU over an intranet or via a VPN F...

Страница 61: ... occur You can operate the other party s device using tone signals with the KX VC1600 KX VC1300 HDVC MPCS 1 1 Enter a tone signal 0 9 or The input field A is displayed A Note The input field can only contain up to 16 characters If you input 17 characters the first character input will not be displayed in the input field but all tone signals will be sent The input field is not displayed until a ton...

Страница 62: ...gue box is not displayed and the manual dial screen is displayed instead For sites that are in a video conference call that was made using profile calling with entry restriction set to ON in the profile settings the dialogue box is not displayed and the profile used to make the call is selected 3 Use to select the dialling method Profile or Manual Dial When selecting profile The profile setting se...

Страница 63: ... 49 For the call history press G to switch between the incoming call history and the outgoing call history Press ENTER 4 Press START Note If your own site becomes a Sub Site do not try to add additional sites to a video conference call When the called party was selected from the contact list the site name for the other party is displayed When the called party was selected from the call history sel...

Страница 64: ... dialogue box to select the party you want to disconnect is displayed Note In step 1 pressing MENU using to select Disconnect and then pressing ENTER will still display the dialogue box 2 Select the party whom you want to disconnect using and press ENTER The selected party is disconnected Disconnecting a multi party conference Sub Site only 1 Press END The video conference call is disconnected 64 ...

Страница 65: ... 1 Press MENU The communication menu screen is displayed 2 Use to select Send Cont Method and press ENTER A dialogue box for selecting the contents sending method is displayed 3 Use to select a content sending method and press ENTER Auto default Automatically changes between dual stream and single stream Single stream Fixed to single stream Document Version 2015 08 User Manual 65 During Video Conf...

Страница 66: ... image is displayed full screen and your own image is displayed in the upper right subscreen PwithP Layout 3 The other party s image and your own image are displayed Side by side Layout 4 Your own image is displayed full screen 1 Example 1 display 2 party video conference without content sharing Main Site Single stream communication LAYOUT The other party The other party The other party LAYOUT You...

Страница 67: ...es joining a video conference call CP1 to CP10 Changes to the selected layout Layout according to the number of sites when Auto is selected Number of Sites Layout Number 2 CP1 3 4 CP4 5 6 CP6 7 8 CP8 9 CP9 10 CP10 Layout patterns that can be selected during a video conference call Layout Number Layout Configuration CP1 1 CP2 1 2 CP4 1 2 3 4 Document Version 2015 08 User Manual 67 During Video Conf...

Страница 68: ...21 CP1 22 CP2 24 CP4 26 CP6 28 CP8 29 CP9 20 CP10 Note If DTMF layout change in MCU Settings is set to OFF operations cannot be performed from a Sub Site Page 108 When the layout is changed from a Sub Site all sites layouts are also changed When the layout of the Main Site automatically changes when Screen Layout of MCU Settings is set to Auto Page 107 or when Screen mode set is set to Auto on the...

Страница 69: ...lume during a call will be automatically set as the main display Voice Activation 2 Your own site s image is fixed as the main display and the party caller with the loudest volume during a call will be set to display priority 2 Local Site Displays your own site Site 1 to Site 9 Displays the selected site as the main display Note When sharing a computer s screen or sub camera image on one screen th...

Страница 70: ... Site only You can set whether the audio of the other party during a video conference call will be combined with the audio of the Main Site or if it will be muted 1 Press MENU The communication menu screen is displayed 2 Use to select Other Site s Audio and press ENTER The other party s audio setting dialogue box is displayed 3 Use to select Mix or Mute and press ENTER Mix default Audio is output ...

Страница 71: ...arty s voice Pressing will decrease the volume of the other party s voice After about 3 seconds the volume level bar disappears Note You can set the volume level of a video conference call before starting the call Page 109 After ending a video conference call the volume level returns to the volume level set before starting the call You cannot adjust the display s volume Document Version 2015 08 Us...

Страница 72: ... regardless of which party initiated the call Page 106 Muting the Microphone Operation with the Remote Control 1 Press MIC MUTE An icon appears in the status display area of the screen Page 38 and the LED light on the Boundary Microphone becomes red Make sure the colour of the LED changes Pressing MIC MUTE again will unmute the microphone The LED light on the Boundary Microphone becomes green Make...

Страница 73: ...olour of the LED changes Note When multiple Digital Boundary Microphones are connected pressing the MIC Mute button of one Digital Boundary Microphone will mute all Digital Boundary Microphones When using Digital Boundary Microphones and an Analogue Boundary Microphone together pressing the MIC Mute button on one Boundary Microphone will mute all Boundary Microphones If a headset is connected the ...

Страница 74: ...eduction is enabled Pressing Y again will display Whisper Mode OFF and noise reduction is disabled Note Noise reduction is available only when Digital Boundary Microphones are connected You can set whether to enable noise reduction for a video conference call before starting the call Page 106 After a video conference call is finished the noise reduction setting returns to the value set before star...

Страница 75: ...ull HD 1920 1080 1 Press PC or CAMERA SUB during a video conference call For dual stream communication You can send the image of your video camera and the image of your computer s screen or a sub video camera at the same time to the other party You can view the other party and check shared data at the same time Note If dual stream communication is disabled in the communication settings Page 105 or...

Страница 76: ...1 HDMI2 Site 3 Site 4 CAMERA MAIN PC CAMERA SUB Your Own Site With contents sharing With contents sharing Other Video Sources Other Video Sources Other Video Sources Other Video Sources LAYOUT LAYOUT LAYOUT Other Video Sources Other Video Sources Other Video Sources Other Video Sources Other Video Sources Other Video Sources Site 2 Site 1 Site 3 Site 4 Site 2 Site 1 LAYOUT LAYOUT LAYOUT Site 3 Sit...

Страница 77: ...ge their screen layout to one that displays your screen For dual stream communication While sharing the contents of a computer s screen or the sub camera image the other party can also share their contents Note that in this case the images for the contents of all sites will change to the last shared image While the Home screen idle screen is displayed pressing PC or CAMERA SUB will display the con...

Страница 78: ...r parties is using the KX VC400 KX VC500 KX VC300 KX VC600 with a software version older than 2 30 not including 2 30 you will not be able to control any of the other party s video cameras You will only be able to control your own video camera In order for other parties to be able to control your video camera you must set CAM ctrl from remote site s in your settings to ON by default it is set to O...

Страница 79: ...yed Operation from the video camera menu 1 Press CAM CTRL The site selection dialogue box is displayed Note After the site selection dialogue box is displayed if no operations are performed within approximately 3 seconds the dialogue box will disappear 3 1 2 3 2 Use to select the site to display and press ENTER The camera control screen is displayed Document Version 2015 08 User Manual 79 Controll...

Страница 80: ...s in succession To return to the video conference call screen press BACK Note You can press FULL SCREEN on the remote control to display hide the guide area You can specify in the administrator menu Page 130 whether the entire guide area is hidden or only a portion of it In the following cases you will not be able to control a video camera even if you press CAM CTRL While displaying the unit infor...

Страница 81: ...unctions For details contact your dealer The features that can be used may be limited depending on your video camera model e g A video camera with only a zoom feature 1 Press HOME The Home screen is displayed Note If you are registering presets for the sub video camera press CAMERA SUB 5 3 6 5 7 2 1 8 4 2 Press CAM CTRL The camera control screen for your own video camera is displayed 3 Press G The...

Страница 82: ...om out Pan the video camera left right Tilt the video camera up down 6 Press G A dialogue box to confirm the saving of settings is displayed 7 Use to select Yes and press ENTER The preset screen is displayed Note To continue making settings repeat steps 4 7 8 Press HOME The Home screen is displayed Note Preset registration information for a video camera is saved in that video camera If a video cam...

Страница 83: ...ng a video conference call 1 Press CAM CTRL The site selection dialogue box is displayed Note After the site selection dialogue box is displayed if no operations are performed within approximately 3 seconds the dialogue box will disappear 2 1 3 2 Use to select Local Site and press ENTER The camera control screen is displayed 3 Press a numeric button 1 9 to select the preset number that you want to...

Страница 84: ...on your video camera model For details about compatible video camera models contact your dealer 1 Press CAM CTRL The site selection dialogue box is displayed Note After the site selection dialogue box is displayed if no operations are performed within approximately 3 seconds the dialogue box will disappear 1 2 4 3 2 Use to select Local Site and press ENTER The camera control screen is displayed 84...

Страница 85: ...ing on your video camera model While you are configuring settings on the camera menu screen other parties cannot control your video camera Brightness screen Brightness Mode Press ENTER and use to select Auto or Manual Note When Manual is selected you can adjust the brightness by pressing the buttons on the remote control B Dark R Light Document Version 2015 08 User Manual 85 Controlling a Video Ca...

Страница 86: ...procedure 1 Press ENTER If the white balance had been set before by selecting Calibrate that previously set state will be recalled 2 Turn a piece of white paper toward the video camera 3 Press G Focus screen Use to select the following items for input Focus Position Press ENTER and use to select Center or Sides Wide Focus Mode Press ENTER and use to select Auto or Manual Note When Manual is select...

Страница 87: ... a part of the video image and displays it in the four corners of the screen Magnifier Press ENTER and use to select ON or OFF Note If you want to use the magnifier function perform the following procedure 1 Select ON and press ENTER Your own image is displayed in full screen and a magnified image of your own is displayed in the upper right subscreen Document Version 2015 08 User Manual 87 Control...

Страница 88: ...OOM to zoom in and press ZOOM to zoom out To change the screen layout If you want to change the position of the magnified image on the screen press Y Each time you press Y the position of the magnified image will change in the following order upper right lower right lower left upper left Example When the dotted line part is magnified and displayed in the upper left subscreen 3 To return to the mag...

Страница 89: ...ayed A mark is displayed next to any network or peripheral devices connection that is not in normal operation or not connected 2 1 2 Press BACK The display returns to the screen in use before the connections status screen was viewed Document Version 2015 08 User Manual 89 D i s p l a y i n g t h e C o n n e c t i o n S t a t u s Displaying the Connection Status ...

Страница 90: ...e items press R to move to the next page and press B to move to the previous page Note The status of communication encryption ON OFF Best effort is displayed under Encryption SIP Encryption H 323 Encryption NAT Traversal The first and second pages display information for your own site and the third page only during a video conference call displays information for the other party s site During a mu...

Страница 91: ...The maximum bandwidth during a video conference call adjusts to that of the party that has set the lowest bandwidth for the maximum bandwidth setting among all participating parties Video conferences cannot use more bandwidth than the maximum bandwidth setting set by your dealer For details contact your dealer Connection mode Press ENTER and use to select the connection mode call type IP Mode SIP ...

Страница 92: ...ering another contact press B and repeat steps 4 6 7 Press HOME The Home screen is displayed Editing Contact Information 1 Press MENU The Menu screen is displayed 2 Use to select Contact List and press ENTER The contact list screen is displayed 3 Use to select the contact you want to edit You can use or the numeric buttons of the remote control to select the displayed tab Page 49 4 Press ENTER The...

Страница 93: ...se to select the single party entry you want to add as a contact and press B The contact list registration screen is displayed 4 Use to select the necessary items and input information 5 Press G A dialogue box to confirm the saving of settings is displayed 6 Use to select Yes and press ENTER The outgoing or incoming call history screen is displayed depending on which of the screens you displayed i...

Страница 94: ...ay priority 2 Local Site default Displays your own site Site 1 to Site 20 Displays the image of the selected connection as the main display Site name display Use to select whether to display site names during a multiple party connection ON default Display site names OFF Do not display site names Other Site s Audio Press ENTER and use to select whether to forcibly mute the audio of other parties du...

Страница 95: ...m the saving of settings is displayed 9 Use to select Yes and press ENTER The profile list screen is displayed 10 Press HOME The Home screen is displayed Note To continue entering another contact press B and repeat steps 3 9 Up to 20 connections can be registered but the number of usable connections will be automatically selected from the top after invalid settings Not Registered Connection mode C...

Страница 96: ...cal site screen Page 130 Registering a Local Site 1 Press MENU The Menu screen is displayed 2 Use to select Select local site and press ENTER The select local site screen is displayed 3 Use to select Not Registered and press B The local site settings screen is displayed 4 Use to select the following items for input Add Local Site Press ENTER and use to select a creation method Add New default Crea...

Страница 97: ...t restarts automatically Note When changing the connection mode the time required for a restart may depend on network conditions Restarting the unit once more will return the local site to the basic settings the first line of the local site selection settings To keep the selection after restarting set Same setting after restart to ON Page 131 System settings and administrator menu settings can be ...

Страница 98: ...6 Press HOME The Home screen is displayed 98 User Manual Document Version 2015 08 Contacts and Settings ...

Страница 99: ...d data is lost When No is selected you can continue entering the data 1 Press MENU The Menu screen is displayed 2 Use to select Settings and press ENTER The system settings screen is displayed System Setting Screen List A System Settings Sets the device s name Page 102 B Set Date Time Sets the date and time Page 102 C Network Settings Sets the network settings Page 102 D Call set up Sets items use...

Страница 100: ... 109 I MIC Setting Sets the positioning for proprietary digital boundary microphones Page 110 J Remote Ctrl ID Sets IDs for the remote control and the main unit Page 112 Previous page Following page B R K Camera Settings Sets the camera at your own site Page 112 L Language Setting Sets the display language Page 113 M Multicast Setting Sets the multicast feature Page 148 Previous page Following pag...

Страница 101: ... being sent to other parties from your own site Page 114 Previous page Following page B R S License Info You can display information about licences and open source software Page 115 T EULA You can display information about the licence agreement Page 115 U Remote access Performs the operations so that dealers can carry out maintenance remotely Page 115 3 Use to select an item to set and press ENTER...

Страница 102: ...mask LAN 1 are respectively displayed as IP Address setting IP Address and Subnet mask 1 Select Network Settings and press ENTER The network settings screen is displayed 2 Use to select the following items for input IP Address LAN 1 setting Use to select whether the IP address information for this unit IP Address LAN 1 Subnet mask LAN 1 Default Gateway will be obtained automatically from a DHCP se...

Страница 103: ... IPv6 Address and Prefix length 4 Use to select the following items for input IPv6 LAN 1 Select ON or OFF default Note When ON is selected both the IPv4 address and IPv6 address will be displayed on the unit information screen On the upper right of the home screen only the IPv4 address is displayed IPv6 Address LAN 1 setting Select whether the IPv6 address will be obtained automatically or will be...

Страница 104: ...s not set for LAN 2 Routing Settings will not be displayed Once LAN 2 is set to ON press G to save the settings and close the setting screen Then select Network Settings and set the routing Routing settings for LAN2 KX VC1600 only 7 Use to select Routing Settings and press ENTER The routing list screen is displayed 8 Use to select Not Registered 9 Press B The routing settings screen is displayed 1...

Страница 105: ...bandwidth to be used 256 kbps 18 Mbps default 9 0 Mbps Max Bandwidth Per Site LAN 1 Press ENTER and then use to select the maximum bandwidth per site 256 kbps 18 Mbps or Not Specified default Not Specified Max Bandwidth Per Site LAN 2 KX VC1600 only Press ENTER and then use to select the maximum bandwidth per site 256 kbps 18 Mbps or Not Specified default Not Specified Note For the KX VC1300 Max B...

Страница 106: ...isconnected MIC detection Use to select whether to enable connection status detection for Boundary Microphones or a headset ON default Boundary Microphone headset detection is enabled OFF Boundary Microphone headset detection is disabled Note When Boundary Microphones headsets are not being used set this to OFF Network Connection Status Use to select whether to display the network status indicatio...

Страница 107: ... 1 Select MCU Settings and press ENTER The settings screen of the built in MCU is displayed 2 Use to select the following items for input The following items are displayed over 2 pages To view all the items press R to move to the next page and press B to move to the previous page Screen Layout Press ENTER and use to select the screen layout Auto default Automatically changes the layout depending o...

Страница 108: ...g the PC CAMERA SUB and CAMERA MAIN buttons as well as the numeric keypad 10 Start sharing 11 Stop sharing DTMF layout change Use to select whether other parties can use remote control operations to perform screen layout change operations ON Enable operations by Sub Sites using the remote control OFF default Disable remote control operations by Sub Sites Auto move to CP1 Use to select whether the ...

Страница 109: ...R The screen standby settings screen is displayed 2 Enter the length of time 0 99 in minutes until the unit enters screen standby mode default 10 Note If you set 0 the unit will not enter screen standby mode automatically However if you press the remote control s STANDBY button the unit will enter screen standby mode even if 0 is set 3 Press G A dialogue box to confirm the saving of settings is di...

Страница 110: ...nes are connected the output settings differ as follows 2 or more Digital Boundary Microphones Monaural output 1 Digital Boundary Microphone Stereo output When using Digital Boundary Microphones and an Analogue Boundary Microphone together the output for all Boundary Microphones will be monaural Setting the MIC Position manually 1 Select MIC Setting and press ENTER The auto settings screen is disp...

Страница 111: ...s Main video camera R ch L ch MIC 2 MIC 3 MIC 1 Display Speaker Speaker Connector MIC 1 Right side MIC 2 Center Mono MIC 3 Left side Note Make some noise near the Digital Boundary Microphone is displayed to indicate which Digital Boundary Microphone picks up the noise is not displayed when the Digital Boundary Microphone is mute is not displayed when multiple Digital Boundary Microphones pick up t...

Страница 112: ...ettings is displayed 4 Use to select Yes and press ENTER 5 When Remote ID enable is set to ON The dialogue box for changing the ID of the remote control is displayed Proceed to step 6 Note While the dialogue box is displayed video conference calls cannot be received When Remote ID enable is set to OFF The system settings screen is displayed Press HOME to return to the Home screen 6 Use the followi...

Страница 113: ...controlled ON default The layout will change OFF The layout will not change 3 Press G A dialogue box to confirm the saving of settings is displayed 4 Use to select Yes and press ENTER The system settings screen is displayed Making Language Settings 1 Select Language Setting and press ENTER The language settings screen is displayed 2 Press ENTER and use to select the desired language Note The langu...

Страница 114: ...r 2 digit numbers enter these numbers as they are Do not enter like 001 Example The IP address is 192 168 0 1 Correct entry 192 168 0 1 Wrong entry 192 168 000 001 For the input format when an IPv6 address is used refer to Page 43 3 Press R The network test starts After the network test is finished if the network test was successful or timed out the details of the results are displayed If the netw...

Страница 115: ...formation display screen is displayed Press R to move to the next page and press B to move to the previous page 2 Press BACK The system setting screen is displayed Displaying the End User Licence Agreement You can display information about the End User Licence Agreement 1 Select EULA and press ENTER The End User Licence Agreement display screen is displayed 2 Press BACK The system setting screen i...

Страница 116: ...you can answer a video conference call while any unsaved data is lost When No is selected you can continue entering the data 1 Press MENU The Menu screen is displayed 2 Use to select Settings and press ENTER The system settings screen is displayed 3 Press to display the fourth page 4 Use to select Admin login and press ENTER The login screen is displayed 5 Use to select Password then enter the adm...

Страница 117: ...f encrypted communications and users etc Page 120 C Update Settings Performs the settings for confirming the latest version before performing a software update Page 121 D Connection mode Sets the mode for communicating with the other party Page 122 E NAT Settings Sets NAT information Page 122 Previous page Following page B R F Call Type Settings Sets the communication types used by the unit Page 1...

Страница 118: ...ortcut Settings Sets the shortcut function where the remote control s colour keys can be set to display screens such as the network settings screen Page 131 O Select local site set Sets local site settings Page 131 P Multicast Tree Set Sets the multicast function settings Page 148 Q Export data Exports information from the address book etc Page 131 R Import data Imports exported data from a USB me...

Страница 119: ...own site s video camera Page 135 V System Initialize Initialises all settings apart from those for functions enabled from enhanced software Page 135 7 Use to select the items for input and press ENTER The selected screen is displayed Perform settings following the descriptions of each screen A through V 8 Press HOME The Home screen is displayed Document Version 2015 08 User Manual 119 Contacts and...

Страница 120: ...yption settings If an encryption key is not set for SIP communication you cannot enable encryption When using encrypted communication with the KX VC Series NAT Traversal Service set SIP communication encryption using this setting When using IP NAT traversal mode use the same encryption settings as for SIP communication in IP mode or NAT traversal mode Be aware that if encryption is disabled eavesd...

Страница 121: ...mode SIP Access mode H 323 3 Press G A dialogue box to confirm the saving of settings is displayed 4 Use to select Yes and press ENTER The administrator menu screen is displayed Making Software Update Settings Preparation settings for updating the software can be made here Note The DNS server setting is necessary to check for upgrades and to download the latest software from the network Page 102 1...

Страница 122: ...isplayed in step 2 When using NAT traversal mode Page 122 Static NAT WAN IP Address and Local address judgement are not displayed in step 2 This setting is available only when IP Address LAN 1 setting is set to Manual in Network Settings Page 102 1 Select NAT Settings and press ENTER The NAT settings screen is displayed 2 Use to select the following items for input The following items are displaye...

Страница 123: ...select the following items for input SIP Use to select ON default or OFF Note When OFF is selected you cannot use a SIP server even if ON is set to SIP Server Page 124 If the other party is using the KX VC300 KX VC600 with a software version older than 3 00 not including 3 00 you cannot make a video conference call using H 323 You must select ON H 323 Use to select ON default or OFF Note When OFF ...

Страница 124: ...cation OFF default Disables digest authentication Authentication ID Enter an authentication ID 1 60 characters alphanumeric space symbols Page 158 comma double quotation mark cannot be entered Authentication Password Enter an authentication password 0 60 characters alphanumeric space symbols Page 158 comma double quotation mark cannot be entered Note To communicate using a SIP server it may be nec...

Страница 125: ... host names Page 102 See Page 43 for details about the characters that can be input for host names H 323 Name Enter the H 323 name H 323 Extension Enter the H 323 extension Note See Page 43 for details about the characters that can be input Enter a standards compliant value For details contact your network administrator Authentication Use to select whether to enable authentication ON Enables authe...

Страница 126: ...23 Audio System Use to select the item that you want to change and press ENTER Checkmarks are added or removed Codecs without a checkmark are disabled By default all are enabled Note The setting of H 264 Baseline Profile PktMode0 codec for H 323 Video System and the setting of G 722 codec for H 323 Audio System cannot be changed The setting of H 264 Baseline Profile PktMode0 codec for SIP Video Sy...

Страница 127: ...nts Content Other PwithP Displays your own site s shared contents with camera image of the other party s site as a picture in picture Content Local PwithP Displays your own site s shared contents and camera image as a picture in picture Content Other SideBySide Displays your own site s shared contents with camera image of the other party s site arranged side by side Content Local SideBySide Displa...

Страница 128: ...esolution of 1080p 1080i 720p cannot be used Analog compo video output KX VC1600 only Press ENTER and use to select settings for analogue component output Same as HDMI 1 default Outputs an analogue component signal that is the same image as for HDMI1 Same as HDMI 2 Outputs an analogue component signal that is the same image as for HDMI2 Max Resolution KX VC1600 only Press ENTER and use to select 1...

Страница 129: ...rom HDMI2 OFF Audio is not output to HDMI Note In the image output settings when Video Output is set to HDMI 1 HDMI2 is not displayed Page 127 Output local site sound Press ENTER and use to select whether your own site s audio is output to its destination during a video conference call OFF default Local site audio is not output RCA Local site audio is output through the Audio Out R jack HDMI Local...

Страница 130: ...e Menu Use to select ON default or OFF If you select OFF the guide is not displayed in the Home screen Pressing FULL SCREEN on the remote control will switch between displaying hiding Active Camera control Menu Press ENTER use to select Partially Hide default or Fully Hide This setting determines the result when you press FULL SCREEN on the remote control to hide the guide area while using the cam...

Страница 131: ...e administrator menu screen is displayed Setting Local Site Selection 1 Select Select local site set and press ENTER The local site selection settings screen is displayed 2 Use to select the following items for input Same setting after restart Select whether to use the same local site after restarting ON The local site settings made before restarting will be retained OFF default The local site set...

Страница 132: ...e exported contacts list address xml or profile profile xml contact your dealer 4 Check the result successful failed and press ENTER The administrator menu screen is displayed 5 Remove the USB memory device Note To prevent data leakage from the USB memory device make sure to erase all data from the USB memory device before disposing of lending or returning it Importing Data The contacts list and o...

Страница 133: ...the default startup screen will be displayed If the image file is smaller than 960 540 pixels in size it will be displayed centered on the screen Activating Enhanced Features You can activate features by enhancing the unit s software To activate the feature you must obtain a registration key from your dealer First provide your dealer with the Activation Key No and Registration ID written on the ac...

Страница 134: ...the name of the software update file Connect the USB memory device to the USB jack on the back of the unit ahead of time 1 Select Software update and press ENTER The software update screen is displayed 2 Use to select Update Method and press ENTER 3 Use to select Network or USB and press ENTER Network Updates the software from the network USB Updates the software from a USB memory device Note If y...

Страница 135: ...cted to your unit and only when you are not on a video conference call For details about compatible video camera models contact your dealer 1 Select Camera Initialize and press ENTER The video camera initialisation screen is displayed 2 Use to select the video camera to be initialised Main default or Sub 3 Press R A dialogue box confirming whether you want to start the video camera initialisation ...

Страница 136: ...etails see Checking Enhanced Features Page 114 To continue using this service after the trial service period has ended you must purchase an activation key to extend the service period The length of the service period depends on the card For details about the card contact your dealer For details about the procedure for extending the service period see Extending the Service Period Page 141 Security ...

Страница 137: ...he unit 5 Video conference call over KX VC Series NAT Traversal Service 6 Extend the Service Period of KX VC Series NAT Traversal Service Page 141 using a computer Note Operations in Obtain a Registration Key Page 138 and Extending the Service Period Page 141 must be performed by your dealer For details contact your dealer Document Version 2015 08 User Manual 137 Using the KX VC Series NAT Travers...

Страница 138: ...ack in Part Names and Usage Page 19 Note Operation cannot be guaranteed in the following cases You are using a router other than one tested by Panasonic Multiple HD Visual Communication Units are connected to one router The HD Visual Communication Unit is connected directly to the Internet and not through a router Obtain a Registration Key In this procedure you will use a computer to access the KX...

Страница 139: ... the language from the drop down list in the upper right of the screen 2 Enter the characters displayed in the image and then click Apply The function selection screen is displayed Note The fields are case sensitive 3 Click Apply new next to HDVC The new application screen is displayed 4 Fill in the following items MPR ID Activation Key No Registration ID 5 Click Next The Terms of Use screen is di...

Страница 140: ...tion Key again using a computer Page 140 9 Click Menu The function selection screen is displayed To display the Registration Key again using a computer If you misplace the Registration Key information you can display it again by following the procedure below 1 From a computer access the KX VC Series NAT Traversal Service registration page https www tsunagarunet com hdcom main The login screen is d...

Страница 141: ...ervice period the service period is extended by 1 year Jan 1 Mar 1 Service Period 3 months Whole day April 1 Until midnight April 2 Whole day April 2 the following year Until midnight April 3 Extended by 1 year Service Period 1 year and 3 months Duration 1 year If the service period is extended within 6 months following the expiration of a service period the service period begins at the time the e...

Страница 142: ...ick Accept The extension confirmation screen is displayed 7 Click Register The extension completion screen is displayed Note To register another activation key click Register New and repeat steps 4 to 7 The total amount of the service period that can be registered using activation keys at one time is 6 years which includes the amount of time remaining in the currently active service period An acti...

Страница 143: ...NTER The enhanced feature confirmation screen is displayed Check the field KX VC Series NAT Traversal Service and confirm that the service period has been extended 14 Press HOME The Home screen is displayed Document Version 2015 08 User Manual 143 Using the KX VC Series NAT Traversal Service ...

Страница 144: ...Mobile device NAT Traversal HD Visual Communication Unit none Mobile device NAT Traversal Connection modes usable for communication IP Mode IP NAT Traversal Mode using IP Mode IP Mode NAT Traversal Mode IP NAT Traversal Mode IP Mode IP NAT Traversal Mode using IP Mode Maximum number of mobile devices that can connect using mobile connection KX VC1300 3 units KX VC1600 5 units KX VC1600 when using ...

Страница 145: ...layers of relays a system of 31 units can be established A multicast system is composed of the following terminals Multicast terminal The top level terminal that multicasts video and audio Relay terminal Receives video and audio from a higher level terminal and relays it to a lower lever terminal The received contents are also shown at the relay terminal Receiver terminal Receives video and audio ...

Страница 146: ...Connection using a SIP server cannot be performed When configuring a system of 32 or more units a multicast server is required For details contact your dealer Multicast Operation Starting Multicast In order to perform multicasting multicast tree settings must first be set Page 147 Page 148 When the multicast is started from the multicast tree setting screen connections are established with the low...

Страница 147: ...minal Multicast terminal About the Network The multicast terminal and relay terminals multicast data to up to 2 terminals so all terminals in the multicast system must have bandwidth twice that of the multicast maximum bandwidth 1 1 2 2 3 4 5 Mbps The recommended resolutions for the multicast maximum bandwidth are as follows Maximum bandwidth Maximum resolution Full HD 1080 30p HD 720 60p 5 Mbps r...

Страница 148: ...g System Maintenance Page 99 select Multicast Setting and press ENTER The multicast setting screen is displayed 2 Press ENTER and use to select the microphone of the multicast terminal to use for the multicast feature MIC Audio In default Audio is input from both the Boundary Microphone and the RCA inputs Audio In Audio is input from the RCA inputs Note Multicast Setting is displayed when Multicas...

Страница 149: ...dwidth of the connection used during the multicast drops the resolution and or frame rate of the multicast data may lower Multicast Default Video Press ENTER and use to select the video to send when the multicast starts Main Camera default The video of the main camera is sent Sub Camera The video of the sub camera is sent PC The image of the PC is sent Note Performing contents sharing operations c...

Страница 150: ...START is pressed 6 Use to select the Not Registered target with the lowest node ID and then press B A dialogue box is displayed for selecting the input method When Input Address is selected The address input screen is displayed Use to select the following items for input Multicast Target Name Input the multicast target name maximum 24 characters Page 158 IP Address Enter the IP address Press G The...

Страница 151: ... In step 7 of Administrator Menu List Page 116 select Multicast Tree Set and press ENTER The multicast tree screen is displayed 2 Use to select the multicast tree to edit 3 Press B The multicast tree setting screen is displayed 4 Use to select the item to edit and then edit it 5 Press G A dialogue box to confirm the saving of settings is displayed 6 Use to select Yes and press ENTER The multicast ...

Страница 152: ...eparation the multicast will be cancelled If no response is received from a lower level terminal for a connection confirmation for approximately 1 minute the multicast tree will adjust and then the multicast will start 4 To end the multicast press END Starting a Multicast by Selecting the Multicast Target Select a multicast target from the multicast target list registered in advance to the multica...

Страница 153: ...ulticast will not begin when START is pressed 5 Press START The multicast preparation screen is displayed and when connection confirmations for lower level terminals are completed the multicast will start Note If END is pressed during multicast preparation the multicast will be cancelled If no response is received from a lower level terminal for a connection confirmation for approximately 1 minute...

Страница 154: ...yed 3 Use to select a multicast target and press ENTER The communication status of the selected multicast target is displayed Note Press B to return to the multicast information screen and to change the displayed site When automatic adjustment for the multicast tree occurs the adjusted node IDs are displayed in Current of Node ID Set Current 154 User Manual Document Version 2015 08 Using Multicast...

Страница 155: ...During a Multicast Relay Terminal Receiver Terminal 1 Press STATUS twice The unit information screen is displayed 2 1 2 Press R twice The multicast information screen is displayed Document Version 2015 08 User Manual 155 Using Multicast ...

Страница 156: ...ries For users in Taiwan only 1 Open the cover 2 Take out the R6 AA batteries 3 Insert new batteries R6 AA dry cell minus side first then close the cover 156 User Manual Document Version 2015 08 M i s c e l l a n e o u s Miscellaneous ...

Страница 157: ...with a neutral household cleaning agent using a well wrung damp cloth Then wipe down the unit with a dry soft cloth Do not use the following when cleaning the unit They may cause unit discolouration or damage Petroleum Scouring powder Alcohol Thinner Benzine Wax Hot water Powder soap If using a chemically treated cleaning cloth be sure to follow all accompanying directions and warnings Document Ve...

Страница 158: ...e input depends on which language is selected through system settings Press the indicated button repeatedly to cycle through the characters and numbers assigned to that button until the character you want to input is displayed If you want to input another character using the same button press to move the input cursor to the right 158 User Manual Document Version 2015 08 I n p u t Input ...

Страница 159: ...mber Mode 1 1 1 1 1 1 ABCabc2 AÀÁÂÃÄÅ ÆBCÇaàá âãäåæbcç 2 aàáâãäåæ bcçAÀÁ ÃÄÅÆBC Ç2 2 DEFdef 3 3 GHIghi4 4 JKLjkl5 5 MNOmno6 6 PQRSpqr s7 7 TUVtuv8 8 WXYZwxy z9 9 0 Space 0 _ 1 abcABC2 defDEF3 ghiGHI4 jklJKL5 JKLjkl5 jklJKL5 mnoMNO6 pqrsPQR S7 tuvTUV8 wxyzWXY Z9 0 Space 0 Space 0 Space 0 Space 0 Space _ _ _ _ _ _ DEÈÉÊËF deèéêëf3 deèéêëfD EÈÉÊËF3 GHIÍghií4 ghiíGHIÍ4 MNÑOÒÓ ÔÕÖØŒ mnñoòóô õöøœ6 mnño...

Страница 160: ...1 1 AÁBCaáb c2 AÀÁÂÃÄÅ ÆBCÇaàá âãäåæbcç 2 aàáâãäåæ bcçAÀÁ ÃÄÅÆBC Ç2 2 DEÉFdeé f 3 3 GHIÍghií4 4 JKLjkl5 5 MNÑOÓm nñoó6 6 PQRSpqr s7 7 TUÚÜVtu úüv8 8 WXYZwxy z9 9 0 Space 0 _ 1 aábcAÁB C2 deéfDEÉ F3 ghiíGHIÍ4 jklJKL5 JKLjkl5 jklJKL5 mnñoóMN ÑOÓ6 pqrsPQR S7 tuúüvTUÚ ÜV8 wxyzWXY Z9 0 Space 0 Space 0 Space 0 Space 0 Space _ _ _ _ _ _ DEÈÉÊËF deèéêëf3 deèéêëfD EÈÉÊËF3 GHIÍghií4 ghiíGHIÍ4 MNÑOÒÓ ÔÕÖØŒ ...

Страница 161: ... Çaáâãàbc ç2 AÀÁÂÃÄÅ ÆBCÇaàá âãäåæbcç 2 aàáâãäåæ bcçAÀÁÂ ÃÄÅÆBC Ç2 2 DEÉÊFde éêf3 3 GHIÍghií4 4 JKLjkl5 5 MNOÓÔÕ mnoóôõ6 6 PQRSpqr s7 7 TUÚÜVtuú üv8 8 WXYZwxy z9 9 0 Space 0 _ 1 aáâãàbcç AÁÂÃÀBC Ç2 deéêfDEÉ ÊF3 ghiíGHIÍ4 jklJKL5 JKLjkl5 jklJKL5 mnoóôõM NOÓÔÕ6 pqrsPQR S7 tuúüvTUÚ ÜV8 wxyzWXY Z9 0 Space 0 Space 0 Space 0 Space 0 Space _ _ _ _ _ _ DEÈÉÊËF deèéêëf3 deèéêëfD EÈÉÊËF3 GHIÍghií4 ghiíGHIÍ4...

Страница 162: ...rsPQRS7 tuvTUV8 wxyzWXYZ9 0 Normal space _ Button Katakana Mode Full Width Uppercase preferred Mode Lowercase preferred Mode Number Mode Normal アイウエオァ ィ ゥ ェ ォ カキクケコ サシスセソ タチツテ トッ ナニヌネノ ハヒフヘホ マミムメモ ヤユヨャュ ョ ラリルレロ ワヲンヮ Full width space Voicing mark Half voicing mark 1 2 3 4 5 6 7 8 9 0 _ Latin Mode Normal 162 User Manual Document Version 2015 08 Input ...

Страница 163: ...ту6 6 ФХЦЧфхцч7 7 ШЩЪЫшщъ ы8 8 ЬЭЮЯьэюя9 9 0 Space ҐЄІЇЎ ґєіїў 0 _ 1 абвгАБВГ2 деёжзДЕЁЖ З3 ийклИЙКЛ4 мнопМНОП5 рстуРСТУ6 фхцчФХЦЧ7 шщъыШЩЪ Ы8 ьэюяЬЭЮЯ9 0 Space ґєіїў ҐЄІЇЎ _ 1 AÁÂÃÀBCÇ aáâãàbcç2 DEÉÊFdeéê f3 GHIÍghií4 JKLjkl5 MNOÓÔÕm noóôõ6 TUÚÜVtuúü v8 0 Space 1 ghiíGHIÍ4 jklJKL5 mnoóôõM NOÓÔÕ6 pqrsPQRS7 tuúüvTUÚÜ V8 0 Space _ aáâãàbcç AÁÂÃÀBCÇ2 deéêfDEÉÊ F3 PQRSpqrs7 WXYZwxy z9 wxyzWXY Z9 _ _ D...

Страница 164: ... Character 1 Western Europe Mode Extended Character 2 Eastern Europe Mode 1 1 1 1 AÀÁÂÃÄÅ ÆBCÇaàá âãäåæbcç 2 aàáâãäåæ bcçAÀÁ ÃÄÅÆBC Ç2 JKLjkl5 jklJKL5 0 Space 0 Space 0 Space 0 Space _ _ _ _ DEÈÉÊËF deèéêëf3 deèéêëfD EÈÉÊËF3 GHIÍghií4 ghiíGHIÍ4 MNÑOÒÓ ÔÕÖØŒ mnñoòóô õöøœ6 mnñoòóôõ öøœMNÑ OÒÓÔÕÖ ØŒ6 164 User Manual Document Version 2015 08 Input ...

Страница 165: ...UVtuv8 WXYZ wxyz9 0 _ 1 abcAB C2 defDEF3 ghiGHI4 jklJKL5 mnoMNO6 pqrsPQRS7 tuvTUV8 wxyzWXYZ 9 0 _ Button Uppercase preferred Mode Number Mode 1 2 3 4 5 6 7 8 9 0 _ Lowercase preferred Mode Normal space Normal space Latin Mode Document Version 2015 08 User Manual 165 Input ...

Страница 166: ... 1 1 1 1 1 AÄBCaäb c2 AÀÁÂÃÄÅ ÆBCÇaàá âãäåæbcç 2 aàáâãäåæ bcçAÀÁ ÃÄÅÆBC Ç2 2 DEFdef 3 3 GHIghi4 4 JKLjkl5 5 MNOÖmn oö6 6 PQRSßpq rsß7 7 TUÜVtuüv 8 8 WXYZwxy z9 9 0 Space 0 _ 1 aäbcAÄB C2 defDEF3 ghiGHI4 jklJKL5 JKLjkl5 jklJKL5 mnoöMNO Ö6 pqrsßPQR Sß7 tuüvTUÜV 8 wxyzWXY Z9 0 Space 0 Space 0 Space 0 Space 0 Space _ _ _ _ _ _ DEÈÉÊËF deèéêëf3 deèéêëfD EÈÉÊËF3 GHIÍghií4 ghiíGHIÍ4 MNÑOÒÓ ÔÕÖØŒ mnñoòóô...

Страница 167: ... ç2 AÀÁÂÃÄÅ ÆBCÇaàá âãäåæbcç 2 aàáâãäåæ bcçAÀÁ ÃÄÅÆBC Ç2 2 DEÈÉÊËF deèéêëf 3 3 GHIÎÏghiîï 4 4 JKLjkl5 5 MNOÔŒ mnoôœ6 6 PQRSpqr s7 7 TUÙÛÜVt uùûüv8 8 WXYZwxy z9 9 0 Space 0 _ 1 aàâæbcçA ÀÂÆBCÇ2 deèéêëfD EÈÉÊËF3 ghiîïGHIÎÏ 4 jklJKL5 JKLjkl5 jklJKL5 mnoôœM NOÔŒ6 pqrsPQR S7 tuùûüvTU ÙÛÜV8 wxyzWXY Z9 0 Space 0 Space 0 Space 0 Space 0 Space _ _ _ _ _ _ DEÈÉÊËF deèéêëf3 deèéêëfD EÈÉÊËF3 GHIÍghií4 ghiíGH...

Страница 168: ...1 1 AÀBCaàb c2 AÀÁÂÃÄÅ ÆBCÇaàá âãäåæbcç 2 aàáâãäåæ bcçAÀÁ ÃÄÅÆBC Ç2 2 DEÈÉFde èéf 3 3 GHIÌghiì4 4 JKLjkl5 5 MNOÒÓm noòó6 6 PQRSpqr s7 7 TUÙVtuùv 8 8 WXYZwxy z9 9 0 Space 0 _ 1 aàbcAÀB C2 deèéfDEÈ ÉF3 ghiìGHIÌ4 jklJKL5 JKLjkl5 jklJKL5 mnoòóMN OÒÓ6 pqrsPQR S7 tuùvTUÙV 8 wxyzWXY Z9 0 Space 0 Space 0 Space 0 Space 0 Space _ _ _ _ _ _ DEÈÉÊËF deèéêëf3 deèéêëfD EÈÉÊËF3 GHIÍghií4 ghiíGHIÍ4 MNÑOÒÓ ÔÕÖØŒ ...

Страница 169: ...bc2 AÀÁÂÃÄÅ ÆBCÇaàá âãäåæbcç 2 aàáâãäåæ bcçAÀÁÂ ÃÄÅÆBC Ç2 2 DEÈÉËFd eèéëf 3 3 GHIÍÏghiíï 4 4 JKLjkl5 5 MNOÓÖm noóö6 6 PQRSpqr s7 7 TUÚÜVtuú üv8 8 WXIJYZw xijyz9 9 0 Space 0 _ 1 aáäbcAÁÄ BC2 deèéëfDE ÈÉËF3 ghiíïGHIÍÏ 4 jklJKL5 JKLjkl5 jklJKL5 mnoóöMN OÓÖ6 pqrsPQR S7 tuúüvTUÚ ÜV8 wxijyzWX IJYZ9 0 Space 0 Space 0 Space 0 Space 0 Space _ _ _ _ _ _ DEÈÉÊËF deèéêëf3 deèéêëfD EÈÉÊËF3 GHIÍghií4 ghiíGHIÍ4 ...

Страница 170: ...n an input mode other than Katakana mode or number mode is selected lowercase preferred mode uppercase preferred mode The current input mode is displayed in the guide area Example Latin mode and lowercase preferred mode currently selected Deleting an Input Character Press Y to delete an input character The character deleted depends on the position of the cursor If the cursor is to the right of the...

Страница 171: ... administrator can set the length of time until the unit enters screen standby mode Page 109 When connecting a device equipped with HDCP High bandwidth Digital Content Protection only a blue or blue black screen may be displayed If an image is not correctly displayed do not connect an HDCP equipped device The area at the edges of the screen is not displaying properly The display is not set to show...

Страница 172: ... the remote control match Perform the following procedure 1 Turn off the unit and restart it The Home screen is displayed Check the remote control ID of the unit Page 38 Note If the remote control ID is not displayed on the Home screen contact your dealer 2 Press and hold and at the same time 3 Within 2 seconds after you release the buttons press the number 1 to 3 corresponding to the ID displayed...

Страница 173: ...er party s unit Page 112 Ask the other party to set CAM ctrl from remote site s to ON on their unit You are trying to use a function that is not supported by the other party s video camera For example you tried to use the pan function with a video camera that supports only the zoom function Check whether the other party s video camera supports the function you are trying to use When the other part...

Страница 174: ...the SIP settings if you still cannot connect to the other party contact your network administrator The ID and password for digest authentication are incorrect Check that the values specified for Authentication ID and Authentication Password are correct Page 124 The SIP Transport Protocol setting is different from the other party s Set the SIP Transport Protocol setting so that it is the same as th...

Страница 175: ...t IP address Check the settings for DNS Server or Primary DNS Server in network settings Page 102 The IP address set for LAN1 and IP address set for LAN2 may be using the same network address KX VC1600 only Check the IP addresses set for LAN1 and LAN2 in the Unit Information on the Home screen Page 38 If the addresses are using the same network address contact your network administrator When Auto ...

Страница 176: ...y s device the image may be distorted due to lack of bandwidth In this case contact your dealer There may be a problem with your communication lines Contact your dealer The maximum bandwidth changes during a video conference call The maximum bandwidth during a video conference call adjusts to that of the party that has set the lowest bandwidth for the maximum bandwidth setting among all participat...

Страница 177: ...io input from Boundary Microphones is disabled To use the Boundary Microphones disconnect the headset There may be a problem with your communication lines Contact your dealer The sound cuts out You are too far from a microphone Speak close to a microphone The microphone or unit is being moved during a video conference call Do not move the unit or the microphone during a video conference call The m...

Страница 178: ...properly positioned Ask the other party to position speakers on either side of the display When the MIC position is set automatically if the other party places the display at the front of the room and the speakers at the back the microphone s left right spatial direction may be reversed and the orientation of the image and sound will not match The MIC positions set manually by the other party are ...

Страница 179: ...red is invalid Enter the IPv4 address correctly in the format XXX XXX XXX XXX decimal values separated by periods For values of only 1 or 2 digits enter these numbers as they are Do not enter like 001 Example The IP address is 192 168 0 1 Correct entry 192 168 0 1 Wrong entry 192 168 000 001 Multicast or broadcast addresses cannot be used Enter a valid IPv6 address For the IPv6 address input forma...

Страница 180: ...minal s number 1 to 3 A display with a video frequency different from that of the unit was connected Match the unit s video frequency to the display being used A display that does not support 1920 1080 resolution was connected Use a display that supports 1080 resolution Note The resolution of all connected displays will be lowered When the terminal connected to the display indicated in the message...

Страница 181: ... correct remote control or setup remote control as follows 1 Press and at the same time 2 Within 2 seconds press n2 3 Press Home to finish this message will disappear If this message will not disappear please check the batteries in your remote control and try again Note The remote control ID of the remote control 1 2 3 is represented by n1 The remote control ID of the unit 1 2 3 is represented by ...

Страница 182: ...g the same IP address Register the correct IP address Invalid Primary DNS Server address The IP address contains an invalid value Enter the IPv4 address correctly The correct format is XXX XXX XXX XXX dotted format decimal notation If the IPv4 address contains 1 or 2 digit numbers enter these numbers as they are Do not enter like 001 Example The IP address is 192 168 0 1 Correct entry 192 168 0 1 ...

Страница 183: ...name etc is displayed and video conference calls can be made after reconnecting the LAN cable Disconnected When connecting to an MCU or non Panasonic video conference system the video conference call was disconnected When connecting to an MCU or non Panasonic video conference system encryption may not be available or some operations may not function as expected depending on the device used by the ...

Страница 184: ...nnot be used Enter a valid IPv6 address For the IPv6 address input format refer to Page 43 Invalid SIP Domain Name The format of the SIP domain name that you entered is invalid Enter a standards compliant value For details contact your network administrator Invalid WAN IP Address The format of the router s WAN IP address that you entered is invalid Enter the WAN IP address correctly in the format ...

Страница 185: ...ress from the external server Contact your dealer Software update failed 3996 0BBB The USB memory device does not contain the appropriate firmware The firmware is incorrect Confirm that the correct firmware is saved to the USB memory device For details about the firmware contact your dealer Software update failed 3996 0BBB Restart the system Administrative rights are required for this operation Th...

Страница 186: ...ppears contact your dealer This Trial licence already registered You are trying to use a different activation key after completing registration using the included activation key Do not use an activation key other than the one included with the product KX VC Series NAT Traversal Service for this Device Problem Cause and Solution I registered a Registration Key but I cannot make a video conference c...

Страница 187: ...XXXXXXXX Note An error code containing alphanumeric characters is displayed in XXXXXXXX The router or the LAN cable is not connected correctly to the unit and therefore you cannot make a video conference call The following table explains the error codes Error Code Explanation 01000003 The DHCP lease expired 10000001 Registration to the gate keeper failed 01000006 There was a change due to an exten...

Страница 188: ... expiration Purchase a new activation key and extend the service period Page 141 If 6 months or more since expiration Purchase a new activation key and then acquire a new Registration Key and re register to the unit Page 133 Page 138 Note To determine whether it has been more than 6 months since the service period expired see Checking Enhanced Features Due to server issues the NAT Traversal Servic...

Страница 189: ...mote Camera Control H 281 Zoom Pan Tilt Preset Dual Stream Method H 239 H 323 BFCP SIP No of Displays 3 displays 2 displays Supported Resolution and Frame Rate Main Maximum 1080p 30 frames sec Sub 1080p 30 frames sec Encryption SRTP AES 128 bit H 235 AES 128 bit Other H 460 Communication Bandwidth 256 kbps 18 Mbps Video Compatible Resolutions 1 176 144p 352 240p 352 288p 512 288p 640 480p 704 480p...

Страница 190: ...Control terminal 1 Not used No of Simultaneous Connections 6 Expandable to 10 4 Contents Sharing PC RGB HDMI Sub video camera HDMI Sub USB Memory Device Updating Software Import Contact List Profile Configuration Data Encryption Data Startup screen Multicast Tree List Export Contact List Profile Configuration Data Encryption Data Multicast Tree List Network Protocol TCP IPv4 TCP IPv6 5 UDP IPv4 UD...

Страница 191: ...ng Temperature 0 C 40 C 32 F 104 F Operating Humidity 10 90 non condensing 1 Varies according to device settings and the status of the network 2 HDCP is not supported 3 For 3 conductor stereo mini plugs only 4 Simultaneous voice audio output for HDMI1 HDMI2 is not supported 5 Some features are not supported when using IPv6 Document Version 2015 08 User Manual 191 Specifications ...

Страница 192: ...amera viewing 75 Confirming the MPR ID 133 Connecting to an MCU 60 Connection Amplifier Active Speaker 32 Computer 31 Sub Video Camera 31 Connection Status viewing 89 Connection setting 105 Contacts adding 91 Contacts deleting 92 Contacts editing 92 Controlling a Video Camera 78 D Date and Time setting 102 Device Connection 26 E Encryption setting 120 F For Your Safety 11 G GUI setting 130 H Heads...

Страница 193: ...en Standby setting 109 Security 14 Self Diagnosis performing 114 Software Update setting 121 Sound setting 109 Specifications system 189 Sub Site 3 Sub Video Camera 31 System Initialisation performing 135 T Troubleshooting 171 U Unit Information viewing 90 113 Unit Name setting 102 Using Mobile Connection Enhanced Features 144 Using Multicast 145 V Volume adjusting 71 Document Version 2015 08 User...

Страница 194: ...194 User Manual Document Version 2015 08 Notes ...

Страница 195: ...Document Version 2015 08 User Manual 195 Notes ...

Страница 196: ...prohibited without the written consent of Panasonic System Networks Co Ltd Panasonic System Networks Co Ltd 2014 PD1114KK3095 1 62 4 chome Minoshima Hakata ku Fukuoka 812 8531 Japan http www panasonic com Authorised Representative in EU Panasonic Testing Centre Panasonic Marketing Europe GmbH Panasonic System Networks Co Ltd Fukuoka Japan Winsbergring 15 22525 Hamburg Germany ...

Отзывы: