background image

Useful Inf

o

rmation

Basic Operation

Preparation

Ad
v

a

nced Operation

For assistance, please visit http://www.panasonic.com/phonehelp


This unit is compatible with Caller ID. To use this feature, you must 
subscribe to the appropriate service offered by your service provider.

Please read these Operating Instructions before using the unit and save 
for future reference.

Panasonic World Wide Web address: http://www.panasonic.com

for customers in the USA or Puerto Rico

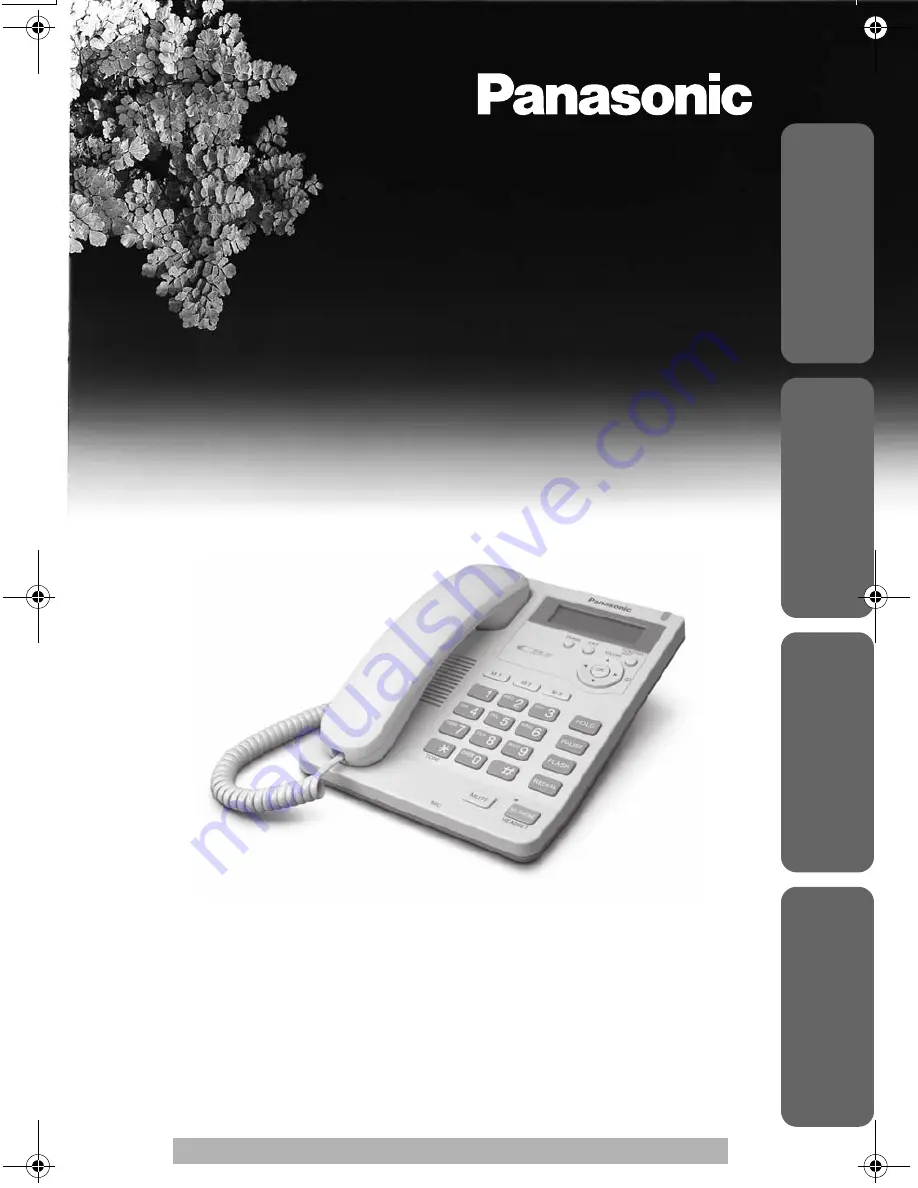
Integrated Telephone System

Operating Instructions

Model No.

 KX-TS600W
 KX-TS600B

Pulse-or-tone dialing capability

KX-TS600W

TS600W.book  Page 1  Friday, October 28, 2005  2:10 PM

Содержание KX-TS600B

Страница 1: ...ou must subscribe to the appropriate service offered by your service provider Please read these Operating Instructions before using the unit and save for future reference Panasonic World Wide Web address http www panasonic com for customers in the USA or Puerto Rico Integrated Telephone System Operating Instructions Model No KX TS600W KX TS600B Pulse or tone dialing capability KX TS600W ...

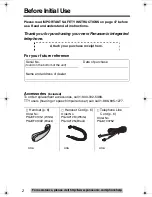
Страница 2: ...rence Serial No Date of purchase found on the bottom of the unit Name and address of dealer Accessories included To order replacement accessories call 1 800 332 5368 TTY users hearing or speech impaired user can call 1 866 605 1277 Handset p 6 Order No PQJXF0101Z White PQJXF0102Z Black one Handset Cord p 6 Order No PQJA212M White PQJA212N Black one Telephone Line Cord p 6 Order No PQJA10075Z one A...

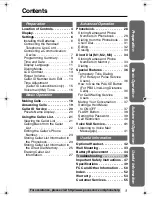
Страница 3: ... 25 Erasing Caller List Information 27 Phonebook 28 Storing Names and Phone Numbers in Phonebook 28 Dialing from the Phonebook 30 Chain Dial 31 Editing 32 Erasing 33 Direct Dial M1 M2 M3 34 Storing Names and Phone Numbers in Memory 34 Dialing 35 Special Features 36 Temporary Tone Dialing For Rotary or Pulse Service Users 36 How to Use the PAUSE Button For PBX Line Long Distance Calls 36 For Call W...

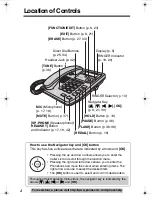
Страница 4: ... select the desired item The OK button is used to select and confirm desired item Throughout this Operating Instructions the navigator key is indicated by the arrows 4 3 2 or 1 and OK O P E R FUNCTION EDIT Button p 8 23 EXIT Button p 8 21 ERASE Button p 27 33 HOLD Button p 19 PAUSE Button p 36 FLASH Button p 36 38 REDIAL Button p 18 TONE Button p 36 MUTE Button p 37 Display p 5 RINGER Indicator p ...

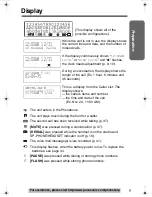
Страница 5: ...ller s name and number the time and date of the call Ex Nov 24 11 50 AM The unit enters in the Phonebook The unit plays music during the hold for a caller The second call has been received while talking p 37 MUTE was pressed during a conversation p 37 REDIAL was pressed while the handset is on the cradle and SP PHONE HEADSET indicator is off p 18 The voice mail message s is are recorded p 41 This ...

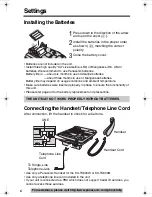
Страница 6: ... of Manganese batteries Battery life may depend on usage conditions and ambient temperature Make sure batteries were inserted properly in phase to ensure the functionality of this unit Please refer page 44 for the battery replacement and precautions Connecting the Handset Telephone Line Cord After connection lift the handset to check for a dial tone Use only a Panasonic Handset for the KX TS600W o...

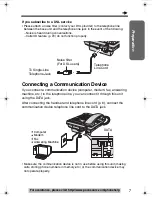
Страница 7: ...vice If you connect a communication device computer modem fax answering machine etc to the telephone line you can connect it through this unit using the DATA jack After connecting the handset and telephone line cord p 6 connect the communication device telephone line cord to the DATA jack Make sure the communication device is not in use before using this unit making calls storing phone numbers in ...

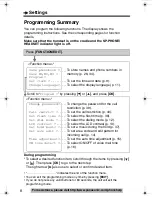
Страница 8: ... any valid buttons for 60 seconds the unit will exit the programming mode Press FUNCTION EDIT Function menu Save phonebook To store names and phone numbers in Save M1 M2 M3 memory p 28 34 Program Set clock To set the time and date p 9 Change language To select the display language p 11 Function menu Change password To change the password for the call restriction p 39 Call restrict To set the call ...

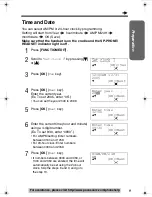
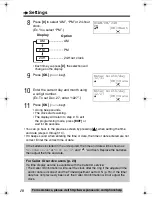
Страница 9: ...t year Ex To set 2005 enter 05 You can set the year 2000 to 2099 5 Press OK Next key 6 Enter the current time hour and minute using a 4 digit number Ex To set 9 30 enter 0930 For AM PM setting Enter numbers between 0100 and 1259 For 24 hour clock Enter numbers between 0000 and 2359 7 Press OK Next key If numbers between 0000 and 0059 or 1300 and 2359 are entered the time will automatically be set ...

Страница 10: ... beeps sound when entering the time or date the time or date entered are not correct Enter the correct time or date If the batteries installed in the unit expired the time and date will be shown as 12 00AM 12 31 or 0 00 12 31 and will flash Replace the batteries then adjust the time and date For Caller ID service users p 20 If a time display service is available with the Caller ID service The Call...

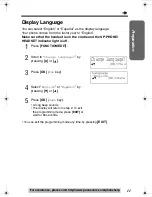
Страница 11: ...the cradle and the SP PHONE HEADSET indicator light is off 1 Press FUNCTION EDIT 2 Scroll to Change language by pressing or 3 Press OK Yes key 4 Select English or Español by pressing or 5 Press OK Save key A long beep sounds The display will return to step 2 To exit the programming mode press EXIT or wait for 60 seconds You can exit the programming mode any time by pressing EXIT Change language 34...

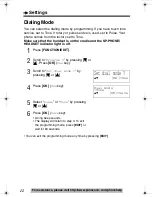
Страница 12: ...t is on the cradle and the SP PHONE HEADSET indicator light is off 1 Press FUNCTION EDIT 2 Scroll to Program by pressing 4 or 3 Press OK Yes key 3 Scroll to Set dial mode by pressing 4 or 3 4 Press OK Yes key 5 Select Pulse or Tone by pressing 4 or 3 6 Press OK Save key A long beep sounds The display will return to step 3 To exit the programming mode press EXIT or wait for 60 seconds You can exit ...

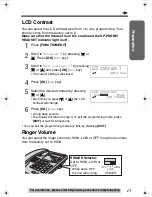
Страница 13: ...Yes key The current setting is displayed 4 Press OK Yes key 5 Select the desired contrast by pressing 4 or 3 Each time you press 4 or 3 the LCD contrast will change 6 Press OK Save key A long beep sounds The display will return to step 3 To exit the programming mode press EXIT or wait for 60 seconds You can exit the programming mode any time by pressing EXIT Ringer Volume You can select the ringer...

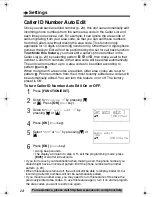
Страница 14: ... codes are edited older area codes are reset to pattern Phone numbers from the 4 most recently edited area codes will be automatically edited You can turn this feature on or off The factory preset is ON To turn Caller ID Number Auto Edit On or OFF 1 Press FUNCTION EDIT 2 Scroll to Program by pressing 4 or 3 Press OK Yes key 3 Scroll to Set auto edit by pressing 4 or 3 4 Press OK Yes key 5 Select O...

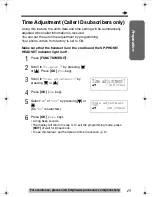
Страница 15: ...e sure that the handset is on the cradle and the SP PHONE HEADSET indicator light is off 1 Press FUNCTION EDIT 2 Scroll to Program by pressing 4 or 3 Press OK Yes key 3 Scroll to Time adjustment by pressing 4 or 3 4 Press OK Yes key 5 Select On or Off by pressing 4 or 3 Ex On is selected 6 Press OK Save key A long beep sounds The display will return to step 3 To exit the programming mode press EXI...

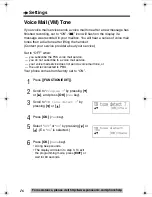
Страница 16: ...t to OFF when you subscribe the FSK voice mail service you do not subscribe to a voice mail service your voice mail service does not send a voice mail tone or the unit is connected to PBX Your phone comes from factory set to ON 1 Press FUNCTION EDIT 2 Scroll to Program by pressing or and press OK Yes key 3 Scroll to VM tone detect by pressing or 4 Press OK Yes key 5 Select Off or On by pressing or...

Страница 17: ...ll If you misdial hang up and start again from step 1 2 When the other party answers talk into the MIC microphone 3 To hang up press SP PHONE HEADSET The indicator light goes out The display back to standby after a few seconds During speakerphone operation For best performance please note the following Talk alternately with the other party in a quiet room If the other party has difficulty hearing ...

Страница 18: ...he number dialed has been stored in the Phonebook the name is also displayed 2 Scroll to the desired number by pressing 4 or 3 You can also scroll through the list by pressing REDIAL To exit the list press EXIT 3 Lift the handset or press SP PHONE HEADSET To erase an item repeat steps 1 and 2 and press ERASE If No items stored is displayed the list is empty To adjust the handset volume 4 levels or...

Страница 19: ...y lifting its handset Answering Calls When a call is received the unit rings the RINGER indicator flashes quickly and Incoming call is displayed You can answer a call by simply lifting the handset If you subscribe to a Caller ID service the calling party s information will be displayed when the unit is ringing p 20 Using the speakerphone 1 Press SP PHONE HEADSET The indicator lights 2 Talk into th...

Страница 20: ... the Phonebook p 28 or Direct Dial memory p 34 Caller information will not be displayed in the following cases If the caller dialed from an area which does not provide a Caller ID service the display will show Out of area If the caller has requested not to display his her information the display will show Private caller If a long distance call is identified and the caller s name and or number cann...

Страница 21: ... call To return to the previous caller press 3 To exit the Caller List press EXIT If you receive a call from one of the same phone numbers stored in the Phonebook or the Direct Dial memory the caller s name will be displayed Private name display If an arrow or is displayed after the number the whole phone number has not been shown Press 2 or 1 to see the remaining numbers or to return to the previ...

Страница 22: ... press SP PHONE HEADSET The displayed phone number is dialed automatically After a few seconds the display will show the length of the call In some cases you may have to edit the number before dialing p 23 If a phone number is not displayed in the caller information you cannot call back that caller Display meaning Y You have checked this caller information answered the call or called back the call...

Страница 23: ...rearranged into one of 3 patterns a b c The order in which pattern a c are displayed depends on how the telephone number is displayed in step 2 5 After editing you can continue with calling back or storing procedures To call back lift the handset or press SP PHONE HEADSET p 22 To store the number in the Phonebook memory follow steps 4 to 5 on page 24 to complete the operation To store the number i...

Страница 24: ... name is required enter the name p 29 When finished press OK Next key 5 Press OK Save key A long beep sounds After a few seconds the display will return to the Caller List You can continue storing other items To exit the Caller List press EXIT or wait for 60 seconds If 3 beeps sound and the display shows Phonebook full in step 5 press EXIT to exit the list To erase other stored items from the Phon...

Страница 25: ...croll to the caller you want to store in the Direct Dial memory by pressing 4 or 3 3 Press FUNCTION EDIT If the number requires editing see page 23 4 Press OK Next key a If a name is not required press OK Next key b If a name is required enter the name p 29 When finished press OK Next key 5 Press 4 6 Press one of the Direct Dial button M1 M2 or M3 Ex M1 is pressed Continued SMITH JACK 1 111 444 77...

Страница 26: ...ial button by pressing M1 M2 or M3 Save key A long beep sounds After a few seconds the display will return to the Caller List You can continue storing other items To exit the Caller List press EXIT or wait for 60 seconds To erase other stored items from the Direct Dial memory see page 35 To cancel during programming press EXIT Start again from step 1 You cannot store caller information in the Dire...

Страница 27: ... to the caller you want to erase from the Caller List by pressing 4 or 3 3 Press ERASE A long beep sounds and the information is erased After a few seconds the display will show the previous caller information To exit the Caller List press EXIT or wait for 60 seconds To erase all entries in the Caller List 1 Press 4 or 3 to enter the Caller List 2 Press ERASE 3 Press OK Yes key A long beep sounds ...

Страница 28: ...splay 6 Press OK Save key The entered name and phone number are displayed The display will return to step 1 If the display shows Phonebook full in step 2 press EXIT to exit the list To erase other stored items from the Phonebook see page 33 You can exit the programming mode any time by pressing EXIT If a pause is required for dialing press PAUSE where needed If required you can also store FLASH in...

Страница 29: ...delete and enter the correct character Each time you press ERASE a character is erased For example to enter Tom Jones 1 Press 8 four times 2 Press 6 three times then press 1 3 Press 6 once then press 1 twice 4 Press 5 four times press 6 three times then press 1 5 Press 6 twice press 3 twice then press 7 four times Number of times key is pressed Keys 1 2 3 4 5 6 7 8 9 1 1 2 a b c A B C 2 3 d e f D ...

Страница 30: ...ntil any name with the same initial is displayed see the Index table on page 31 Ex To find Frank press 3 repeatedly until the first item under F is displayed 2 Press 4 repeatedly until the name is displayed 3 Lift the handset or press SP PHONE HEADSET 4 To hang up place the handset on the cradle or press SP PHONE HEADSET If No items stored is displayed in step 1 the Phonebook is empty You can exit...

Страница 31: ... the Phonebook p 36 1 Search and dial from Phonebook 1800123456 Calling card access number The Voice guidance may be announced 2 Search and dial from Phonebook 1234 Calling card PIN 3 Search and dial from Phonebook 15550123456 Destination number 1 While you are on a call Press 2 or 1 2 Search for the desired item by pressing 4 or 3 To search for an item by initial see page 30 3 Press OK The phone ...

Страница 32: ...tial see page 30 3 Press FUNCTION EDIT If you do not want to change the name go to step 5 4 Edit the name using the dialing buttons p 29 To clear an incorrect character move the cursor to the character by using 2 or 1 then press ERASE 5 Press OK Next key 6 Insert the required numbers If you enter a wrong number press ERASE and enter the correct number 7 Press OK Save key To exit the Phonebook pres...

Страница 33: ...nebook 2 Scroll the Phonebook item you want to erase by using 4 or 3 To search for the item by initial see page 30 3 Press ERASE To stop erasing press 3 No key 4 Press OK Yes key A long beep sounds To erase other items repeat from step 2 To exit the Phonebook press EXIT or wait for 60 seconds Item with at the beginning cannot be deleted when the Call Restriction is set to ON You can exit the progr...

Страница 34: ...g buttons 0 to 9 and p 29 To move the cursor press 2 or 1 If a name is not required go to step 4 4 Press OK Next key 5 Enter a phone number up to 32 digits If you enter a wrong number press ERASE and enter the correct number 6 Press one of the Direct Dial button M1 M2 or M3 Save key Ex M1 is pressed The entered name and phone number are displayed After a few seconds the display will return to step...

Страница 35: ...Direct Dial memory M1 M2 or M3 You can exit the programming mode any time by pressing EXIT If a pause is required for dialing press PAUSE where needed If required you can also store FLASH in a phone number Pressing PAUSE or FLASH counts as one digit p 36 38 To erase a stored number 1 Press the required Direct Dial button M1 M2 or M3 2 Press ERASE To stop erasing press 3 No key 3 Press OK Yes key A...

Страница 36: ...quired for dialing with a PBX or to make a long distance call Ex Line access number 9 PBX 9 PAUSE Pressing PAUSE once creates a 3 5 second pause This prevents misdialing when you redial or dial a stored number Pressing PAUSE more than once increases the length of the pause between numbers For Call Waiting Service Users Press FLASH if you hear a call waiting tone while talking The first call is put...

Страница 37: ... The other party cannot hear you but you can hear them To resume the conversation press MUTE again Setting a Hold Music to ON OFF You can set music play during the hold as follows Your phone comes from the factory set to ON Make sure that the handset is on the cradle and the SP PHONE HEADSET indicator light is off 1 Press FUNCTION EDIT 2 Scroll to Program by pressing 4 or 3 and press OK Yes key 3 ...

Страница 38: ...handset is on the cradle and the SP PHONE HEADSET indicator light is off 1 Press FUNCTION EDIT 2 Scroll to Program by pressing 4 or 3 and press OK Yes key 3 Scroll to Set flash time by pressing 4 or 3 4 Press OK Yes key 5 Select the desired time by pressing 4 or 3 6 Press OK Save key A long beep sounds The display will return to step 3 To exit the programming mode press EXIT or wait for 60 seconds...

Страница 39: ...ord by pressing 4 or 3 4 Press OK Yes key 5 Enter the current password 6 Press OK Next key If the wrong password is entered 3 beeps will sound Enter the correct password 7 Enter a new password using a 4 digit number Ex 1234 is entered 8 Press OK Save key A long beep sounds The display will return to step 3 To exit the programming mode press EXIT or wait for 60 seconds You can exit the programming ...

Страница 40: ... 3 and press OK Yes key 3 Scroll to Call restrict by pressing 4 or 3 4 Press OK Yes key If you changed the password 1111 factory set the display on the right will be shown Follow below steps 1 and 2 1 Enter the password p 39 2 Press OK Next key Go to step 5 If the wrong password is entered 3 beeps will sound Enter the correct password 5 Enter the number s 1 digit or 2 digits you want to restrict 0...

Страница 41: ...ded Voice mail and will be displayed Listening to Voice Mail Message s After receiving a voice mail message will flash on the display To listen to your voice mail perform the following steps 1 Lift the handset or press SP PHONE HEADSET and dial an access phone number You will get an access phone number from your telephone company 2 Follow the pre recorded instructions 3 When finished place the han...

Страница 42: ...call The SP PHONE HEADSET indicator lights If you misdial during pre dialing press ERASE and enter the correct number Then press SP PHONE HEADSET for dialing 2 To hang up press SP PHONE HEADSET The indicator light goes out To adjust the headset receiver volume 4 levels While using the headset press VOLUME 3 or 4 During a conversation using the headset you cannot switch the call to the handset by l...

Страница 43: ...mounting adaptor and push it in the direction of the arrow 1 and 2 UP WALL should be facing upward 3 Drive screws not included into the wall using the wall template below Connect the telephone line cord Mount the unit and slide down Wall Template 2 1 Screws To Single Line Telephone Jack 8 3 cm To temporarily set the handset down during a conversation place it as shown here Wall Mounting 8 3 cm ...

Страница 44: ...e cord to the unit The time will be shown as 12 00AM 12 31 or 0 00 12 31 and will flash after replacing the batteries readjust the time and date Battery Precautions The batteries should be used correctly otherwise the unit may be damaged by battery leakage Do not mix different types of batteries Do not charge short circuit disassemble heat or dispose of in fire Remove all the batteries when replac...

Страница 45: ...ed during the conversation If is displayed press MUTE You cannot program items such as the dialing mode Programming is not possible when the handset is off the cradle the SP PHONE HEADSET indicator lights or when viewing the Caller List and the Phonebook Do not pause for over 60 seconds while programming The unit does not display the caller s phone number You need to subscribe to a Caller ID servi...

Страница 46: ...ok full is displayed erase other stored items from the Phonebook memory p 33 While programming or searching the unit starts to ring and stops the program search To answer the call lift the handset or press SP PHONE HEADSET Start again from the beginning after hanging up The display exits the Caller List Do not pause for over 60 seconds while searching You cannot redial by pressing REDIAL If the la...

Страница 47: ... This may result in the risk of fire or electric shock Never spill any liquid on the unit 10 To reduce the risk of electric shock do not disassemble this unit Take the unit to an authorized servicenter when service is required Opening or removing covers may expose you to dangerous voltages or other risks Incorrect reassembly can cause electric shock when the unit is subsequently used 11 Unplug thi...

Страница 48: ...sing burns or irritation to the eyes or skin 7 Replace all batteries at the same time Mixing fresh and discharged batteries could increase internal cell pressure and rupture the discharged batteries Applies to products employing more than one separately replaceable primary battery 8 When installing batteries observe the proper polarity or direction Incorrect installation can cause charging and may...

Страница 49: ...phonehelp Power Source From telephone line From 3 AA LR6 UM 3 R6 batteries Dimensions H x W x D Approx 91 mm x 165 mm x 220 mm 3 19 32 x 6 1 2 x 8 21 32 Mass Weight Approx 700g 1 54lb Dialing Mode Tone DTMF Pulse Operating Environment 5 C 40 C 41 F 104 F Specifications are subject to change without notice Specifications ...

Страница 50: ...e telephone company will notify you in advance that temporary discontinuance of service may be required But if advance notice isn t practical the telephone company will notify the customer as soon as possible Also you will be advised of your right to file a complaint with the FCC if you believe it is necessary The telephone company may make changes in its facilities equipment operations or procedu...

Страница 51: ...o TV technician for help This equipment is hearing aid compatible as defined by the FCC in 47 CFR Section 68 316 When you hold the phone to your ear noise might be heard in your Hearing Aid Some Hearing Aids are not adequately shielded from external RF radio frequency energy If noise occurs use an optional headset accessory or the speakerphone option if applicable when using this phone Consult you...

Страница 52: ...ialing Mode 12 Display 5 Direct Dial Dialing 35 Erasing 35 Storing 34 F FCC and Other Information 50 Flash Button 38 Flash time 38 H Headset 42 I Important Safety Instructions 47 L LCD Contrast 13 M Making Calls 18 Mute 37 N Navigator key 4 P Password 39 PAUSE 36 Phonebook Chain Dial 31 Editing 32 Erasing 33 Storing 28 Pulse Service 36 R Redial 18 Ringer Volume 13 Rotary Service Tone Dialing 36 S ...

Страница 53: ... be no charge for labor During the Parts Limited Warranty period there will be no charge for parts You must mail in your product during the Limited Warranty period This Limited Warranty excludes both parts and labor for batteries antennas and cosmetic parts cabinet This Limited Warranty only applies to products purchased and serviced in the United State or Puerto Rico This Limited Warranty is exte...

Страница 54: ...ARRANTOR IS NOT LIABLE FOR INCIDENTAL OR CONSEQUENTIAL DAMAGES RESULTING FROM THE USE OF THIS PRODUCT OR ARISING OUT OF ANY BREACH OF THIS LIMITED WARRANTY As examples this excludes damages for lost time lost calls or messages cost of having someone remove or re install an installed unit if applicable travel to and from the servicer The items listed are not exclusive but are for illustration only ...

Страница 55: ...aired users can call 1 877 833 8855 Accessory Purchases Purchase Parts Accessories and Instruction Books online for all Panasonic Products by visiting our Web Site at http www pasc panasonic com or send your request by E mail to npcpart us panasonic com You may also contact us directly at 1 800 332 5368 Phone 1 800 237 9080 Fax only Monday Friday 9 am to 8 pm EST Panasonic Services Company 20421 8...

Страница 56: ...cations do not repair consumer products Panasonic Consumer Electronics Company Division of Panasonic Corporation of North America One Panasonic Way Secaucus New Jersey 07094 Panasonic Puerto Rico Inc San Gabriel Industrial Park Ave 65 de Infantería Km 9 5 Carolina Puerto Rico 00985 PQQX14924ZA FM1005SN0 Copyright This material is copyrighted by Panasonic Communications Malaysia Sdn Bhd and may be ...

Отзывы: