background image

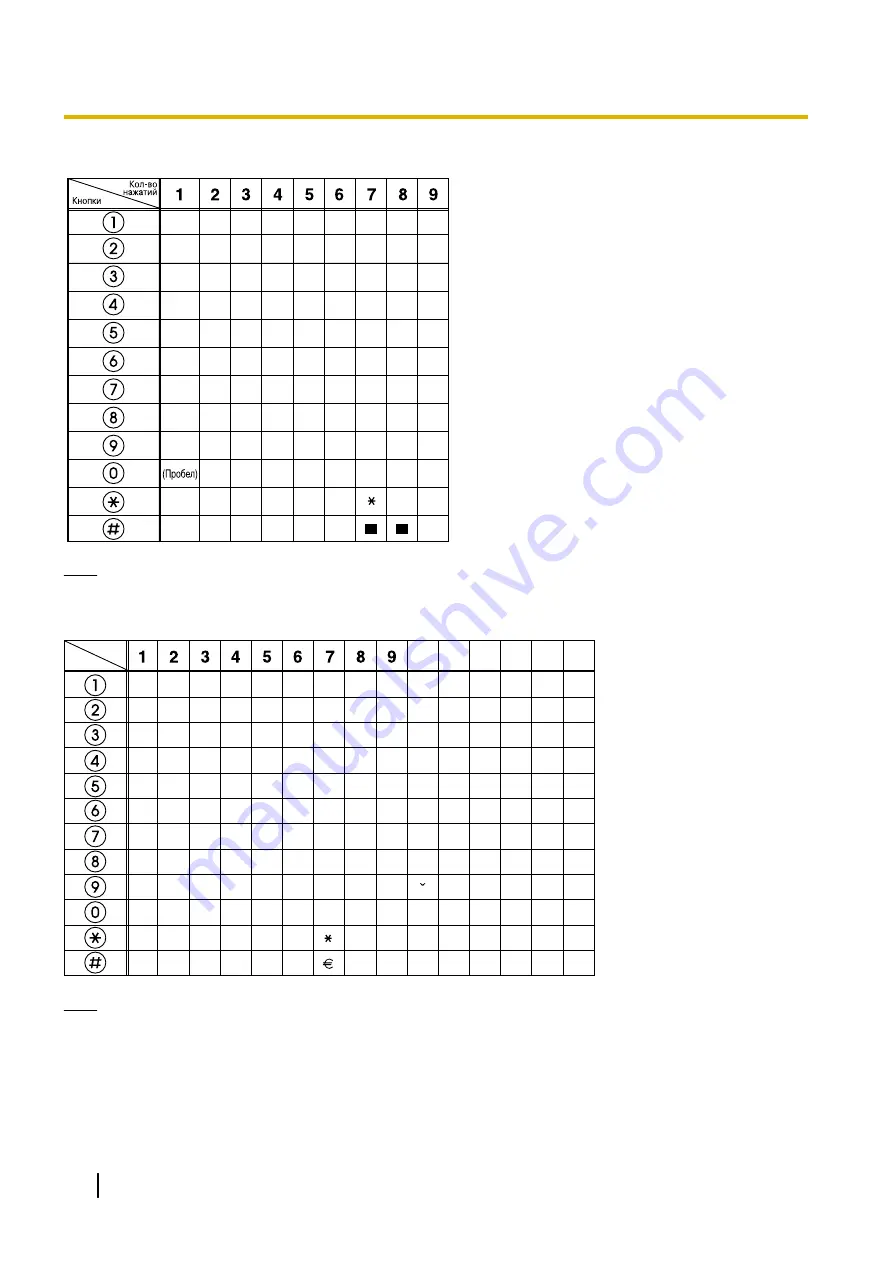
Table 1 (Standard mode for RU model)

?

1

"

B

C

a

b

c

2

E

F

d

e

f

3

H

I

g

h

i

4

K

L

j

k

l

5

N

O

m

n

6

o

Q

R

S

p

q

r

s

7

U

V

t

8

u

v

X

Y

Z

w

x

y

z

9

.

,

:

;

0

%

&

(

)

#

+

=

<

>

@

!
A

D

G
J

M

P

T

W

$

/

Note

A space counts as one character.

Table 2 (Option mode)

Times

Buttons

!

A

D
G

J

M
P

T

W

$

?

ä

"

B

C

a

b

c

À

E

F

d

e

f

Ð

H

I

g

h

i

Ì

K

L

j

k

l

5

N

O

m

n

Ñ

o

Q

R

S

p

q

r

s

U

V

t

u

v

X

Y

Z

w

x

y

z

ý

9

.

0

%

&


(

)

#

£

ö

1

ü

/

+

=

<

>

10 11 12 13 14 15

Á

Â

Ã

Ä

Å

Æ

Ç

2

È

É

Ê

Ë

3

Í

Î

Ï

4

Ò

Ó

Ô

Õ

Ö

Ø

Œ

6

ß

7

Ù

Ú

Û

Ü

8

,

:

;

Š

Z

@

(space)

Note

A space counts as one character.

156

Operating Instructions

Settings and Customisation

Содержание KX-NT400

Страница 1: ...tary Telephone IP PT Please read this manual carefully before using this product and save this manual for future use For more details please refer to the manuals of the PBX In this manual the suffix of each model number is omitted unless necessary SD Logo is a trademark of SD 3C LLC ...

Страница 2: ...es a simple interface for operating the KX NT400 Common telephone operations such as transferring calls establishing conferences and checking messages can be performed simply by pressing buttons on the screen The touch screen also provides an intuitive interface for managing contacts and call logs 2 Operating Instructions Introduction ...

Страница 3: ... text chat session with other users Network Camera Integration The KX NT400 can display video feeds from Panasonic Network Cameras e g BB HCM BL C series You can register up to 20 cameras If a registered camera is connected to a doorphone whenever you make a call to or receive a call from that doorphone the video feed is automatically displayed on the KX NT400 In addition you can register camera i...

Страница 4: ...eb page that contains links to telephone numbers Data Import and Export to SD Memory Card The KX NT400 contains an SD memory card slot so that you can back up the KX NT400 s data to an SD memory card You can back up information such as your personal contacts chat log and settings If you switch phones or data is lost from the KX NT400 you can recover your data from the SD memory card 4 Operating In...

Страница 5: ...nic Network Camera Panasonic KX NT400 Doorphone and Door Opener Proprietary Telephone or Single Line Telephone PC Running CA Client Web Server Portable Station IMPORTANT If a PC that has Communication Assistant CA installed is connected to the KX NT400 do not set the extension number in CA to the same extension number that is assigned to the KX NT400 Operating Instructions 5 Introduction ...

Страница 6: ...Notice When a portable station is configured to share an extension number with the KX NT400 to apply the configuration you must restart the KX NT400 6 Operating Instructions Introduction ...

Страница 7: ...l Standard MPEG 4 Video and or ii decoding MPEG 4 Video that was encoded by a consumer engaged in a personal and non commercial activity and or was obtained from a video provider licensed by MPEG LA to provide MPEG 4 Video No licence is granted or shall be implied for any other use Additional information including that relating to promotional internal and commercial uses and licensing may be obtai...

Страница 8: ...the label affixed to the side of the unit You should note the serial number of this unit in the space provided and retain this manual as a permanent record of your purchase to aid in identification in the event of theft MODEL NO SERIAL NO DATE OF PURCHASE NAME OF DEALER DEALER S ADDRESS DEALER S TEL NO 8 Operating Instructions Introduction ...

Страница 9: ...sible fire or electric shock do not expose this unit to rain or moisture If damage to the unit exposes any internal parts immediately disconnect the cable or cord If the power is supplied from the network to the IP PT Power over Ethernet disconnect the Ethernet cable Otherwise disconnect the AC adaptor cord Then return this unit to a service centre This handset earpiece is magnetised and may retai...

Страница 10: ... shown on the unit s display consult the network administrator Use only the correct Panasonic handset Data Security We recommend observing the security precautions described in this section in order to prevent the following loss disclosure falsification or theft of user information unauthorised use of the unit interference or suspension of use caused by an unauthorised party We cannot be responsib...

Страница 11: ...ecurity measures For Bluetooth Headset Users Medical Consult the manufacturer of any personal medical devices such as pacemakers or hearing aids to determine if they are adequately shielded from external RF radio frequency energy the product operates in the frequency range of 2 4000 GHz to 2 4835 GHz and the power output is 2 5 mW max Do not use the product in health care facilities if any regulat...

Страница 12: ...r swimming pools 999 and 112 can be dialled on the product after accessing the outside line for the purpose of making outgoing calls to the BT emergency 999 and 112 services For Users in New Zealand This equipment shall not be set to make automatic calls to the Telecom 111 Emergency Service The grant of a Telepermit for any item of terminal equipment indicates only that Telecom has accepted that t...

Страница 13: ...For Users in Russia and Ukraine Operating Instructions 13 Additional Information ...

Страница 14: ...d the Directives 2002 96 EC and 2006 66 EC By disposing of these products and batteries correctly you will help to save valuable resources and prevent any potential negative effects on human health and the environment which could otherwise arise from inappropriate waste handling For more information about collection and recycling of old products and batteries please contact your local municipality...

Страница 15: ...Making a Call 65 Making a Call from the Contact List 66 Dialling by Using Call Logs 68 Redialling the Last Number You Dialled Last Number Redial 69 One touch Dialling 70 Receiving Calls 71 Receiving a Call 71 Redirecting Calls 71 During a Conversation 72 Holding a Call 73 Receiving a Second Call Answering Call Waiting 74 Talking to Two Parties Alternately Call Splitting 74 Transferring a Call Call...

Страница 16: ...g Do Not Disturb DND Override 91 If a Host PBX is Connected 92 Accessing External Services External Feature Access EFA 92 PBX Feature List 93 Contact Management 113 Managing Your Personal Contacts 113 Adding a Contact 113 Editing a Contact 114 Deleting a Contact 115 Details for Contacts 115 Managing the PBX s System Speed Dial Entries 118 Settings and Customisation 121 User Options 121 Password Se...

Страница 17: ...r Log 174 Maintaining the KX NT400 174 Data Maintenance 174 Initialising the KX NT400 176 Restarting the KX NT400 176 Cleaning the KX NT400 177 Appendix 178 Specifications 178 Programming Items 179 User Options 179 Administrator Options 185 Firmware Version Update 189 SD Memory Cards 190 Important Information 190 Compatible SD Memory Cards 190 Inserting and Removing SD Memory Cards 190 Write Prote...

Страница 18: ...lus Pen 1 Optional Accessories AC Adaptor Bluetooth Module Headset KX A420 PSLP1662 KX NT307 PSLP1528 For KX NT400NE users and KX NT400RU users KX TCA89 For KX NT400X users in South America KX TCA87 For all other KX NT400X users KX TCA86 KX TCA92 18 Operating Instructions Before Operating the Telephone ...

Страница 19: ... of Controls Front View Note The KX NT400 s appearance varies by country or area KX NT400NE KX NT400X A D E H G B F I C J KX NT400RU A D E H G B F I C J Operating Instructions 19 Before Operating the Telephone ...

Страница 20: ...ands free operations When the SP PHONE is used the lamp next to the SP PHONE button turns red HOLD Used to put a call on hold TRANSFER Used to transfer a call to another party CANCEL Used to cancel the selected item MIC Used for hands free conversation Navigator Key Used to adjust the volume or select desired items ENTER Used to assign the selected item Handset Hook Keeps the handset stable 20 Ope...

Страница 21: ...Slot Used to insert an SD memory card SD memory cards are used to backup and restore personal settings and data For details see SD Memory Cards Page 190 USB Port Used to connect a USB keyboard Operating Instructions 21 Before Operating the Telephone ...

Страница 22: ...Left Side View C A D B Handset Handset Jack Headset Jack Handset Cord For details see Connections Page 158 22 Operating Instructions Before Operating the Telephone ...

Страница 23: ...luetooth Module Socket For details see Bluetooth Headset Connections Page 161 Operation Board Angle Adjust Button Used to adjust the angle of the operation board For details see Operation Board Angle Adjustment Page 25 Operating Instructions 23 Before Operating the Telephone ...

Страница 24: ...Bottom View LAN Port PC Port DC Jack For details see Connections Page 158 24 Operating Instructions Before Operating the Telephone ...

Страница 25: ...he lock click and then release the button CAUTION Hold the operation board until it is secured at the desired angle Make sure you do not pinch your fingers when raising or lowering the operation board Do not squeeze the LCD touch screen when adjusting the operation board applying too much pressure will damage the screen To raise 1 Hold the base of the unit with one hand 2 Gently lift the operation...

Страница 26: ...n below 2 Hold the base of the unit with one hand 3 Slightly lift the operation board to disengage the lock 4 While holding down the button tilt the board to the desired angle and then release the button 26 Operating Instructions Before Operating the Telephone ...

Страница 27: ...the Handset You can hook the handset with following operations To Hook the Handset During a Conversation 1 Hook the handset over the top edge of the unit Operating Instructions 27 Before Operating the Telephone ...

Страница 28: ...A Navigation details A Tabs and controls Soft Button or Icon Description Display the HOME screen Page 30 An orange line appears on this tab when you have new missed calls Checking Missed Calls Page 82 Calls Screen Page 39 Display the Contacts screen Page 34 Display the Calls screen Page 39 Display the Call Log screen Page 49 Display the Camera screen Page 51 28 Operating Instructions Before Operat...

Страница 29: ...utton or Icon Description Display the Chat screen Page 54 Display the Portal screen Page 56 Display the Options screen Page 60 Display additional tabs Operating Instructions 29 Before Operating the Telephone ...

Страница 30: ...ng Operations Application Lock Page 79 Turning Auto Answer on off Page 71 Redialling the Last Number You Dialled Last Number Redial Page 69 Call List mode only Adjusting the Volume Page 61 A B C Note If the Calls screen is set to Line Buttons mode some buttons and information are not displayed on the HOME screen For details about the Calls screen s modes see Calls Screen Page 39 30 Operating Instr...

Страница 31: ...e This button appears if you have set the voice mail system s extension number Accessing Voice Mail Page 81 Check new messages This button appears only when there is a new message Checking New Messages Page 80 Display the missed call log This button appears only when there is a new missed call Checking Missed Calls Page 82 Displays the current time and date Note If the Calls screen is set to Line ...

Страница 32: ... in hands free mode Auto Answer is turned on Auto Answer is turned off Receiving a Call Page 71 Indicates the ringer status The ringer is turned on The ringer is turned off Adjusting the Volume Page 61 Indicates the Bluetooth connection status Communicating with module Linking Talking Playing the background music When a Bluetooth Module is not installed these icons do not appear on the screen Blue...

Страница 33: ...n or Icon Description Redial the last number you dialled You can change the behaviour of this button so that it redials only the last outside number that you dialled Redialling the Last Number You Dialled Last Number Redial Page 69 Display Operation Settings Page 121 Display the Feature Key screen Page 58 Operating Instructions 33 Before Operating the Telephone ...

Страница 34: ... A B C LDAP Directory D E Contacts Screen Details A Local directory operations Soft Button or Icon Description Select Directory to display the contacts stored in the local directory To switch to the LDAP directory press the directory selection list and select LDAP Search Making a Call from the Local Directory Page 66 Add a new contact to your personal contacts Adding a Contact Page 113 Adding a Co...

Страница 35: ...e status of each extension s telephone For extensions using KX NT400 Icon Phone Status Presence Status Absent Message Idle Presence status not set Available Presence status On or DND for internal call Busy Presence status not set Available Presence status On or DND for internal call Ringing Presence status not set Available Presence status On or DND for internal call For extensions logged in to Co...

Страница 36: ...For details consult your administrator For other extensions Icon Phone Status Absent Message Idle Absent message not set Available Absent message On or DND for internal call Busy Absent message not set Available Absent message On or DND for internal call Ringing Absent message not set Available Absent message On or DND for internal call No Icon The line is not connected C Contact summary informati...

Страница 37: ...t Button or Icon Description Select LDAP Search to display a contact list stored in LDAP servers To switch to the local directory press the directory selection list and select Directory Making a Call from the LDAP Directory Page 67 Display the LDAP Server Select screen Search the LDAP directory for a contact Making a Call from the LDAP Directory Page 67 Display the Advanced screen from which you c...

Страница 38: ...act s name and registered phone number Also you can make a call to and display detailed information for the selected contact Making a Call from the LDAP Directory Page 67 Adding a Contact from an LDAP Directory Page 114 38 Operating Instructions Before Operating the Telephone ...

Страница 39: ...nal IP proprietary telephone IP PT This mode lets you easily access flexible keys which you can customise freely See Calls Screen in Line Buttons Mode Page 46 For details about changing the mode see Display Operation Settings Page 121 Calls Screen in Call List Mode Call List mode displays a list of all calls that you are currently handling Call handling functions that are available for the current...

Страница 40: ...splayed in square brackets internal calls only For Incoming Calls Call status icon Number of the caller up to 16 digits or name when available Group name of the caller when available Duration of call DID DDI name when available Call status icons Page 40 During a Conversation Page 72 Scroll the list on the screen Call status icons Icon Call Status Off hook Outgoing call Incoming call Active call Ca...

Страница 41: ...ee Calls Screen Button Active Call Settings Page 129 Common Soft Button or Icon Description Display the next previous page for available operations Hang up the call Mute unmute outgoing voice and sound Outgoing voice and sound is muted Outgoing voice and sound is not muted Mute Page 76 For outgoing calls Soft Button or Icon Description Leave a notification that you called to the called extension T...

Страница 42: ... 71 Redirect the selected call to your voice mailbox Redirecting Calls Page 71 For active calls Soft Button or Icon Description Record the current call to voice mail This feature requires a Panasonic Voice Processing System Recording Calls Two way Recording Page 76 Stop recording the current call Recording Calls Two way Recording Page 76 Invite a third party and establish a conference call Confere...

Страница 43: ...fer Page 75 Put the call on hold Holding a call at your extension Call Hold Page 73 Use External Feature Access EFA to access special features offered by a host PBX or a telephone company Accessing External Services External Feature Access EFA Page 92 Switch the call on hold and the current call Talking to Two Parties Alternately Call Splitting Page 74 Unlock the door that is connected to the door...

Страница 44: ...Soft Button or Icon Description You can receive a callback ringing notification from an extension when it becomes available This button appears only for internal calls Reserving a Busy Line Automatic Callback Busy Page 91 Send the called extension a call waiting signal This button appears only for internal calls Sending a Call Waiting Notification Call Waiting Page 90 Leave a notification that you...

Страница 45: ...versation Executive Busy Override Page 91 For Do Not Disturb calls Soft Button or Icon Description Override Do Not Disturb Overriding Do Not Disturb DND Override Page 91 For parked calls Soft Button or Icon Description Retrieve the selected parked call Holding a Call in a System Parking Zone Call Park Page 73 Operating Instructions 45 Before Operating the Telephone ...

Страница 46: ...y Operation Settings Page 121 The buttons along the lower right edge of the screen indicated by D MSG INT etc can also be displayed as icons The screen shots in this manual show the text buttons For details about changing this setting see Display Operation Settings Page 121 D C B A Calls Screen in Line Buttons Mode Details A Soft buttons Soft Button or Icon Description Soft buttons Use these butto...

Страница 47: ... waiting indication this button s light blinks red Checking Message Waiting Page 80 Leaving a Message Waiting Indication Page 90 Used to make or receive intercom calls When you have seized the intercom line this button s light lights green Used to mute the microphone during a conversation When mute is active this button s light blinks red Mute Page 76 Used to disconnect the current call and make a...

Страница 48: ...tton or Icon Description Used to redial the last outside phone number that you dialled Redialling the Last Number You Dialled Last Number Redial Page 69 48 Operating Instructions Before Operating the Telephone ...

Страница 49: ...e available on this screen Dialling by Using Call Logs Page 68 Adding a Contact from a Call Log Page 113 A B Call Log Screen Details A Call log selection Soft Button or Icon Description Display the Outgoing call log Display the Incoming call log Display the Missed call log Operating Instructions 49 Before Operating the Telephone ...

Страница 50: ...led information Call log icons Page 50 Dialling by Using Call Logs Page 68 Adding a Contact from a Call Log Page 113 Scroll the log list on the screen Scroll to the top bottom of the log list on the screen Call log icons Icon Outgoing Incoming Missed Outgoing Answered Call Incoming Received Call Outgoing Unanswered Call Incoming Missed Call Incoming Missed Call 50 Operating Instructions Before Ope...

Страница 51: ...ons related to cameras Network Camera Page 85 B C A Camera Screen Details A Camera display Soft Button or Icon Description Shows the selected camera s video feed Adjusting the Angle of the Camera Page 86 Operating Instructions 51 Before Operating the Telephone ...

Страница 52: ...lay Selecting Cameras to View Page 85 IP Camera Settings Page 125 Choose a preset viewing angle for the selected camera Adjusting the Angle of the Camera Page 86 1 Zoom in the view Zooming In and Out Page 85 1 Zoom out the view Zooming In and Out Page 85 1 Show hide the pan and tilt buttons on the camera view Adjusting the Angle of the Camera Page 86 1 Switch to full screen mode Full Screen Mode P...

Страница 53: ...oice and sound is muted Outgoing voice and sound is not muted Mute Page 76 During a conversation with a doorphone open the door connected to a doorphone camera Opening Doors Page 86 1 Depending on the camera model this operation might not be available or it might not function due to security settings etc Operating Instructions 53 Before Operating the Telephone ...

Страница 54: ...hat Page 87 Making a Call to a Chat Participant Page 87 A B Chat Screen Details A Chat area Soft Button or Icon Description Scroll the chat log on the screen B Chat controls Soft Button or Icon Description Display hide the soft keyboard The soft keyboard is not displayed The soft keyboard is displayed Using the Soft Keyboard Page 63 Shows the name or the extension number of the other chat particip...

Страница 55: ...message you typed in the message input box Clear the text in the message input box Make a call to the other chat participant End the chat The other chat participant will be disconnected Operating Instructions 55 Before Operating the Telephone ...

Страница 56: ...creen controls Soft Button or Icon Description Select an intranet Web page from the Web page list Navigating Web Pages Page 88 Show the previous or next Web page Navigating Web Pages Page 88 Reload the current Web page Navigating Web Pages Page 88 Display your homepage Navigating Web Pages Page 88 56 Operating Instructions Before Operating the Telephone ...

Страница 57: ...ton or Icon Description Display hide the soft keyboard The soft keyboard is not displayed The soft keyboard is displayed Using the Soft Keyboard Page 63 Operating Instructions 57 Before Operating the Telephone ...

Страница 58: ...ey screen is accessed by pressing Feature on the HOME screen For details about the HOME screen see HOME Screen Page 30 If the Calls screen is set to Line Buttons mode you cannot access this screen All of the functions available on this screen can be performed on the Calls screen For details see Calls Screen in Line Buttons Mode Page 46 Feature Key Screen Details A Soft buttons Soft Button or Icon ...

Страница 59: ...ature key page C Feature keys Soft Button or Icon Description You can customise the flexible buttons by assigning functions to them Customising the Flexible Buttons Page 142 Return to the HOME screen HOME Screen Page 30 Operating Instructions 59 Before Operating the Telephone ...

Страница 60: ...1 Administrator Options Page 130 A Options Screen Details A Options screen details Soft Button or Icon Description Shows the extension number and name registered for your extension Display the User Options screen User Options Page 121 Display the Administrator Options screen Administrator Options Page 130 60 Operating Instructions Before Operating the Telephone ...

Страница 61: ...me function as going on hook Hands free Mode In hands free mode you can talk and hear the other party in a conversation without using the handset This mode is useful for performing other tasks during a conversation such as writing Enabling hands free mode You can enable hands free mode in one of the following ways In stand by mode i e when you have no active calls press SP PHONE During a conversat...

Страница 62: ...r key use the stylus pen to select it instead Usage tips Highlighted items are displayed with a yellow background Some operations require you to use the Navigator key to highlight an item before performing an action on it In this manual when you must use the Navigator key to perform an operation it will be explicitly written For example Use the Navigator key to highlight Scrolling Pages If there i...

Страница 63: ... Press Cancel to close the soft keyboard window without changing the original contents of the text field Usage tips Some screens such as the Contacts and Chat screens contain a soft keyboard button Press to display and hide the soft keyboard To use the Shift key press Shift once and then press the desired key The keys will then return to their original characters You do not need to hold Shift down...

Страница 64: ...rd at any time 1 User supplied Note The USB port is located on the right side of the KX NT400 See Right Side View Page 21 For details about connecting a USB key board see Connections for a USB Device Page 160 Using the Dial Keys You can use the dial keys to enter text as well as numbers See Entering Characters Page 155 64 Operating Instructions Before Operating the Telephone ...

Страница 65: ...all You can call an extension or a group assigned as the operator See Operator Call Page 108 Usage tips After you dial the Calls screen appears For details see Calls Screen Page 39 Note If you want to dial a phone number on the Contacts screen using the dial keys press and then enter the phone number When you finish dialling go off hook or press to connect the call Calling an Outside Party You hav...

Страница 66: ...For details about configuring LDAP server settings see LDAP Server Settings Page 130 Note When you display the Contacts tab the previously selected directory is displayed The first time you display the Contacts tab the local directory is displayed Making a Call from the Local Directory 1 Press the Contacts tab 2 If necessary press the directory selection list and select Directory 3 To search for a...

Страница 67: ... icons and buttons on the Contacts screen see Contacts Screen Page 34 Note You cannot search directories that are not displayed To display hide directories see Directory List Select Settings Page 124 Making a Call from the LDAP Directory 1 Press the Contacts tab 2 If necessary press the directory selection list and select LDAP Search 3 To search for a contact start entering the contact s name For ...

Страница 68: ...o select a different LDAP server For details about specifying LDAP server information see LDAP Server Settings Page 130 For details about the icons and buttons on the Contacts screen see Contacts Screen Page 34 Dialling by Using Call Logs The last 100 incoming calls outgoing calls and missed calls are stored in their respective logs in order of newest to oldest call You can make calls to the conta...

Страница 69: ...eate a personal contact for any doorphones sensors that you will receive calls from Doing so ensures that the registered name always appears in the call log Redialling the Last Number You Dialled Last Number Redial Operation in Call List mode You can redial the last number that you dialled By default this operation redials both extension numbers and outside phone numbers 1 On the HOME screen go of...

Страница 70: ... from the buttons 1 6 3 Select the desired party and go off hook 4 To end the call go on hook Operation in Line Buttons mode 1 On the Calls screen select the list number of the desired party from the buttons 1 6 2 Select the desired party and go off hook 3 To end the call go on hook Usage tips For details about creating One touch dialling buttons see Customising the Flexible Buttons Page 142 70 Op...

Страница 71: ...recting Calls Page 71 If you press Close on the Call Alert window the window will close but the call will continue ringing When you receive another call while the Call Alert window is displayed the following window appears to Calls Display the Calls screen Close Close the window Note For incoming calls from outside lines the KX NT400 can display up to 16 digits of the caller s phone number Redirec...

Страница 72: ...etails about Line Buttons mode see Calls Screen in Line Buttons Mode Page 46 Usage tips You can configure the KX NT400 to redirect all incoming calls to a specified destination For details see Call Forwarding Do Not Disturb Page 83 During a Conversation When you start a conversation the Calls screen appears Calls screen in Call List mode Calls screen in Line Buttons mode This section explains how ...

Страница 73: ...lso retrieve another extension s held call by programming that extension as a flexible button For details about feature numbers for holding and retrieving calls see Call Hold Page 98 For details about programming flexible buttons see Customising the Flexible Buttons Page 142 Holding a Call in a System Parking Zone Call Park You can hold a call in a common parking zone Calls held in a parking zone ...

Страница 74: ...eminder Call Park Recall If an outside call is not retrieved within a specified time it is automatically disconnected If you hear a reorder tone when retrieving a parked call there is no held call Confirm the stored parking zone number After you park a call you can perform other operations Receiving a Second Call Answering Call Waiting During a conversation if a second call arrives the Call Alert ...

Страница 75: ...u can configure the KX NT400 so that the Dial window appears when you press Transfer the Call For details see Display Operation Settings Page 121 Operation in Line Buttons mode To transfer a call 1 Press TRANSFER 2 Call the party you want to transfer the call to For details see Making Calls Page 65 3 Wait until the other party answers to announce the transfer This step can be omitted 4 Go on hook ...

Страница 76: ... the voice mail extension number For details see Dial Number Settings Page 123 Operation in Call List mode To record a conversation 1 On the Calls screen select the call you want to record 2 Press Record the call To stop recording 1 On the Calls screen select the call you are recording 2 Press Stop Recording Operation in Line Buttons mode To record a conversation 1 On the Calls screen press the fl...

Страница 77: ...e the conference at any time by going on hook Up to 8 parties intercom and outside lines can participate in a conference call Calls screen during a conference call in Call List mode Making a Conference Call During a conversation you can call another party and establish a conference call Operation in Call List mode 1 Make a call to the first party you want to include in the conference For details s...

Страница 78: ...maining party or parties Operation in Line Buttons mode 1 Press TRANSFER once or twice to establish a conversation with the party to be disconnected The other party will be put on hold 2 On the Calls screen press FLASH This will disconnect the party 3 On the Calls screen do one of the following Press the flashing green flexible button that corresponds to the original party Press INT if it is flash...

Страница 79: ...parties and have the conversation continue your extension must be enabled to transfer calls to outside lines through COS programming Locking Operations Application Lock The Application Lock feature lets you restrict operation to only a few operation screens When you set the Application Lock you can still access some screens such as the HOME and Calls screens If you try to access a screen that is l...

Страница 80: ... selected party If you call back the party that left the message waiting and the party answers the message will be removed from the message waiting list If the Calls screen is set to Line Buttons mode you can also check message waiting by pressing on the Calls screen You can delete the message waiting by pressing Checking Messages Stored on the Simplified Voice Message SVM System If SVM is configu...

Страница 81: ...rieve Voice Message button is only displayed if you have set the voice mail system s extension number For details see Dial Number Settings Page 123 Accessing Voice Mail You can access your voice mailbox from the HOME screen 1 On the HOME screen press Access Voice Mail You will be connected to the voice mail system Follow the audio guidance Note The Access Voice Mail button is displayed if you have...

Страница 82: ...g away from your desk etc The KX NT400 has several preset presence statuses that you can select You can also create custom presence statuses 1 On the HOME screen press the first drop down list 2 On the Presence Select window select the desired presence status If you have created additional presence statuses press Custom to display them Press Options to enter a custom presence status For details se...

Страница 83: ...age 155 For a full list see the documentation for the PBX Call Forwarding Do Not Disturb You can have incoming calls automatically forwarded to another destination You can also have incoming calls rejected Do Not Disturb Simple Call Forwarding Settings You can set one forwarding destination for external and internal calls 1 On the HOME screen press the second drop down list If call forwarding or D...

Страница 84: ...busy or do not answer after a set amount of time 1 Do not disturb Reject incoming calls If you want to apply the same settings to both types of calls select the For both external calls and internal calls check box 4 Enter a forwarding destination for external and internal calls See Entering Text Page 63 5 Press OK Usage tips On the Advanced window you can press Standard to display the simple call ...

Страница 85: ...ions might not function due to security reasons etc For details consult your administrator If a camera feed does not display see Troubleshooting Page 192 for assistance If you put a call on hold while you are viewing the Camera screen the display will change to the Calls screen Selecting Cameras to View You can use the Location list or quick access buttons to select the camera you want to view Loc...

Страница 86: ...ress the Position drop down list and then select the position you want to view Note Positions are programmed via the camera s settings and cannot be programmed from the KX NT400 If a position name contains non ASCII characters the position name will appear garbled The text Preset is always displayed in the Position drop down list even after you select a programmed position Opening Doors If you are...

Страница 87: ...the message you entered to the other chat participant Clear Erase the text in the input box Call Call the other chat participant Close End the current chat During a chat you can use all of the KX NT400 s features To return to the Chat screen press the Chat tab Use and or UP and DOWN on the Navigator key to scroll through the chat log You can view up to 200 previous messages when scrolling through ...

Страница 88: ...ing Page 192 for assistance Navigating Web Pages The KX NT400 provides controls along the top of the Portal screen for navigating Web pages Press this list to view a list of Web pages that you have registered In the list press the page you want to view to load it For details about registering Web pages see Portal Settings Page 126 Press these buttons to view the previous or next page in your brows...

Страница 89: ...ou are off hook when you press a link that points to a phone number the number will be dialled immediately You cannot use the dial keys to edit the number displayed in the Dial window when you are making a call from a Web page Operating Instructions 89 Advanced Feature Operation ...

Страница 90: ...ly for internal calls Leaving a Message Waiting Indication When the called party is busy or does not answer your call you can leave a notification so that the called party can call you back Operation in Call List mode 1 On the Calls screen press Leave message waiting Operation in Line Buttons mode 1 On the Calls screen press MSG Note This feature is available only for internal calls Leaving a Voic...

Страница 91: ... Note If you do not answer the callback ringing within 10 seconds this feature will be cancelled Joining an Existing Conversation Executive Busy Override If your extension has sufficient privileges you can call a busy party and establish a 3 party conference Operation in Call List mode 1 On the Calls screen press Override Conference You will join the called party s conversation and establish a 3 p...

Страница 92: ...l Operation in Call List mode 1 During an outside conversation on the Calls screen press Send Flash 2 If required enter the service code for the feature you want to access Operation in Line Buttons mode 1 During an outside conversation on the Calls screen press FLASH 2 If required enter the service code for the feature you want to access Note For operation in Line Buttons mode the FLASH button mus...

Страница 93: ... to extension users and check their telephone usage You can specify an account code for each client and check the call duration account code outside phone no Alternate Calling Ring Voice The caller can alternate the alerting method either ring or voice when making an intercom call On the other hand any extension can set the alerting method either ring or voice when receiving an intercom call Autom...

Страница 94: ...e announcement simply by going off hook They can send a notification tone if they want to join the conversation broadcasting group no 1 digit Built in Simplified Voice Message SVM Your PBX can provide you with answering machine service Your extension is assigned a message box into which callers can leave voice messages for you After callers reach your message box they will hear your personal greet...

Страница 95: ...ure Busy No answer floating extension no for the SVM feature Note The default floating extension number for the SVM feature is 591 To leave a voice message directly to another extension mailbox extension no To listen to voice message or To listen to voice message by skipping to the desired message Press MESSAGE until desired SVM Log appears go off hook To clear the voice message that you are liste...

Страница 96: ...nditional Call Forwarding Unconditional CFU When your extension is busy Call Forwarding Busy CFB When you do not answer Call Forwarding No Reply CFNR To set outside line no multiple subscriber no Unconditional Busy No Reply phone no To cancel outside line no multiple subscriber no To confirm outside line no multiple subscriber no 96 Operating Instructions PBX Feature List ...

Страница 97: ... Me from another extension Both Calls Outside Calls Intercom Calls your extension no To cancel Follow Me from another extension Both Calls Outside Calls Intercom Calls your extension no To set the timer for No answer and Busy No answer second To set Call Forwarding for your Incoming Call Distribution ICD Group Both Calls Outside Calls Intercom Calls ICD group extension no phone no To cancel Call F...

Страница 98: ...ailbox Feature key screen 1 Voice Mail Transfer DSS To listen to message voice mail extension no Note The default voice mail extension number is 500 Call Hold You can put a call on hold Holding a call at your extension Call Hold Page 73 To hold a call TRANSFER To retrieve a call To retrieve a call by specifying a held line number outside line no which is held 3 digits To retrieve a call by specify...

Страница 99: ...mon parking zone of the PBX so that any extension can retrieve the parked call You can use this feature as a transferring feature Holding a Call in a System Parking Zone Call Park Page 73 To set specified TRANSFER parking zone no 2 digits To set automatically TRANSFER To retrieve stored parking zone no 2 digits Call Pickup You can answer an incoming call that is ringing at another extension or gro...

Страница 100: ...ension is letting you know a call is waiting Answering Call Waiting from the Telephone Company This is an optional telephone company service You can receive a call waiting tone and the caller s information For details consult your telephone company Receiving Call Waiting During a conversation you can be informed of a call waiting with a tone or voice announcement through your built in speaker or h...

Страница 101: ...y screen 1 Conference go on hook To return while others are talking Feature key screen 1 flexible button INT corresponding to original party Connected Line Identification Restriction COLR When receiving an outside call you can select whether the caller can see your telephone number or not To show To prevent Data Line Security You can protect the line against audible notification tones such as a ca...

Страница 102: ...n All Security Mode only DISA phone no your extension no verification code extension PIN verification code PIN extension no To call an outside party In No Security Mode DISA phone no outside phone no To call an outside party In Trunk Security Mode All Security Mode DISA phone no your extension no verification code extension PIN verification code PIN outside phone no To retry phone no DND Override ...

Страница 103: ...ing System Reset Page 176 To set an extension to Service out status To set an extension to Service in status and have your own settings available your extension no extension PIN Executive Busy Override The preprogrammed extension can call someone who is busy on the telephone and establish a three party conversation Joining an Existing Conversation Executive Busy Override Page 91 phone no Executive...

Страница 104: ...e made if a third party discovers your password extension PIN The cost of such calls will be billed to the owner renter of the PBX To protect the PBX from this kind of fraudulent use we strongly recommend a Keeping your PIN secret b Selecting a complex random PIN that cannot be easily guessed c Selecting complex random PINs that cannot be easily guessed d Changing your PIN regularly Valid numbers ...

Страница 105: ...receive an alert call from an external sensor e g security alarm connected to the PBX Off hook Group Paging You can make a voice announcement to proprietary telephones or external speakers or both in the preset group simultaneously To page paging group no 2 digits To answer To deny Paging Deny To allow Hands free Answerback You can answer an incoming call without going off hook as soon as the line...

Страница 106: ...current Timed Reminder setting for a room extension To set extension no hour minute AM PM once daily or extension no hour minute once daily To cancel extension no To confirm extension no Hot Line You can make an outside call simply by going off hook if you have preprogrammed your phone To store phone no To set To cancel ISDN Service Access You can access services provided by the ISDN Feature key s...

Страница 107: ... up Malicious Call Identification MCID You can ask your telephone company to trace a malicious calling party during a conversation or after the calling party hangs up You will receive the information on the malicious call later on TRANSFER Manual Queue Redirection When your incoming call distribution group is busy and other outside calls arrive the arriving calls are put in a waiting queue Extensi...

Страница 108: ...t to monitor that extension will also stop monitoring another PBX extension no Off hook Monitor You can let other people in the room listen to the conversation through the speaker while continuing the conversation using the handset SP PHONE Operator Call You can call an extension or a group assigned as the operator Making a Call Page 65 Note The operator call number default varies depending on cou...

Страница 109: ...ess an extension user group or outside party without operator assistance 2 Incoming Call Distribution Group message Used to greet and guide callers to an incoming call distribution group 3 Timed Reminder message Used for a wake up call message when the extension answers the Timed Reminder To record Options tab Administrator Options Programming OGM floating extension no AUTO DIAL STORE To play back...

Страница 110: ...s stored in the PBX system speed dialling no 3 digits Three party Conference 3PTY by ISDN You can add third party during a conversation using the ISDN service TRANSFER phone no Talk TRANSFER TIE Line Access You can access extensions connected to other PBXs in a private network private phone no Timed Reminder You can receive an alarm at your telephone to remind you of a meeting appointment or as a ...

Страница 111: ... way Transfer You can record a conversation into another mailbox while talking on the phone Feature key screen 1 Two way Transfer DSS One touch Two way Transfer You can record a conversation into another mailbox with one touch while talking on the phone Feature key screen 1 One touch Two way Transfer Trunk Busy Out When a problem is found on a certain outside line the PBX automatically makes it un...

Страница 112: ...creen is set to Call List mode Press Feature If the Calls screen is set to Line Buttons mode Press the Calls tab For details about the Calls screen see Calls Screen Page 39 112 Operating Instructions PBX Feature List ...

Страница 113: ...ries manually See Adding a Contact Page 113 Adding entries from the call log See Adding a Contact from a Call Log Page 113 Adding entries from the system speed dialling directory and the extension directory See Adding a Contact from the PBX Page 114 Adding entries from an LDAP directory See Adding a Contact from an LDAP Directory Page 114 Usage tips You can add up to 300 personal contacts Adding a...

Страница 114: ...ling directory and extension directory the corresponding check boxes have to be selected in the Directory List Select settings See Directory List Select Settings Page 124 3 Press 4 Fill in the fields as necessary For details about the fields see Details for Contacts Page 115 5 Press OK Adding a Contact from an LDAP Directory You can add new personal contacts from an LDAP directory 1 On the Contact...

Страница 115: ...ntact Information Phone Number Office Enter the contact s office phone number Use this field for extension numbers within your organisation Maximum 64 digits Allowed characters P pause 0 9 Phone Number Mobile Enter the contact s mobile phone number Maximum 64 digits Allowed characters P pause 0 9 Phone Number Home Enter the contact s home phone number Maximum 64 digits Allowed characters P pause 0...

Страница 116: ... 1 65535 Note Consult your administrator to obtain the correct values for the camera settings Door Use the Door contact type for doorphones Page 1 3 Basic Information Door Phone Name required Enter the name to assign for the door phone Maximum 32 characters Door Phone Number required Enter the number of the doorphone Maximum 2 digits Allowed characters P pause 0 9 Note If you enter only 1 digit in...

Страница 117: ...sor Use the Sensor contact type for sensors such as motion sensors that are connected to the PBX Page 1 3 Basic Information Sensor Name required Enter the name to assign for the sensor Maximum 32 characters Sensor Number required Enter the number of the sensor Maximum 2 digits Allowed characters P pause 0 9 Note If you enter only 1 digit in Sensor Number a 0 is added to the beginning of the number...

Страница 118: ...ng entries includes adding new entries and editing and deleting existing entries System speed dial entries are stored on the PBX and are accessible by other extension users Any changes you make affect all PBX users To add a system speed dial number from your local directory 1 On the Contacts screen make sure the local directory is displayed 2 Select the contact you want to add 3 Press The Speed Di...

Страница 119: ...dd to Speed Dial button will be unavailable To modify a system speed dial number 1 On the Contacts screen make sure the local directory is displayed 2 Select the system speed dial number you want to modify Note To display the system speed dialling directory it must be selected in the Directory List Select settings See Directory List Select Settings Page 124 3 Press 4 Edit the fields as necessary F...

Страница 120: ...ple if you enter 1 it is saved as 001 Value range 000 999 Phone Number Enter the phone number that will be called when this speed dial number is dialled When you enter an outside number be sure to enter the outside line access number as the first digit in the number If you do not include this number you will be prompted to add it when you press OK Maximum 32 digits Allowed characters P pause 0 9 P...

Страница 121: ...gs Page 121 3 Press OK Usage tips For details about using the Application Lock see Locking Operations Application Lock Page 79 Details for Password Settings Application Lock Select whether to enable the Application Lock feature Default Don t use Current Password When you are changing the password enter the current password in this box New Password When you are changing the password enter the new p...

Страница 122: ...sed the LCD does not turn off Instead a message indicating that you have missed calls is displayed Page 2 5 Touch Screen Sound Select whether the KX NT400 gives audio feedback when you perform operations on the screen Default Off Touch Screen Calibration Press Calibration to calibrate the touch screen Follow the on screen instructions to perform calibration Calibrating the screen ensures that the ...

Страница 123: ... screen when you press either Transfer the Call or Make a conference on the Calls screen This setting is effective only when the Calls screen is set to Call List mode Display Contacts Screen default Display the Contacts screen Display Dial Popup on Contacts Screen Display the Contacts screen and display the Dial window over it Dial Number Settings The Dial Number settings allow you to enter the vo...

Страница 124: ...Default English US Built in languages English US English UK French French CA German Spanish Italian Portuguese Russian Ukrainian Another Select Another and then press to select the display language from an SD memory card Language files must be stored in the following directory on the SD memory card private meigroup pcc pbxpt nt400 Note This language setting is not effective for the sub display on ...

Страница 125: ...gister in your local directory To register or edit a camera 1 Press the Options tab User Options IP Camera To register a new camera a Press To edit a camera a Select a camera and then press 2 Enter the camera s information as necessary See Details for IP Camera Settings Page 125 3 Press OK To delete a camera 1 Press the Options tab User Options IP Camera 2 Select a camera and then press 3 On the c...

Страница 126: ...To assign cameras to the selection buttons 1 Press the Options tab User Options IP Camera Selection Buttons 2 Assign cameras to the buttons as desired See Details for IP Camera Selection Buttons Settings Page 126 3 Press OK Usage tips For details about the selection buttons screen see Selecting Cameras to View Page 85 For details about the Camera screen see Camera Screen Page 51 Details for IP Cam...

Страница 127: ...t Web page Maximum 256 characters Note The KX NT400 does not support the DNS Domain Name Server protocol Therefore URLs cannot contain domains such as www example com You can only use URLs with IP addresses such as 192 168 0 1 nt400 list html For details consult your administrator Presence Settings The Presence settings allow you to customise your presence buttons e g Available or In a Meeting In ...

Страница 128: ... external calls Always All Dial 0123456 Presence Setting Example 2 In addition to forwarding your calls while you are away you might want to keep others from making calls from your phone This can be accomplished by assigning the Extension Dial Lock feature number to the Not at My Desk presence To do this configure the settings as follows Modify screen see Details for Presence List Settings 2 2 Pag...

Страница 129: ...ernal and internal calls Always All Forward all calls Busy Only forward calls when you are busy i e on a call No answer Only forward calls when you do not answer the phone after a set amount of time 1 Busy No answer Forward calls when you are busy or do not answer after a set amount of time 1 Do not disturb Reject incoming calls Not Assigned Do not forward or reject calls Dial If you selected a fo...

Страница 130: ...ngs To configure LDAP Server settings 1 Press the Options tab Administrator Options LDAP Server 2 Select an operation To add a new LDAP server a Press See Details for LDAP Server Settings Page 130 To edit an LDAP server s configuration a Select an LDAP server b Press See Details for LDAP Server Settings Page 130 To delete an LDAP server a Select an LDAP server b Press c On the confirmation dialogu...

Страница 131: ...ter than the Min number of digits of an outside line setting the dialled number is treated as an outside call To configure Dial Modification settings 1 Press the Options tab Administrator Options Dial Modification 2 Configure the dial modification settings See Details for Dial Modification Settings Page 131 3 Press OK Setting Example This example illustrates how different numbers are modified for ...

Страница 132: ...owed characters P pause 0 9 Default values If International area code is 1 Entry 7 0 Entry 8 1 Entry 9 1 Entry 10 If International area code is 7 Entry 7 0 Entry 8 8 Entry 9 7 Entry 10 For all other values of International area code Entry 9 International area code Entry 10 Add Number 1 10 Enter the digits to add to the beginning of a dialled telephone number after removing leading digits When a te...

Страница 133: ...bols Allowed characters P pause 0 9 Default values If International area code is 1 1 If International area code is 7 8 For all other values of International area code blank Operating Instructions 133 Settings and Customisation ...

Страница 134: ... for the feature as necessary See Feature Programming Page 135 5 Press EXIT to exit Note To continue programming other features repeat the above procedure from step 2 During programming you can only use the dial keys to enter characters Pressing P allows you to access buttons normally found on ordinary IP PTs as hard keys Usage tips Once you enter programming mode step 2 in the above procedure you...

Страница 135: ...h internal and external calls regardless of this setting Calls Screen Page 39 Speed Dial Store frequently dialled numbers in your contact list Managing Your Personal Contacts Page 113 Hot Line Would you like to dial a preset number simply by going off hook desired no max 32 digits Do not use Use Calling Line Identification Restriction CLIR Should you prevent your number being displayed on the call...

Страница 136: ...o answer when you go off hook No line The longest ringing line when multiple calls arrive CO button no 01 48 A CO ICD Group button or PDN button A PDN button Alternate Receiving Ring Voice How do you prefer to receive an intercom call Ringing Tone Call Directly The party s voice is heard without ringing Ring only Prohibiting the caller switching to the voice mode Forced Answerback Selection Do you...

Страница 137: ...to receive call waiting notifications for intercom calls No call Off Tone BSS Voice announcement through the handset Whisper OHCA Call Waiting Tone Type Selection Which type of call waiting tone do you prefer Tone 1 Tone 2 Absent Message Would you like to show a message on the caller s telephone display Set your absent message presence status via the HOME screen Presence Status Setting Page 82 Per...

Страница 138: ...rohibit paging announcements No Allow Yes Deny Key Pad Tone Set Do you prefer to hear the key pad tone Note Changing this setting affects key tone for only physical keys and buttons No Off Yes On Background Music BGM Do you want background music through your telephone speaker while on hook No Off BGM no 1 digit Yes On Bluetooth Registration To register a Bluetooth wireless headset on your extensio...

Страница 139: ...igits To unlock extension PIN max 10 digits To lock One touch Dialling Assignment Mode Selection Do you prefer to set the One touch dialling only No Normal Any Flexible buttons can be modified Yes Only One touch dial keys can be modified However to modify them there is no need to enter 2 before the number 1 This setting applies to both outside and intercom calls For intercom calls this feature mus...

Страница 140: ...on Disable Live Call Screening Mode Set Hands free mode LCS Mode Set After Answering Stop recording Automatic Call Waiting Off Manual Call Waiting Intercom Calls Off No call No tone Call Waiting Tone Type Selection Tone 1 Absent Message Off Personal Absent Message Cleared Call Forwarding FWD Do Not Disturb DND Intercom Outside Calls Off FWD N A Timer 15 seconds Call Pickup Deny Allow Headset Opera...

Страница 141: ...ess EXIT Usage tips You can also reset the features on the Feature Key screen or the Calls screen in Line Buttons mode For details see Feature Key Screen Page 58 and Calls Screen in Line Buttons Mode Page 46 Note If you do not want the Call Waiting FWD DND or Hot Line to be cleared by this feature please ask your dealer Operating Instructions 141 Settings and Customisation ...

Страница 142: ...ible buttons work as Single CO S CO button by default Programming Screen The flexible buttons lights on the Programming screen indicate their status Button Name Light Status Meaning FWD DND Off Both features are not set Red on FWD mode Flashing red slowly DND mode AUTO ANS MUTE Off Normal Red on Auto Answer ON INT INTERCOM Green on The extension is seized by you To customise flexible buttons 1 Pre...

Страница 143: ... press EXIT Usage tips In step 5 in the procedure above you can also use the Navigator key to scroll through the programmable features and to select parameters You can exit the programming procedure at any time by lifting the handset You can also customise the flexible buttons on the Feature Key screen or the Calls screen in Line Buttons mode For details see Feature Key Screen Page 58 and Calls Sc...

Страница 144: ...e group arrive at this button Programming Input Outside line group no 2 digits The G CO button light shows the current status as follows Green on The outside line is seized by you Red on The outside line is busy Regular Hold mode Flashing green slowly Your held call Flashing red Another extension s held call Exclusive Call Hold mode Flashing green moderately Your held call Single CO S CO 1 Used to...

Страница 145: ...delayed ringing time 0 7 3 For monitoring and changing the Log in Log out status of extensions the DSS button light shows the current status as follows Off The extension is not in the group Green on Log in Ready mode Flashing green Log in Not Ready mode Red on Log out mode Message Used to leave a message waiting indication or call back the party who left the message waiting indication Programming ...

Страница 146: ...rogramming Input The FWD DND button light shows the current status as follows Off Both features are not set Red on FWD mode Flashing red slowly DND mode Group FWD Both calls Used to forward all the calls to your group to a specified destination Programming Input Incoming call distribution group extension no The Group FWD button light shows the current status as follows Off No set Red on FWD mode G...

Страница 147: ...gramming Input Terminate Used to disconnect the current call and make another call without hanging up Programming Input External Feature Access EFA Used to access special features offered by a host PBX or a telephone company Programming Input Call Charge Reference Used to check the total call charge for your own extension Programming Input Call Park Used to park or retrieve a call in a preset park...

Страница 148: ...tton for another incoming call distribution group Programming Input Incoming call distribution group extension no The Log in Log out of a specified group button light shows the current status as follows Off Log in mode Red on Log out mode Log in Log out for all groups Used to have a Log in Log out button for all groups Programming Input Hurry up Used to transfer the longest waiting call in the que...

Страница 149: ...enant no The Time Service Day Night Lunch Break button light shows the current status as follows Off Day mode Green on Lunch mode Flashing green Break mode Red on Night mode Flashing red Holiday mode Answer Used to answer an incoming call Programming Input Release Used to disconnect the line during or after a conversation or to complete a Call Transfer Programming Input Toll Restriction Call Barri...

Страница 150: ...eset COLR button while on hook The COLR button light shows the current status as follows Off shows your telephone number Red on prevents your telephone number being displayed ISDN Hold Used to transfer a call using telephone company Programming Input Headset Used to talk using the headset Programming Input The Headset button light shows the current status as follows Off Headset mode off Red on Hea...

Страница 151: ...e and receive both outside and intercom calls Programming Input The PDN button light shows the current status as follows Off The PDN extension is idle Green on The extension is on a call using the PDN button Flashing green slowly A call is on hold at the PDN extension Regular Hold Flashing green moderately A call is on hold temporarily or on Exclusive Call Hold Flashing green rapidly The PDN exten...

Страница 152: ...g red slowly Another corresponding SDN extension or the PDN extension itself is holding a call Two way Record 8 Used to record a conversation into your own mailbox Programming Input Voice mail floating extension no 9 The Two way Record button light shows the current status as follows Off Not recording On Recording the conversation Two way Transfer 8 Used to record a conversation into the mailbox o...

Страница 153: ...ount code before the line access number Example Account code feature no 49 Account code 1234 Account code delimiter Automatic line access number 0 9 Phone number SECRET 123 4567 3 Depending on the settings of your PBX you may be required to enter delayed ringing time 0 Immediate 1 1 ring 2 2 rings 3 3 rings 4 4 rings 5 5 rings 6 6 rings 7 No ring In this case you can automatically join a new ICD G...

Страница 154: ...imes 7 To continue clearing buttons repeat the procedure from step 3 To exit press EXIT Usage tips You can also clear the number or feature assigned to a flexible button on the Feature Key screen or the Calls screen in Line Buttons mode For details see Feature Key Screen Page 58 and Calls Screen in Line Buttons Mode Page 46 154 Operating Instructions Settings and Customisation ...

Страница 155: ...aracter by pressing LEFT on the Navigator key For a list of available characters refer to the following pages The tables show you the characters available for each button Note You can switch the character table by pressing You can specify the length of time before a character is automatically accepted After you enter a character if you do not press any other buttons before the specified length of ...

Страница 156: ...ce counts as one character Table 2 Option mode Times Buttons A D G J M P T W ä B C a b c À E F d e f Ð H I g h i Ì K L j k l 5 N O m n Ñ o Q R S p q r s U V t u v X Y Z w x y z ý 9 0 ö 1 ü 10 11 12 13 14 15 Á Â Ã Ä Å Æ Ç 2 È É Ê Ë 3 Í Î Ï 4 Ò Ó Ô Õ Ö Ø Œ 6 ß 7 Ù Ú Û Ü 8 Š Z space Note A space counts as one character 156 Operating Instructions Settings and Customisation ...

Страница 157: ...Table 2 Option mode for RU model 11 10 Note A space counts as one character Operating Instructions 157 Settings and Customisation ...

Страница 158: ...accessible When connecting a headset Ensure that the headset cord has slack and is not pulled tight during use to prevent damage to the connectors Notice It is recommended that you use one of the following Panasonic headsets For KX NT400NE KX NT400RU users KX TCA89 For KX NT400X users in South America KX TCA87 For all other KX NT400X users KX TCA86 KX TCA92 When selecting Ethernet cables Use flexi...

Страница 159: ...hernet cable not included that is 6 5 mm in diameter or less For further information on the connection to a PC see the documentation for the PBX When connecting cables Ensure that the Ethernet cables and the AC adaptor cord are clamped to prevent damage to the connectors Operating Instructions 159 Installation and Setup ...

Страница 160: ...tions for a USB Device To a USB device CAUTION When connecting a USB device Ensure that the USB cable has slack and is not pulled tight during use to prevent damage to the connectors 160 Operating Instructions Installation and Setup ...

Страница 161: ...t cable and AC adaptor if used and make sure that the power is off 2 Remove the screw as shown in the illustration below 3 Remove the cover as shown in the illustration below Notice To prevent the KX NT400 from getting scratched do not use hard sharp tools flat drivers craft knives etc to open the cover 4 Install the KX NT307 Bluetooth module to the Bluetooth module socket see Location of Controls...

Страница 162: ...6 Connect the Ethernet cable and the AC adaptor if necessary to the KX NT400 162 Operating Instructions Installation and Setup ...

Страница 163: ...tone confirm the Bluetooth headset s Pass Key press CANCEL and repeat this step 6 Press EXIT to exit programming mode Note Do not turn the headset power off until the headset completes establishing a link to the KX NT400 the Message Ringer Lamp will flash green for 3 seconds or the headset may fail to link If you have already registered a Bluetooth headset that you do not want to use anymore regis...

Страница 164: ...y from the telephone and closer to the one it is registered to Noise Signals are transmitted between this module and the Bluetooth headset using radio waves For maximum distance and noise free operation it is recommended that the module is situated away from electrical appliances such as faxes radios personal computers or microwaves Systems using the 2 4 GHz ISM Industrial Scientific and Medical b...

Страница 165: ...efault settings To make the ringing icons appear you must set the DSS key mode for Incoming Call setting to ON or Flash using the PC Maintenance Console For details see the PBX s documentation It is recommended that you do not change the Preferred Line Assignment Outgoing setting from its default value Intercom Changing it can result in inconsistent behaviour when making outgoing calls Accessing t...

Страница 166: ...enance Page 170 View the MAC addresses for the KX NT400 s network adaptors and test connections to other network devices 6 Firmware Version Update Page 171 If a new firmware version is released perform a firmware upgrade to install the latest version For details about firmware consult your dealer 7 Initialise Settings Page 173 Initialising the settings resets the KX NT400 to its factory shipment s...

Страница 167: ...g Page 134 For details about obtaining additional language files consult your dealer IP Address Settings To properly connect the KX NT400 to a network the IP address settings must be configured to match the settings of the network Consult your administrator for details about the correct settings Note The KX NT400 requires 2 IP addresses Confirm that the 2 IP addresses are prepared for it before co...

Страница 168: ... Characters Page 155 You can reset the settings to their default values by pressing Reset to Default IP Port Settings To properly connect the KX NT400 to a network the IP port settings must be configured to match the settings of the network Consult your administrator for details about the correct settings If your network uses a secondary PBX also fill in the following for IP Port 2 PTAP Server PTA...

Страница 169: ...or for details about the correct values QoS Setting screen 1 2 Select whether to enable communication over a VLAN in the network If you enable VLAN communication enter the VLAN IDs and VLAN priorities for Primary Port and Secondary Port VLAN Select whether to use VLAN to enhance the network traffic controlling Default Disable Primary Port VLAN ID Enter the VLAN ID number to which the PBX belongs D...

Страница 170: ...ure For details consult your administrator You can reset the settings to their default values by pressing Reset to Default Maintenance You can view MAC addresses of the KX NT400 and verify connections for the network devices on this screen Network Maintenance screen You can view the MAC addresses of the KX NT400 and verify the network connection VoIP Shows the MAC address used for VoIP data Applic...

Страница 171: ...g the firmware from an FTP server see Troubleshooting Page 192 Firmware Version Update screen 1 4 Enter the information for the FTP server to use for downloading the firmware FTP Server Address required Enter the IP address of the FTP server FTP Server Control Port required Enter the port number that the FTP server uses for control communications Default 21 Firmware Version Update screen 2 4 Enter...

Страница 172: ...en 4 4 Enter the full path and file name for the firmware file stored in an SD memory card The firmware data must be stored in the following directory on the SD memory card private meigroup pcc pbxpt nt400 File Name Enter the full path of the firmware or Press to browse the SD memory card to find the file Upgrading the Firmware from an SD Memory Card 1 Insert an SD memory card that contains the fi...

Страница 173: ...On the Initialise Settings screen press Initialise 3 On the confirmation dialogue press OK The initialisation process starts 4 When the initialisation process finishes the KX NT400 reboots automatically Firmware Version You can view the firmware version of the KX NT400 on this screen Firmware Version screen VoIP IPL Version Shows the firmware version of the VoIP IPL VoIP Application Version Shows ...

Страница 174: ...ext editors The CSV file can also be imported to other KX NT400s to copy the original settings and contact lists You can select the desired files and settings by selecting the check boxes for each data To maintain the data 1 Press the Options tab Administrator Options Maintenance Maintenance screen 1 4 Local Directory Delete All Press Delete to delete all of your personal contacts from the local d...

Страница 175: ... Page 126 Network Settings Select the check box to export import the network settings For details about network settings see Setting Up the KX NT400 Page 165 LDAP Server Settings Select the check box to export import the LDAP server settings For details about LDAP Server settings see LDAP Server Settings Page 130 Dial Modification Settings Select the check box to export import the Dial modificatio...

Страница 176: ...tarts after you press Close on the Setup screen Language Settings Page 167 IP Address Settings Page 167 IP Port Settings Page 168 Quality of Service QoS Settings Page 169 Firmware Version Update Page 171 Setting Initialise Page 173 Note For details about the Setup screen see Setting Up the KX NT400 Page 165 On the Options screen During normal use when you change settings on either of the following...

Страница 177: ... cloth with very small quantity of neutral detergent or ethyl alcohol Do not press or rub the LCD touch screen with too much force during cleaning For the body To avoid damaging the KX NT400 disconnect the Ethernet cable and all other cables from the KX NT400 before cleaning When using an AC adaptor disconnect the AC adaptor from the KX NT400 and power outlet before the cleaning If the KX NT400 be...

Страница 178: ...phone 1 IP Network Interface Jack LAN 2 RJ45 USB Port 1 USB1 1 USB low power device only SD Memory Card Slot 1 32 MB 2 GB Audio Interface Jack 1 ø 2 5 mm Dimensions About 159 mm H 277 mm W 160 mm D When the operation board angle is set to 60 Weight About 1250 g Including a handset a handset cord and a stylus pen PoE Interface Compliant with IEEE 802 3af Power Consumption Stand by mode about 4 8 W ...

Страница 179: ...fore the LCD dims 1 3 5 10 15 30 60 minutes 5 minutes LCD Off Timer Select the amount of time of inactivity before the LCD turns off after it has dimmed 1 5 10 30 60 120 180 300 minutes 30 minutes Touch Screen Sound Specify whether a sound is used to indicate each touch screen response On Off Off Time allowed between character input Specify the length of time before a character that input with the...

Страница 180: ... voice mail system 8 characters Incoming Redirect Number Edit the default phone number to redirect calls 32 characters Language For details see Language Settings Page 124 Parameter Name Description Value Range Default Setting Language Select the on screen language English US English UK French French CA German Spanish Italian Portuguese Russian Ukrainian English US Directory List Select For details...

Страница 181: ...y the codec for the camera Motion JPEG MPEG4 Motion JPEG Camera RTSP Port MPEG4 Only Edit a RTSP port for the camera 1 65535 554 IP Camera Selection Buttons For details see IP Camera Selection Buttons Settings Page 126 Parameter Name Description Value Range Default Setting Camera Button 1 Select a camera from the drop down list to be shown on the Camera screen Currently registered cameras Camera B...

Страница 182: ...Parameter Name Description Value Range Default Setting URL Enter the URL for the intranet Web page 1 256 characters 182 Operating Instructions Appendix ...

Страница 183: ... Busy No answer Do not disturb Not Assigned Not Assigned Dial FWD DND External Number Enter the phone number to transfer calls for external calls 32 digits FWD DND Internal Mode Specify the type of your presence for internal calls Always All Busy No answer Busy No answer Do not disturb Not Assigned Not Assigned Dial FWD DND Internal Number Enter the phone number to transfer calls for internal call...

Страница 184: ... Value Range Default Setting VoIP IPL Version Displays the VoIP IPL Version VoIP Application Version Displays the VoIP APP Version Application Loader Version Displays the Application Loader Version Application Version Displays the Application Version 184 Operating Instructions Appendix ...

Страница 185: ...2 Valid IP Address PBX Change Time Enter the length of the time before the failover process starts 30 300 seconds 60 seconds Network IP Port These parameters are editable only during setup after connecting the KX NT400 to a PBX On the Options screen you can only view these parameters For details about editing these parameters see IP Port Settings Page 168 Parameter Name Description Value Range Def...

Страница 186: ...eter Name Description Value Range Default Setting MAC Address VoIP Shows the KX NT400 s VoIP MAC address MAC Address Application Shows the KX NT400 s Application MAC address LDAP Server Settings For more details see LDAP Server Settings Page 130 Parameter Name Description Value Range Default Setting Display Name Enter the LDAP server name to be displayed 1 20 characters Server Name Address Enter t...

Страница 187: ...ether the string 0 from a copied outside telephone number is to be deleted Yes No Yes Leading Digits to Remove 1 10 Edit the number or string to delete from a dialled number 0 16 characters See the Telephone Number Modification Default table below Add Number 1 10 Edit the number or string to add on before a dialled number 0 8 characters Additional No to Add 1 10 Edit the number or string to add on...

Страница 188: ...International area code other Remove Add No 1 8 No 9 International area code 0 No 10 Access Code for International Call Other 188 Operating Instructions Appendix ...

Страница 189: ...the FTP server 21 1024 65535 21 FTP User ID Enter the user ID for the FTP server 0 24 characters FTP User Password Enter the user password for the FTP server 0 24 characters FTP Path Enter the path of the firmware data in the FTP server 1 128 characters C panasonic nt400 FTP File Name Enter the file name of the firmware data 1 24 characters PNT400 VLAN Specify whether VLAN is used Enable Disable D...

Страница 190: ...ible SD memory card Compatible SD Memory Cards The KX NT400 supports the following SD memory cards SD miniSD and microSD memory cards Use a miniSD or microSD adaptor when using miniSD or microSD memory cards respectively and always insert the miniSD or microSD memory card into the adaptor before inserting the adaptor into the KX NT400 Cards with a capacity of 32 MB to 2 GB Class 2 Class 4 and Clas...

Страница 191: ... the SD memory card before the first use Formatting deletes all the data stored on the SD memory card Back up important data before formatting the SD memory card To format the SD memory card see Maintenance screen 1 4 Page 174 Note When formatting cards with a computer select the FAT format When an SD memory card is formatted all information on the card is deleted Operating Instructions 191 Append...

Страница 192: ...58 Your connection settings are incorrect Consult your administrator to confirm that your settings are correct If the problem persists consult your dealer Page 165 An error has occurred Reset the KX NT400 When using PoE disconnect the Ethernet cable wait 10 seconds and then connect the Ethernet cable again If using an AC adaptor disconnect the AC adaptor from the power outlet wait 10 seconds and t...

Страница 193: ...the feature numbers The feature numbers may have been changed Consult your administrator Ask your dealer to change the feature numbers for easier use Page 93 I forgot the password Ask the manager to assist you The background music started suddenly Turn off the music Page 94 The date and time are not correct The KX NT400 obtains its date and time information from the PBX Therefore the date and time...

Страница 194: ...lso exit automatically after a certain amount of time if it is left idle When I go off hook I do not hear a dial tone The service for your telephone is turned off in the connected PBX Consult your administrator to change the service status Note The KX NT400 turns off its service during certain operations importing exporting data refreshing the directories periodic refreshing In some cases it canno...

Страница 195: ... Extension First Digit Timer setting of the PBX has not been set to 250 s Using the PBX s PC Maintenance Console set the Extension First Digit setting to 250 s For more details refer to the PBX s documentation or consult your administrator An outside call is made even when I try to make an internal call The Preferred Line Assignment Outgoing setting has been changed from its default setting Interc...

Страница 196: ... microphone Do not obstruct the KX NT400 during calls Keep your hands as well as common objects such as folders cups and coffee pots away from the KX NT400 during calls The other party is using a half duplex speakerphone If the other party is using a half duplex speakerphone sound may cut out occasionally during calls For best performance the other party should use a full duplex speakerphone SD Me...

Страница 197: ...ettings in the IP Camera settings You have not registered any cameras Register a camera in the IP Camera settings Page 125 The settings for a camera registered to a contact are not configured correctly Confirm the camera settings in the contact s settings Page 114 The camera is not functioning correctly Refer to the documentation for the camera or consult your administrator The video feed does not...

Страница 198: ... Position drop down list even if you have selected a programmed position Note For other issues regarding cameras refer to the documentation for the camera or consult your administrator Chat Issue Possible Cause Solution Reference I cannot initiate a chat The other user is not using a KX NT400 or software programme that supports the chat feature such as Communication Assistant You can confirm wheth...

Страница 199: ... from another phone check the dial modification settings or consult your administrator Page 131 The dial modification settings are configured incorrectly Confirm that the dial modification settings are configured correctly If you are unsure whether they are correct consult your administrator Page 131 If you are dialling an outside number an outside line might not be available Wait a while and then...

Страница 200: ...erence The USB device I connected does not work The device is not supported by the KX NT400 The KX NT400 only supports USB keyboards The USB keyboard I connected does not work The keyboard is not connected properly Confirm the connection Page 158 Firmware Update Issue Possible Cause Solution Reference I have problems upgrading the firmware from an FTP server The settings for connecting to the FTP ...

Страница 201: ...backing up because it is full Delete unneeded data Cannot access SD Card or SD Card is read only The switch on the side of the SD memory card is set to the LOCK position Remove the card slide the switch to the WRITE position and then insert the card again Page 190 Check a Network cable The Ethernet cable is not connected Check all connections Page 158 DHCP server is not found The KX NT400 cannot r...

Страница 202: ...0 Page 190 The SD Card format feature does not support SD Cards smaller than 32M Bytes Failed to connect to the LDAP server The KX NT400 could not connect to the LDAP server Check the settings for the LDAP server Page 130 Failed to connect to the IP camera The KX NT400 could not connect to a network camera Check the settings for the network camera Page 125 Password is locked Please contact your ma...

Страница 203: ... there is a problem with the LAN If this error is displayed frequently consult your network administrator 0x2004 0x0000 KX NT400 not registered Check the registration status of the KX NT400 0x2005 0x0000 Connection refused by the PBX 0x2006 0x IP address lease time from DHCP server has expired IP address lease renewal was refused by DHCP server Consult your network administrator 0x2007 0x0000 Comm...

Страница 204: ...r 0x700F 0x Acquiring the initial data from the PBX failed KX NT400 was initialised with values for European PBXs If this error is displayed frequently consult your network administrator 0x7010 0x7018 0x Software error If this error is displayed frequently consult your network administrator 0x7019 0x 1 Software error 2 Import error 1 Check the Import file 2 Consult your network administrator 0x710...

Страница 205: ...strator 0x8102 0x Import error If this error is displayed frequently consult your network administrator 0x8103 0x8104 0x Communication error between KX NT400 CPUs Consult your network administrator 0x8105 0x PBX system data is locked Consult your network administrator 0x8108 0x Transmission error If this error is displayed frequently consult your network administrator 0x9001 0x0000 The camera s se...

Страница 206: ... Wireless Headset Registration 138 Bluetooth Wireless Headset Removal 138 Bottom view 24 Broadcasting 94 Built in Simplified Voice Message 80 94 Button Name 183 C Cables Connections 159 Call button 55 Call Charge Reference flexible button 147 Call Forwarding CF by ISDN 96 Call Forwarding FWD 83 97 Advanced settings 84 Presence status 129 Remote setting 110 Simple settings 83 Call Forwarding drop d...

Страница 207: ...resentation 99 CLIR Calling Line Identification Restriction 98 Close button 55 Codec 181 COLR Connected Line Identification Restriction 101 Completion of Calls to Busy Subscriber CCBS 100 Conference 101 Flexible button 147 Unattended 101 Conference call 77 by ISDN 110 Establishing 77 Leaving Unattended conference 78 Removing a participant 78 Connected Line Identification Presentation COLP 135 Feat...

Страница 208: ...st 180 Extension number display 31 60 61 Extension PIN Personal Identification Number 104 139 External Background Music BGM 104 External Feature Access EFA 92 105 Flexible button 147 External Relay 105 External Sensor 105 F Feature button 33 Feature clear 140 Feature Key screen 58 Feature number and Presence status 129 Feature Number 183 Feature Number check box 183 Feature Programming 135 File Na...

Страница 209: ...180 Language Settings 124 167 180 Sub display 135 Last Number Redial 69 106 Last Number Redial outside line only 123 LCD Liquid Crystal Display 20 LCD Brightness 179 LCD Off Timer 179 LCS Mode Set After Answering 137 Feature clear 140 LCS Live Call Screening 104 106 LDAP directory 34 Advanced search 37 67 Search 37 67 LDAP Server Server select button 37 Settings 130 175 186 Leading Digits to Remov...

Страница 210: ... Override Executive Busy 103 P Paging Deny 138 Feature clear 140 Paging Group 105 Pan scan 86 Button 52 Pan Tilt control button 52 Park the call Automatic button 43 Park the call Manual button 43 Parking zone 73 Password 179 181 186 Password Settings 121 Paste text 63 PBX Change Time 185 PBX Feature List 93 PBX IP Address 1 185 PBX IP Address 2 185 PC port 24 PC Connections 158 PDN SDN Extension 1...

Страница 211: ...on 186 Server Name Address 186 Service in 103 Service out 103 Set call back button 44 Shift key 63 Side cover 21 Single CO S CO flexible button 144 Soft button Feature Key screen 58 Soft keyboard 63 Chat screen 54 Contacts screen 36 Portal screen 57 Speaker volume 62 Specifications 178 Speed Dial 135 181 Split call 74 Split the Call button 43 SP PHONE speakerphone button 20 Start up Settings 165 E...

Страница 212: ...esence List 128 Presence Settings 127 Web Page List Settings 127 V Verify Password 179 View Back 23 Bottom 24 Front 19 Left side 22 Right Side 21 VLAN 186 189 VLAN ID Firmware update 189 Primary Port 186 Secondary Port 186 VLAN Priority Firmware update 189 Primary Port 186 Secondary Port 186 Voice Mail 90 Accessing 81 Checking new messages 81 Voice Mail Number 180 Voice Mail Transfer 75 Flexible b...

Страница 213: ...Operating Instructions 213 Notes ...

Страница 214: ...l is copyrighted by Panasonic System Networks Co Ltd and may be reproduced for internal use only All other reproduction in whole or in part is prohibited without the written consent of Panasonic System Networks Co Ltd Panasonic System Networks Co Ltd 2010 KK0809KM2090 PSQX4998XA ...

Отзывы: