background image

Caller IQ Feature

82

For assistance, please call openLCR: 1-866-openLCR (1-866-673-6527)

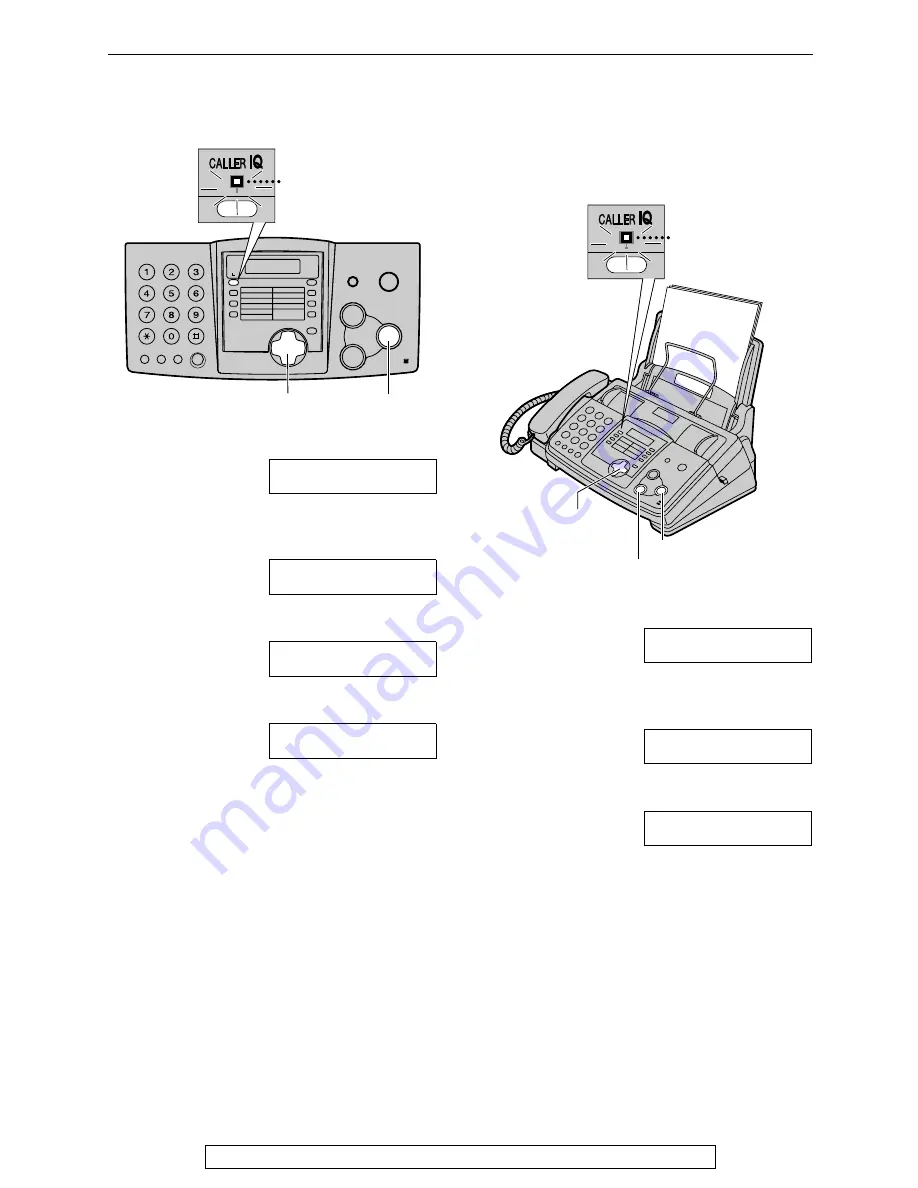
To turn the Caller IQ feature 
from OFF to ON 

1

Press 

{{{{

CALLER IQ

}}}}

.

CALLER IQ
PRESS NAVI.[

(


)

]

2

Press 

{{{{<

<

<

<}}}}

 or 

{{{{>

>

>

>}}}}

 until the following is 

displayed or press 

{{{{

0

}}}}

.

TO ENABLE LCR

PRESS “1”, SET

3

Press 

{{{{

1

}}}}

.

TO ENABLE LCR

PRESS SET

4

Press 

{{{{

SET

}}}}

.

DOWNLOAD IN
PROCESS.

L

The fax machine will automatically 
receive the rate table on this page.

Updating the rate table 
(downloading the rate table)

If you register through openLCR web site or 
move to another area, you have to download the 
rate table manually.

1

Press 

{{{{

CALLER IQ

}}}}

.

CALLER IQ
PRESS NAVI.[

(


)

]

2

Press 

{{{{<

<

<

<}}}}

 or 

{{{{>

>

>

>}}}}

 until the following is 

displayed or press 

{{{{

2

}}}}

.

NEW RATE TABLE

PRESS SET

3

Press 

{{{{

SET

}}}}

.

DOWNLOAD IN
PROCESS.

L

The fax machine will automatically 
receive the rate table.

{

SET

}

FLASH/LIGHT

{<}{>}

FLASH/LIGHT

{

SET

}

{

STOP

}

{<}{>}

Содержание KX-FHD331

Страница 1: ...tions before using the unit and save for future reference This model is designed to be used only in the U S A FOR FAX ADVANTAGE ASSISTANCE VOICE CALL 1 800 HELP FAX 1 800 435 7329 E MAIL TO consumerpr...

Страница 2: ...k film L Do not rub or use an eraser on the printed side of recording paper as the print may smear Energy Star L As an ENERGY STAR Partner Panasonic has determined that this product meets the ENERGY S...

Страница 3: ...n authorized service center when service is required Opening or removing covers may expose you to dangerous voltage or other risks Incorrect reassembly can cause electric shock when the unit is subseq...

Страница 4: ...Computer with MODEM and fax machine share a single line one phone number 26 Help Button Help function 28 Volume Adjusting volume 29 Initial Programming Date and time your logo and fax number 30 Telep...

Страница 5: ...k check here 67 Replacement Ink film 71 Jams Recording paper jam 73 Document jams sending 76 Cleaning Document feeder 77 Thermal head 78 General Information Printed Reports Reference lists and reports...

Страница 6: ...hipping and transportation of the unit L The part numbers are subject to change without notice Power cord 1 Part No PFJA1030Z Telephone line cord 1 Part No PFJA02B002Z Handset 1 Part No PFJXE0805Z or...

Страница 7: ...per use the legal paper tray L To place an order L If you have any questions about internet orders please contact us at Model No Item Specifications Usage KX FA93 Replacement film 216 mm 70 m 81 2 229...

Страница 8: ...L To redial the last number dialed L To insert a pause during dialing J J J J MUTE L To mute your voice to the other party during a conversation Press this button again to resume the conversation K K...

Страница 9: ...D D Document tray E E E E Recording paper entrance F F F F Recording paper exit G G G G Tension plate H H H H Front cover I I I I Document exit J J J J Document entrance K K K K Back cover open button...

Страница 10: ...right side of the unit OR Push the back cover open lever green inside of the unit 3 Open the back cover 4 Insert the gear of blue core of the front ink film roll into the left slot of the unit Insert...

Страница 11: ...at least once 6 Close the back cover securely by pushing down on the dotted area at both ends Close the front cover securely Note L The ink film is safe to touch and will not rub off on your hands li...

Страница 12: ...ording paper Insert tabs on the paper tray into slots on the back of the unit Note L Do not place the unit in an area where the paper tray may be obstructed i e by a wall etc To use legal size paper L...

Страница 13: ...document tray into the slots on the recording paper exit The recording paper will be ejected from the top of the unit after printing The document tray prevents the printed paper from curling Handset...

Страница 14: ...1 Fan the stack of paper to prevent a paper jam 2 Pull the tension plate forward and hold open while inserting the paper L The paper should not be over the tab L If the paper is not inserted correctly...

Страница 15: ...ive Ring page 24 Case 6 Computer with MODEM and fax machine share a single line one phone number page 26 Connecting to a telephone line jack and power outlet Using surge protectors L The warranty does...

Страница 16: ...hone number Your situation You wish to use the fax machine and your answering machine in the same room Telephone wiring image in house or office Connections Answering machine Fax machine Single teleph...

Страница 17: ...will be disconnected and the call will be switched to the fax machine The fax machine will receive a fax automatically If the answering machine is turned off The fax machine will ring 5 times and rec...

Страница 18: ...for fax only Your situation You wish to use the fax machine only for fax reception transmission Telephone wiring image in house or office Connections Fax machine Single telephone line 1 phone number T...

Страница 19: ...until the following is displayed L The display will show the number of rings before the fax machine answers a call in FAX ONLY mode 2 Press or to change the ring setting to 2 and press SET How to rec...

Страница 20: ...use the fax machine and an extension telephone in a different room Most incoming calls are phone calls and the fax machine is seldom used for fax reception Telephone wiring image in house or office C...

Страница 21: ...tion is required a fax calling tone slow beep is heard or no sound is heard press FAX START 3 Replace the handset L The fax machine will start reception With an extension telephone 1 When the extensio...

Страница 22: ...or fax besides the current phone number To get a new phone number you need to subscribe to Distinctive Ring service at your local telephone company L Distinctive Ring service may be called Identa Ring...

Страница 23: ...assigned for phone calls is called the fax machine and answering machine will ring and then the answering machine will record voice message automatically If the number assigned for fax is called the f...

Страница 24: ...e number To get a new phone number you need to subscribe to a Distinctive Ring service at your local telephone company L Distinctive Ring service may be called Identa Ring service The name of service...

Страница 25: ...How to receive calls If the number assigned for phone calls is called the voice message will be recorded in voice mail service If the number assigned for fax is called the fax machine will ring If an...

Страница 26: ...via MODEM and the fax machine on a single telephone line The fax machine and the computer are in the same room and you don t want the computer to answer the incoming call automatically Telephone wirin...

Страница 27: ...receive calls When receiving calls the fax machine will automatically answer all calls and only receive fax documents Note L If you use your computer as an answering machine please refer to Case 1 Rec...

Страница 28: ...the features FEATURE LIST PRESS SET 3 How to store names and telephone numbers in the directory and how to dial them DIRECTORY PRESS SET 4 Help with problems sending receiving faxes FAX SND RCV PRESS...

Страница 29: ...R OFF L To turn the ringer back on press While the ringer volume is set to off When a call is received the unit will not ring and will display the following INCOMING CALL Ringer pattern You can select...

Страница 30: ...mple August 10 2002 Press 0 8 1 0 0 2 M 08 D 10 Y 02 TIME 12 00AM 5 Enter the correct hour minute by selecting 2 digits for each using the dial keypad Press to select AM or PM Example 10 15PM 1 Press...

Страница 31: ...ill be displayed 6 Press MENU Note L You can enter your logo by pressing or in step 4 In this case press to move the cursor see page 32 for details To change capital or lower case letters Pressing the...

Страница 32: ...rn to step 1 to enter the next character Display order of characters Keys Characters 1 1 _ 2 A B C a b c 2 3 D E F d e f 3 4 G H I g h i 4 5 J K L j k l 5 6 M N O m n o 6 7 P Q R S p q r s 7 8 T U V t...

Страница 33: ...will be displayed 6 Press MENU Note L You can enter your fax number by pressing or in step 4 In this case press to move the cursor L The button replaces the digit with a and the button replaces it wit...

Страница 34: ...2 for instructions Example NAME John STORE PRESS SET 4 Press SET Example S01 5 Enter the telephone number up to 30 digits using the dial keypad Example S01 1114497 L If you want to enter a hyphen pres...

Страница 35: ...ess MENU to exit the program Helpful hint L For your convenience HELP FAX 1 800 435 7329 has been pre programmed If you cannot solve a problem call using this entry page 38 If unnecessary you can eras...

Страница 36: ...EDIT PRESS MENU 3 Press MENU Example NAME Mary EDIT DELETE 4 Press Example NAME Mary STORE PRESS SET L If you do not need to edit the name skip to step 6 5 Edit the name see page 32 and page 35 for i...

Страница 37: ...ment entrance DIRECTORY 2 Press or until the desired entry is displayed Example Peter 9876543 b Peter EDIT PRESS MENU 3 Press MENU Example NAME Peter EDIT DELETE 4 Press DELETE OK YES SET NO STOP L To...

Страница 38: ...ress L Confirm that there are no documents in the document entrance DIRECTORY 2 Press or until the desired entry is displayed Example Lisa 2233445 b Lisa EDIT PRESS MENU L If the desired name has not...

Страница 39: ...name telephone number and the time of the call You can view the caller information page 40 and print the caller ID list page 80 Note L If the unit is connected to a PBX Private Branch Exchange system...

Страница 40: ...ert the document FACE DOWN and press FAX START To change the display of the caller information Press CALLER ID repeatedly after step 2 Example SAM LEE 11 20AM Jul 20 b 1345678901 11 20AM Jul 20 L Chec...

Страница 41: ...sing press STOP then MENU 4 Press SET ERASE COMPLETED 5 Press STOP to exit the program Erasing specific caller information 1 Press CALLER ID Example 2 NEW CALLS PRESS NAVI 2 Press or until the desired...

Страница 42: ...directory For station 1 1 Press station 1 STATION 1 DIAL MODE 2 Press SET Example NAME SAM LEE STORE PRESS SET 3 Press SET Example S01 134567 For stations 2 5 1 Press the desired station key 2 Press S...

Страница 43: ...elect the resolution Select the desired resolution according to the type of document STANDARD For printed or typewritten originals with normal sized characters FINE For originals with small printing S...

Страница 44: ...number 3 Press FAX START L The document will be fed into the unit and scanned into memory The unit will then transmit the data If the document exceeds the memory capacity sending will be canceled and...

Страница 45: ...that can be seen through the other side i e newspaper L Check that ink paste or correction fluid has dried completely L To transmit the document with a width of less than standard letter size 216 mm w...

Страница 46: ...avigator directory Press or then press or to display the desired entry and press SET L If the desired name has not been stored in navigator directory press STOP and dial the number manually Fax auto r...

Страница 47: ...STATION 1 DIAL MODE 3 Press or until the following is displayed STATION 1 BROADCAST 4 Press SET DIR 00 NAVI SET 5 Program entries Using stations 2 5 Press the desired station key Example DIR ANN 01 ST...

Страница 48: ...isplayed BROADCAST EDIT PRESS MENU 3 Press MENU BROADCAST ADD DELETE 4 Press 5 Press or until the desired entry you want to add is displayed L Navigator Example Mary 15843724123 L Station 2 Example Pe...

Страница 49: ...splayed BROADCAST EDIT PRESS MENU 3 Press MENU BROADCAST ADD DELETE 4 Press 5 Press or until the desired entry you want to erase is displayed L Navigator Example Dick 13281432968 L To cancel erasing p...

Страница 50: ...pacity sending will be canceled L If one of the entries is busy or does not answer it will be skipped All skipped entries will be redialed up to 2 times after all of the other entries have been called...

Страница 51: ...can then send a fax To stop receiving Press STOP Extension telephone If you use the fax machine with an extension telephone you can receive fax documents using the extension telephone You do not have...

Страница 52: ...ollowing is displayed L The display will show the number of rings before the unit answers a call in FAX ONLY mode 2 Press or to change the ring setting to 2 and press SET How to receive calls Just lea...

Страница 53: ...a fax the fax machine will automatically start fax reception This service is convenient if you wish to have a different number for fax in a single telephone line To use this service you must subscrib...

Страница 54: ...ENU SYSTEM SET UP PRESS NAVI 2 Press then 3 2 FAX RING PATTERN RING B D 3 Press or to select the ring pattern assigned for fax A Standard ring one long ring B Double ring two short rings C Triple ring...

Страница 55: ...ed resolution according to the type of document FINE For printed or typewritten originals with small printing SUPER FINE For originals with very small printing PHOTO For originals containing photograp...

Страница 56: ...he following table for the recommended reduction rates Letter 216 mm 279 mm 81 2 11 Legal 216 mm 356 mm 81 2 14 A4 210 mm 297 mm 81 4 1111 16 Example 72 reduced copy Note L If the appropriate reductio...

Страница 57: ...il the following is displayed COLLATE ON RESOLUTION 3 Press START Example Making 2 copies of a 4 page original document Note L The unit will store the documents into memory while collating the copies...

Страница 58: ...until the desired setting is displayed L This step may be slightly different depending on the feature 4 Press SET L The setting you selected is set and the next feature will be displayed 5 To exit pro...

Страница 59: ...til the desired setting is displayed L This step may be slightly different depending on the feature 6 Press SET L The setting you selected is set and the next feature will be displayed 7 To exit progr...

Страница 60: ...s a call in FAX ONLY mode You can select from 1 2 3 default 4 and 5 EXT TAM If you are using the unit with an answering machine set to 5 EXT TAM Code 12 Securing the remote operation for the answering...

Страница 61: ...hours in advance of the desired time To send a document 1 Insert the document 2 Follow steps 1 to 4 on page 59 3 Press or to select ON 4 Press SET 5 Enter the fax number 6 Press SET 7 Enter the trans...

Страница 62: ...ION MODE ON If you use an extension telephone and wish to use it to receive a fax activate this feature and program the activation code 1 Follow steps 1 to 4 on page 59 2 Press or to select ON 3 Press...

Страница 63: ...If the ring back tone continues the other party s machine may not be a facsimile or may have run out of paper Check with the other party L The connecting tone volume cannot be adjusted ON default You...

Страница 64: ...e document is jammed Remove the jammed document page 76 ERROR NOT YOUR UNIT Code 54 59 70 L A transmission or reception error occurred because of a problem with the other party s fax machine Check wit...

Страница 65: ...s SET to clear the message Do not install folded or heavily curled paper COVER OPEN L The back cover is open Close it DIRECTORY FULL L There is no space to store new entries in navigator directory Era...

Страница 66: ...Vs or speakers which generate an intense magnetic field PAPER JAMMED L A recording paper jam occurred Clear the jammed paper page 73 PLEASE WAIT L The unit is checking that there is no slack on the in...

Страница 67: ...nge to TEL mode by pressing RECEIVE MODE L If you use a Distinctive Ring service make sure you have set the same ring pattern assigned by the telephone company page 53 The receiving mode does not func...

Страница 68: ...CEIVE MODE L The time taken to answer the call is too long Decrease the number of rings of feature 06 page 60 The display shows the following but faxes are not received CONNECTING L The incoming call...

Страница 69: ...er 20 such as letterhead or resume paper We recommend smooth paper such as Hammermill Jet Print for clearer printing Using an answering machine I cannot receive documents automatically L Your greeting...

Страница 70: ...made for access to emergency services L Fax transmission and reception will be interrupted L If the delayed transmission feature 25 on page 61 is programmed and the start time is passed during a powe...

Страница 71: ...t side of the unit OR Push the back cover open lever green inside of the unit 3 Open the back cover 4 Remove the used core and the used ink film 5 Remove the stoppers and tags from the new ink film 6...

Страница 72: ...the dotted area at both ends Close the front cover securely L The following message will be displayed while the unit is checking that there is no slack in the ink film PLEASE WAIT Note L The ink film...

Страница 73: ...APER JAMMED 1 Open the front cover by pulling up the center part 2 Push the back cover open button green on the right side of the unit OR Push the back cover open lever green inside of the unit 3 Open...

Страница 74: ...he back cover securely by pushing down on the dotted area at both ends Close the front cover securely 7 Remove the recording paper and straighten Pull the tension plate forward and hold open while ins...

Страница 75: ...the recording paper was not fed into the unit properly The display will show the following CHECK PAPER Remove the recording paper and straighten Pull the tension plate forward and hold open while ins...

Страница 76: ...ams sending 1 Open the front cover by pulling up the center part Remove the jammed document carefully 2 Close the front cover securely Note L Do not pull out the jammed paper forcibly before opening t...

Страница 77: ...r part 3 Clean the document feeder rollers and rubber flap with a cloth moistened with isopropyl rubbing alcohol and let all parts dry thoroughly Caution L L L L Do not use paper products such as pape...

Страница 78: ...enter part 3 Push the back cover open button green on the right side of the unit OR Push the back cover open lever green inside of the unit 4 Open the back cover Remove the ink film 5 Clean the therma...

Страница 79: ...e blue core at least once 7 Close the back cover securely by pushing down on the dotted area at both ends Close the front cover securely 8 Connect the power cord and the telephone line cord Ink film G...

Страница 80: ...ur unit If the test print has a smudge or blurred points or lines clean the thermal head page 78 Broadcast programming list provides you with entries which are stored in the broadcast feature page 47...

Страница 81: ...ANY OTHER THIRD PARTY WITH RESPECT TO ANY OF THE SERVICES PROVIDED BY OPENLCR NOR ASSUME NOR CREATE ANY OTHER OBLIGATION OF ANY KIND ON BEHALF OF OPENLCR L If you subscribe to openLCR service the unit...

Страница 82: ...NLOAD IN PROCESS L The fax machine will automatically receive the rate table on this page Updating the rate table downloading the rate table If you register through openLCR web site or move to another...

Страница 83: ...ly again L If the display shows the following the Caller IQ feature is set to off SET LCR TO ON Set the Caller IQ feature to on by referring to page 82 Automatic download The fax machine will automati...

Страница 84: ...ution 7 7 lines mm 196 lines inch in fine photo resolution 15 4 lines mm 392 lines inch in super fine resolution Photo resolution 64 level Scanner type Contact Image Sensor Printer type Thermal Transf...

Страница 85: ...ng the other side of the paper if you are not happy with the print quality or if misfeeding occurs L For proper feeding and best print quality we recommend using long grained paper L Do not use paper...

Страница 86: ...allow the customer an opportunity to maintain uninterrupted service CAUTION Any changes or modifications not expressly approved by the party responsible for compliance could void the user s authority...

Страница 87: ...n or Mail In Service For Carry In or Mail In Service in the United States call 1 800 HELP FAX 1 800 435 7329 For assistance in Puerto Rico call Panasonic Sales Company 787 750 4300 or fax 787 768 2910...

Страница 88: ...AND SERVICE WHICH ARE NOT COVERED BY THIS LIMITED WARRANTY ARE YOUR RESPONSIBILITY For product service Call toll free 1 800 HELP FAX 1 800 435 7329 for the location of an authorized servicenter For o...

Страница 89: ...d please contact 1 900 555 PANA 1 900 555 7262 for support on a fee basis Web Site www panasonic com for customers in the USA or Puerto Rico ONLY You can purchase parts accessories or locate your near...

Страница 90: ...features 60 Broadcast transmission 47 Buttons Keys BROADCAST 47 50 CALLER ID 40 CALLER IQ 81 82 Delete 32 HELP 28 Insert 32 LOWER 34 38 46 MONITOR 38 RECEIVE MODE 51 52 REDIAL 43 C Caller ID 39 Callin...

Страница 91: ...vation ID Feature 12 60 Reports Broadcast programming 80 Broadcast sending 50 Caller ID 39 61 80 Journal 44 80 Power down 70 Printer test 80 Sending 44 60 Setup 80 Telephone number 80 Reset Feature 80...

Страница 92: ...s to mail in or carry in your fax to one of our Regional Service centers where the unit will be repaired and returned to you Instructions If you choose to receive a replacement unit under the Fax Adva...

Отзывы: