background image

Cleaning the Unit

35

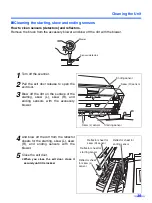
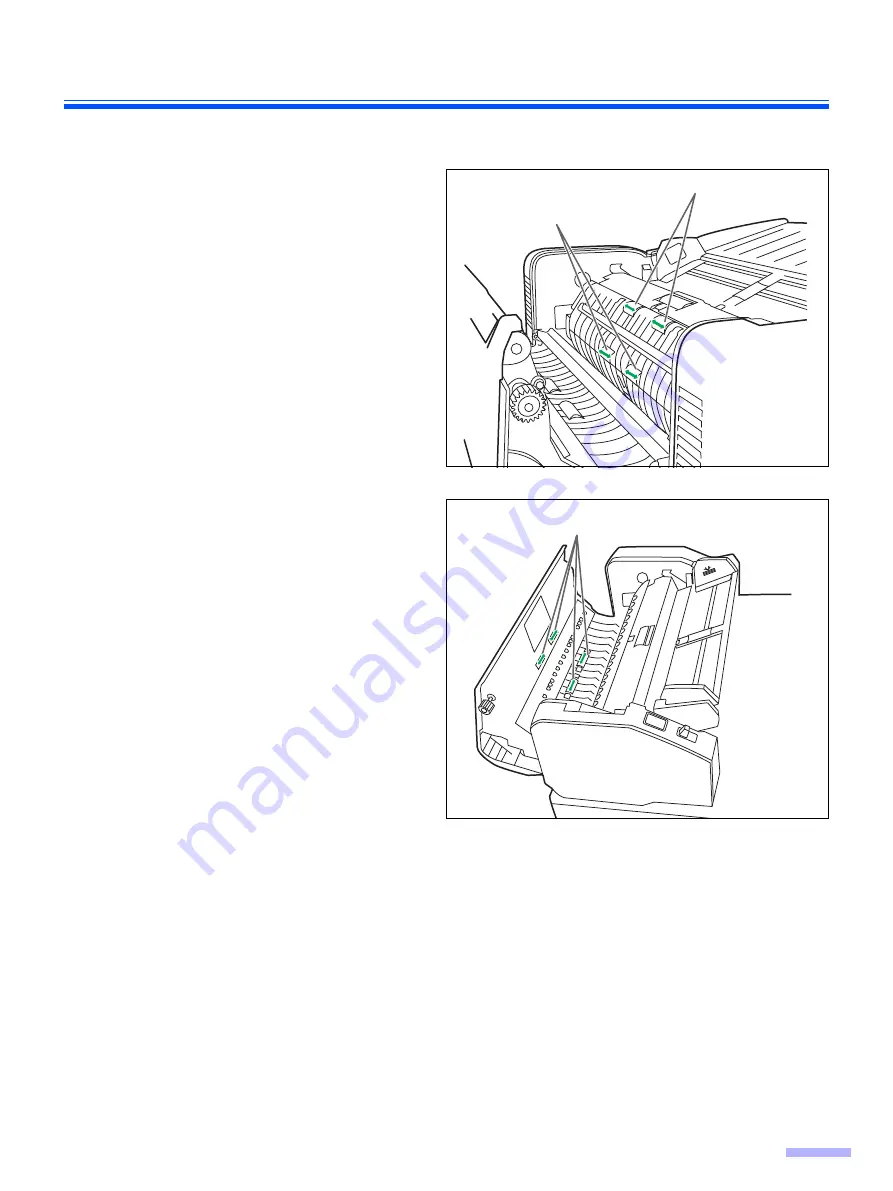
Cleaning the drive rollers and free rollers

1

Turn the power off.

2

Push the ADF door release to open the
ADF door.

3

Use the roller cleaning paper (KV-
SS03) to remove the dirt from the
surfaces of the 4 drive rollers.

When wiping off the dirt on the roller
surfaces, hold the rollers to prevent them
from rotating, and wipe the roller all the
way around them proceeding from one
end to the other in the direction of the
arrows shown in the figure.

4

Use the roller cleaning paper (KV-
SS03) to remove the dirt from the
surfaces of the 4 free rollers.

When wiping off the dirt on the roller
surfaces, hold the rollers to prevent them
from rotating, and wipe the roller all the
way around them proceeding from one
end to the other in the direction of the
arrows shown in the figure.

5

Close the ADF door.

When you close the ADF door, close it
securely until it is locked.

Drive roller

s

Drive roller

s

Free roller

s

Содержание KV-S7075C

Страница 1: ...g these instructions please read the installation manual enclosed with this unit Please carefully read these instructions and the enclosed installation manual Keep all documentation in a safe place for future reference Model No KV S7075C Operating Manual High Speed Color Scanner ...

Страница 2: ...rademarks of Intel Corporation in the U S and other countries Adobe and Reader are either registered trademarks or trademarks of Adobe Systems Incorporated in the United States and or other countries All other trademarks identified herein are the property of their respective owners International ENERGY STAR Program Installation Manual printed documentation The Installation Manual explains the inst...

Страница 3: ... used in accordance with the instruction manual may cause harmful interference to radio communications Operation of this equipment in a residential area is likely to cause harmful interference in which case the user will be required to correct the interference at his own expense For FRG Users For Germany Only Computer IBM PC AT or compatible machine with a CD ROM drive CPU Intel Core 2 Duo 1 8 GHz...

Страница 4: ... 30 Removing paper jams from the paper slot 30 Removing paper jams from the exit path 31 Cleaning the Unit 32 Outside of the scanner 32 Inside the scanner 32 Cleaning the paper feed roller separation roller and double feed prevention roller 33 Cleaning the drive rollers and free rollers 35 Cleaning the drive rollers free rollers and exit rollers 36 Cleaning the reference plates and ADF glasses 37 ...

Страница 5: ...ke or become hot to the touch When you operate this product the power outlet should be near the product and easily accessible To ensure safe operation the power cord supplied must be inserted into a standard three prong AC outlet which is effectively grounded earthed through the normal wiring The fact that the equipment operates satisfactorily does not imply that the power point is grounded earthe...

Страница 6: ...to the unit turn the unit off and unplug the unit immediately Contact your dealer for service Operating the contaminated unit can cause fire or electric shock Do not open covers and do not attempt to repair the unit yourself Contact your dealer for service Do not alter the unit or modify any parts Alteration or modification can cause fire or electric shock During thunderstorms do not touch the uni...

Страница 7: ... can cause injury and damage to the unit Do not place printed materials containing magnetic ink characters or magnetic strip cards on the flatbed Magnets are located in the flatbed cover flatbed sheet and may damage data stored on printed materials and cards Hollows If the unit falls down or gets damaged turn the unit off and unplug the power cord Otherwise it may cause fire or electric shock Do n...

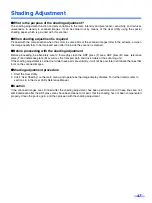
Страница 8: ...TRICAL SHOCK IF THE CUT OFF PLUG IS INSERTED INTO ANY 13 AMP SOCKET If a new plug is to be fitted please observe the wiring cord as shown below If in any doubt please consult a qualified electrician THIS APPLIANCE MUST BE EARTHED The wires in this mains lead are coloured as follows As the colours of the wires in the mains lead of this apparatus may not correspond with the coloured markings identif...

Страница 9: ...iods Do not throw or bend the CD ROM Roller Cleaning Paper Keep the roller cleaning paper out of reach of small children Do not store the roller cleaning paper in direct sunlight or in a place with a temperature over 40 104 F Only use the roller cleaning paper to clean the rollers and ADF glasses For details about the roller cleaning paper please refer to the Material Safety Data Sheet MSDS Please...

Страница 10: ... certain docu ments Duplicating certain documents may be illegal in your country area Penalties of fines and or imprisonment may be imposed on those found guilty The following are examples of items that may be illegal to duplicate in your country area Currency Bank notes and checks Bank and government bonds and securities Passports licenses official or private documents identification cards and th...

Страница 11: ...art Stop button Exit tray When the power is turned on the green indicator lights When an error occurs the indicator will change to red and light steadily or flash Used to stop or start scanning a document Document guides selector Hopper extension tray AC inlet Imprinter door Power cord Top cover FAN exhaust vent USB connector Plugs may vary in shape depending on country area Exit door ...

Страница 12: ...Component Identification 12 Flatbed sheet Flatbed glass Exit door release ADF glass B Reference plate F Reference plate B ADF glass F ...

Страница 13: ... replaced Refer to Operating Instructions CD ROM for the way of cleaning or replacing the rollers 1 2 Check the status of the scanner using the User Utility The User Utility is included in the CD ROM Refer to Installing Software in the Installation Manual LED light Status Green Ready to scan or scanning Green flashing Sleep mode Orange Ready to scan or scanning with caution 1 Orange flashing Initi...

Страница 14: ...er The number of sheets depends on the paper quality If a paper feed problem occurs reduce the number of sheets of the document loaded on the hopper Recommendable paper Plain paper Documents must also meet the following conditions Page thickness g m 40 11 lbs 52 14 lbs 64 17 lbs 75 20 lbs 80 21 lbs 90 24 lbs 104 28 lbs 127 34 lbs Maximum number of sheets 320 260 200 170 160 140 120 100 Curl Foldin...

Страница 15: ...wing Clean the rollers and sensors Reduce the number of sheets of paper loaded on the hopper Change the orientation of documents placed in portrait orientation to landscape orientation or vice versa Scan the documents using manual feeding Set the feed speed to Slow Scan the documents with the flatbed Make sure to remove paper clips and staples from documents before scanning Failing to do so can da...

Страница 16: ...ocument feed the document 1 page at a time When scanning important documents or bound documents feed them manually 2 Documents that have been stapled together or stacked together as in a file folder will need to be separated 1 Fan the stack of documents to separate all the edges 2 Hold both ends and bend the documents as shown in the illustration 3 To flatten the documents hold firmly and pull the...

Страница 17: ...than the actual size of the documents 5 When using long paper pull out the hopper extension tray from the hopper Then raise and adjust the exit stopper to the position a little longer than the actual length of the document Document guide Hopperextension tray Hopper Exit stopper ...

Страница 18: ...opper with the side to be scanned facing up Then push them in the direction of the arrow until they stop The amount of documents should not exceed the limit mark on the document guide This may cause a paper jam or skew Fill indicator Limit mark Portrait Landscape ...

Страница 19: ...the document to be output When scanning the document with the length between 420 mm A3 size or 432 mm 17 in and 2540 mm 100 in close the exit stopper 8 Open your scanning application 1 and scan the documents 1 The software RTIV and QuickScan Pro demo included with the scanner can be used for scanning the documents Document guide Exit stopper ...

Страница 20: ...have been stapled together or stacked together as in a file folder will need to be separated 1Fan the stack of documents to separate all the edges 2 Hold both ends and bend the documents as shown in the illustration 3 To flatten the documents hold firmly and pull them apart as shown in the illustration Repeat these steps as necessary 3 Unlock the document guide Slide the document guides selector i...

Страница 21: ...so that the center of the smallest sheet will be fed to the center of the paper slot If the document is not properly aligned the pages will not be fed correctly The amount of documents should not exceed the limit mark on the document guide This may cause a paper jam or skew Depending on the types of paper the document may not be fed smoothly In such case reduce the number of sheets of the document...

Страница 22: ... hopper again and adjust the document guide according to the size of the document to be scanned Make sure to align the document pages along one side Make sure that the center of the smallest sheet of the document will be fed to the center of the paper slot 9 Open your scanning application 1 and scan the documents 1 The software RTIV and QuickScan Pro demo included with the scanner can be used for ...

Страница 23: ...e direction shown in the illustration until the 1 and 2 marks are aligned to unlock the document guide 2 Completely spread apart the document guides 3 Lock the document guide Slide the document guides selector in the direction shown in the illustration until the 1 and 2 marks are aligned to lock the document guide 2 1 Document guides selector 1 2 Document guides selector ...

Страница 24: ...acters or magnetic strip cards on the flatbed Magnets are located in the flatbed cover flatbed sheet and may damage data stored on printed materials and cards When scanning with the flatbed 1 Raise the hopper tray 2 Open the document cover 3 Place the scanning side of the document face down on top of the flatbed glass towards the upper left corner If the document is bent or folded straighten it Do...

Страница 25: ...ure to close the document cover before use After scanning open the document cover and remove the document 7 Open your scanning application 1 and scan the documents 1 The software RTIV and QuickScan Pro demo included with the scanner can be used for scanning the documents Scanning thick documents When scanning thick documents such as a book please note the following items Please note that areas of ...

Страница 26: ...d on the included CD ROM Control sheet functions Simplex Duplex Binary 256 level gray Color Dynamic Threshold Dither Error diffusion Function 1 9 Separation Sheet Multiple control sheets can be used To use control sheet functions your scanning application must support control sheets When using control sheets refer to the instruction manual of your scanning application Print out control sheets from...

Страница 27: ... In order to print control sheets Adobe Reader must been installed on your computer Refer to the instruction manual for your printer for details about changing print settings 1 Insert the CD ROM into the CD DVD driver on your computer If you have a feature called Autorun activated the installation process will start automatically The setup window will appear If the AutoPlay dialog box is displayed...

Страница 28: ...ent must be performed Please refer to page 47 for more information regarding the shading adjustment ADF reference plate setting 1 Turn off the scanner 2 Pull the exit door release to open the exit door 3 Using your finger turn the reference plate B over Confirm that the reference plate has changed and is locked in its proper position 4 Using your finger turn the reference plate F over Confirm that...

Страница 29: ...om the flatbed cover 3 The flatbed sheet is attached to the document cover with magnets 4 Turn the flatbed sheet over and then place it in the upper left corner of the flatbed glass Set the flatbed sheet to the left 5 Close the document cover When you close the document cover close it securely until it is locked The flatbed sheet will become magnetically attached to the document cover Hopper tray ...

Страница 30: ...he ADF door 2 Pull the jammed document towards the paper slot When the jammed paper cannot be removed remove it from the exit path Refer to page 31 When only the bottom end of jammed paper is visible open the exit door while leaving the ADF door open to remove the jammed paper Pulling the jammed paper with the ADF door closed may damage the document 3 Close the ADF door When you close the ADF door...

Страница 31: ...tray 2 Pull the exit door release open the exit door and pull the jammed document When the jammed paper cannot be removed remove it from the paper slot Refer to page 30 3 Close the exit door When you close the exit door close it securely until it is locked Hopper tray Exit stopper Exit door Exit door release ...

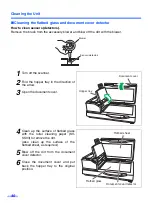
Страница 32: ...e scanned images Refer to page 37 Clean the flatbed glass and document cover detector Refer to page 40 If the documents you scan are dirty then the scanner components will also become dirty To maintain proper scanning clean the scanner components frequently When scanning with the flatbed and black dots or white patches occurs open the document cover and clean the flatbed glass and flatbed sheet us...

Страница 33: ...ler Note When wiping off the dirt on the roller surfaces hold the rollers to prevent them from rotating and wipe the roller all the way around them proceeding from one end to the other in the direction of the arrows shown in the figure 4 Open the double feed prevention conveyor in the direction of the arrow shown in the figure by using the indent on the back side ADF door ADF door release Paper fe...

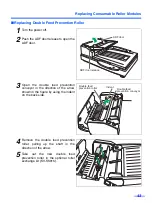
Страница 34: ...o the other in the direction of the arrows shown in the figure 6 Close the double feed prevention conveyor in the direction of the arrow shown in the figure 7 Close the ADF door When you close the ADF door close it securely until the door is locked 8 Clear the roller cleaning counter with User Utility After cleaning the above rollers click Clear Counter button for After Clean Roller with User Util...

Страница 35: ...e way around them proceeding from one end to the other in the direction of the arrows shown in the figure 4 Use the roller cleaning paper KV SS03 to remove the dirt from the surfaces of the 4 free rollers When wiping off the dirt on the roller surfaces hold the rollers to prevent them from rotating and wipe the roller all the way around them proceeding from one end to the other in the direction of...

Страница 36: ...t them from rotating and wipe the roller all the way around them proceeding from one end to the other in the direction of the arrows shown in the figure 4 Use the roller cleaning paper KV SS03 to remove the dirt from the surfaces of the 6 free rollers When wiping off the dirt on the roller surfaces hold the rollers to prevent them from rotating and wipe the roller all the way around them proceedin...

Страница 37: ...anner 2 Pull the exit door release to open the exit door 3 Clean the ADF glass F and reference plate B with the roller cleaning paper KV SS03 4 Clean the ADF glass B and reference plate F with the roller cleaning paper KV SS03 5 Close the exit door When you close the exit door close it securely until it is locked Reference plate B ADF glass F Reference plate F ADF glass B ...

Страница 38: ...urface of the paper sensor and waiting sensor with an accessory blower 4 And also blow off the dirt on the surface of the reflector sheet for the waiting sensor with the accessory blower 5 Blow off the dirt from the double feed detector G and double feed detector R with the accessory blower 6 Close the ADF door When you close the ADF door close it securely until it is locked Blower Sensor detector...

Страница 39: ...ace of the starting skew L skew R and ending sensors with the accessory blower 4 And blow off the dirt from the reflector sheets for the starting skew L skew R and ending sensors with the blower 5 Close the exit door When you close the exit door close it securely until it is locked Blower Sensor detector Ending sensor Skew L sensor Skew R sensor Starting sensor Reflector sheet for skew R sensor Re...

Страница 40: ... direction of the arrow 3 Open the document cover 4 Clean up the surface of flatbed glass with the roller cleaning paper KV SS03 to remove the dirt Also clean up the surface of the flatbed sheet as required 5 Blow off the dirt from the document cover detector 6 Close the document cover and put back the hopper tray to the original position Blower Sensor detector Hopper tray Document cover Flatbed s...

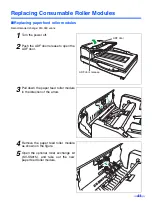
Страница 41: ... the power off 2 Push the ADF door release to open the ADF door 3 Pull down the paper feed roller module in the direction of the arrow 4 Remove the paper feed roller module as shown on the figure 5 Open the optional roller exchange kit KV SS015 and take out the new paper feed roller module ADF door ADF door release ...

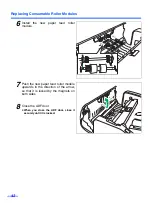
Страница 42: ...l the new paper feed roller module 7 Push the new paper feed roller module upwards in the direction of the arrow so that it is locked by the magnets on both sides 8 Close the ADF door When you close the ADF door close it securely until it is locked ...

Страница 43: ...on conveyor in the direction of the arrow shown in the figure by using the indent on the back side 4 Remove the double feed prevention roller pulling up the shaft in the direction of the arrow 5 Take out the new double feed prevention roller in the optional roller exchange kit KV SS015 ADF door ADF door release Double feed prevention roller Double feed prevention conveyor Indent ...

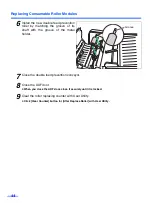
Страница 44: ... of its shaft with the groove of the metal holder 7 Close the double feed prevention conveyor 8 Close the ADF door When you close the ADF door close it securely until it is locked 9 Clear the roller replacing counter with User Utility Click Clear Counter button for After Replace Roller with User Utility Groove ...

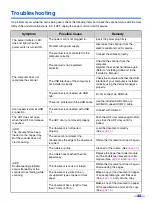
Страница 45: ...or a certified Hi speed USB 2 0 cable Scan speed is slow at USB connection The scanner is connected with USB 1 1 Connect with USB 2 0 The ADF does not open when the ADF door release is pushed The ADF door is not closed properly Push the ADF door release again after you close the ADF door until it is locked ADF The document has been loaded on the hopper tray But the scanner does not start scanning ...

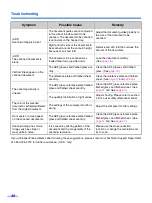
Страница 46: ... plate and flatbed sheet are dirty Clean the reference plate and flatbed sheet See page 37 and page 40 The scanning density is uneven The ADF glass reference plate flatbed glass and flatbed sheet are dirty Clean the ADF glass reference plate flatbed glass and flatbed sheet See page 37 and See page 40 The quantity distribution of light varies Adjust shading Please refer to section 4 6 of a user uti...

Страница 47: ...ely sure to thoroughly clean the ADF glass F area ADF glass B area reference plate F and reference plate B as well as the transport path and drive rollers of the scanning unit If the shading adjustment is carried out while these parts are still dirty it will not be possible to eliminate the lines that form on the scanned images Shading adjustment procedure 1 Start the User Utility 2 Click User Sha...

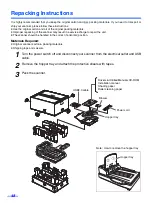
Страница 48: ...air the unit The scanner should be handled in the correct horizontal position Materials Required Original scanner carton packing materials Shipping tape and scissors 1 Turn the power switch off and disconnect your scanner from the electrical outlet and USB cable 2 Remove the hopper tray and attach the protective sheets with tapes 3 Pack the scanner Power cord USB2 0 cable Drivers Utilities Manuals...

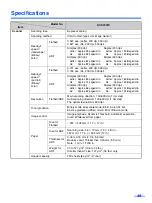
Страница 49: ...r Approx 66 pages min A4 Approx 62 pages min Duplex 200 dpi Letter Approx 160 images min A4 Approx 150 images min Duplex 300 dpi Letter Approx 132 images min A4 Approx 124 images min Resolution Flatbed ADF Main scanning direction 100 600 dpi 1 dpi step Sub scanning direction 100 600 dpi 1 dpi step The optical resolution is 600 dpi Tonal gradation Binary mode Grayscale mode 8 bit Color 24 bit 64 st...

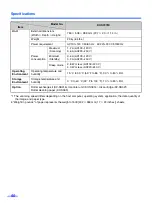
Страница 50: ...quirement AC100 120 V 50 60 Hz AC220 240 V 50 60 Hz Power consumption Maximum Scanning 1 2 A AC100 120 V 0 6 A AC220 240 V Minimum Standby 0 6 A AC100 120 V 0 3 A AC220 240 V Sleep mode 2 8 W or less AC100 120 V 4 0 W or less AC220 240 V Operating Environment Operating temperature and humidity 15 C to 30 C 59 F to 86 F 30 to 80 RH Storage Environment Storage temperature and humidity 0 C to 40 C 32...

Страница 51: ... 34 43 Double feed prevention roller 33 43 Drive rollers 35 36 E Ending sensors 39 ENERGY STAR 2 Exit door 11 28 31 Exit door release 12 28 39 Exit rollers 36 Exit stopper 11 Exit tray 11 15 External dimensions 50 F FAN exhaust vent 11 32 Flatbed 24 29 49 Flatbed glass 12 32 40 Flatbed sheet 12 29 40 Free rollers 35 36 H Hard disk 3 Hopper 11 17 21 Hopper extension tray 11 17 21 Hopper tray 11 24 ...

Страница 52: ...ower switch 11 13 Precautions 9 R Reference plate 12 28 37 Repacking 48 Replacing Consumable 41 Roller cleaning paper 6 9 32 S Separation roller 33 Shading 46 47 Shading paper 48 Specifications 49 Start Stop button 11 Starting sensor 39 System Requirements 3 T Top cover 11 Troubleshooting 45 U Unacceptable documents 15 USB connector 11 USB hub 3 45 User utility 13 34 44 47 W Waiting sensor 38 ...

Страница 53: ...of Panasonic U K Ltd Willoughby Road Bracknell Berkshire RG12 8FP Panasonic Marketing Europe GmbH Hagenauer Strasse 43 65203 Wiesbaden Germany For information of Compliance with EU relevant Regulatory Directives Contact to Authorised Representative Panasonic Testing Centre Panasonic Marketing Europe GmbH Winsbergring 15 22525 Hamburg Germany Panasonic Corporation Web Site http panasonic net Panaso...

Отзывы: