background image


118 


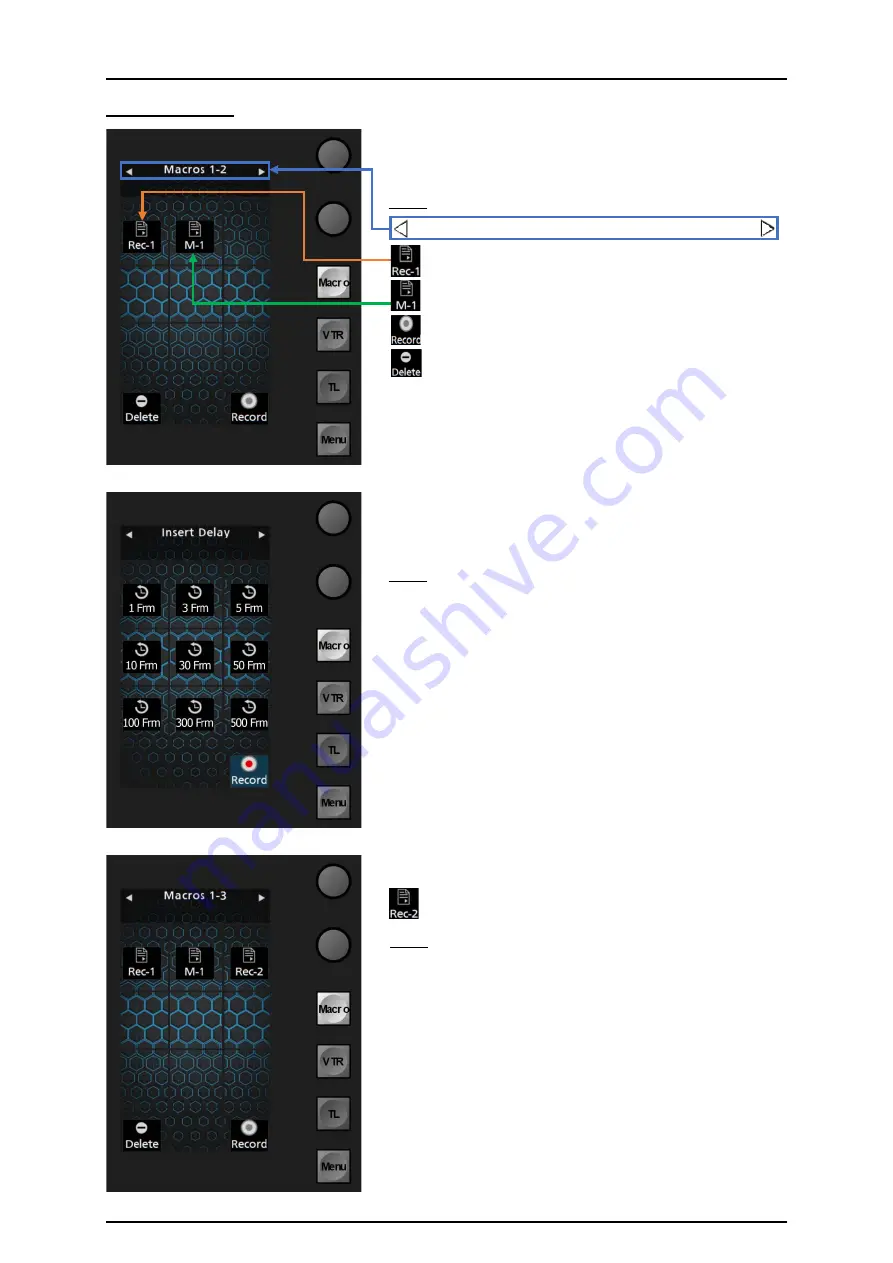
4.6.1 Macros 


Picture 4.6.1.1 

When Numeric Keypad section is delegated to “Macro,” 

various operations can be executed such as Recall, Record, 

Insert Pause, select Bank, and Delete. 


Note:

 Panel-Macros belong to their Panel-Profile (1–8). 


Previous Bank

Macros 1-2 (Bank1-2 Macros)

Next Bank


= Macro recorded via Control Panel “Record” function. 


= Macro recorded via Kairos Creator GUI Menu. 


= Record new Control Panel Macro. 


= Delete Control Panel Macro. 

Picture 4.6.1.2 

Picture 4.6.1.3 

When pressing the “Record” button, the Numeric Keypad 

display turns into an “Insert Delay” keypad with multiple 

different default selections in numbered in Frames: 

1, 3, 5, 10, 30, 50, 100, 300, & 500. 


Note:

 The listed delay times can also be pressed multiple 

times to result in a specific time. 

So, for example, the requested “Delay” time is 46 Frames: 

Press 30 + 10 + 3 + 3 = 46, or any other 

comparable/reasonable combination. 


Press “Record” again to stop recording. 


Once recording is stopped, the display shows the Macro 

recall page with an added new “Panel Macro.” 


= Added new “Panel Macro” with default name. 


Note:

 Kairos Creator GUI can be used for renaming Macros 

and sort the list of appearance. Also Cut, Copy, and Paste 

functionality is supported by Kairos Creator GUI across all 

available Macro locations & destinations. 


Содержание KAIROS

Страница 1: ...ENGLISH DVQP2366YA W1020XX1061 DS YI IT IP Centric Live Video Processing Platform Operating Guide ...

Страница 2: ...her countries f f NDI is a registered trademark of NewTek Inc f f Other names of companies and products contained in this document may be trademarks or registered trademarks of their respective owners Copyright and license f f Distributing copying disassembling reverse compiling reverse engineering and also exporting in violation of export laws of the software provided with this unit are expressly...

Страница 3: ...ord periodically To avoid passwords that can be guessed easily by third parties set a password of at least 8 characters in length including at least 3 different types of characters such as upper case lower case numbers and symbols Restrict access to the system by authenticating the users for example to prevent setting information stored on the system from leaking over the network Do not install th...

Страница 4: ...rce Options 21 3 2 3 Color Adjustments 22 3 3 Menu Delegation Navigation 23 3 3 1 Top Level GUI Menu Bar Kairos Creator 23 3 3 1 1 Production 23 3 3 1 2 Settings 24 3 3 1 3 Deck A Deck B 25 3 3 1 4 Help 26 3 3 1 5 GUI Tab Cycling History 27 3 3 1 6 GUI Undo 27 3 3 2 Kairos Creator Menu System 27 3 3 3 Mixer Tab Selection 29 3 3 3 1 Control 29 3 3 3 2 Scenes 29 3 3 3 3 Tools in Working Area 34 3 3 ...

Страница 5: ...4 1 Rest API Overview 95 3 4 2 AUX All 95 3 4 3 AUX Delegation 96 3 4 4 Inputs Tally Indication 96 3 4 5 Macros 96 3 4 6 Multiviewer 96 3 4 7 Scenes 97 4 Control Panel 98 4 1 General Panel Overview 98 4 2 Kairos Creator GUI Panel Tab 99 4 2 1 Smart Delegation 101 4 3 New Layout Wizard 104 4 4 Transition Section 106 4 5 Control Panel Crossbar Section 109 4 6 Numeric Keypad Section Menu 112 4 6 1 Ma...

Страница 6: ...cy executed on a GPU while the open software architecture ensures excellent system flexibility and scalability A variety of video inputs and outputs are available with KAIROS to support not only baseband signals such as SDI but also new IP signals including ST 2110 and NDI to realize remote live video production KAIROS uses the GPU for the video processing thus allowing flexible video production u...

Страница 7: ...er with differing parameters As an example a single layer could have multiple chroma keys applied with different key colors selected so as to fix a poorly lit chroma key background All Layers including BGD Layer and Aux Buses are capable of enabling Bus Dissolve whereby the dissolve type apart from Mix Dissolve can also select from Wipes DVE s and User Transitions such as various programable Repla...

Страница 8: ... Player Clip Player Stills etc AUX Programmable Output section Live View Multi Viewer Monitoring in GUI Layer A Layer is treated like a generic Keyer for the purpose of compositing but a layer differs from a Keyer in that it can contain multiple combinations of attributes even of the same type such as Luminance and Chroma keys Masks Wipes DVE s Color Corrections etc see section 1 2 3 Layer Source ...

Страница 9: ...sed on pure IP infrastructure with SDI IP Gateway and Ethernet switch System Integration Example SDI based This system is based on SDI HDMI DP only infrastructure with Deltacast Flex series Note Install or remove Deltacast Flex modules with Kairos Core Main Frame turned off If the modules are installed after booting they may not be recognized ...

Страница 10: ... used together in a KAIROS system 1 5 Peripheral Devices Peripheral devices using the following protocols can be connected directly through the Network AMP over LAN Advanced Media Protocol PTZ Control Panasonic Tally over IP direct Panasonic cameras ...

Страница 11: ...e display port terminals and turn them on If the display port terminals are connected after Kairos Core Main Frame is powered up they may not be recognized 2 Connect LAN1 of Kairos Core Main Frame and Kairos Creator GUI PC in the same network Open the Kairos Creator and connect to the Kairos Core with appropriate IP address setting Default IP address of Kairos Core LAN1 192 168 10 10 The MIXER Con...

Страница 12: ...e 4 6 Numeric Keypad Section Menu for setting up the IP address If the Kairos Control is properly connected to the Kairos Core source names are displayed on the lower or and upper crossbar section Lower crossbar section Upper crossbar section Source name display area 1Gbit Ethernet Default 192 168 10 10 Default 192 168 10 20 LAN LAN1 Source name display area Kairos Core Main Frame Kairos Control C...

Страница 13: ...directory is empty MV1 contains Main PGM Main PVW followed by IN01 IN08 style 10 Split A MV2 contains IN09 IN24 style 16 Split Main consists of BGD 2 Layers Basic Main Scene with Scene examples Templates assigned to Bus cross points Background Layer PGM PST mode is set to Swap This can be adjusted in the GUI Mixer Scenes page Parameter View panel on the right side under Layer Settings Advanced Mak...

Страница 14: ...lates folder is empty MV1 contains Main PGM Main PVW followed by IN01 IN08 style 10 Split A MV2 contains IN09 IN24 style 16 Split Main consists of BGD 2 Layers M E s consist of BGD 4 Layers 3M E Scenes are created for Main Scene M E1 M E2 and the Templates folder is empty MV1 contains Main PGM Main PVW followed by IN01 IN08 style 10 Split A MV2 contains IN09 IN24 style 16 Split Main consists of BG...

Страница 15: ...s Creator and every participating Kairos Core requires a valid License file in order to function properly within the system The Kairos Creator GUI Software for PC needs AT SFC10 Software Key for Kairos Creator The licenses for Kairos Core Main Frame are divided into separate parts which include several available License packages so far AT SF001 4K Support AT SF002 I O expansion AT SF003 Canvas Out...

Страница 16: ... Help menu in the top left corner allows to select Install License which is used for the connected Kairos Core Please refer to the following site for license installation https panasonic biz sav kairos_e Picture 2 2 2 1 Picture 2 2 2 2 The installed license files are listed here ...

Страница 17: ...m Software Version Once the Kairos Creator App is running the Help menu in the top right corner allows to select About Picture 2 2 3 1 Picture 2 2 3 2 Software version of Kairos Creator Software version of Kairos Core ...

Страница 18: ...There is a time slot of approx 2 3 seconds in order to hit the cursor up or down button on the Keyboard in order to stop the time out for the auto boot sequence Selecting KairosCore Network Configuration will launch after confirmation of a subroutine to be able to access the 1Gb network adapter settings on KAIROS Core Note All navigations from now on can be simply done using the arrow cursor butto...

Страница 19: ... the connected Keyboard When finished confirm OK After entering the IP address and hitting OK the next 2 dialogs will handle the according Netmask Default Gateway settings After confirming OK for the Netmask and Gateway the final screen is used to Apply the new settings Use the Keyboard cursor buttons to select Apply and confirm with OK This will use the new IP settings and continue to boot KAIROS...

Страница 20: ... resources being used regarding numbers of Layers Scenes added attributes e g ColCorr DVE s ChromaKey etc Outputs and so on there is a GPU Meter located in the top right corner of every GUI Menu page next to the Macro Record button This monitors the actual workload of the processing system GPU per connected KAIROS Core GPU Meters should not exceed 100 workload Note Apart from the Kairos Creator GU...

Страница 21: ... window will close immediately Clicking the Cancel button after changing a source Picture 3 2 1 1 on previous page will open this dialog Picture 3 2 1 2 Click Save to use the new source and close this dialog box as well as the Source Select window Pressing Discard will revert all source changes and close both this dialog box and the Source Select window Cancel in Picture 3 2 1 2 will close this di...

Страница 22: ... be entered for Hue Sat Lum or for individual Red Green Blue Hexadecimal color values can be entered in the HTML box Any change in one area updates the other areas simultaneously The according box is present as well only when Alpha channel is supported Use the Pick Screen Color function to pick a color from anywhere on the computer screen surface including outside the GUI menu Up to 16 Presets can...

Страница 23: ...oduction related tasks are handled including New Load Save Save As The five most recent Productions that were loaded are listed next Choosing Exit will close the dialog For more detailed information regarding the individual items of the Production drop down Menu please refer to the individual sections in this Manual Note The keyboard shortcuts if available listed to the right of some menu commands...

Страница 24: ...Level Warning level db level for red bar indication Caution level db level for yellow bar indication Min level db minimum display Level Peak hold hold peak audio level duration Peak decay attack time to decay peak level Fade type X Fade or V Fade mode Fade time ms Audio dissolve duration Note Audio fades are executed on PGM Layer or Aux buses after the designated Video crosspoint has changed Selec...

Страница 25: ...elegated but Scenes within them can be selected Note Smart Delegation is only available for the Deck B drop down menu This selects a special Auto Delegation mode for the GUI Mixer Control menu page When Smart Delegation is enabled the choices are Preview or Program The selection will be used to unfold a selected Scene from Deck A PVW or PGM bus to be delegated to Deck B For more detailed informati...

Страница 26: ...es Required for KAIROS starting on page 15 in this manual OSS license info from the Help drop down menu will open a list of Open Source Software Information used in KAIROS product Use the slider on right hand screen to scroll through the document Select About from the Help drop down menu Here the System Id information for the KAIROS CREATOR PC and the Connected Server Kairos Core are displayed whi...

Страница 27: ...r Insert and Delete operations 3 3 2 Kairos Creator Menu System The start screen of Kairos Creator shows the Mixer Main Tab The structure of KairosCreator is a revolutionary new menu paradigm designed to be only one level deep This allows the user to jump directly from their current menu page to any other menu page in a maximum of two menu tab clicks Kairos Creator always starts up on the Control ...

Страница 28: ...click any other Menu tab in the overlay to jump to that Menu page to change and close the overlay window Or click on any Main tab left column to go to the last selected item from that row and close the overlay window The last selection in each row is indicated by the Light gray button To close the overlay window without changing the Menu page simply re select the current page In this example you w...

Страница 29: ...PVW is calculated from the component s including BGD and Layer s that are selected for Next Transition These are usually operated with the Lever arm the Cut or Auto button below The Preview functionality can be selected for individual Multiviewer tiles and Aux buses Beside the Next Transition selection method each transition can still be executed individually using the Cut and Auto buttons located...

Страница 30: ... down selection for Layers in the wizard allows a maximum of 6 Layers Background once the scene has been created Layers can be added and removed as needed New Layer Group only works when a scene is selected in the scene tree If a Directory is currently highlighted selecting the New Layer Group action from the Insert menu will open a Message Box telling you to Select a scene first Click OK to ackno...

Страница 31: ...rder of the objects access clipboard functionality Rename or Delete the object The according keyboard shortcuts are listed to the right Due to the cursor selection in Layers window the Parameter View window is only showing the relevant Scene settings All settings here can be changed on a Scene by Scene basis Resolution 1280 720 1920 1080 3840 2160 Scene Color and Tally indication The Background Bu...

Страница 32: ...ayer Settings unfolded in the Parameter View panel present additional Layer controls for Opacity Source link PGM PST mode see bottom of Page 7 section 1 2 3 Layer in this manual Mode Size default settings per Layer related to the Scene Settings X Y Resolution Preset Enabled or B Bus Clean mask to enable disable a Layer from a designated Output Dissolve enable per Layer also available for Aux Buses...

Страница 33: ...sbar below the working area which changes the layout and color to match the parameters of the currently selected layer Notice that Layer 1 is now visible as indicated by the eye ball in the 3rd column of the Layers panel Preset enable adds A B bus functionality to the source control for any layer You can select a source on either bus by clicking the edit pencil which will open the source selection...

Страница 34: ...ibed in the following examples Path Linear and Path Animation can be used once selected and enabled via the button in the lower right corner Picture 3 3 1 3 16 Picture 3 3 1 3 19 Picture 3 3 1 3 18 Picture 3 3 1 3 20 A list of default effects for instant use per Layer picture 3 3 1 3 17 For more effects use the button located in the lower right corner of the Scenes menu Selecting more effects from...

Страница 35: ...in the Layers panel are not visible in the working area Left click an object to select it and it will be framed in a light red color All the surrounding parameter panels will change to reflect the currently selected object Where multiple layers overlap a right mouse click will open a context box allowing you to select the desired layer Picture 3 3 3 3 1 1 Picture 3 3 3 3 1 2 Picture 3 3 3 3 1 3 Pi...

Страница 36: ...r Settings described on page 38 in this Manual Picture 3 3 3 3 2 6 When hovering the mouse over the crop edges the focused edge can be grabbed with left mouse click and modified Positioning the cursor in a corner where 2 edges are connected will focus both adjacent edges shown in red and allow control of the corner cropping when the left mouse is clicked and held down Picture 3 3 3 3 2 1 Picture 3...

Страница 37: ...es as indicated in red This allows click and drag repositioning of the entire crop frame Now the image will crop when dragging the image while keeping the left mouse button pressed toward the screen edges Note The crop automatically ends at the screen edges Picture 3 3 3 3 2 3 Picture 3 3 3 3 2 4 ...

Страница 38: ...vanced controls within Crop Settings to expose the Rounded Corners and individual Crop Edge Softness controls By default Global softness is enabled for crop edges as indicated by the checked box next to Global softness Untick the check box for Global softness to enable individual edge softness controls which you can control with a mouse using slider or arrows or by entering numeric values When Glo...

Страница 39: ...n expanding the Transform 2D Settings within the Parameter View window allowing to modify the values by mouse using the slider or arrows or by entering numeric values in the designated area right next to the slider controls Rotation coordinates in Parameter View window are labeled Rotation origin X Y aka Rotation Axis Here numeric values can be entered or modified using the drag pad right next to ...

Страница 40: ... be entered or modified using the drag pads next to the value boxes for each individual corner Top left X Y Top right X Y Bottom left X Y Bottom right X Y Enable and Disable the effect with the switch and Reset to Default with the rewind button Overall the Corner Pinning Interpolation Mode can be changed between 2D and 3D Note When positioning a Layer regardless of working area or drag pad control...

Страница 41: ... the effects panel to the right of the categories panel In this case only In Out Effects are available and the Mix effect out of the Mix In Out category is selected Also a Parameter View will show all available modifications for the selected transition type such as manual slider for Fader control Transition Duration the Mode for Normal Reverse run direction indicating the current Direction of the ...

Страница 42: ...icture or OTS Over The Shoulder box In addition to having A B Bus enabled on Layer 1 a separate In Out Effect can be selected to bring the layer in and out Combinations e g In Out A B are possible as well Available Transition Types are Picture 3 3 4 1 4 Note This grouping of selections has been graphically composited and is not available as an actual GUI menu However all Transition types are avail...

Страница 43: ...ion 20 Frames no Layer component enabled Picture 3 3 4 1 7 Various Transition Types applied to Layer components Layer 2 is not participating in this Transition Picture 3 3 4 1 8 For overall trimming use the graphic slider controls and or the TransitionEffect Settings underneath Parameter View to adjust individual selected Transitions Layers ...

Страница 44: ...selecting Transition to set the transition duration Ctrl D rename it F2 or delete it Del With any transition component selected you can left click the Transition item in the menu bar of Kairos Creator to set the duration of the transition or use the keyboard shortcut Ctrl D Picture 3 3 4 1 10 Picture 3 3 4 1 11 Picture 3 3 4 1 12 Picture 3 3 4 1 13 Set duration opens this pop up window Numeric ent...

Страница 45: ...ght click an icon in the User area to access various functions for specific modifications Picture 3 3 4 1 22 Use Set effect in order to apply an effect for a selected Transition For multiple Transition types used in a single Transition select Add effect or drag and drop the selected effect towards the desired Transition position Change a User Transition position Left or Right also by using the lis...

Страница 46: ... to open the menu for Clip selection If a Video Clip contains an alpha channel key signal which is supported by KAIROS it will not be necessary to select an Overlay key source unless you wish to override it To perform an A B transition that matches the Overlay an animated mask signal can be associated with the ReplayWipe by selecting it as the source for A b mask Both the Key signal and the Mask s...

Страница 47: ...3 3 3 5 5 where Volume settings can be modified using the slider or arrows or enter numeric values in the designated area right next to the slider controls Clicking the left mouse under or above the Fader surrounded with cyan color border will also control the volume in single steps in the up or down direction Double clicking the left mouse on any of the Audio Mixer Channel Name displays surrounde...

Страница 48: ...ontrols that have already been explained Apart from that the context menu also shows all individual supported keyboard shortcuts Set Source Ctrl O Opens the Inputs selection Rename F2 Opens the Rename dialog box Channel Shuffle Ctrl F Opens the Channel Shuffle menu Gain Ctrl G Opens the Gain control menu Audio Delay Ctrl D Opens the Audio Delay dialog box Unset Source Ctrl Shift G Will set None as...

Страница 49: ...value in the designated area Use Ok to confirm changes Cancel will open the selection to either Save Discard or Cancel the former changes to this Gain setting When selecting Unset Source from the right mouse click context menu picture 3 3 3 5 12 or the corresponding keyboard shortcut Ctrl Shift O the Video source for the selected Audio Mixer Channel will be cleared and set to None Fader Gain contr...

Страница 50: ...x Scene are published into the designated area of the loaded channel Applying changes inside the Painter menu from Control to Edit dialog will give access to edit add delete and modify for Gfx Scene objects Note The drop down menus in the upper left corner are equally the same regardless of the Control or Edit dialog selection However the main use will typically take place when in Edit mode Clicki...

Страница 51: ...symbol next to the Text object name indicates the object type as well Also when selecting one of the Text objects the naming dialog launches first with the default name of the selected object The Text object is used to represent all sorts of text The Counter object is typically used for scores and Clock for Game clocks Timer The World Clock object is used as a regular digital style real time clock...

Страница 52: ...last page For this Gfx Scene named Example which is part of the New Production wizard explained in section 1 7 Load Save Production Behavior starting on page 13 in this manual every listed object is associated with a graphical element in the working area When selecting a Gfx Scene Cursor focus within the Painter Edit dialog all belonging objects are listed in the designated Objects area Picture 3 ...

Страница 53: ...ws or by entering numeric values in the designated area right next to the slider controls When in GfxFill Settings the method Solid is selected a single color will be use to fill the selected object whether it s a Text based or a geometric object In this case all other controls controls surrounded with an Orange border in GfxFill Settings are disabled The next examples will use a full screen box o...

Страница 54: ...gures are used to display the Counter Score Picture 3 3 3 6 28 Picture 3 3 3 6 29 The field Start is used to define the Clock time to start with However since the default Direction is set to count in the Up direction the Start field can also contain a time e g 30 00 minutes and no hour and start to count in the Down direction see picture 3 3 3 6 30 underneath Use Start Stop and Reset buttons to co...

Страница 55: ...dit page is mounted only graphically into the Control dialog to visualize the interacting controls Counter A controls the TEAM A score side using the buttons Increase Decrease Reset 0 Counter B controls the TEAM B score side using the buttons Increase Decrease Reset 0 The Clock controls are Start Stop Reset to the initial preset time entered in Edit mode for Clock Picture 3 3 3 6 32 The Sub Title ...

Страница 56: ...ual Clicking on the Production menu in the upper left corner of Kairos Creator and select Live view from the drop down menu allows to open a new Viewer pane where the right mouse click context menu within the new window allows to select from the listed streams provided by Kairos Core Multiviewer outputs and configured RTP streams Multiple Stream windows can be launched in parallel With the selecti...

Страница 57: ...odifying Audio Delay 0 2000ms and a Clear layout function can be operated adjusted in this GUI section per Multi Viewer Also Audio Levels are visualized for the selected Audio source When unfolding the Advanced settings controls for Text scale Size and enable or disable for Show tally borders can be operated adjusted per Multi Viewer Picture 3 3 5 2 2 When selecting a tile tile 2 in this case the ...

Страница 58: ...MV tile is Disabled Kairos allows to select 1 16 Tracks per MV tile Tracks 1 8 are displayed to the Left or in the Top area of the tile Tracks 9 16 are displayed to the Right or in the Bottom area Left Right areas are used when Audio bar orientation is set to Vertical Top and Bottom areas are used when set to Horizontal Advanced tile settings can be copied to all other tiles for the selected Multi...

Страница 59: ...e symbol in Source Settings at the bottom of the Parameter View panel next to the Input icon IN7 in this example to open the Inputs overlay window for selection listing all available sources A double left mouse click on a destination in the MV Inputs panel a right mouse click on one of the items listed in the MV Inputs panel or a double left mouse click directly on a Multi Viewer tile will open th...

Страница 60: ... the symbol in Multiviewer Settings at the top of the Parameter View panel next to the Audio source icon scene Main is selected in this example to open the overlay window for this selection listing all available Audio sources The selection contains all existing Scenes Inputs FxInputs ClipPlayers a configurable AudioMixer and Audio Generators Picture 3 3 5 2 14 The speaker symbol is visualizing the...

Страница 61: ...ated Control Panel with selected activated Profile See also section 4 6 1 Macros on page 118 Record Button for Global Macros Picture 3 3 6 1 1 GUI Macro Bus row with name display for the selected individual Macro group including Spacer picture 3 3 6 1 2 List of available Global Macros Individual Macro sections Individual programable Macro sections for Global Scene and Panel Macros picture 3 3 6 1 ...

Страница 62: ...cro Record Ctrl R Will start recording a Macro which is in cursor focus Default name Rec indicating Rec for Record created Macros and for numbering Stop Record Ctrl Shift R Stops recording Macro which is in cursor focus Set Color Ctrl Shift C Enables specification of a Color per Macro using the color adjustment dialog see section 3 2 3 Color Adjustments on page 22 in this manual Edit Ctrl E Opens ...

Страница 63: ...ed by the Macro Monitor box for any kind of errors during Macro editing such as logical spelling syntax etc Save changes and not closing edit dialog Insert Wait editable pauses in frames or seconds open Macro Edit Help Close edit dialog without changes Export Macro Import Load new Macro Play Macro loaded into Edit mode The Macro can be played back while in Edit mode for example for testing purpose...

Страница 64: ... 3 Picture 3 3 6 2 4 Picture 3 3 6 2 4 Opening Macro Edit dialog and clicking on the Insert Wait button located in the headline reveals the sub selection for Time with selectable presets in Microseconds msec and Seconds sec Once a pause Wait state gets inserted into a Macro the numbers can be changed within the editor by simply overwriting and saving them The sub selection Frame offers selectable ...

Страница 65: ...in top level directory named Main and a Transition called BgdMix Productions created with the built in wizard when selecting Production New in upper left corner of the GUI will always provide these 2 elements For more details regarding the available Production types within the wizard see section 1 7 Load Save Production Behavior on page 13 in this manual See next page for more details regarding th...

Страница 66: ... last loop call loop function that is executed in a specified cycle when the App is running Model access functions object_path object_id set get call call parent first_child next_sibling object get the ObjectID from a path object_type path get the path from an ObjectID parameters optional functions optional Note An Application also provides an AutoStart parameter If set to 1 true the application w...

Страница 67: ... begin select FX Inputs under the SOURCES tab The default Production has an empty container in the upper left section of the FX Inputs tree labeled FX Inputs Picture 3 3 7 1 1 To create a new FxInput right click on the container icon into which you wish to add an item and select New FxInput from the pop up menu Selecting New Directory will create a new directory inside the current one You can also...

Страница 68: ...nput Selection Available Source groups Sources available within Inputs group Picture 3 3 7 1 6 Picture 3 3 7 1 7 Picture 3 3 7 1 8 Rename with the F2 keyboard shortcut or the pop up drop down dialog as shown in the picture Click OK to confirm and Cancel to abort without changing the name Note For more detailed information look at section 3 2 1 Source Input Selection starting on Page 21 Picture 3 3...

Страница 69: ...ed in section 3 3 3 2 Scenes starting on Page 29 of this manual Created FX Inputs in their designated directories The Move Up Move Down controls which are used to change the order of FX Inputs within a directory can be found in the right click context window Main FX Inputs directory Subdirectories within FX Inputs Empty directory Picture 3 3 7 1 11 Picture 3 3 7 1 12 ...

Страница 70: ...Still to Load to RAM When selecting a Still which is already loaded to RAM the very first entry in the context menu will change to Unload from RAM Select a Still in order to Rename or Delete it To create a new folder use New Directory which will open a new pop up window Picture 3 3 7 2 3 asking for a new directory Additional keyboard shortcuts are Ctrl L Load to RAM Ctrl Shift N New Directory F2 R...

Страница 71: ... to show or hide the directory tree on the left of the Stills page Picture 3 3 7 2 6 on page 71 The Show extensions function from the View pull down menu will toggle to Show or Hide the file specific format or use the Keyboard shortcut Ctrl U to toggle This arrow marker is indicating that this folder contains at least one subdirectory which is not visible in the plane view mode Picture 3 3 7 2 1 N...

Страница 72: ... 2 Stills section on page 70 in this manual A new Clip can be imported Import Clip or an existing Clip exported Export Clip The functions Set mark in out Clear mark in out will be explained on the next page Additional keyboard shortcuts are Ctrl L Unload from RAM F2 Rename Del Delete Ctrl Shift N New Directory Ctrl I Import Clip Ctrl E Export Clip Ram Player main menu page Individual created direc...

Страница 73: ...tadata per Clip The Set mark in Set mark out functions can be used in order to trim a Clip regarding Start time TC and or End time TC The Goto function can address specific Clip position as listed Begin End Mark in TC Mark out TC The Channel context menu additionally provides TMCs Tape Motion Controls for Play Reverse Play Stop Ram Player TMCs Picture 3 3 7 3 3 Picture 3 3 7 3 4 Ram Player Channel...

Страница 74: ...he left of the Clip Browser Compare below with Picture 3 3 7 2 6 from page 71 in this manual The arrow marker at the Wall directory is indicating that this folder contains at least one more subdirectory 3 in this case which is not visible in the plane view mode Picture 3 3 7 3 2 The Show extensions function from the View pull down menu will toggle to Show or Hide the file specific format or use th...

Страница 75: ...s except Play Reverse Playmodes and Channel handlings are identical to the former described Ram Player controls see section 3 3 7 3 Ram Player Unlike the Stills and Ram Player Clips which have to be loaded into the RAM memory first the Clip Players perform a live decompressed playback from the internal server disk No additional operation in terms of conversion is required Note Like in Ram Player m...

Страница 76: ...o enter a name for the ColorMatte 1 After entering the name and confirming with OK the new Matte will be added to the list Cancel will abort the dialog The ColorMat Settings items are Tally On Off Color when visible on designated output Position relative Wash position related to the Angle settings Softness Wash softness between ColorA ColorB Enable Spin Activates the Speed control and disables Ang...

Страница 77: ...the selected Aux bus for a pop up menu Picture 3 3 8 1 3 3 Click the Set source button in the Parameter View GUI section Picture 3 3 8 1 4 4 Click the graphic Crossbar section at the bottom of the GUI menu Picture 3 3 8 1 1 5 Use the Ctrl O keyboard shortcut The Input selection dialog will come up next except when using method 4 graphic crossbar selection as already described in section 3 2 1 Sour...

Страница 78: ... disable all selections at once See the next page for details Output resolution displays the defined Output Settings for a selected Auxbus Source resolution identifies the selected Scene resolution settings Auto fit On Off controls whether or not a selected Auxbus source is auto scaled in order to fit the specified Output resolution When Auto fit is turned Off the Mapping offset Zoom controls are ...

Страница 79: ...arious other effects are available Selecting Source Substitution will add the effect to the list Setting up a list for Source Substitution when clicking on the set button right next to Table which will open a new dialog box Delete effect from list Enable Disable effect Set edit Table list for Source Substitution Picture 3 3 8 1 8 Picture 3 3 8 1 9 Opening the Source dialog for selection Substituti...

Страница 80: ...8 2 1 3rd Column displays Tally information per input 1st Column displays the physical input name 2nd Column displays the user production input name Symbol for connected remote external devices such as VTR s PTZ Cameras etc Picture 3 3 8 1 1 1 Picture 3 3 8 1 1 2 Picture 3 3 8 1 1 3 Tally can be modified for each individual Aux Bus using the Aux Bus drop down menu in the menu bar the right mouse c...

Страница 81: ...oard shortcut F2 on focused item All dialogs would be continued as follows Picture 3 3 8 2 4 Picture 3 3 8 2 5 Selecting an Input where a VTR is connected will enable additional controls Picture 3 3 8 2 6 Selected device type is VTR Right mouse click context menu Loaded Clip External device TMC commands Clip Timecode position Clip positioning shuttle bar Loop Mode On Off Available Clips on externa...

Страница 82: ...onality on connected network devices for example Robotics Intercom etc Creating a New Directory is also available in order to help organize individual categories of commands and or controlled devices e g groups of Robots PTZ s Video Servers etc Note Functions in the Edit drop down menu or right mouse click context menu are disabled when there s no existing object e g Directory IP Command or HTTP C...

Страница 83: ...s selected Entering the Edit dialog from the right mouse click context menu on a HTTP command There are 3 different request methods available to select from GET POST PUT After editing the entries Url Body relevant to the selected method the dialog can be confirmed and closed with OK Changes in the Body field must be confirmed by save before use The Send button allows to send the entered command pr...

Страница 84: ...r Save Discard Cancel the action as described on previous page page 83 Picture 3 3 8 3 5 3 3 9 Setup Tab Selection 3 3 9 1 System Settings Multiviewer Resolutions can be adjusted separately from the AUX Outputs The System Frequency determines the overall processed system framerate applied to all Video Outputs including connected Multiviewer However every Output provides individual selectable frame...

Страница 85: ...40 50 1234 multiviewers 1 sdp for Multiviewer 2 MV1 Address and MV1 Port address the stream for Multiviewer 1 output MV2 Address and MV2 Port address the stream for Multiviewer 2 output The Domain settings define the appropriate PTP Network Interface determines where the physical PTP connection to the KAIROS Core is derived from QSFP28 1 in this case The selection also contains LAN 1 and LAN 2 Gb ...

Страница 86: ...ons in the Kairos Creator Settings drop down menu See section 3 3 1 2 Settings on page 24 in this manual for details The QSFP28 2 function is not supported yet Enables or disables the individual Network Adaptors using the designated check box LAN1 Onboard wired network adapter 1 1 Gb Lan Enabled LAN2 Onboard wired network adapter 2 1 Gb Lan Disabled QSFP1 High speed Network interface 1 100 Gb Lan ...

Страница 87: ...ed via NMOS protocol The format per input is auto sensed and displayed Picture 3 3 9 2 5 Click the symbol in order to activate Video IP and Port settings for adjustments When finished press the keyboard Return or Enter key or click on the green symbol to confirm and close Only the first input out of a group of 4 can select 4K indicated with the yellow symbol in which case all other inputs in that ...

Страница 88: ...le the selected input Picture 3 3 9 2 8 For a Stream input selection the Stream type RTP SRT RTMP RTSP and the entries for IP and Port number are required in a first step For an NDI input an NDI stream can be selected from the NDI streams published on the network Default NDI stream selection is None Selecting the drop down menu on the far right shows the available NDI network streams After selecti...

Страница 89: ...eck box Note When the Input type is set to SDI the ST2110 tab will disappear from the More selection However when the Input type is set to Stream instead the former ST2110 tab will be replaced with the RTP tab RTP Tab RTP Click the symbol which will turn into a green check mark in order to set up the IP and Port settings When finished press the keyboard Return or Enter key or click on the green sy...

Страница 90: ...r Tab The PtzTrigger Tab addresses a wide variety of Panasonic Camera remote controls including Tally over IP The Camera menu contains all Panasonic Cameras available in KAIROS network Picture 3 3 9 2 18 If necessary all controls can be set manually by selecting from the currently supported devices in the corresponding drop down menu The Auto detect button in the main PtzTrigger Tab helps to explo...

Страница 91: ...hat at least 1 audio group ST2110 30 is enabled for this output When Delay is activated the indicator appears next to the designated More button Similar to the Input Settings the Output Settings GUI menu shows a list of all 16 outputs each capable of a 3G signal bandwidth The output types are selectable between ST2110 SDI NDI and Stream Picture 3 3 9 3 2 Note 16 Outputs are accessible only when li...

Страница 92: ... 3 5 Picture 3 3 9 3 5 Output 1 format selected 3840 2160 59p for 4K OUT2 OUT3 OUT4 are disabled because OUT1 is set to 4K format 3840 2160 59p As described in 3 3 9 2 Input Settings for IP signals when an Output is set to IP Type the corresponding IP Address and Port number also need to be specified Picture 3 3 9 3 6 Click the symbol in order to activate Video IP and Port settings for adjustments...

Страница 93: ...of an artificial delay to the output signal for ST2110 SDI Default is 0 no additional delay and the maximum is 12 frames ST2110 Tab The ST2110 Tab provides all required Video Audio settings regarding the ST2110 Standard Click the symbol which will turn into a green check mark in order to activate the Video and or Audio IP and Port settings for adjustments When finished press the keyboard Return or...

Страница 94: ...Resource name if applicable Enter User name if applicable Enter Key or passphrase if applicable RTP Tab RTMP When Stream type RTMP is selected various protocol specific adjustments also need to be accomplished GOP size adjustable between 1 2 3 4 5 sec Bitrate control CBR Constant Bitrate or VBR Variable Bitrate Overall Stream type RTP SRT or RTMP Enter Resource name if applicable Enter Key or pass...

Страница 95: ...point on any designated output Aux When there are more sources than source buttons available see section 3 2 2 Source Options page 21 automatically a Shift level is or multiple Shift levels are applied to the far right side of the source selection buttons Designate output AUX Available sources per AUX Shift levels per source selection Picture 3 4 1 1 Picture 3 4 2 1 Type in the IP address and Port...

Страница 96: ...ly Indication Selecting the tab Inputs will show a list of all available external inputs with their designated Tally signalization In this example Red Tally On Air PGM 1 for Input 1 Yellow Tally Preview Preset for Input 2 Cyan Tally PGM 2 for Input 11 Blue Tally PGM 3 for Input 17 Magenta Tally PGM 4 for Input 21 and Green Tally PGM 5 for Input 31 3 4 5 Macros The Macro tab contains all recorded G...

Страница 97: ...4 7 2 Background A B 2 Layers Scene ME1 delegated Picture 3 4 7 3 Background A B 4 Layers Note Also in Scenes tab once a Scene is delegated when there are more sources than source buttons available see section 3 2 2 Source Options page 21 automatically a Shift level is or multiple Shift levels are applied to the far right side of the source selection buttons Picture 3 4 7 1 Picture 3 4 7 2 Picture...

Страница 98: ... Panel backplane The sections can be delegated using according buttons labeled MACRO Control Panel Macros individual per connected Control Panel VTR Tape Motion Commands TMC for Clip Player Ram Player TL Timeline TL controls not yet implemented MENU Connection settings and various Setup items regarding IP Address Netmask Gateway Fader Joystick calibration Brightness Profiles Panel Reboot Restart T...

Страница 99: ...toward the Joystick section in order to delegate the appropriate controls Picture 4 2 1 Picture 4 2 2 Entering the Kairos Creator GUI Mixer Panel tab is showing a Control Panel overview with unselected Panel Profile Picture 4 2 1 above Selecting Profile1 for example is showing the default Deck 1 Deck 2 assignment In this case the upper Control Panel M E Deck 1 is delegated to control the Scene cal...

Страница 100: ...gnated Scene controls and allows to set up the individual Module Settings Picture 4 2 3 Picture 4 2 4 Selecting Deck 1 with Main assigned will highlight the corresponding button section and enables access to the available Module Settings Picture 4 2 4 In this example for Profile 1 ...

Страница 101: ...4 2 9 As long as Smart Delegation is disabled the Modules Deck 1 2 Picture 4 2 1 1 will show the delegated Scenes The Module Settings in the Parameter View is also reflecting this Picture 4 2 1 2 Clicking the Pen symbol next to Smart delegation opens the available selections for the corresponding Control Panel M E PGM PST GROUP1 GROUP2 Selection is PST from the lower M E Deck 1 After enabling and ...

Страница 102: ...Control Panel as well as in Kairos Creator GUI Pictures 4 2 1 6 4 2 1 8 When multiple Scenes M E s need to be selectable for instant delegation the function Source Options within Module Settings in Parameter View is used for that Similar to the already described functionality in section 3 2 2 Source Options starting on page 21 in this manual the Source Options operations for Scene delegations are ...

Страница 103: ...ist Open dialog to add new Scene into list see picture 4 2 18 Picture 4 2 1 10 When finished organizing the Source Options list for Scene delegations the selection could look like this Note The content of Scene Directories within the Source Options list will be automatically unpacked when displayed on the Control Panel In this case the Templates folder see Picture 4 2 1 11 is containing the Scenes...

Страница 104: ...hin a user defined production 3 Scene layout with upper CP ME divided into 2 halves 1 Main 2 ME1 3 ME2 Preferred Cut Auto location like described above 4 Scene layout Every A B bus pair refers to a single Scene 1 Main 2 ME1 3 ME2 4 ME3 Preferred Cut Auto position like described above When selecting Cut left the Cut transition function is defaulting to the left button beneath both lever fader arms ...

Страница 105: ...ithin the mapped Scenes M E s will auto delegate and highlight the according F1 F2 or F3 key together with the belonging Transition section In case more than one Scene M E is delegated to the upper Deck the function keys F1 F8 are representing additional delegation functionality for the according Transition section Picture 4 3 4 Picture 4 3 3 Picture 4 3 4 Note This functionality can also be combi...

Страница 106: ...on each with their individual applicable Transition Duration rate When press hold one of the buttons labeled 1 8 right above the Cut Auto pairs of buttons the lower numeric keypad will be auto delegated in order to enter a transition duration rate in frames or to cancel the dialog Picture 4 4 2 Right above the Transition display a row of buttons is located which are used to temporarily overwrite a...

Страница 107: ...will be delegated Or use the lower Digipot next to the Numeric Keypad of Deck 1 to enter value Confirm close dialog Backspace for entry corrections 1 press confirmation 2 press closing dialog Picture 4 4 5 Picture 4 4 7 Press hold one of the Next Transition selection buttons 1 8 in Transition section of Deck 1 or Deck 2 in order to enter a Transition Duration rate in Frames and the Numeric Keypad ...

Страница 108: ...be displayed in according Transition display Please see Picture 4 4 9 for more operational instructions Picture 4 4 9 Note This selection of all available transitions has been graphically composited and is not available as an actual GUI menu However all Transition types are available for In Out Effects as well as A B Effects The selected Category for User at the bottom of Picture 4 4 10 is User de...

Страница 109: ...splay Note Kairos will automatically create as many Shift levels as required in order to represent all assigned cross points Shift buttons per Layer Press hold Delegation button in top row Press hold Delegation button in 2nd row Picture 4 2 24 Available Layers and Buses in Scene Kairos Bus delegation on Layer 1 in top row Bus delegation on Layer 2 in 2nd row ...

Страница 110: ... A in 3rd row Bus delegation on BGD B in bottom row All available Bus delegations Layer 1 is the actual delegation on this Bus Note After press hold any of the Delegation buttons Kairos Control Panel allows to change the actual delegation of the selected Bus to any other listed Layer such as BGD A BGD B Layer 1 Layer 2 etc default Layer names or designated Scene Macros Press hold Delegation button...

Страница 111: ...legation button in top row and select Split Note Split operation allows to separate every Bus individually into 2 halves So instead of controlling only one single Layer per Bus 2 delegations per Bus are applicable Source displays Shift Delegation Cross points buttons Shift Delegation Status upper right Split segment Scene Kairos Layer 2 delegated Unshifted selected source Esports with Alpha Status...

Страница 112: ...ialog of upper or lower Decks Numeric Keypad section Picture 4 6 1 the upcoming dialog allows to enter an IP address for a Kairos Core server in order to connect with the Control Panel Picture 4 6 2 Use the Backspace button as needed Use the Cancel button to abort the dialog Use the button to confirm and close the entry Picture 4 6 3 Pressing the Setup button in main Menu dialog of upper or lower ...

Страница 113: ... and close the entry Netmask setting for Control Panel Allows to set the Control Panel Netmask Use the Backspace button as needed Use the Cancel button to abort the dialog Use the button to confirm and close the entry Gateway address setting for Control Panel Allows to set the Control Panel Gateway address Use the Backspace button as needed Use the Cancel button to abort the dialog Use the button ...

Страница 114: ... in upper Transition section STEP 1 MOVE ALL FADERS TO MIN DOWN POSITION Press OK to continue or Cancel to abort Fader Calibration dialog Follow instructions displayed in upper Transition section STEP 2 MOVE ALL FADERS TO MAX UP POSITION Press OK to confirm and finish or Cancel to abort ...

Страница 115: ... Max Limits 2 Rotate Joystick Clockwise and Counterclockwise in a full circle 2 3 times to be sure Press OK to confirm or Cancel to abort Brightness control Brightness adjustment button backlight intensity Use Numeric Keypad or lower Digipot to enter the value Use the Backspace button as needed Use the Cancel button to abort the dialog Use the button to confirm and close the entry ...

Страница 116: ...e Control Panel Info regarding Software Version Information regarding installed software version This is a read only information Use the Cancel button to abort the dialog High Low LED button Contrast Use the buttons High Mid or Low in order to select the preferred contrast setting When selecting Sapphire mode the Kairos Control Panel will disable all button colors except Tally On Air indication an...

Страница 117: ... Main T DUR buttons located right above the Fader arms the upper Digipot does not provide any functionality yet the upper Digipot in the upper as well as in the lower Deck once delegated by according Next Transition delegation 1 8 can adjust Transition attributes such as Norm Reverse or Norm Reverse run directions for DVE or Wipe transitions if assigned for designated Next Transition delegation Pi...

Страница 118: ...turns into an Insert Delay keypad with multiple different default selections in numbered in Frames 1 3 5 10 30 50 100 300 500 Note The listed delay times can also be pressed multiple times to result in a specific time So for example the requested Delay time is 46 Frames Press 30 10 3 3 46 or any other comparable reasonable combination Press Record again to stop recording Once recording is stopped ...

Страница 119: ...nd external VTR Server type of devices can be controlled Using the arrows Left Right to cycle through all available device list TMC Tape Motion Commands Stopped after Clip load Loop Loop Mode On Off Off Device Type Timecode Position Clip Name Previous Device Next Device When Numeric Keypad section is delegated to VTR all internal and external VTR Server type of devices can be controlled Using the ...

Страница 120: ... 7 1 Picture 4 7 2 Picture 4 7 3 Picture 4 7 4 Display for selected item Joystick delegation Sub selection for selected item FxInputs PTZ Scenes etc Selectable Joystick controls Selectable items for Joystick delegation e g FxInputs PTZ Scenes etc Selection buttons for the above listed items Note If more than 8 items are available the last button in the lower right corner turns into Shift functiona...

Страница 121: ...ction Scene Kairos is selected and highlighted in Joystick delegation section Scene Kairos is selected and highlighted in Joystick delegation section Layer 1 in Scene Kairos is selected and highlighted in Joystick delegation section Delegation enabled for Layer 1 Trans2D Joystick controls Joystick delegation shows available Transforms for Layer 1 Crop Trans2D The right Joystick button acts like an...

Страница 122: ...Web Site https www panasonic com Panasonic Corporation 2020 ...

Отзывы: