background image

Содержание HDC-SDT750PP

Страница 1: ...ions High Definition Video Camera Mo_e No HDC SDT750PP Before connecting operating or adjusting this product please read the instructions completely ZXVCH iE _ F17DOLBY LEICA _ T O G TAL OlcOMAR _ _ 5 1 CREATOR H ml V TM VQT3 B18 ...

Страница 2: ... PARTS INSIDE REFER SERVICING TO QUALIFIED SERVICE PERSONNEL CAUTION DO NOT INSTALL OR PLACE THIS UNIT IN A BOOKCASE BUILT IN CABINET OR IN ANOTHER CONFINED SPACE ENSURE THE UNIT IS WELL VENTILATED TO PREVENT RISK OF ELECTRIC SHOCK OR FIRE HAZARD DUE TO OVERHEATING ENSURE THAT CURTAINS AND ANY OTHER MATERIALS DO NOT OBSTRUCT THE VENTILATION VENTS The following mark and symbols are located on botto...

Страница 3: ...nect the equipment into an outlet on a circuit different from that to which the receiver is connected Consult the dealer or an experienced radio TV technician for help FCC Caution To assure continued compliance follow the attached installation instructions and use only shielded interface cables with ferrite core when connecting to computer or peripheral devices Any changes or modifications not exp...

Страница 4: ...on and burns Do not disassemble Do not heat the batteries above the following temperatures or incinerate Button type battery 60 C 140 F Battery pack 60 C 140 F AC adaptor This AC adaptor operates on AC between 110 V and 240 V But In the U S A and Canada the AC adaptor must be connected to a 120 V AC power supply only When connecting to an AC supply outside of the U S A or Canada use a plug adaptor...

Страница 5: ...uct _ _ _ you have purchased Please call 1 800 8 BATTERY for information on how to recycle this battery For USA California only This product contains a CR Coin Cell Lithium Battery which contains Perchlorate Material special handling may apply See www dtsc ca qov hazardouswaste perch orate 5 VQT3B18 ...

Страница 6: ...ing prong The wide blade or the third prong are provided for your safety If the provided plug does not fit into your outlet consult an electrician for replacement of the obsolete outlet 12 13 14 Only use attachments accessories specified by the manufacturer Use only with the cart stand tripod bracket or table specified by the manufacturer or sold with the apparatus When a cart is used use caution ...

Страница 7: ...internal parts of your camera AVOID SUDDEN CHANGES IN TEMPERATURE If the unit is suddenly moved from a cold place to a warm place moisture may form on the SD card and inside the unit DO NOT LEAVE YOUR CAMERA OR THE POWER SUPPLY TURNED ON WHEN NOT IN USE STORAGE OF YOUR CAMERA Store and handle your camera in a manner that will not subject it to unnecessary movement avoid shaking and striking Your c...

Страница 8: ...e SDHC logo or 48 GB or more Memory Cards that do not have the SDXC logo are not based on SD Memory Card Specifications Refer to page 23 for more details on SD cards For the purposes of these operating instructions SD Memory Card SDHC Memory Card and SDXC Memory Card are referred to as the SD card Functions that can be used for motion picture recording motion picture playback indicated by _ in the...

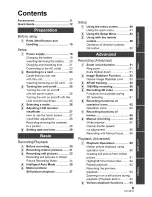
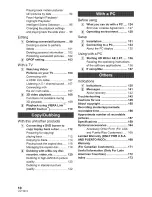
Страница 9: ...ng Mode 34 Intelligent Auto Mode 35 Motion picture Still picture playback 37 Setup Using the menu screen 40 Using the quick menu 41 Using the Setup Menu 42 Using with the remote control 49 Operation of direction buttons OK button 50 Recording Advanced Zoom in out function 51 Ring zoom 51 Extra Optical Zoom 51 Image Stabilizer Function 52 Optical Image Stabilizer Lock 53 AF AE tracking 54 1080 60p ...

Страница 10: ...s 114 Playing back the copied disc 118 Managing the copied disc 119 Dubbing with a Blu ray disc recorder video etc 120 Dubbing in high definition picture quality 120 Dubbing in standard picture quality 122 Before using What you can dowith a PC 124 End User License Agreement 127 Operating environment 128 Setup Installation 131 Connecting to a PC 133 About the PC display 135 Using with a PC Starting...

Страница 11: ...BG130 _ _ _ VYC0996 AC adaptor VSK0697 CD ROM Software AC cable K2CA2CA00025 DC cable K2GJYDC00004 Remote control Built in battery N2QAEC000024 AV multi cable K1 HY12YY0004 USB cable K1 HY04YY0032 3D Conversion Lens Lens storage bag VFC4619 Lens front cap VYK4K64 Lens rear cap VGQOM57 HDMI mini cable VFA0531 Stylus pen VGQOC14 ___ Lens hood VDW2053 This is attached to the 3D Conversion Lens at the...

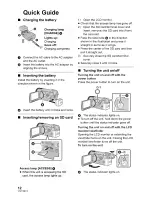
Страница 12: ... go Press the center of the SD card and then pull it straight out 3 Securely close the SD card terminal cover Securely close it until it clicks Turning the unit on off Turning the unit on and off with the power button Press the power button to turn on the unit I O Insert the battery until it clicks and locks Inserting removing an SD card O The status indicator lights on To turn off the unit hold d...

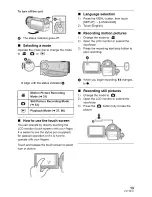
Страница 13: ... indicator O Motion Picture Recording Jim Mode _ 31 Still Picture Recording Mode O _ 33 Playback Mode 37 90 O When you begin recording changes to O Recording still pictures 1 Change the mode to O 2 Open the LCD monitor or extend the viewfinder 3 Press the _ button fully to take the picture How to use the touch screen You can operate by directly touching the LCD monitor touch screen with your finge...

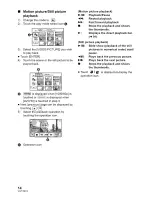
Страница 14: ...s Displays the direct playback bar _ 91 Still picture playback I I Slide show playback of the still pictures in numerical order start pause 11 Plays back the previous picture I I Plays back the next picture II Stops the playback and shows the thumbnails Touch _ _ to display not display the operation icon Q _ is displayed when 1080 60p is touched or _ VCi4Dis displayed when AVCHD is touched in step...

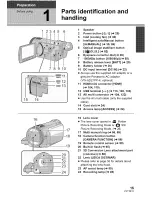
Страница 15: ...K optional 11 HDMI mini connector HDMI 104 110 12 USBterminal _ 113 120 133 13 AV multi connector 104 122 Use the AV multi cable only the supplied cable 14 Card slot 24 15 Access lamp ACCESS 24 16 19 16 Lens cover The lens cover opens in _ Motion Picture Recording Mode or O Still Picture Recording Mode 26 17 Multi manual ring 86 89 18 Camera function button CAMERA FUNCTION 86 19 Remote control sen...

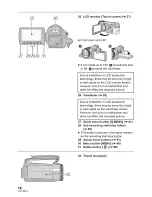
Страница 16: ...nd does not affect the recorded picture 26 Viewfinder 28 Due to limitations in LCD production technology there may be some tiny bright or dark spots on the viewfinder screen However this is not a malfunction and does not affect the recorded picture 27 Quick menu button Q MENU 41 28 Sub recording start stop button 30 This button functions in the same manner as the recording start stop button 29 Adj...

Страница 17: ...1 Mode dial 26 42 Shoulder strap fixture 43 Grip belt Adjust the length of the grip belt so that it fits your hand 40 41 42 43 O Flip the belt I_ Adjust the length I_ Replace the belt 44 Microphone terminal MIC A compatible plug in powered microphone can be used as an external microphone Audio will be stereo 2 ch with the external microphone input When the unit is connected with the AC adaptor som...

Страница 18: ...l alignment adjustment dial 7 Horizontal image position adjustment dial GI 8 Protective glass rear 9 Camera body attachment part convex Lens front cap 10 10 Horizontal line for adjustment Use to adjust the lens attachment position If you use the lens front cap as a stand as shown below you can leave the unit with the 3D Conversion Lens attached 18 VQT3B18 ...

Страница 19: ...he genuine product are made available to purchase in some markets Some of these battery packs are not adequately protected with internal protection to meet the requirements of appropriate safety standards There is a possibility that these battery packs may lead to fire or explosion Please be advised that we are not liable for any accident or failure occurring as a result of use of a counterfeit ba...

Страница 20: ...moving the battery Be sure to hold down the power button until the status indicator goes off Then remove the battery while supporting the unit to prevent it from dropping Move the battery release lever in the direction indicated by the arrow and remove the battery when unlocked O Insert the battery until it clicks and locks _ _ CAUTION Danger of explosion if battery is incorrectly replaced Replace...

Страница 21: ...battery pack holder kit VW VH04 optional is necessary These times are approximations The indicated charging time is for when the battery has been discharged completely Charging time and recordable time vary depending on the usage conditions such as high low temperature Recordable time of 3D recording mode is the same During 3D recording mode 1080 60p recording mode cannot be used The actual record...

Страница 22: ... capacity will not be shown Important While the DC cable is connected to the AC adaptor the battery will not charge Do not use the AC cable with any other equipment as it is designed only for this unit Also do not use the AC cable from other equipment with this unit oDCIN _ _ iii i_i_i_i_i_i_i_i_i_i_ii ili_i _ii j_ _ _i i_ _iiiiiiiiiiiii_iiiiiiii_ iiiiii iiiiiiiliii iiii_ _ iiiiiiiiiiiiiiii_i_ O D...

Страница 23: ... 16 MB Cannot be used 32 MB 64 MB 128 MB Cannot be guaranteed in operation iilHiiiii ii iiii ii_i_i_iii iiiiiiiil 256 MB 512 MB 1 GB 2GB 4 GB 6 GB 8 GB 12 GB 16 GB 24 GB 32 GB 48 GB 64 GB Can be used Can be used The SD Speed Class Rating is the speed standard for successive writes 4 GB or more Memory Cards that do not have the SDHC logo or 48 GB or more Memory Cards that do not have the SDXC logo ...

Страница 24: ... clicks Do not touch the terminals on the back of the SD card Do not apply strong shocks bend or drop the SD card Electrical noise static electricity or the failure of this unit or the SD card may damage or erase the data stored on the SD card When the card access lamp is lit do not Remove the SD card Turn the unit off Insert and remove the USB cable Expose the unit to vibrations or shock Performi...

Страница 25: ...enient to turn the unit on off using the LCD monitor or viewfinder To turn on the unit To turn off the unit O The status indicator lights on Q The status indicator goes off The unit will not turn off unless the LCD monitor is closed and the viewfinder is retracted The unit will not turn off while recording motion pictures even if the LCD monitor is closed and the viewfinder is retracted In the fol...

Страница 26: ...hange the mode to recording or playback Operate the mode dial to change the mode to _ O or Align with the status indicator O Motion Picture Recording Mode 31 Still Picture Recording Mode 33 Playback Mode 37 90 26 VQT3B18 ...

Страница 27: ...u and thumbnail display page for item selection and setting etc Touch to return to the previous screen such as when setting menus Touch the center of the icon Touching the touch screen will not operate while you are touching another part of the touch screen Drag Move your finger while pressing on the touch screen Can be used during direct playback and playback zoom Do not touch on the LCD monitor ...

Страница 28: ... turn on the viewfinder LCD monitor and viewfinder are turned on during the face to face recording when the viewfinder is extended The image is horizontally flipped as if you see a mirror image However the image recorded is the same as a normal recording Record by viewing the image in the viewfinder during the face to face recording Only some indications will appear on the screen When _ appears re...

Страница 29: ... battery needs to be charged To recharge the built in lithium battery connect the AC adaptor or attach the battery to this unit Leave the unit as it is for approx 24 hours and the battery will maintain the date and time for approx 6 months The battery is still being recharged even if the unit is off O Displaying the World time setting 42 _ _ HOME _ DESTINATION The year can be set between 2000 and ...

Страница 30: ...er the microphones or the cooling fan inlet with your hand etc Basic motion picture recording The unit should normally be held steady when recording If you move the unit when recording do so slowly maintaining a constant speed The zoom operation is useful for recording subjects you cannot get close to but overuse of zoom in and zoom out can make the resulting motion picture less enjoyable to watch...

Страница 31: ...ng start stop button to start recording and pressing it again to pause recording become one scene Maximum number of recordable scenes Approx 3900 Maximum number of different dates Approx 200 94 When either of them reaches to the maximum limit additional scenes cannot be recorded In the case of SD cards it is the maximum number of recordable scenes per card While recording is in progress the record...

Страница 32: ...for second About the compatibility of the recorded Please refer to page 55 about motion pictures 1080 60p They are not compatible with devices other than these that support AVCHD Images cannot be played with equipment that does not support AVCHD ordinary DVD recorders Confirm that your equipment supports AVCHD by referring to the operating instructions There are some cases where the recorded motio...

Страница 33: ...abilizer function 52 to _1 MODE1 then the Image Stabilizer function will be more effective I_IEGA_ MEGA Optical Image Stabilizer will be displayed when the _ button is pressed halfway The AF assist lamp lights in dark places Focus indication will change to registered focus icon when FACE RECOG is set to ON 73 Using a flash or tripod is recommended when recording still pictures in dark places becau...

Страница 34: ... focused If so move the contrasting object out of the focus area Focus area is not displayed in the following conditions When the Intelligent Auto Mode Portrait is used When AF AE tracking is used When the Extra Optical Zoom is used When the unit determines that the AF assist lamp is necessary You can record still pictures even in Motion Picture Recording Mode 4_ Change the mode to _ Press the O b...

Страница 35: ...ou can record night scenery vividly by scenery slowing the shutter speed _ 2 Macro Recording zooming in This allows recording at very close on a flower etc proximity to the object of recording 1 Normal Other situations Contrast is adjusted automatically for 2 clear images 1 In Motion Picture Recording Mode only 2 In Still Picture Recording Mode only Faces are detected and focused automatically and...

Страница 36: ... these settings 87 89 Automatic white balance The illustration shows the range over which Automatic white balance functions 1 2 3 4 5 6 7 8 9 10 000K 2 9 000K 8 000K 6 000K 5 000K 4 _ _ _ 5 _ 4 000K 3 000K 6 i7 _7 2 000K 8 9 1 000K The effective range of Automatic white balance adjustment on this unit Blue sky Cloudy sky rain Sunlight White fluorescent lamp Halogen light bulb Incandescent light bu...

Страница 37: ...select icon O 3 Select the VIDEO PICTURE you wish to play back Touch ENTER 4 Touch the scene or the still picture to be played back _ is displayed when 1080 60p is touched or AVCHD_ iSdisplayed when AVCHD is touched in step 3 Next previous page can be displayed by touching 37 VQT3B18 ...

Страница 38: ...ture playback l_ l I l_ l l 4 1_1_ B Playback Pause Rewind playback Fast forward playback Stops the playback and shows the thumbnails Displays the direct playback bar _ 91 11 II1_ I Slide show playback of the still pictures in numerical order start pause Plays back the previous picture Plays back the next picture Stops the playback and shows the thumbnails 38 VQT3B18 ...

Страница 39: ...ard only during normal playback If pause play is continued for 5 minutes the screen returns to the thumbnails The elapsed time for playback indication will be reset to 0h00m00s for each scene Motion picture compatibility Please refer to page 55 about 1080 60p This unit is based on the AVCHD format The video signal that can be played back on this unit is 1920x 1080 60i 1920 x 1080 24p or 1440 x 108...

Страница 40: ...xt previous page can be displayed by touching _ _ 5 Touch EXIT or press the MENU button to exit the menu setting About _ guide display After touching _ touching the submenus and items will cause function descriptions and settings confirmation messages to appear After the messages have been displayed the guide display is canceled 40 VQT3B18 ...

Страница 41: ...epending on the position of the mode dial or settings REC MODE 69 TIME LAPSE OFF 70 REC _ PICTURE SIZE 82 _oN DISPLAY 42 A_ POWER LCD 45 GUIDE LINES 67 MIC LEVEL 78 AUTO _oN MF ASSIST 89 _0FF ZEBRA 80 _NL LUMINANCE 80 _rMN L HISTOGRAM _ 81 2 Touch the desired item to enter the setting 3 Touch EXIT or press Q MENU button to exit the quick menu 41 VQT3B18 ...

Страница 42: ... is not set adjust the clock to the current time 29 When the HOME your home region is not set the message appears Touch ENTER and proceed to Step 3 2 Only when setting your home region Touch HOME Touch ENTER 3 Only when setting your home region Touch _ _ to select your home region and touch ENTER Touch SUMMER TIME SET to set daylight saving time _ appears and the summer time setting is turned on t...

Страница 43: ...vel destination is indicated The local time at the selected travel destination _ The time difference between the travel destination and the home region To return the display to the home setting Set the home region using Step 1 to 3 and close the setting by touching EXIT or pressing the MENU button If you cannot find your travel destination in the area shown on the screen set it by using the time d...

Страница 44: ...the unit goes into Quick start standby mode The lens cover does not close 3 Open the LCD monitor or extend the viewfinder The status indicator O lights red and the unit is put into recording pause Quick Start Standby Mode is canceled if about 5 minutes have elapsed mode is set to Time for Quick start will be more than 0 6 seconds slower when the Digital cinema is used Depending on the recording co...

Страница 45: ...or in bright places including outdoors These settings will not affect the images actually recorded It is possible to set from the quick menu 41 E_ Makes even brighter _ Makes brighter 0_ Normal _ Makes less bright A_ Automatic adjustment It is not displayed in the Manual Mode or in the Playback Mode When the AC adaptor is in use the LCD monitor is set to _ automatically The recordable time will be...

Страница 46: ...while checking the picture in the viewfinder 4 Touch ENTER Touch EXIT or press the MENU button to complete the setting Please refer to page 107 __ i i ii ii 480i 1080i ii Please refer to page 107 Please refer to page 107 Please refer to page 110 Please refer to page 106 Please refer to page 108 Set to YES for changing the menu settings back to the default condition Settings for CLOCK SET and LANGU...

Страница 47: ...ess the MENU button to close the indication The SD card requires some space to store information and manage system files so the actual usable space is slightly less than the indicated value The usable space is generally calculated as 1 GB 1 000 000 000 bytes The capacities of this unit PCs and software are expressed as 1 GB 1 024x 1 024x 1 024 1 073 741 824 bytes Therefore the indicated value of t...

Страница 48: ...nceled However ifnooperations take place for approx 10 minutes the demonstration automatically starts again To stop the demonstration set DEMO MODE to OFF orinsert anSD card This item isused tostart the Optical Image Stabilizer demo Only when the mode isatthe_ position Touch O I S DEMO the demonstration automatically starts When you touch EXIT the demonstration will be canceled You can select the ...

Страница 49: ...ot button Q 3 On screen display button EXT DISPLAY _ 106 4 Playback operation buttons 37 90 These buttons function in the same manner 1 While pressing the stopper Q pu II out the battery holder Set the button type battery with its mark facing upward and then put the battery holder back in place When the button type battery runs as the corresponding playback operation icon being displayed on screen...

Страница 50: ...emble or dispose of in fire Remote control usable range __ 1s O Remote control sensor Distance Within approx 5 m 16 feet Angle Approx 10 up and 15 down left and right The remote control is intended for indoor operation Outdoors or under strong light the unit may not operate properly even within the usable ranges 1 Press a direction button Selected item will become yellow Select the item with the d...

Страница 51: ...ng pixels is set to anything other than the maximum number of recording pixels in Still Picture Recording Mode the still picture can be recorded with a zoom ratio of a maximum of 25x without degrading the picture quality Extra optical zoom ratio varies depending on the setting of PICTURE SIZE and ASPECT RATIO 82 83 Extra optical zoom mechanism When you set the picture size to the maximum area is c...

Страница 52: ... that you set to OFF Still Picture Recording Mode _1JI_ 2 _ OFF When O l S is MODE1 _1 is displayed When MODE2 _2 is displayed Changing Image Stabilizer Mode Motion Picture Recording Mode RECORD SETUP _ HYBRID O I S _ ON or OFF I When set to ON you can further improve image stabilization for recording while walking or holding the unit and recording a distant subject with zoom This function s defau...

Страница 53: ...is displayed while you are touching the icon Optical Image Stabilizer Lock is released when you remove your finger from the icon Operation icon will disappear when no function is performed for a specific period of time if DISPLAY is set to OFF Touch the screen to display it again Setting to display not display the O I S LOCK icon RECORD SETUP _ O I S LOCK DISPLAY _ ON or OFF Stabilization may not ...

Страница 54: ...ed and then disappears Touch a characteristic part color etc on the object to lock onto it again When the O button is pressed halfway in Still Picture Recording Mode the focus is set to the object that is locked The target frame turns green when it focuses and the target cannot be changed This function cannot be used in Manual Mode When Manual Mode is set in Still Picture Recording Mode it can onl...

Страница 55: ...und on the following support site As of Aug 2010 http llpanaeonic jplsupportlgloballcsle_camlindex html 4_ Change the mode to _ To set to 080 60p recording mode pres s and h01d the butto n until _ is displayedl To return to normal recording mode press and hold the button until disappears Please refer to page 156 for details about approximate recordable time The scenes recorded in 1080 60p can be s...

Страница 56: ... by side format the recorded 3D video is not of high definition picture quality Attaching the 3D Conversion Lens 1 Rotate the lens rear cap in the direction indicated by the arrow Rotate the lens rear cap while pushing on the attachment screw with your fingers 2 Match the position of the convex on the 3D Conversion Lens with the concave O in the unit Attach with the adjustment dial cover _ of the ...

Страница 57: ...ically after performing the initial setting If the 3D Conversion Lens adjustment mode screen does not appear automatically set from the menu SETUP _ 3D CONV LENS SETUP If the unit is turned on with the USB cable still connected the USB connection will take priority 3 Attach the lens front cap to the 3D Conversion Lens 2 screens will appear The horizontal line for adjustment on the lens front cap i...

Страница 58: ...er checking the operation description touch NEXT To adjust the horizontal position rotate the horizontal image position adjustment dial D so that the black vertical line is between the red guidelines O Touch NEXT 7 After checking the operation description touch NEXT To adjust the vertical position rotate the vertical position adjustment dial _F_so that the black horizontal line at the right of the...

Страница 59: ...ching the 3D Conversion Lens or after an impact etc it is recommended that you perform the adjustment again Q appears 11Press the recording start stop button to start recording When the 3D Conversion Lens is attached the zoom position is fixed and the zoom operation is disabled When recording in 3D the image will appear with black frame around it The black frame will be recorded in the video To en...

Страница 60: ...site direction until the adjustment screen starts moving ECONOMY will not work while you adjust the 3D Conversion Lens attachment position When the 3D Conversion Lens is attached the auto slow shutter setting is AUTO SLOW SHTR 3D The default setting of AUTO SLOW SHTR 3D is ON _ 75 While 3D recording if moving the unit fast the message is more likely to appear Removing the 3D Conversion Lens Rotate...

Страница 61: ...ne Color night rec Scene node Zoom mode Digital cinema Face recognition Name display Face framing Digital cinema color Shooting guide Zoom microphone Picture adjust Luminance Histogram Picture size Quality MF assist fur ction 1 The zoom position is fixed and the zoom operation is disabled 2 The Optical Image Stabilizer _ and Optical Image Stabilizer Lock _ can be used 3 Intelligent Auto Mode is ca...

Страница 62: ...of Panasonic Corporation of North America One Panasonic Way Secaucus NJ 07094 Panasonic Canada Inc 5770 Ambler Drive Mississauga Ontario L4W 2T3 VQT3B 18 FO810MZO 2000 _ IIII III III IIIII III IIII III IIII Panasonic Corporation 2010 Printed in Japan ...

Отзывы: