background image

10

Before use

•  When you use the product for the first time, try it by pressing it 

gently against the skin and moving it slowly.

Preparation

Wipe off any water or sweat on the skin.

•  Keep your skin dry and clean during use. Do not use 

the product when any lotion, milky lotion, foundation or 

antiperspirant is applied on your skin.

Check

The product is designed for the face and neck.

How to use

How to trim downy hair

1.  Hold the protective cap on its central part 

to pull it out.

2. Turn on the power switch, and start trim-

ming.

Содержание ES-WF61

Страница 1: ...English 3 Português 中文 17 Operating Instructions Household Facial Hair Shaver Model No ES WF61 Instruções de Operação Depiladora Facial Uso Doméstico Modelo Nº ES WF61 31 17 3 ...

Страница 2: ......

Страница 3: ... Parts identification 8 Battery installation and lifespan 9 Before use 10 How to use 10 Attaching Removing the blade 14 How to clean 15 Troubleshooting 16 Specifications 16 Thank you for purchasing this Panasonic product Before operating this unit please read these instructions completely and save them for future use ...

Страница 4: ...rious injury or death CAUTION Denotes a hazard that could result in minor injury or prop erty damage The following symbols are used to classify and describe the type of instructions to be observed This symbol is used to alert users to a specific operating procedure that must not be performed This symbol is used to alert users to a specific operating procedure that must be followed in order to oper...

Страница 5: ...to do so may cause an accident or injury CAUTION X X To protect your skin Do not use in the following cases People who are feeble or with sensitive skin People with an allergic constitution Never use this product in the following areas Areas with papules rashes or acne Doing so may result in injury to the skin Do not disassemble the battery cover by force when it is difficult to remove it Doing so...

Страница 6: ...ilure to do so may cause injury If there is any abnormality on your skin after use stop using the product and consult a dermatologist Failure to do so may cause symptoms to worsen Be sure to attach the protective cap when carrying the product around or storing it Failure to do so may cause injury to the skin or shorten the service life of the blade X X This product Do not share the product with yo...

Страница 7: ...e appliance for an extended period of time Please use the battery by the recommended use by date Non rechargeable battery are not to be recharged Failure to do so may cause overheating or explosion of the battery injury or contamination of surroundings due to leakage X X Observe the following precautions To trim your eyebrows use the eyebrow attachment or eyebrow comb Failure to do so may cause ey...

Страница 8: ...on A Main body 1 Blade 2 Power switch 0 1 3 Battery cover 4 Facial blade 5 Blade locker B Eyebrow attachment C Eyebrow comb D Protective cap Accessory E Protective cap Dry battery is not supplied Please buy them separately ...

Страница 9: ...e battery Lift the battery from the end 3 Attach the battery cover until a click is heard Battery lifespan Panasonic s dry battery is recommended With LR03 AAA alkaline battery it can be used for about one month When it is used twice a week with approx 5 min for each use at a room temperature of 20 C Use only LR03 AAA alkaline battery The power or number of uses may vary if other battery is used ...

Страница 10: ...r sweat on the skin Keep your skin dry and clean during use Do not use the product when any lotion milky lotion foundation or antiperspirant is applied on your skin Check The product is designed for the face and neck How to use How to trim downy hair 1 Hold the protective cap on its central part to pull it out 2 Turn on the power switch and start trim ming ...

Страница 11: ...enter of the forehead and then return to the hairline Cheek Fig 2 Move outward from the central part of the face Below the nose Fig 3 Purse up your lips before trimming Sideburns Fig 4 Select the desired length of the sideburns and trim downward Below the eyes Fig 5 Press the skin under the eyes gently with your fingers and move outward from the center Neck Fig 6 Trim upward ...

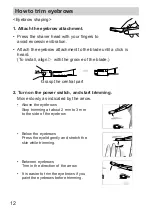
Страница 12: ...oove of the blade Grasp the central part 2 Turn on the power switch and start trimming Move slowly as indicated by the arrow Above the eyebrows Stop trimming at about 2 mm to 3 mm to the side of the eyebrow Below the eyebrows Press the eyelid gently and stretch the skin while trimming Between eyebrows Trim in the direction of the arrow It is easier to trim the eyebrows if you paint the eyebrows be...

Страница 13: ...yebrow comb Indication on the eyebrow comb 6 4 2 Trimming length Approx 6 mm Approx 4 mm Approx 2 mm 2 Turn on the power switch and start trimming Press the eyebrow comb close to the skin to trim Align the eyebrow comb with your eyebrow and move it from the tail to the start of eyebrow Repeat this step until the eyebrows are trimmed to the desired length Depending on individuals the hair at the ey...

Страница 14: ...ocker as indicated by the arrow It is easier to slide it with your nail 3 Remove the blade as indicated by the arrow Take the blade out while sliding it downward How to attach 1 Press the shaver head with your fingers to avoid excessive vibration 2 Insert the tiny hook on the top of the main body into the hole of the blade 3 Slide the blade locker as indicated by the arrow It is easier to slide it...

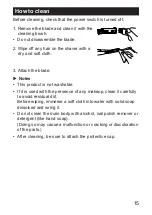
Страница 15: ... blade X X Notes This product is not washable If it is used with the presence of any makeup clean it carefully to avoid residual dirt Before wiping immerse a soft cloth into water with solid soap dissolved and wring it Do not clean the main body with alcohol nail polish remover or detergent like hand soap Doing so may cause a malfunction or cracking or discoloration of the parts After cleaning be ...

Страница 16: ...e battery Sold separately This product is intended for household use only Problem The trimmer is not cutting as well as before Replace the blade Guidelines for replacement Approximately 1 5 months Differs depending on your hair state and how often you use the appliance number of times amount of time Replace with a new battery Clean the hair dust The trimmer is not working Make sure the battery is ...

Страница 17: ...17 目錄 感謝您購買本 Panasonic 產品 使用本產品之前 請仔細閱讀本說明書 並妥善保存以供未來使用 使用說明書 家用 美容修剪器 型號 ES WF61 安全注意事項 18 使用須知 21 部件名稱 22 電池安裝方法和壽命 23 使用之前 24 使用方法 24 刀刃的拆卸及安裝方法 28 清潔方法 29 故障排除 30 規格 30 ...

Страница 18: ...級別分類和作出解釋 若不理會此等符號 不當使用本產品就可能會導致所述的危險 人身傷害及財物損失 警告 表示潛在的危險可能會導致嚴重受傷或致命 注意 表示可能會導致輕傷或財物損失的危險 以下符號用於分類和解釋必須留意的指示類型 此符號用於提示用戶 不得執行某項特定的操作程序 此符號用於提示用戶 必須遵從某項特定的操作程序 藉以安全操作本產品 警告 本產品 切勿將產品存放於兒童或幼童可觸摸的地方 請勿讓兒童或幼童使用 否則兒童或幼童可能會意外吞食附屬物品或可拆卸 零件等物品 導致意外和受傷 發生異常及故障時 請立即停止使用 否則可導致火警或受傷 ...

Страница 19: ...產 品 否則可能會發生意外或受傷 注意 為了保護你的皮膚 如有以下情況 請勿使用本產品 皮膚敏感 身體虛弱 過敏性體質 請勿用於下述部位 請勿用於有丘疹 皮疹或粉刺的部位 否則可能導致受傷 如果難以取下電池蓋 請勿強行拆出 否則可能會因保護蓋向前脫落而導致刀刃劃傷手部 請勿用力按壓在皮膚上 在同一部位反覆刮剃 或者 讓修剪器放著不動 使用時請勿拍打本產品 否則可導致皮膚疼痛 發炎或受傷 請勿用力按壓刀刃 使用期間 亦切勿讓刀刃直接接 觸手指或指甲 否則可導致皮膚受傷或刀刃壽命縮短 使用之前 請先檢查刀刃有否變形或損壞 否則可導致皮膚受傷 取下保護蓋時 請握住中間位置向外拔出 否則可導致刀刃劃傷手部 ...

Страница 20: ...在使用後出現皮膚異常 請停止使用本產品 並 前往皮膚科醫生處診治 否則可能會導致症狀惡化 攜帶及存放本產品時 請確保蓋上保護蓋 否則可導致皮膚受傷或刀刃壽命縮短 本產品 請勿與家人或他人共用 否則可導致皮膚感染或發炎 請避免讓本產品掉落或受到強烈衝擊 否則可導致受傷 請勿擅自改造 分解或修理本產品 否則可導致意外或受傷 如需修理本產品 請聯絡 客戶諮詢服務中心 電池 請勿將乾電池丟入火中或將其拆解 請勿讓供電端子之間形成短路 否則可導致燙傷或其他傷害 ...

Страница 21: ...註明的注意事項 請檢查乾電池的極性 和 並正確安裝 乾電池的電量耗盡後 請立即將其取出 並以安全的 方式棄置 如果長時間不使用本產品 請將乾電池取出 請使用未超過有效期的乾電池 請勿為非充電式電池充電 否則可能會因乾電池發熱 爆裂或漏液 導致受傷 或者令四周受到污染 請留意以下注意事項 修整眉毛時 請使用修眉配件或眉梳 否則可能會剪斷睫毛等部位 左側符號表示 本產品請勿水洗 使用須知 請勿濕剃 請保持產品乾燥 否則可導致功能失常 ...

Страница 22: ...22 部件名稱 b a d e c E A 機身 1 刀頭 2 電源開關 0 1 3 電池蓋 4 面部用刀刃 5 刀刃鎖定扣 B 修眉配件 C 眉梳 D 保護蓋 附屬物品 E 清潔刷 本產品並無附上乾電池 請前往商店購買 ...

Страница 23: ...乾電池時 請確保蓋上保護蓋 1 取下電池蓋 2 確認 極 然後裝入乾電池 取出電池的方法 在電池的 極位置鈎起 即可取出 3 蓋上電池蓋 直至聽到 咔 聲 1 3 2 電池壽命 建議使用 Panasonic 乾電池 1顆 Panasonic LR03 AAA 鹼 性乾電池 可使用約 1個月 此為每週使用 2次 每次約 5分鐘 且室溫為 20 的情況 必須使用 LR03 AAA 鹼性乾電池 使用非指定的電池 可導致使用時間嚴重縮短 ...

Страница 24: ...24 使用之前 首次使用時 請以輕輕接觸皮膚 緩慢移動的方式試用 準備 擦乾皮膚上的水分或汗水 使用時 請確保皮膚清潔乾燥 不建議在塗上化妝水 乳 液 粉底 止汗劑等物品後使用 確認 本產品設計用於面部和頸部 使用方法 茸毛修剪方法 1 握住保護蓋的中間位置 將其拔出 2 啟動電源開關 開始修剪 ...

Страница 25: ...5 修剪方法 將刀刃放平 貼在皮膚之上 根據箭咀所示 沿著茸毛生長的相反方向慢慢移動刀刃 額頭 圖1 由髮際線起向前額中間位置移動 然後再回到髮際線 面頰 圖2 由面部中間位置開始向外移動 鼻子靠下位置 圖3 抿住嘴唇後加以修剪 鬢角 圖4 決定需要修剪的鬢角長度後 慢慢向下修剪 眼睛靠下位置 圖5 用手指輕力按住眼睛下面的皮膚 由中間位置開始向外移 動 頸部 圖6 由下往上移動 1 2 3 4 5 6 ...

Страница 26: ...26 眉毛修剪方法 修整眉形 1 安裝修眉配件 用手指按住刀頭 以免讓其震動幅 度過大 將修眉配件安裝到刀刃上 直至聽到 咔 聲 安裝時 應讓 號對準刀刃的凹槽 握住中間位置 2 啟動電源開關 開始修剪 根據箭咀所示 慢慢移動 眉毛靠上位置 在眉毛側面 2 3 mm 處停止 眉毛靠下位置 一邊輕輕按住眼瞼 伸展皮膚 一邊修剪 雙眉之間 按照箭咀所示的相應方向修剪 在畫眉之後再行修剪 可更易修整 眉形 ...

Страница 27: ... 使眉梳上的標誌線 a 與刀刃上的 凹槽 b 對齊 然後將眉梳直接插入刀刃 直至聽 到 咔 聲 a b 根據眉梳的安裝位置 選擇相應的修剪長度 眉梳上的標記 6 4 2 修剪長度 約 6 mm 約 4 mm 約 2 mm 2 啟動電源開關 開始修剪 將眉梳貼近皮膚 然後梳剪 將眉梳與眉毛對齊 然後由眉尾 往眉頭方向慢慢移動 重複操作 直至將眉毛修剪成理 想的長度 視乎個別人士而定 眉頭上的毛 髮有可能會朝上 在這種情況下 建議依照毛髮生長的相反方向 由前額開始往鼻子方向移動 皮 膚 ...

Страница 28: ...28 刀刃的拆卸及安裝方法 拆卸及安裝刀刃之前 請確定電源開關處於關閉狀態 拆卸方法 1 用手指按住刀頭 以免讓其震動幅 度過大 2 根據箭咀所示 滑動刀刃鎖定扣 如使用指甲 可更容易滑動 3 根據箭咀所示取出刀刃 一邊向下滑動 一邊取出刀刃 安裝方法 1 用手指按住刀頭 以免讓其震動幅 度過大 2 將機身頂部的小鈎插入刀刃的孔中 即可安裝 3 根據箭咀所示 滑動刀刃鎖定扣 如使用指甲 可更容易滑動 ...

Страница 29: ...29 清潔方法 清潔之前 請確定電源開關處於關閉狀態 1 取下刀刃 用清潔刷清潔 請勿拆解刀刃 2 用乾軟布擦掉修剪器上的毛髮 3 裝回刀刃 注意 本產品不可水洗 如果在化妝後使用 清潔應格外小心 以免殘留污漬 將軟布浸入已溶解的固體肥皂水中 然後將其擰乾 並以 擦拭的方式清潔產品 請勿使用酒精 洗甲水或清潔劑 洗手液一類 等物品 清潔機身 否則可導致故障 部件破裂或褪色等 清潔之後 必須裝上保護蓋 ...

Страница 30: ...故障排除 故障 糾正措施 修剪效能降低 請更換刀刃 標準的更換年期約為1 5年 實際情况視乎毛髮狀態及使用 頻率 次數及時間 而定 更換全新的乾電池 清理毛屑 已啟動產品開關 但修剪器無法運作 正確安裝電池 如果仍然無法解決問題 請與您購買本機的商店聯繫 或 洽 Panasonic 直屬服務站進行維修 規格 型號 ES WF61 電源 使用1顆LR03 AAA 鹼性乾電池 須另行購買 本產品只適用於家居用途 ...

Страница 31: ...5 Identificação das peças 36 Colocação e duração da pilha 37 Antes de utilizar 38 Como utilizar 38 Instalação Remoção da lâmina 42 Como limpar 43 Solução de problemas 44 Especificações 44 Obrigado por escolher este produto Panasonic Antes de utilizá lo leia todas as instruções a seguir e as mantenha disponíveis para consultas futuras ...

Страница 32: ...s graves ou morte CUIDADO Indica um risco que pode resultar em lesões leves ou danos materiais Os símbolos abaixo classificam e descrevem o tipo de instrução a ser observada Este símbolo alerta o usuário quanto a um procedimento de operação específico que não deve ser realizado Este símbolo alerta o usuário a quanto a um procedimento de operação específico que deve ser seguido para o uso seguro da...

Страница 33: ...rar que não manuseiem o aparelho Caso contrário pode haver o risco de acidentes ou lesões CUIDADO X X Para proteger sua pele Não utilize nos seguintes casos Pessoas com pele frágil ou sensível Pessoas alérgicas Nunca utilize este produto nas seguintes áreas Áreas com pápulas erupções cutâneas ou acne Fazê lo poderá causar lesões na pele Não force a tampa da pilha para retirá la quando houver dific...

Страница 34: ...uer anormalidade na sua pele após o uso interrompa o uso do produto e consulte um dermatologista Caso contrário os sintomas poderão piorar Lembre se sempre de instalar a tampa protetora antes de carregar o produto ou guardá lo Caso contrário poderão ocorrer lesões na pele ou redução da vida útil da lâmina X X Sobre este produto Não compartilhe o produto com sua família ou outras pessoas Caso contr...

Страница 35: ... o aparelho por um período prolongado Utilize a pilha apenas dentro de sua data de validade Não recarregue pilhas não recarregáveis Caso contrário poderá ocorrer superaquecimento ou explosão da pilha lesões ou contaminação do ambiente devido ao vazamento X X Siga as seguintes precauções Para aparar as sobrancelhas utilize o acessório ou o pente para sobrancelhas Caso contrário os cílios poderão se...

Страница 36: ...terruptor liga desliga 0 1 3 Tampa da pilha 4 Lâmina facial 5 Trava da lâmina B Acessório para sobrancelha C Pente para sobrancelha D Tampa protetora Acessório E Pincel de Limpeza A pilha alcalina não é fornecida com o produto É preciso comprá la separadamente ...

Страница 37: ...lha pelo lado 3 Coloque a tampa da pilha até ouvir um clique Duração da pilha É recomendado o uso de pilha alcalina da Panasonic Uma pilha alcalina tipo AAA pode durar cerca de um mês Quando o produto for utilizado duas vezes por semana por aprox 5 minutos a cada uso em uma temperatura ambiente de 20 C Use apenas pilhas alcalinas tipo AAA A potência ou o número de usos podem variar com o uso de ou...

Страница 38: ... suor da pele Mantenha a pele seca e limpa durante o uso Não utilize o produto quando houver qualquer loção hidratante base ou antitranspirante aplicado na pele Verificação Este produto se destina ao uso no rosto e pescoço Como utilizar Como aparar os pelos faciais 1 Segure a tampa protetora pela parte cen tral para retirá la 2 Ligue o interruptor e comece a aparar ...

Страница 39: ...ção ao centro da testa e retorne para o ponto inicial Bochecha Fig 2 Mova para cima a partir da parte central do rosto Abaixo do nariz Fig 3 Franza os lábios antes de aparar Costeletas Fig 4 Defina a altura desejada das costeletas e apare para baixo Embaixo dos olhos Fig 5 Pressione a pele debaixo dos olhos suavemente com os dedos e mova o aparelho para o lado de fora a partir do centro Pescoço Fi...

Страница 40: ...marca com a ranhura na lâmina Grasp the central part 2 Ligue o interruptor e comece a aparar Mova lentamente no sentido indicado pelas setas Acima das sobrancelhas Pare de aparar cerca de 2 mm a 3 mm ao lado da sobrancelha Abaixo das sobrancelhas Pressione a pálpebra suavemente e estique a pele enquanto apara Entre as sobrancelhas Apare na direção da seta A sobrancelha pode ser pintada antes de ap...

Страница 41: ...a sobrancelha Indicação no pente para sobrancelha 6 4 2 Altura de corte Aprox 6 mm Aprox 4 mm Aprox 2 mm 2 Ligue o interruptor e comece a aparar Pressione o pente para sobrancelha rente à pele para aparar Alinhe o pente com sua sobrancelha e mova o do fim para o começo da sobrancelha Repita esta etapa até que as sobrancelhas estejam aparadas na altura desejada Dependendo da pessoa o cabelo no come...

Страница 42: ...ze a trava da lâmina na direção da seta É mais fácil deslizá la com a unha 3 Remova a lâmina na direção da seta Retire a lâmina enquanto a desliza para baixo Como instalar 1 Segure a cabeça da depiladora com os dedos para evitar vibração em excesso 2 Insira o pequeno gancho no topo do corpo principal no furo da lâmina 3 Deslize a trava da lâmina na direção da seta É mais fácil deslizá la com a unh...

Страница 43: ...duto não pode ser lavado Caso utilize o produto com a presença de maquiagem limpe o com cuidado para evitar resíduos de sujeira Antes de limpar mergulhe um pano macio em água com sabão sólido dissolvido e torça o Não limpe o corpo principal com álcool removedor de esmalte ou detergente como sabonete para as mãos Caso contrário poderá ocorrer mau funcionamento danos ou descoloração das peças Lembre...

Страница 44: ... pilha alcalina tipo AAA Vendidas separadamente Este produto se destina somente ao uso doméstico Problema Queda na eficiência de corte do aparador Substitua a lâmina Intervalo recomendado Aproximadamente a cada 1 5 mês Varia de acordo com o estado dos pelos e a frequência de uso do aparelho número de vezes quantidade de tempo Substitua a pilha Limpe os vestígios de pelos O aparador não funciona Ve...

Страница 45: ...31 MEMO MEMO 45 ...

Страница 46: ...sso autorizado mais próximo de sua região acesse nosso site www panasonic com br suporte ou entre em contato através dos telefones Tel 0800 776 0000 Exceto Celulares Tel 4004 6600 Panasonic Corporation http www panasonic com www panasonic com br Panasonic Corporation 2019 Y EN HK PT Printed in China Impresso na China ES9700WF611401 S0219 0 ...

Отзывы: