background image

Installation Manual

39

Operating Instructions

1

Wall Mounting Construction

Checking the Wall

When mounting on a wall, consult with your building’s owner, caretaker or construction manager to determine 
if the wall strength is sufficient to install the elite Panaboard. For safety, install the elite Panaboard only after 
thoroughly understanding the type of walls, the appropriate types of screws and the construction method 
(page 42).

CAUTION

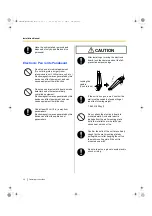
Do not attach the electronic board to mortared walls. Accidental electric leakage from the wall 
mounting plate bolts to metal laths or wire laths can cause heat, smoke or fire.

I.

Necessary Tools and Parts (not included with the elite Panaboard)

Drill, Phillips-head screwdriver, Measuring tape, Level
8 screws (M6 size)

II.

Before Starting

1.

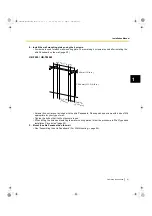
Make sure that the wall is strong enough to support the elite Panaboard.

Rated strength: greater than 1,962 N (200 k

g

f)

Notice

If necessary, reinforce the wall so that it is strong enough to support the elite Panaboard.

2.

Make sure that the location is large enough to accommodate the elite Panaboard.

Height: greater than 2,100 mm (6 ft. 10

5

/

8

in.)

Width: greater than 2,000 mm (6 ft. 6

3

/

4

in.)

3.

Make sure that the AC outlet is within 3 m (9 ft. 10

1

/

8

in.) of where the elite Panaboard will be 

mounted and that it will not be behind the elite Panaboard.

UB-T880-PJQXC0337ZA_mst.book  39 ページ  2010年5月11日 火曜日 午後1時9分

Содержание ElitePANABOARD UB-T880

Страница 1: ... Before operating this unit please read these instructions completely and keep them carefully for future reference This unit is designed for installation by a qualified servicing dealer Installation performed by non authorized individuals could cause safety related problems with the operation of this equipment For U S A only To locate the closest authorized dealer in your area please call 1 800 44...

Страница 2: ...are lets you save the contents of the screen on your computer and retrieve it for later use In built USB Speaker The elite Panaboard has an in built USB speaker Sound can be heard through the USB speaker when it is connected to a computer USB Hub Features The elite Panaboard comes with a 2 port USB hub as standard By connecting equipment such as scanners printers or external USB memory sources you...

Страница 3: ...indows 7 operating system DirectX refers to the Microsoft DirectX application programming interface Trademarks Microsoft Windows Windows Vista DirectX Windows Media and Internet Explorer are either registered trademarks or trademarks of Microsoft Corporation in the United States and or other countries IBM is a trademark of International Business Machines Corporation in the United States other coun...

Страница 4: ...unications Operation of this equipment in a residential area is likely to cause harmful interference in which case the user will be required to correct the interference at his own expense Industry Canada Requirements For Canada Only This equipment complies with IC radiation exposure limits set forth for an uncontrolled equipment and meets RSS 102 of the IC radio frequency RF Exposure rules This eq...

Страница 5: ...ilding or similar phenomena When the system storage device or any of its optional storage device is adversely effected by operational errors static electricity electrical noise vibration dust or when the power has been cut off due to malfunction repair or inadvertently the memory contents may be lost or changed Before operating the system make a point of reading the precautionary notes in the Oper...

Страница 6: ...d pressure level is 70 dB A or less in conformity with EN ISO 7779 This device is not intended for use in the direct field of view at visual display workplaces To avoid incommoding reflexions at visual display workplaces this device must not be placed in the direct field of view UB T880 PJQXC0337ZA_mst book 6 ページ 2010年5月11日 火曜日 午後1時9分 ...

Страница 7: ...Care 28 Cleaning the elite Panaboard 28 Replacing the Battery in the Electronic Pen 28 Replacing the Penpoint of the Electronic Pen 29 Troubleshooting 30 Specifications 32 Supplies Accessories 34 Installation Manual 35 Installation Manual for qualified service personnel 35 For Your Safety 35 Notice 35 Included Accessories 37 Wall Mounting Construction 39 Checking the Wall 39 Installing the Wall Mo...

Страница 8: ...ug the unit into an AC outlet with the proper voltage If you use a cord with an unspecified current rating the unit or plug may emit smoke or become hot to the touch When you operate this product the power outlet should be near the product and easily accessible To ensure safe operation the power cord supplied must be inserted into a standard three prong AC outlet which is effectively grounded eart...

Страница 9: ...rvice When disconnecting the unit grasp the plug instead of the cord Pulling on a cord forcibly can damage it and cause fire or electric shock During thunderstorms do not touch the unit and plug It may cause an electric shock Have the unit installed removed and disposed of only by qualified service personnel When the unit will no longer be used in order to prevent it from falling do not leave the ...

Страница 10: ...etectors and other automatically controlled equipment Electromagnetic waves generated by this device can affect equipment and can cause equipment to malfunction Use at least 22 cm 9 in away from pacemakers Electromagnetic waves generated by this device can affect the operation of pacemakers When the unit is not used over an extended period of time switch it off and unplug it If an unused unit is l...

Страница 11: ...THE FUSE SHOULD BE REMOVED AND THE PLUG CUT OFF AND DISPOSED OF SAFELY THERE IS A DANGER OF SEVERE ELECTRICAL SHOCK IF THE CUT OFF PLUG IS INSERTED INTO ANY 13 AMP SOCKET If a new plug is to be fitted please observe the wiring code as shown below If in any doubt please consult a qualified electrician WARNING This appliance must be earthed IMPORTANT The wires in this mains lead are coloured as foll...

Страница 12: ...ions Any changes or modifications not expressly approved by the party responsible for compliance could void the user s authority to operate this device About Using the Battery If a battery is used improperly the battery may leak causing corrosion of the unit or it may burst To prevent this always follow the precaution given below If the electronic pen ceases to function because the battery has run...

Страница 13: ... so Hospitals or health care facilities may be using equipment that could be sensitive to external RF radio frequency energy For European Union EU Panasonic System Networks Co Ltd declares that this equipment is in compliance with the essential requirements and other relevant provisions of Radio Telecommunications Terminal Equipment R TTE Directive 1999 5 EC Declarations of Conformity for the rele...

Страница 14: ...ilable for purchase separately page 34 The warranty may not be included depending on country area About Using the DVD ROM Power Cord 3 m 9 ft 10 1 8 in 1 USB Cable 5 m 16 ft 4 7 8 in 1 Software DVD ROM 1 AAA Battery LR03 Disposable 1 Electronic Pen 1 Penpoint Replacement 1 Operating Instructions this document 1 Warranty 1 2 4 GHz USB Wireless Adaptor 1 To prevent damage to the DVD ROM Do not touch...

Страница 15: ...t or freehand lines may be drawn connected or intersecting Screen Board Detects the position of your finger or the electronic pen Project the contents of a computer screen using a projector Error LED red Blinks red when an error occurs Power Switch Power LED green Turns the elite Panaboard on or off each time the power switch is pressed Lights green when the power is on Pen Tray Push the center of...

Страница 16: ...otion to turn itself on or off automatically To conserve battery power put the pen in low power mode before carrying it while walking when it is not in use Selector Dial Selects features of the electronic pen Status LED green Lights when the electronic pen power is on Blinks when the electronic pen battery is low Prepare a new battery and replace the old battery soon Up Button Performs the same fu...

Страница 17: ...tronic pen are unresponsive The elite Panaboard responds to the electronic pen as if you were touching the elite Panaboard with your finger The elite Panaboard responds as if you were operating it but you are not elite Panaboard operation is erratic Once you register an electronic pen it cannot be used with another electronic whiteboard The whiteboard responds as if you were touching it with your ...

Страница 18: ... AC inlet and secure the cord as shown in the illustrations below About Grounding If you cannot connect the grounding line contact your dealer The cost of installing a grounding connection is not included in the price of the elite Panaboard The included power cord is exclusively for use with the elite Panaboard Do not use it with any other devices Power Cord Included When attaching the power cord ...

Страница 19: ...sult in erroneous operation Notice Do not connect the elite Panaboard to a computer via USB unless elite Panaboard software book is installed Only connect the USB cable after following the steps in Installing the elite Panaboard software book page 22 to install the software 3 Connect the computer to a projector For instructions on connecting your computer and projector refer to the respecting inst...

Страница 20: ...ge Location Do not place the elite Panaboard where it is directly exposed to sunlight Do not use the elite Panaboard in a location less than 10 C 50 F or in a location subject to extreme changes in temperature Note The elite Panaboard may not work properly when used in one of the above locations Operating the elite Panaboard near electrical appliances may cause interference Move away from the elec...

Страница 21: ...witch After turning the elite Panaboard off wait more than 2 seconds before turning it back on Moving the elite Panaboard When Using the Stand Sold Separately 1 After confirming that the power is off disconnect the power cord and USB cable 2 Release the locks on the casters 3 Move the elite Panaboard avoid banging or shaking the board Notice Always move the elite Panaboard with 2 people Do not dra...

Страница 22: ...up screen does not appear select your DVD ROM drive in Explorer and double click Menu exe In Windows Vista or Windows 7 if the Autoplay dialog box is displayed click Run Menu exe 3 When the Welcome screen has been displayed click Next 4 When the Model Selections screen is displayed click the type of device you are using 5 When the Menu screen is displayed click Read Me First After the system requi...

Страница 23: ...ctions and continue with the installation 10 When installation has finished click Finish Restart your computer if you are prompted to do so The group elite Panaboard will be created in the Panasonic group in the program menu The following items will appear in the elite Panaboard group elite Panaboard software elite Panaboard book Electronic Pen Registration Tool Operating Instructions Software Hel...

Страница 24: ...e Refer to your projector s documentation for information on adjusting the projected image Set the Proper Resolution Set your computer s and projector s resolutions to the most appropriate setting If the resolution is not set properly the image will be difficult to see Particularly if the projector s resolution is lower than the computer s thin lines can appear cut or broken Refer to your projecto...

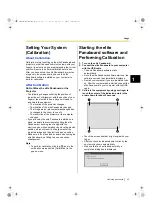
Страница 25: ...ng too strongly with the electronic pen while operating can move the stand s position which will result in misalignment of the projected image and the electronic pen s position Make sure to lock the stand s casters when using the elite Panaboard as failing to do so can cause misalignment Note To perform calibration click the icon in the notification area and click Calibration in the pop up menu St...

Страница 26: ...the Select Function Menu click the Menu Start Tab left side right side on the screen with your finger To display the Drawing Menu touch the screen board while holding the menu button on the electronic pen Note For detailed information about using the elite Panaboard software refer to the help menu For details on accessing the help information see Viewing the Help of the Software page 27 Exiting th...

Страница 27: ...Internet Explorer 6 0 or later for Windows Uninstalling the elite Panaboard software book If it is necessary to uninstall the elite Panaboard software book follow the procedure below 1 Turn on your computer and start Windows Log into an account with Administrator privileges 2 Select Add or Remove Programs from the Control Panel In Windows Vista or Windows 7 select Uninstall a program 3 Select Pana...

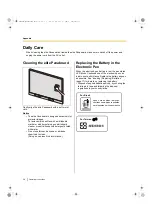
Страница 28: ...r Do not use thinner benzene or abrasive chemicals to clean Doing so can result in discoloration Replacing the Battery in the Electronic Pen When the electronic pen battery is low the pen status LED blinks Continued use of the electronic pen can lead to poor performance Replace the battery as soon as possible See Inserting Replacing Batteries page 17 for details on replacing the battery Dispose of...

Страница 29: ...ily across the surface Continuing to use the electronic pen in this condition may make the screen dirty and cause malfunction Replace the penpoint with a new one as soon as possible 1 Remove the penpoint cover 2 Remove the old penpoint and attach the new one 3 Reattach the penpoint cover Old Penpoint New Penpoint UB T880 PJQXC0337ZA_mst book 29 ページ 2010年5月11日 火曜日 午後1時9分 ...
Страница 30: ... cable is connected to a USB hub Do not connect the elite Panaboard through a USB hub The connection between the computer and the elite Panaboard is unexpectedly lost Check that the elite Panaboard is in an operable state and that the USB cable is properly connected The elite Panaboard response is delayed Other applications or anti virus software are active Shut down the other applications and ant...

Страница 31: ... pen status LED is blinking The electronic pen is low on batteries Replace the electronic pen s battery 17 Marks written with a whiteboard marker cannot be erased Because the elite Panaboard is designed exclusively for projector images you cannot erase the marks with a standard eraser Use commercially available whiteboard cleaner or neutral household cleaner diluted with water 28 The sound level i...

Страница 32: ...0 C to 40 C 4 F to 104 F Humidity 15 to 80 Interface USB 2 0 No of Hub Ports 2 ports Electronic Pen Transmission System GFSK Electronic Pen Power LR03 AAA alkaline dry cell battery 1 Electronic Pen Battery Life 30 hours when used continuously at 25 C 77 F When using Panasonic LR03 alkaline dry cell batteries Audio Features Audio Input Input level 309 mVrms 1 kHz 0 dB 10 kΩ Stereo 1 system ø 3 5 mm...

Страница 33: ...s Effective Area Height Width 1 175 mm 1 567 mm 3 ft 10 1 4 in 5 ft 1 11 16 in 77 in diagonal Model Number UB T880W General External Dimensions Height Width Depth 1 320 mm 1 900 mm 117 mm 4 ft 4 in 6 ft 2 13 16 in 4 5 8 in Weight 39 kg 86 lbs Input Unit Screen Board Size Height Width 1 175 mm 1 845 mm 3 ft 10 1 4 in 6 ft 5 8 in Interactive Features Effective Area Height Width 1 036 mm 1 842 mm 3 f...

Страница 34: ... Stand KX B061 Electronic Pen UE 608026 Stylus Pen UE 608027 Pointer UE 608028 Up Down Unit UE 608030 Stand Table UE 608031 Short Throw Arm Unit UE 608032 Consumables Penpoint Replace the penpoint after it has become worn and no longer slides across the surface UG 6026 UB T880 PJQXC0337ZA_mst book 34 ページ 2010年5月11日 火曜日 午後1時9分 ...
Страница 35: ...symbols are used in this Installation Manual Notice Denotes a potential hazard that could result in serious injury or death Denotes hazards that could result in minor injury or damage to the unit These symbols are used to alert operators to a specific operating procedure that must not be performed These symbols are used to alert operators to a specific operating procedure that must be emphasized i...

Страница 36: ...ctromagnetic waves generated by this device can affect the operation of pacemakers After installing or moving the electronic board lock the casters and set the fall prevention extension legs If the unit is hung on a wall confirm the wall must be capable of supporting at least the following weight 1 962 N 200 kgf Do not attach the electronic board to mortared walls Accidental electric leakage from ...

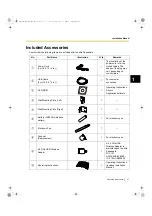
Страница 37: ...ble 5 m 16 ft 4 7 8 in 1 For computer connection DVD ROM 1 Operating Instructions Drivers Application software Wall Mounting Plate Left 1 Wall Mounting Plate Right 1 Battery LR03 AAA alkaline battery 1 For electronic pen Electronic Pen 1 Penpoint Replacement 1 For electronic pen 2 4 GHz USB Wireless Adaptor 1 A 2 4 GHz USB Wireless Adaptor is preinstalled on the elite Panaboard FCC ID ACJ5Z6UE 608...

Страница 38: ...or wall mounting are not included Please purchase screws with a size of M6 appropriate for your type of wall page 42 Warranty 1 May not be included depending on country area No Part Name Illustration Q ty Remarks UB T880 PJQXC0337ZA_mst book 38 ページ 2010年5月11日 火曜日 午後1時9分 ...
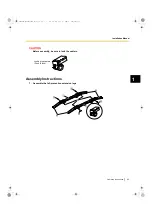
Страница 39: ...can cause heat smoke or fire I Necessary Tools and Parts not included with the elite Panaboard Drill Phillips head screwdriver Measuring tape Level 8 screws M6 size II Before Starting 1 Make sure that the wall is strong enough to support the elite Panaboard Rated strength greater than 1 962 N 200 kgf Notice If necessary reinforce the wall so that it is strong enough to support the elite Panaboard ...

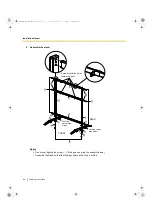
Страница 40: ...represents the outer edge of the elite Panaboard 3 Drill 8 holes for the wall mounting plates Drill holes that are appropriate for the screws you are using 421 8 mm 1 ft 4 19 32 in 813 mm 2 ft 8 in 324 2 mm 1 ft 49 64 in 208 2 mm 8 3 16 in 40 mm 1 9 16 in 1 006 mm 3 ft 3 19 32 in 220 9 mm 8 11 16 in 23 5 mm 15 16 in 543 3 mm 1 ft 9 3 8 in 813 mm 2 ft 8 in 324 2 mm 1 ft 49 64 in 208 2 mm 8 3 16 in ...

Страница 41: ...Please purchase screws with a size of M6 appropriate for your type of wall Tighten the bolt so that it will not become loose When drilling the holes and installing the wall mounting plates follow the procedure in Wall Types and Installation Procedures page 42 5 Mount the elite Panaboard on the wall See Assembling the elite Panaboard For Wall Mounting page 49 40 mm 1 9 16 in 1 006 mm 3 ft 3 19 32 i...

Страница 42: ... on the wall Metal or Concrete walls Stud plugs not included are needed Drill bit Metal or concrete wall Insert a stud plug in the hole Stud plug Wall mounting plate Drill 8 holes in the wall For the correct hole size refer to the instructions for the particular stud plugs used Insert the bolt through the hole in the wall mounting plate and tighten until the wall mounting plate is securely fixed t...

Страница 43: ...ixed into the wall Bolt Insert the bolt through the hole in the wall mounting plate and into the hole in the wall so that the arms of the split wing toggle are horizontal For the correct hole size refer to the instructions for the particular split wing toggles used Arms Wall mounting plate Wood screw Wooden wall Insert the wood screw through the hole in the wall mounting plate and tighten until th...

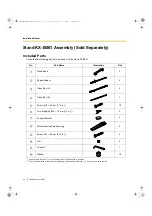
Страница 44: ... to the stand 2 The included wrench is necessary for tightening and loosening the screw 5 so keep it in a safe location No Part Name Illustration Q ty Stand Base 2 Support Beam 2 Cross Bar A 2 Cross Bar B 1 Screw M6 45 mm 1 3 4 in 10 Two wing Bolt M5 12 mm 1 2 in 1 2 Support Bracket 2 Fall prevention Extension Leg 4 Screw M6 60 mm 2 3 8 in 4 Nut 4 Wrench 2 1 Washer 10 UB T880 PJQXC0337ZA_mst book ...

Страница 45: ...ting Instructions 1 CAUTION Before assembly be sure to lock the casters Assembly Instructions 1 Assemble the fall prevention extension legs Locking the casters Push to lock UB T880 PJQXC0337ZA_mst book 45 ページ 2010年5月11日 火曜日 午後1時9分 ...
Страница 46: ...r tighten the screw 5 Doing so can warp the support beams Assemble the stand so that the locking casters are on the rear side Assemble with the holes toward the front Locking caster side rear REAR Locking caster side rear FRONT UB T880 PJQXC0337ZA_mst book 46 ページ 2010年5月11日 火曜日 午後1時9分 ...

Страница 47: ...legs down Note When folding back the fall prevention extension legs release the lock as follows 1 2 4 Mount the elite Panaboard See Assembling the elite Panaboard For Mounting on a Stand KX B061 Sold Separately page 52 2 1 1 1 2 UB T880 PJQXC0337ZA_mst book 47 ページ 2010年5月11日 火曜日 午後1時9分 ...
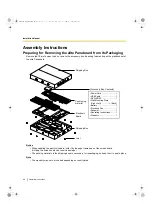
Страница 48: ...ot the screen board Holding the screen board can result in damage The packing materials in the shipping box are necessary for repackaging so keep them in a safe place Note The warranty may not be included depending on country area Shipping Box Electronic Board Shipping Box Accessory Box Contents Power Cord 1 USB Cable 1 DVD ROM 1 Wall Mounting Plate Right Left 1 Each Battery 1 Electronic Pen 1 Pen...

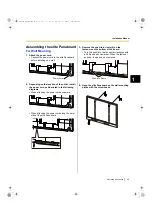
Страница 49: ...ng diagrams When attaching the power cord downward When attaching the power cord along the lower side of the elite Panaboard 3 Remove the push turn rivets 4 on the fasteners on the bottom of the board Turn the push turn rivets counter clockwise with a Phillips head screwdriver When the fastener pops up the part can be removed 4 Hang the elite Panaboard on the wall mounting plates with the screw he...

Страница 50: ...ll Use 4 screws to attach the fasteners on the bottom of the board securely to the wall Notice Screws 4 count are not included with the elite Panaboard Please purchase screws with a size of M6 appropriate for your type of wall 8 Attach the lower frame cover Perform step 6 and step 5 in reverse and attach the lower frame cover making sure there is no unevenness with the front surface Notice When mo...

Страница 51: ... screen board surface Gently wipe the screen board surface with a soft moist cloth Notice Do not use thinner benzene or abrasive chemicals to clean Doing so can result in discoloration Do not wipe the screen board with a dry cloth Doing so can cause static electricity build up UB T880 PJQXC0337ZA_mst book 51 ページ 2010年5月11日 火曜日 午後1時9分 ...

Страница 52: ...utlet install the power cord as illustrated in the following diagrams When attaching the power cord downward When attaching the power cord along the lower side of the elite Panaboard 3 Hang the elite Panaboard on the stand with the screw heads 4 Secure the elite Panaboard to the stand frame using the two wing bolts M5 12 mm 1 2 in 2 count included with the stand Power Cord UB T880 PJQXC0337ZA_mst ...

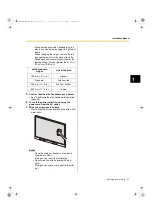
Страница 53: ...the elite Panaboard Operation page 54 6 Turn off the power switch and unplug the power cord from the AC outlet 7 Wipe the screen board surface Gently wipe the screen board surface with a soft moist cloth Notice Do not use thinner benzene or abrasive chemicals to clean Doing so can result in discoloration Do not wipe the screen board with a dry cloth Doing so can cause static electricity build up e...

Страница 54: ...tive calibration by touching each of the following points on the elite Panaboard with your finger for about 2 seconds one point after another For precise adjustment it is necessary to use a projector Confirm operation by writing on the screen board with the electronic pen and checking that the writing is displayed on the computer s screen Your writing with the electronic pen will not appear on the...

Страница 55: ...unting page 49 For Mounting on a Stand KX B061 Sold Separately page 52 Package the unit as depicted in the diagram in Preparing for Removing the elite Panaboard from Its Packaging page 48 Notice When handling the electronic board hold it by the frame and not the screen board Holding the screen board can result in damage UB T880 PJQXC0337ZA_mst book 55 ページ 2010年5月11日 火曜日 午後1時9分 ...

Страница 56: ...ng For more information about collection and recycling of old products and batteries please contact your local municipality your waste disposal service or the point of sale where you purchased the items Penalties may be applicable for incorrect disposal of this waste in accordance with national legislation For business users in the European Union If you wish to discard electrical and electronic eq...

Отзывы: