23
1
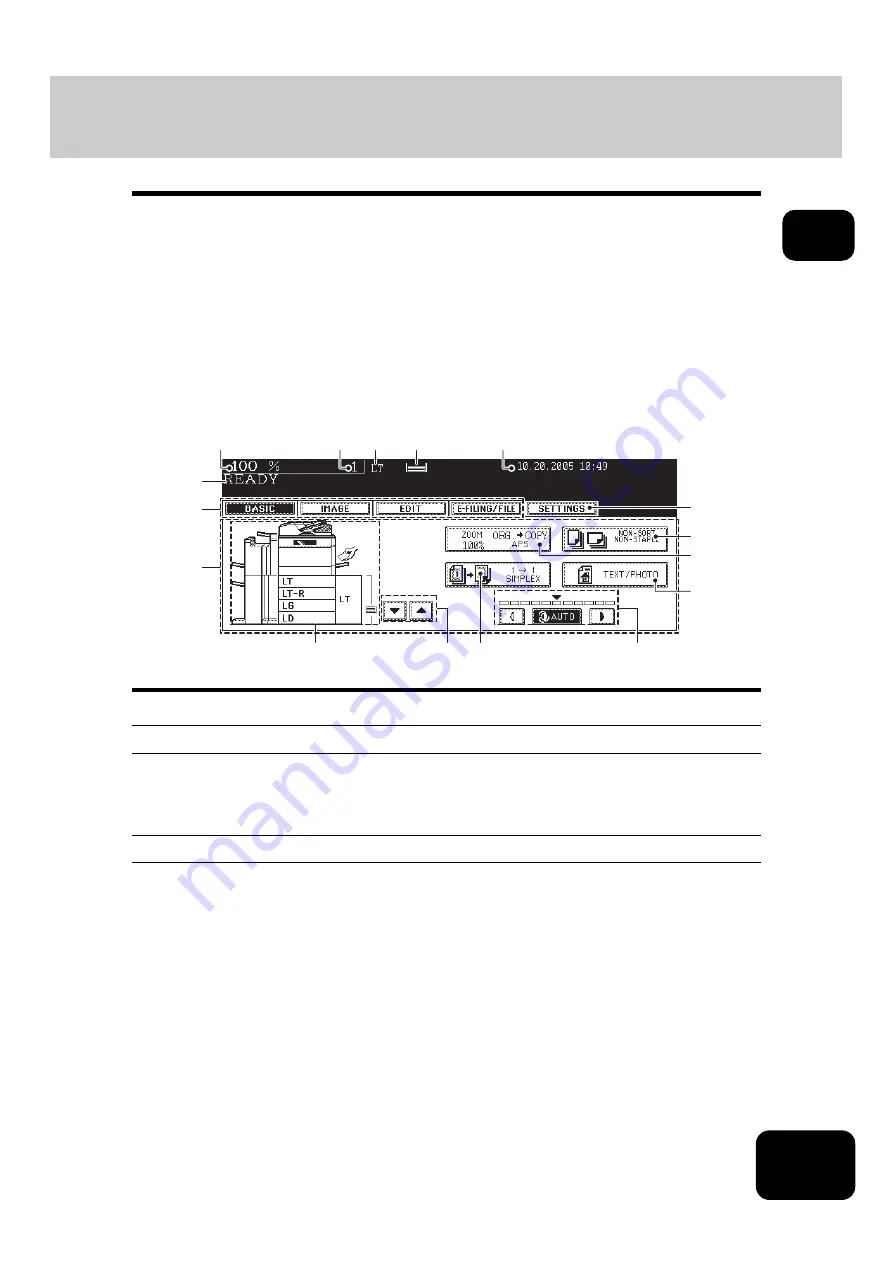
Touch panel
When the power is turned on, the basic menu for the copier function appears on this touch panel. The sta-
tus of the equipment is also displayed on the touch panel with messages and illustrations.
Message display
The following information appears at the top of the touch panel:
Equipment status, operational instructions, cautionary messages, reproduction ratios, total copy quantity,
paper size of a selected drawer, amount of paper in a selected drawer and date and time.
Touch-buttons
Press these buttons on the touch panel lightly to set various functions.
Index buttons
Press these buttons to switch menus. The type and number of the index buttons vary depending on the
function of the copier, scanner and e-Filing.
Function setting area
This area includes buttons for selecting and setting each function.
1.
Message
8.
Finisher button
2.
Reproduction ratio
9.
Enlargement/Reduction ([Zoom...]) button
3.
Total copy quantity
10. Original mode button
4.
Currently selected drawer size
11. Density adjustment buttons
(APS = Automatic Paper Selection;
12. Simplex / duplex button
AMS = Automatic Magnification Selection)
13. Paper source selection buttons
5.
Remaining paper level
14. Equipment status indication area
6.
Date and time
15. Function setting area
7.
Set functions confirmation ([SETTINGS]) button 16. Index buttons
1
16
15
2
3
6
7
8
9
10
5
4
11
13
14
12
Содержание DP-8540
Страница 6: ...4 CONTENTS Cont ...
Страница 73: ...71 3 2 Press the APS button 4 Press the START button ...
Страница 109: ...107 4 4 IMAGE ADJUSTMENT 1 Background Adjustment 108 2 Sharpness 109 ...
Страница 112: ...4 110 4 IMAGE ADJUSTMENT ...
Страница 119: ...117 5 4 Press the ENTER button Set Book type original 2 sided copy P 100 in duplex copying as well ...
Страница 151: ...149 5 5 Press the ENTER button Select other copy modes as required 6 Press the START button ...
Страница 153: ...151 5 5 Press the ENTER button Select other copy modes as required 6 Press the START button ...
Страница 178: ...176 6 e FILING 3 Changing Data of User Boxes Cont 6 7 Press the ENTER button The box settings are updated ...
Страница 192: ...6 190 6 e FILING ...
Страница 222: ...7 220 7 TEMPLATE ...
Страница 260: ...8 258 8 JOB STATUS ...
Страница 291: ...289 10 3 Press the GENERAL button 4 Press the TONER NEAR EMPTY DETECTION button 5 Press the YES button ...
Страница 315: ...313 11 11 MAINTENANCE 1 Daily Inspection 314 2 Simple Troubleshooting 315 ...
Страница 320: ...11 318 11 MAINTENANCE ...
Страница 335: ......


