background image

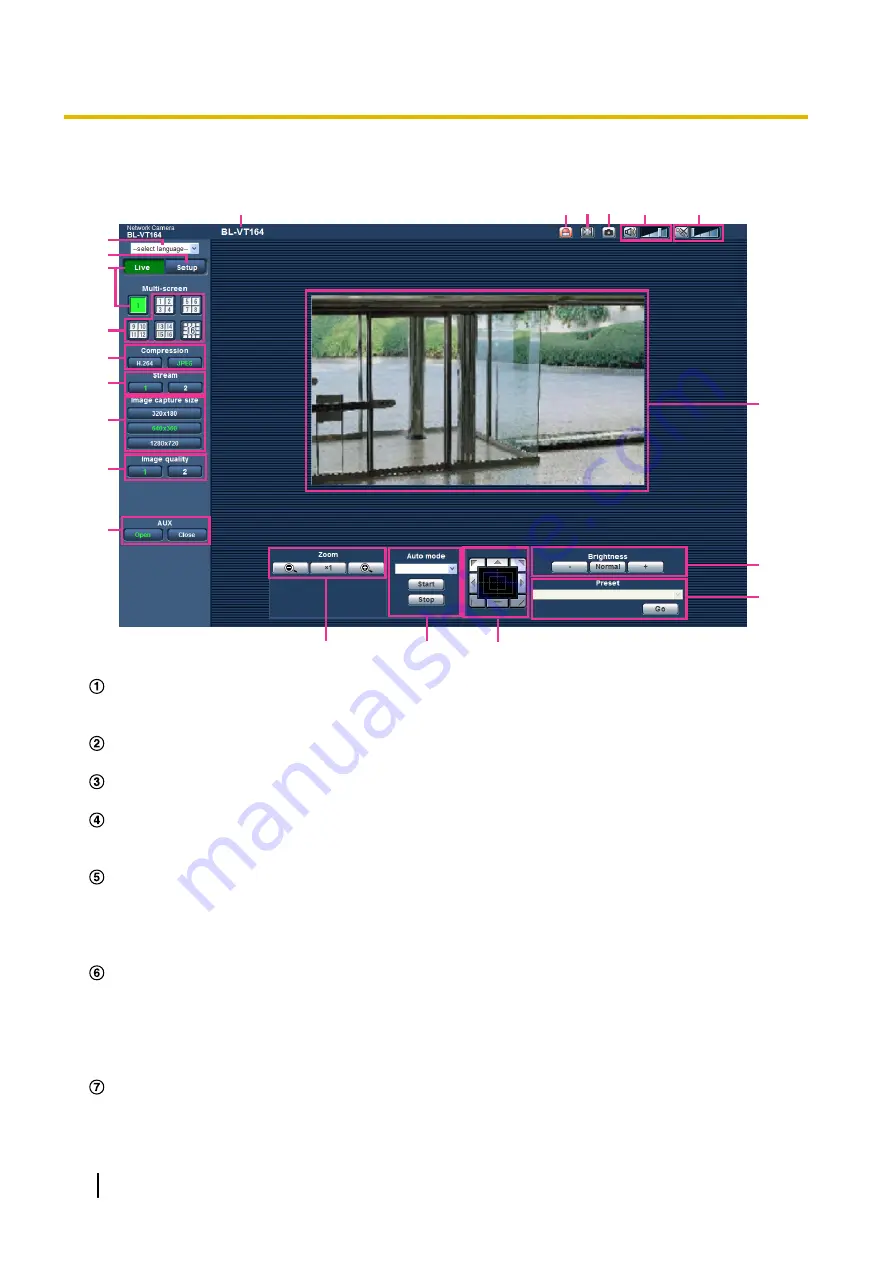
1.2  About the “Live” page (BL-VT164W/BL-VT164)

K

L

A

C

D

E

F

H

I

G

B

O

Q R

S

T

U

P

J

M

N

[select language] pull-down menu

The camera’s display language can be selected. The default language can be set in the [Language] in the
[Basic] settings. (

®

page 39)

[Setup] button

*1

Displays the setup menu. The button will turn green and the setup menu will be displayed.

[Live] button

Display the “Live” page. The button will turn green and the “Live” page will be displayed.

[Multi-screen] buttons

Images from multiple cameras can be displayed on a multi-screen by registering cameras on the setup
menu. (

®

page 18)

[Compression] buttons

[H.264] button:

 The letters “H.264” on the button will turn green and an H.264 image will be displayed.

When “On” is selected for “H.264 transmission” of “H.264(1)”, “H.264(2)”, the [H.264] button will be
displayed. (

®

page 51)

[JPEG] button:

 The letters “JPEG” on the button will turn green and JPEG image will be displayed.

[Stream] buttons

These buttons will be displayed only when an H.264 image is displayed.

[1] button:

 The letter “1” will turn green and images in the main area will be displayed in accordance

with the setting of “H.264(1)”. (

®

page 51)

[2] button:

 The letter “2” will turn green and images in the main area will be displayed in accordance

with the setting of “H.264(2)”. (

®

page 51)

[Image capture size] buttons

These buttons will be displayed only when a JPEG image is displayed.

10

Operating Instructions

1 Monitor images on a PC

Содержание BL-VT164WBR

Страница 1: ...T164WE BL VT164E BL VT164WU BL VT164U BL VT164WBR and BL VP100 Series BL VP104W BL VP104 BL VP101 BL VP104WE BL VP104E BL VP101E BL VP104WU BL VP104U BL VP101U BL VP104WBR Before attempting to connect or operate this product please read these instructions carefully and save this manual for future use The model number is abbreviated in some descriptions in this manual ...

Страница 2: ...W VP104W The functions with this notation are available when using the model BL VP104W VP104 VP104 The functions with this notation are available when using the model BL VP104 VP101 VP101 The functions with this notation are available when using the model BL VP101 Trademarks and registered trademarks Microsoft Windows Windows Vista Internet Explorer ActiveX and DirectX are either registered tradem...

Страница 3: ...ge is displayed on the information bar of the browser When the Live page is displayed for the first time the install wizard of the ActiveX control required to display images from the camera will be displayed Follow the instructions of the wizard When the install wizard is displayed again even after completing the installation of the ActiveX restart the PC The viewer software used on each PC should...

Страница 4: ...44 9 Configure the settings relating to images and audio Image Audio BL VT164W BL VT164 Configure the settings relating to images Image BL VP104W BL VP104 BL VP101 46 9 1 Configure the settings relating to the aspect ratio JPEG H 264 46 9 2 Configure the settings relating to JPEG images JPEG H 264 47 9 3 Configure the settings relating to H 264 images JPEG H 264 49 9 4 Configure the settings relat...

Страница 5: ...ating to the host authentication Host auth 95 13 3 Configure the settings relating to the priority stream System 96 14 Configure the settings of the servers Server 99 14 1 Configure the settings relating to the E mail server E mail 99 14 2 Configure the settings relating to the FTP server FTP 100 14 3 Configure the settings relating to the NTP server NTP 101 15 Configuring the network settings Net...

Страница 6: ...intenance of the camera Maintenance 154 18 1 Check the system log System log 154 18 2 Upgrade the firmware Upgrade 154 18 3 Check the status Status 156 18 4 Reset the settings Reboot the camera Default reset 157 19 Privacy Mode BL VT164W BL VT164 159 19 1 Configuring the Privacy Mode with the PRIVACY button 159 19 2 Configuring the Privacy Mode with the setup menu 160 19 3 Turning the Privacy Mode...

Страница 7: ...v6 address http 2001 db8 10 Example of IPv4 access Example of IPv6 access IMPORTANT When the HTTP port number is changed from 80 enter http IP address of the camera colon port number in the address box of the browser Example http 192 168 0 11 8080 When the PC is in a local network configure the proxy server setting of the web browser under Internet Options under Tools of the menu bar to bypass the...

Страница 8: ...e window with the user name and password entry fields will be displayed 4 Enter the user name and the password The default user name and password are as follows User name admin Password 12345 8 Operating Instructions 1 Monitor images on a PC ...

Страница 9: ...ceiving H 264 images and users who are receiving JPEG images Depending on the set values for Bandwidth control bit rate and Max bit rate per client the maximum concurrent access number may be 14 or less users When 14 users are concurrently accessing the access limit message will be displayed for users who subsequently attempt to access When Multicast is selected for Transmission type of H 264 only...

Страница 10: ... H 264 button The letters H 264 on the button will turn green and an H 264 image will be displayed When On is selected for H 264 transmission of H 264 1 H 264 2 the H 264 button will be displayed page 51 JPEG button The letters JPEG on the button will turn green and JPEG image will be displayed Stream buttons These buttons will be displayed only when an H 264 image is displayed 1 button The letter...

Страница 11: ...tton Images in the main area will be displayed in accordance with the setting for Quality1 of Image quality setting page 47 2 button Images in the main area will be displayed in accordance with the setting for Quality2 of Image quality setting page 47 AUX buttons 2 These buttons will be displayed only when AUX output is selected for Terminal 3 of Alarm on the setup menu page 77 Open button The let...

Страница 12: ...ilting speed will be faster if a clicked point gets farther from the center point of the control pad It is also possible to pan tilt the camera by dragging the mouse Zoom can be adjusted by right clicking When an upper lower area of the control pad is right clicked the displayed image will be zoomed in out on Zoom can also be adjusted using the mouse wheel Brightness buttons 2 Available range 0 12...

Страница 13: ...volume cursor Note When a user is using the audio transmission function with Interactive Half duplex selected the receiver button and the transmission button will be inoperable for the other users When Interactive Full duplex is selected the transmission button is inoperable for other users Possible duration of audio transmission is up to 5 minutes per transmission When 5 minutes have passed the a...

Страница 14: ...y occur when the shooting scene drastically changes due to the GDI restrictions of the OS A phenomenon in which portions of the screen are displayed out of alignment 1 Only operable by users whose access level is 1 Administrator 2 Only operable by users whose access level is 1 Administrator or 2 Camera control when On is selected for User auth page 94 3 Operable by users who belong to the access l...

Страница 15: ...ll turn green and an H 264 image will be displayed When On is selected for H 264 transmission of H 264 1 H 264 2 the H 264 button will be displayed page 51 JPEG button The letters JPEG on the button will turn green and JPEG image will be displayed Stream buttons These buttons will be displayed only when an H 264 image is displayed 1 button The letter 1 will turn green and images in the main area w...

Страница 16: ...setting page 47 Zoom buttons Images will be zoomed in on with the electronic zoom by the viewer software Network Camera View 4S x1 button The letter x1 will turn green and images in the main area will be displayed at x1 x2 button The letter x2 will turn green and images in the main area will be displayed at x2 x4 button The letter x4 will turn green and images in the main area will be displayed at...

Страница 17: ...in order to set the clicked point as the center When selecting an area in the main area by dragging the mouse the selected area will be located at the center of the main area In this case the zoom ratio will be adjusted automatically Zoom can be adjusted using the mouse wheel Note When operated by a lower access level user images displayed on the screen may be changed temporarily This does not aff...

Страница 18: ...disconnected while displaying images displaying images on a multi screen from the Live page will become unavailable When displaying the image on a multi screen and 16 9 is selected for Aspect ratio the image will be displayed altered vertically to the aspect ratio of 4 3 Network Camera Recorder with Viewer Software Lite which supports live monitoring and recording images from multiple cameras is a...

Страница 19: ...When the authentication window is displayed enter the user name and password The default user name and password are as follows User name admin Password 12345 To enhance the security change the password for the user admin page 94 If the cellular phone in use is not compatible with UTF 8 encode it is impossible to display the screen correctly Note It is necessary to configure the network settings of...

Страница 20: ...ss mobile 1 or http Host name registered in the DDNS server mobile using a cellular phone Images from the camera will be displayed A B C D E F G H I 20 Operating Instructions 2 Monitor images on a cellular phone mobile terminal ...

Страница 21: ...y control It is possible to change the image quality between Quality1 and Quality2 page 47 F Home position 2 VT164W VT164W VT164 VT164 The camera will move to the home position page 55 Home position will be displayed only when home position is set G Preset 2 VT164W VT164W VT164 VT164 The camera will move to the designated preset position to display images by pressing the dial key corresponding to ...

Страница 22: ...et 2 Only displayed for users whose access level is 1 Administrator or 2 Camera control when On is selected for User auth page 94 2 2 Monitor images on a mobile terminal It is possible to connect to the camera using a mobile terminal and monitor images MJPEG only from the camera on the screen of the mobile terminal Images are automatically refreshed to display the latest image Operations such as p...

Страница 23: ... Operation buttons area When functions are selected in the function selection area D buttons to operate those functions are displayed Zoom operation area Buttons to operate the zoom are displayed Function selection area When functions that can be operated are selected operation buttons are displayed in the operation buttons area B Operating Instructions 23 2 Monitor images on a cellular phone mobi...

Страница 24: ...T164 VT164 Preset VT164W VT164W VT164 VT164 Resolution control AUX control VT164W VT164W VT164 VT164 Privacy Mode control VT164W VT164W VT164 VT164 Zoom display VT164W VT164W VT164 VT164 Each function is explained below 24 Operating Instructions 2 Monitor images on a cellular phone mobile terminal ...

Страница 25: ...display the buttons used to select the preset position on the screen Camera images are displayed of the registered preset camera directions according to the preset numbers selected from the buttons Only position numbers 1 4 for the preset positions are displayed Only registered preset positions are displayed Unregistered preset positions are not displayed Operating Instructions 25 2 Monitor images...

Страница 26: ...hanges the image capture size between 320x240 640x480 default and 800x600 VP101 VP101 Changes the image capture size between 320x240 and 640x480 default Image in the aspect ratio of 16 9 VT164W VT164W VT164 VT164 VP104W VP104W VP104 VP104 Changes the image capture size between 320x180 640x360 default and 1280x720 VP101 VP101 Changes the image capture size between 320x180 and 640x360 default 26 Ope...

Страница 27: ...d to operate the AUX output on the screen The AUX output terminals can be controlled with the and buttons This function is only displayed when Terminal 3 is set to AUX output on the settings menu page 77 Operating Instructions 27 2 Monitor images on a cellular phone mobile terminal ...

Страница 28: ...play the buttons used to operate the privacy mode on the screen The privacy mode can be enabled and disabled with the and buttons To activate privacy mode press To deactivate privacy mode press 28 Operating Instructions 2 Monitor images on a cellular phone mobile terminal ...

Страница 29: ...t number cam or https Host name registered in the DDNS server colon port number cam When the authentication window is displayed enter the user name of an administrator or user and password Depending on the mobile terminal in use password entry may be required each time the screen is switched It is impossible to transmit receive audio using a mobile terminal Depending on the mobile terminal in use ...

Страница 30: ...ond intervals For this reason it may take a maximum of 30 seconds until the alarm occurrence indication button is displayed on the Live page at an alarm occurrence Notify of alarm occurrences to the device connected to the alarm connector It is possible to output signals from the alarm connector on the rear of the camera and sound the buzzer when an alarm occurs The settings for the alarm output c...

Страница 31: ... recorder is connected to the system When On is selected for Panasonic alarm protocol the connected Panasonic device will be notified that the camera is in the alarm state The settings for Panasonic alarm protocol can be configured in the Panasonic alarm protocol section of the Notification tab of the Alarm page page 88 Operating Instructions 31 3 Action at an alarm occurrence ...

Страница 32: ...s may not reach the set number of images to be transmitted 4 2 Transmit images at a designated interval or period FTP periodic image transmission Images can be transmitted at a designated interval or period To transmit images at a designated interval or period it is necessary to configure the settings in advance The settings for the FTP server can be configured on the FTP tab of the Server page pa...

Страница 33: ...ccess to cameras using the HTTPS function page 112 IMPORTANT Design and enhance security countermeasures to prevent leakage of information such as image data authentication information user name and password alarm E mail information FTP server information DDNS server information etc Perform the countermeasure such as access restriction using the user authentication or access encryption using the H...

Страница 34: ...hen the authentication window is displayed enter the user name and password then click OK The default user name and password are as follows User name admin Password 12345 The setup menu will be displayed Refer to page 37 for further information about this menu Note When Off is selected for User auth if the Setup button is clicked an authentication window is displayed A user name and password must ...

Страница 35: ...nd configure the setting items relating to the name of the tab 2 Complete each setting item displayed in the frame on the right of the window 3 After completing each setting item click the Set button to apply them IMPORTANT When there are two or more Set and Execute buttons on the page click the respective button to the edited setting item Example A C D B When completing the setting items in field...

Страница 36: ...l not be applied unless the Set button B below field A is clicked In the same manner as above click the Set button D below field C when completing the setting items in field C 36 Operating Instructions 6 Display the setup menu from a PC ...

Страница 37: ...age capture size and camera actions of JPEG H 264 camera images can be configured on the Image Audio page page 46 Image button VP104W VP104W VP104 VP104 VP101 VP101 Displays the Image page The settings relating to image quality image capture size etc of JPEG H 264 camera images can be configured on the Image page page 46 Multi screen button Displays the Multi screen page The cameras from which ima...

Страница 38: ... Dynamic DNS SNMP Simple Network Management Protocol and the FTP File Transfer Protocol periodic transmission can be configured on the Network page page 104 Schedule button Displays the Schedule page On the Schedule page it is possible to designate time zones to allow to receive alarm input or to allow to activate the VMD detection function page 151 Maintenance button Displays the Maintenance page...

Страница 39: ...the Camera title field Available number of characters 0 20 characters Unavailable characters Default Varies as follows depending on the model in use BL VT164W VT164W VT164W BL VT164 VT164 VT164 BL VP104W VP104W VP104W BL VP104 VP104 VP104 BL VP101 VP101 VP101 Date time Enter the current time and date When 12h is selected for Time display format AM or PM can be selected Available range 01 01 2010 0...

Страница 40: ...ht saving time is applied in the location where the camera is in use In Applies summer time An asterisk will be displayed on the left side of the displayed time and date Out Does not apply summer time Auto Applies summer time in accordance with the settings for Start time date and End time date month week day of the week time Default Out NTP Time zone When NTP is clicked the NTP tab of the Server ...

Страница 41: ... status On Access The indicator will light when images are viewed On With body heat sensor VT164W VT164W VT164 VT164 The indicator lights for 1 second when the body heat sensor pyroelectric infrared sensor is triggered when a detection is made Off The indicator will light off Default On WIRELESS indicator WPS indicator VT164W VT164W VP104W VP104W On The indicator will light in accordance with the ...

Страница 42: ...ra changes the alarm occurrence indication button the AUX button will be displayed to notify of the camera status Polling 30s Updates the status each 30 seconds and provide notification of the camera status Real time Provide notification of the camera status when the status has changed Default Polling 30s Note Depending on the network environment notification may not be provided in real time Alarm...

Страница 43: ...aintenance page Language Select the language to initially display when the camera is accessed from the following English Japanese Italian French German Spanish Chinese Russian P E U model Portuguese BR model Default English P E U model Portuguese BR model The language displayed on the Live page can also be changed VT164W VT164W VT164 VT164 page 10 VP104W VP104W VP104 VP104 VP101 VP101 page 15 Oper...

Страница 44: ...roperly configured click the Status tab on the Maintenance page and check that the Enable is displayed for Status of UPnP page 156 When Enable is not displayed refer to Cannot access the camera via the Internet in 22 Troubleshooting When the UPnP Auto port forwarding setting is changed the Auto port forwarding setting under UPnP on the Network tab of the Network page also changes to the same setti...

Страница 45: ...displayed Click the OK button after checking the settings to change the settings to the displayed values JPEG H 264 tab on the Image Audio page H 264 1 H 264 2 Internet mode over HTTP On Transmission priority Best effort Network tab on the Network page Common Max RTP packet size Limited 1280byte HTTP max segment size MSS Limited 1280byte Operating Instructions 45 8 Configure the Internet settings ...

Страница 46: ...4 page 35 Aspect ratio Select the aspect ratio 4 3 16 9 Default 16 9 VT164W VT164W VT164 VT164 VP104W VP104W VP104 VP104 4 3 VP101 VP101 Note VT164W VT164W VT164 VT164 VP104W VP104W VP104 VP104 Image adjustment functions are activated for the angle of view in the aspect ratio of 16 9 even while 4 3 is being selected for Aspect ratio When setting the mask area for the back light compensation BLC fu...

Страница 47: ... the right is selected Depending on factors such as the network environment the resolution the image quality or the number of computers concurrently accessing the camera the transmission interval may be longer than the set value If images are not delivered in the specified transmission interval you can make the images be delivered closer to the specified time by lowering the resolution or image qu...

Страница 48: ...t two types of image quality of JPEG images for each image capture size 0 Super fine 1 Fine 2 3 4 5 Normal 6 7 8 9 Low Default Quality1 5 Normal Quality2 8 The setting for Quality1 is activated for FTP periodic image transmission files attached to alarm E mails 48 Operating Instructions 9 Configure the settings relating to images and audio Image Audio BL VT164W BL VT164 Configure the settings rela...

Страница 49: ... H 264 Click the JPEG H 264 tab on the Image Audio page page 34 page 35 Operating Instructions 49 9 Configure the settings relating to images and audio Image Audio BL VT164W BL VT164 Configure the settings relating to images Image BL VP104W BL VP104 BL VP101 ...

Страница 50: ...pture size Image quality etc in this section Refer to page 47 for the settings relating to JPEG images 50 Operating Instructions 9 Configure the settings relating to images and audio Image Audio BL VT164W BL VT164 Configure the settings relating to images Image BL VP104W BL VP104 BL VP101 ...

Страница 51: ...ngs Off H 264 images and audio will be transmitted using the UDP port Default On Note When On is selected only Unicast port AUTO will be available for Transmission type When On is selected it may take time to start displaying H 264 images When On is selected H 264 images may not be displayed depending on the number of the concurrent access user and audio data availability etc When On is selected o...

Страница 52: ...Frame rate is selected in Transmission priority only the maximum bit rate can be set 64kbps 128kbps 256kbps 384kbps 512kbps 768kbps 1024kbps 1536kbps 2048kbps 3072kbps 4096kbps 8192kbps 1 Unlimited Default Max 1024kbps Min 128kbps As in the following the range of bit rates that can be configured for the H 264 bit rates differs depending on the Image capture size 1280x720 8192kbps 1 256kbps 800x600...

Страница 53: ...ulticast Unlimited number of users can access a single camera concurrently Complete the entry field of Multicast address Multicast port and Multicast TTL HOPLimit when transmitting H 264 images with multicast Refer to page 7 for further information about the maximum concurrent access number Default Unicast port AUTO Unicast port1 Image 2 Enter the unicast port number used to transmit images from t...

Страница 54: ...when displaying images using the multicast port Smoother live video display on the browser buffering Perform settings to display camera images on the viewer software On Images are temporarily stored on the computer and are displayed smoother Off Images are displayed in real time and are not stored on the computer Default Off 1 VT164W VT164W VT164 VT164 VP104W VP104W VP104 VP104 2 It is necessary t...

Страница 55: ...e set time has passed the camera will move to the home position automatically Default Off Note This function is also useful to automatically set the camera in a specific mode when the power of the camera is turned on The self return function works even when the setup menu is displayed Self return time Select a waiting time amount of time until the camera starts the selected operation after the end...

Страница 56: ... factors up to 12x Off Does not use the digital zoom Default Off Note When the zoom factor is 1 5x or more the setting of the preset positions will become unavailable Pan Tilt degree Zoom ratio display Select On or Off to determine whether or not to display the current panning tilting degree and the zoom ratio display on images when the camera is being operated manually On Displays the current pan...

Страница 57: ...e displayed in a newly opened window The detailed settings can be configured while monitoring images displayed on the Image Privacy tab The settings relating to image adjust extra zoom and privacy zone can be configured in this section Image adjust Click the Setup button to display the setup menu that can configure the settings relating to image quality The setup menu will be displayed in a newly ...

Страница 58: ...ewly displayed window When the values are changed the changed values will be applied to the currently displayed image on the Image Position tab VP104W VP104W VP104 VP104 VP101 VP101 Click the Setup button of Image adjust on the Image Privacy tab of the Image page page 57 The settings relating to image quality can be configured with the setup menu displayed in a newly displayed window When the valu...

Страница 59: ...tivates the darkness compensation function Default Off IMPORTANT When On is selected for Adaptive black stretch noise in the darker parts may be increased and parts around borders between the darker parts and the brighter parts may become darker brighter than the other darker brighter parts Operating Instructions 59 9 Configure the settings relating to images and audio Image Audio BL VT164W BL VT1...

Страница 60: ...s ELC 1 4000s ELC 1 8000s Default ELC 1 30s Note The shorter the maximum exposure time is the more accurately it is possible to capture a fast moving object with less blur When a faster shutter speed is selected the sensitivity will become lower When a faster shutter speed is selected flickering may happen In case flickering happens it may be improved by configuring the following settings In the a...

Страница 61: ...tment from the following White color can be adjusted by Red gain and Blue gain ATW1 Selects the automatic tracing white balance mode The camera will constantly check the color temperature of the light source and adjust the white balance automatically Operating color temperature range is approx 2 700 K 6 000 K ATW2 Selects the automatic tracing white balance mode under a sodium lamp The camera will...

Страница 62: ...the Reset button to reset the color to the default Default 128 Aperture level Adjust the aperture level outline compensation Images will be sharper when the cursor is moved in the direction and will be softer when the cursor is moved in the direction Click the Reset button to reset the color to the default Default 16 Pedestal level Adjust the black level of images by moving the cursor When the cur...

Страница 63: ...P104W VP104 VP104 Borders will appear and the image displayed on the Image Privacy tab will be divided into 48 6x8 VP101 VP101 Borders will appear and the image displayed on the Image Privacy tab will be divided into 48 6x8 16 4x4 Operating Instructions 63 9 Configure the settings relating to images and audio Image Audio BL VT164W BL VT164 Configure the settings relating to images Image BL VP104W ...

Страница 64: ...ab will disappear VP104W VP104W VP104 VP104 VP101 VP101 The borders on the image displayed on the Image Privacy tab will disappear IMPORTANT VT164W VT164W VT164 VT164 VP104W VP104W VP104 VP104 When 4 3 is selected for the aspect ratio of JPEG H 264 the image will be displayed clipped from the image of 16 9 Therefore even when 4 3 is set the brightness of the masked area will affect the image It is...

Страница 65: ...the aspect ratio of 16 9 Being cut out from the aspect ratio of 4 3 Note When the Reset button is clicked masking for all the masked areas will be canceled 9 5 3 Configure the settings relating to the preset positions Preset position setup menu BL VT164W BL VT164 Click the Setup button of Preset position on the Image Position tab of the Image Audio page page 57 It is possible to register edit and ...

Страница 66: ...1 Register the preset positions 1 Select a preset position number The selected preset position number will be displayed in the Position No area When the selected number has already been registered the camera will move to the selected preset position 2 Move the camera to the desired direction 66 Operating Instructions 9 Configure the settings relating to images and audio Image Audio BL VT164W BL VT...

Страница 67: ...layed on images This function can be applied to each preset position Available number of characters 0 20 characters Available characters 0 9 A Z and the following marks Default None blank Note The entered preset ID will be displayed next to the preset position number on the pull down menu When On is selected for Preset ID the preset ID will be displayed on images Back light compensation BLC The ba...

Страница 68: ...he setting for the function is performed after the settings for the mask areas page 62 privacy zone page 70 VMD area page 84 To prevent this perform the setting for the extra zoom function before other settings 9 5 5 Configure the settings relating to the privacy zone Privacy zone setup menu BL VT164W BL VT164 Click the Setup button of Privacy zone on the Image Position tab of the Image Audio page...

Страница 69: ... to the zone number indicates that the privacy zone has already been set for the number A blinking mask will be displayed at the center of the image displayed on the Image Position tab Operate the camera with the panning tilting zooming operations to cover the area to be covered by the blinking mask Click the Set button after determining the position of the camera To delete the registered zone cli...

Страница 70: ...ose button Click this button to close the Privacy zone setup menu 9 5 6 Configure the settings relating to the privacy zone Privacy zone setup menu BL VP104W BL VP104 BL VP101 Click the Setup button of Privacy zone on the Image Privacy tab of the Image page page 57 When there is a zone that you do not want to display set the zone as a privacy zone not to be displayed Up to 2 privacy zones can be s...

Страница 71: ... privacy zone larger than the size of an object to be hidden Close button Click this button to close the Privacy zone setup menu Operating Instructions 71 9 Configure the settings relating to images and audio Image Audio BL VT164W BL VT164 Configure the settings relating to images Image BL VP104W BL VP104 BL VP101 ...

Страница 72: ...e transmitted to the camera Audio can be heard from the speaker connected to the camera Interactive Half duplex Both reception and transmission are available However audio data cannot simultaneously be transmitted and received Interactive Full duplex Both reception and transmission are simultaneously available Default Interactive Half duplex Note Howling may be generated depending on usage conditi...

Страница 73: ...ult 160ms Note When a shorter interval is selected the delay time will be shorter When a longer interval is selected audio interruption may be diminished even though the delay time will be longer Select the interval according to the network environment Audio output volume PC to Camera Select a volume level on the camera to hear audio transmitted from the PC High Middle Low Default Middle Audio out...

Страница 74: ...cep Select an access level for audio transmission reception from the following 1 Level 1 only 2 Level 2 or higher 3 All users Default 3 All users Note Refer to page 94 and for further information about the access level Muting while panning tilting Select On or Off to determine whether or not to mute the camera s microphone when the camera is panning or tilting Select On to mute the noise from when...

Страница 75: ...address Enter the IP address or the host name of the camera to be used for the multi screen 4 cameras can be registered as a group and up to 4 groups 16 cameras can be registered When the HTTP port number for the camera of which images are to be displayed had been changed enter as follows Example of entry Operating Instructions 75 10 Configure the multi screen settings Multi screen ...

Страница 76: ... panasonic com br netcam Note When using the host name it is necessary to configure the DNS settings of the PC to be used for the multi screen display Refer to the network administrator for information on the DNS setting of PCs This camera is specified when selfcamera is displayed for the IP address or host name Camera title Enter the title of the camera The entered camera title will be displayed ...

Страница 77: ...ttings relating to the alarm images and the alarm output terminal Alarm Terminal 1 VT164W VT164W VT164 VT164 Determine how to use terminal 1 Off Not used Alarm input Receives alarms Close An alarm is detected when the terminal status is changed to On Open An alarm is detected when the terminal status is changed to Off Default Off Terminal 2 VT164W VT164W VT164 VT164 Determine how to use terminal 2...

Страница 78: ...tivity level Normal Sets the sensor to a normal sensitivity level Low Sets the sensor to a low sensitivity level Quiet Sets the sensor to a very low sensitivity level Default Off Note Check the status of the power indicator to determine if the sensor is actually operating or not page 41 Because the sensor body heat sensor detects temperature differences the sensor may not make detections depending...

Страница 79: ...is detected from the following Off Does not take any action even when a terminal alarm 1 is detected 1 64 When the registered preset position is selected the camera will move to the selected preset position when a terminal alarm 1 is detected Default Off Terminal alarm 2 Select an action to be taken when a terminal alarm 2 is detected from the following Off Does not take any action even when a ter...

Страница 80: ...aken when a command alarm is detected from the following Off Does not take any action even when a command alarm is detected 1 64 When the registered preset position is selected the camera will move to the selected preset position when a command alarm is detected Default Off 11 3 Configure the settings relating to the alarm image Alarm Click the Alarm tab on the Alarm page page 34 page 35 The setti...

Страница 81: ...arm image transmission to the FTP server from the following 0 1fps 0 2fps 0 33fps 0 5fps 1fps Default 1fps Number of images Select the number of images to be transmitted from the following 1pic 2pics 3pics 4pics 5pics 6pics 7pics 8pics 9pics 10pics 20pics 30pics 50pics 100pics 200pics 300pics 500pics 1000pics 2000pics 3000pics Default 100pics Recording duration Approximate time to be taken to save...

Страница 82: ...is section Alarm output terminal setup Alarm output trigger Select On or Off to determine whether or not to output the alarm signals to the alarm output terminal when an alarm is detected Default Off Alarm output type Select Latch or Pulse for the alarm output terminal at an alarm occurrence Latch When an alarm is detected the alarm output terminal will be in the state selected for Trigger output ...

Страница 83: ...f AUX Open and Close on the Live page can be changed AUX title AUX Up to 10 characters Enter the name for AUX on the Live page Unavailable characters Default AUX Open Up to 5 characters Enter the name for Open of AUX on the Live page Unavailable characters Default Open Close Up to 5 characters Enter the name for Close of AUX on the Live page Unavailable characters Default Close Note AUX is a camer...

Страница 84: ... VP104 VP104 VP101 VP101 page 15 will be displayed when motion is detected by the VMD function The alarm occurrence indication button will be displayed when receiving an alarm input of a terminal alarm or a command alarm Depending on the network environment notification may be delayed even when Real time is selected for Alarm status update mode on the Basic page page 39 The motion detection functi...

Страница 85: ...re for setting the VMD area Set the areas to activate the VMD function IMPORTANT When the settings are being configured on the setup menu sometimes the VMD function may not work correctly Area When selecting a VMD area in the screen it will be numbered as area 1 Subsequent areas will be numbered in the order of selection All areas button VT164W VT164W VT164 VT164 When the All areas button is click...

Страница 86: ...ing a subject moving over the whole screen Area No notification When Panasonic alarm protocol notification is clicked the Notification tab of the Alarm page will be displayed page 88 1 Set the video motion detection area by dragging the mouse on the screen When the All areas button is clicked the whole area will become the VMD area and 1 White will be automatically applied to Area The designated a...

Страница 87: ...deleted The outline of the respective VMD area will disappear 6 Click the Set button The edited settings will be applied 7 Click the Back button to return to the screen to select a preset position 11 7 Configuration of the settings relating to the E mail notification Notification Click the Notification tab on the Alarm page page 34 page 35 The settings relating to the alarm E mail can be configure...

Страница 88: ...nation E mail address Up to 4 destination E mail addresses can be registered Alarm checkbox When the checkbox is selected the E mail notification will be performed upon an alarm occurrence Destination E mail address Enter the destination E mail address Available number of characters 3 128 characters Available characters Alphanumeric characters the at sign the period the underscore _ and the hyphen...

Страница 89: ...be provided to the registered destination server addresses in order from Address 1 Additional alarm area data VMD Determine whether or not to send notifications for VMD alarm detection area numbers with the Panasonic alarm protocol by selecting On Off Default Off Destination port Select a destination port for the Panasonic alarm protocol from the following Available range 1 65535 Default 1818 The ...

Страница 90: ... address or host name Available characters Alphanumeric characters the colon the period the underscore _ and the hyphen To delete the registered destination server address click the Delete button respective to the desired destination server address IMPORTANT When entering the host name of the Destination server address the DNS settings on the Network tab of the Network page must be configured page...

Страница 91: ...ection functions you need to install the extension software For further information refer to our website http security panasonic com pss security kms 12 1 Configure the settings relating to the XML notification XML notification Click the XML notification tab on the Advanced func page The settings relating to the XML notification can be configured in this section The XML notification notifies the s...

Страница 92: ...le number of characters 1 128 characters Available characters Alphanumeric characters the period the underscore _ and the hyphen Destination port number Configure the port number settings for XML notification The following port numbers are unavailable since they are already in use 20 21 23 25 42 53 67 68 69 110 123 161 162 443 995 10669 10670 Destination path name Configure the settings for the de...

Страница 93: ...ng conditions Face detection Face detection Determine whether or not to enable the face detection function On Information about the face detection frame will be attached and the test frame will be displayed on the image of this page Off Information about the face detection frame will not be attached No face detection frame will be displayed on the image of this page Default Off XML notification Th...

Страница 94: ...hentication of users who can access this camera from the PC or a cellular phone mobile terminal can be configured on this page Up to 18 users can be registered Note When user authentication has failed to pass authentication error 8 times within 30 seconds using the same IP address PC access to the unit will be denied for a while User auth Select On or Off to determine whether or not to authenticat...

Страница 95: ... camera 2 Camera control Allowed to display images from the camera and to control the camera The camera setting configuration is unavailable 3 Live only Only displaying live images is available The camera setting configuration and camera control are unavailable Default 3 Live only User check From the pull down menu of User check the registered user can be selected and the selected user s informati...

Страница 96: ...s already in use is entered and the Set button is clicked the respective host information will be overwritten Access level Select the access level of the host from the following 1 Administrator 2 Camera control 3 Live only Refer to page 94 for further information about the access level Default 3 Live only Host check From the pull down menu of Host check the registered host can be selected and the ...

Страница 97: ... 1 or H 264 2 JPEG JPEG images will be transmitted H 264 1 H 264 1 images will be transmitted H 264 2 H 264 2 images will be transmitted Default JPEG Note When Best effort is selected for Transmission priority of H 264 bit rate will vary between the maximum and minimum rates while images are being transmitted Refresh interval Select the refresh interval from the following This setting is validated...

Страница 98: ...164 VT164 VP104W VP104W VP104 VP104 QVGA VGA 800x600 VP101 VP101 QVGA VGA When 16 9 is selected for Aspect ratio VT164W VT164W VT164 VT164 VP104W VP104W VP104 VP104 320x180 640x360 1280x720 VP101 VP101 320x180 640x360 Default 640x360 VT164W VT164W VT164 VT164 VP104W VP104W VP104 VP104 VGA VP101 VP101 98 Operating Instructions 13 Configure the settings relating to the authentication User mng ...

Страница 99: ...ddress Enter the IP address or the host name of the SMTP server used to send E mails Available number of characters 1 128 characters Available characters Alphanumeric characters the colon the period the underscore _ and the hyphen SMTP port Enter the port number to which E mails are sent Available port number 1 65535 Default 25 The following port numbers are unavailable since they are already in u...

Страница 100: ...strator User name Enter the user name to access the server Available number of characters 0 32 characters Unavailable characters Password Enter the password to access the server Available number of characters 0 32 characters Unavailable characters Sender s E mail address Enter the E mail address of a sender The entered E mail address will be displayed in the From sender line of the sent E mails Av...

Страница 101: ... characters 0 32 characters Unavailable characters Control port Enter a control port number to be used for the FTP server Available port number 1 65535 Default 21 The following port numbers are unavailable since they are already in use 20 23 25 42 53 67 68 69 80 110 123 161 162 443 995 10669 10670 FTP mode Select Passive or Active for the FTP mode Normally select Passive When it is impossible to c...

Страница 102: ...he DHCP server Manual The NTP server address will be entered manually on NTP server address Default Manual IMPORTANT When obtaining the NTP server address from the DHCP server it is necessary to select DHCP Auto AutoIP or Auto Advanced for Network Settings on the Network tab of the Network page page 104 NTP server address When Manual is selected for NTP server address setting enter the IP address ...

Страница 103: ...djustment interval Select an interval 1 24 hours in 1 hour intervals of synchronization with the NTP server Default 1h Time zone Select a time zone corresponding to the location where the camera is in use Default GMT Greenwich Mean Time Dublin Edinburgh Lisbon London Operating Instructions 103 14 Configure the settings of the servers Server ...

Страница 104: ...FTP img trans tab 15 1 Configure the network settings Network Click the Network tab on the Network page page 34 page 35 The following information is required to configure the network settings Contact the network administrator or your Internet service provider IP address Subnet mask Default gateway when using the gateway server router HTTP port Primary DNS address Secondary DNS address when using D...

Страница 105: ... the DHCP function When the DHCP server is not found the IP address is automatically configured Auto Advanced The IP address and other network addresses are obtained using the DHCP function Available IP addresses are determined by searching for IP addresses When the DHCP server is not found the IP address is set to 192 168 0 10 or the already determined IP addresses are used the same way as static...

Страница 106: ...or for further information about the settings of the DHCP server DNS Determine how to set the address of the DNS server by selecting Auto obtain the address automatically or Manual enter the address of the DNS server When Manual is selected it is necessary to configure the settings for the DNS When using the DHCP function it is possible to obtain the DNS address automatically by selecting Auto Ref...

Страница 107: ...speed Select the line speed for data transmission from the following It is recommended to use with the default Auto Auto Line speed will be applied automatically 100M Full 100 Mbps full duplex 100M Half 100 Mbps half duplex 10M Full 10 Mbps full duplex 10M Half 10 Mbps half duplex Default Auto Max RTP packet size Select Unlimited 1500byte or Limited 1280byte to determine whether or not to restrict...

Страница 108: ...ess the camera via the Internet in the 22 Troubleshooting section page 170 Camera short cut Select whether or not to create the shortcut to the camera on the My Network Places folder Network folder when using Windows Vista or Windows 7 of the PC When creating the shortcut select On To use the shortcut function to the camera enable the UPnP function on the PC in advance Default Off Note To display ...

Страница 109: ...d displays the information of the installed server certificate To install the server certificate click the Browse button to display the Open dialog box and select the file of the server certificate issued by CA and click the Execute button If the server certificate is already installed the file name of the installed server certificate will be displayed CA Certificate Information Displays the infor...

Страница 110: ...bps 256kbps 384kbps 512kbps 768kbps 1024kbps 2048kbps 4096kbps 8192kbps Default Unlimited Note When selecting 64kbps select Off for Audio transmission reception on the Audio tab page 72 Select 128kbps or a faster rate to carry out the live transmission of JPEG images and the FTP periodic image transmission simultaneously When Bandwidth control bit rate is set low taking a picture using the snap sh...

Страница 111: ...s translation using the port forwarding function vvv xxx yyy zzz 50000 A 192 168 0 1 50000 Address translation using the port forwarding function vvv xxx yyy zzz 50001 A 192 168 0 2 50001 Private address 192 168 0 1 Port number 50000 Private address 192 168 0 2 Port number 50001 LAN Private address 192 168 0 254 WAN Global address vvv xxx yyy zzz Enter Global IP address colon port number in the Ad...

Страница 112: ...plication for the approval by CA Certificate Authority Issue of the server certificate Generation of CSR Certificate Signing Request Installation of the server certificate Generation of the self signed certificate When using the server certificate When using the self signed certificate A B C D E Generation of the CRT key SSL encryption key page 113 Generation of the self signed certificate page 11...

Страница 113: ... button of CRT key generate The CRT key generate dialog box will be displayed 2 Select 1024bit or 2048bit for the length of the CRT to generate for CRT key generate RSA key size Note To use the server certificate follow the requests from the CA about the RSA key size 3 Click the Execute button The generation of CRT key will be started When the generation is finished the key size and generation tim...

Страница 114: ...e The Self signed Certificate Generate dialog box will be displayed 2 Enter the information of the certificate to be generated Item Description Available number of characters Common Name Enter the camera address or host name 64 characters Country Enter the country name Omission is OK 2 characters Country code State Enter the state name Omission is OK 128 characters Locality Enter the locality name...

Страница 115: ...e OK button after entering the items The self signed certificate will be generated Note The information of the generated self signed certificate will be displayed on Self signed Certificate Information Depending on the status of the self signed certificate the following are displayed Indication Description Not generated The self signed certificate are not generated Invalid Reason CA Certificate in...

Страница 116: ...o button of File Download under Downloads Click the Custom Level button to open the Security Setting window and check the Enable radio button of Automatic prompting for file downloads under Downloads 1 Click the Execute button of CA Certificate Generate Certificate Signing Request The CA Certificate Generate Certificate Signing Request dialog box will be displayed 2 Enter the information of the ce...

Страница 117: ...tallation of the server certificate IMPORTANT If the CSR file is not generated it is impossible to install the server certificate security certificate For the installation the server certificate issued by CA is required A server certification issued by CA is needed in order to install the server certification 1 Click the Browse button of CA Certificate CA Certificate install The Open dialog box wi...

Страница 118: ...e can be checked by double clicking the server certification file issued by CA 15 2 5 Configuration of the connection protocol 1 Select HTTP or HTTPS for Connection to determine the protocol used to access the camera HTTP Only the HTTP connection is available HTTPS Only the HTTPS connection is available 2 Designate the HTTPS port number to be used for HTTPS port Available port number 1 65535 Defau...

Страница 119: ...on the keyboard The Live page will be displayed When the security alert window is displayed install the security certificate page 120 page 126 When On is selected for User auth the authentication window will be displayed before displaying live images for the user name and password entries IMPORTANT When the camera is accessed using the HTTPS protocol the refresh interval and frame rate of images m...

Страница 120: ... Explorer 9 When using Internet Explorer 7 Internet Explorer 8 or Internet Explorer 9 When using Internet Explorer 7 or Internet Explorer 8 with Windows XP note that some of the displayed windows may differ from the following descriptions 1 Access the camera using the HTTPS protocol 2 When the security alert window is displayed click Continue to this website not recommended Enter the user name and...

Страница 121: ...3 Click Certificate Error over the URL and click View certificates Operating Instructions 121 15 Configuring the network settings Network ...

Страница 122: ...not displayed close Internet Explorer once and select Run as Administrator to launch Internet Explorer again Click Start All Programs right click Internet Explorer click Run as Administrator 122 Operating Instructions 15 Configuring the network settings Network ...

Страница 123: ...5 Click Next displayed on Certificate Import Wizard 6 Select Place all certificates in the following store and click Browse Operating Instructions 123 15 Configuring the network settings Network ...

Страница 124: ...7 Select Trusted Root Certificate Authorities and click OK 8 Click Next 124 Operating Instructions 15 Configuring the network settings Network ...

Страница 125: ...9 Click Finish 10 Click Yes When the import is successfully completed the screen The import was successful will be displayed Operating Instructions 125 15 Configuring the network settings Network ...

Страница 126: ...er When using Internet Explorer 6 1 Access the camera using the HTTPS protocol 2 Click View Certificate Note If this window is displayed when accessing a device other than the camera or a website a security problem may have occurred In this case check the system status 126 Operating Instructions 15 Configuring the network settings Network ...

Страница 127: ...3 Click Install Certificate 4 Click Next according to the procedures displayed on the displayed on Certificate Import Wizard Operating Instructions 127 15 Configuring the network settings Network ...

Страница 128: ...5 Click Finish 128 Operating Instructions 15 Configuring the network settings Network ...

Страница 129: ...arding setting for the router About Dynamic DNS Update RFC2136 compliant Operation using DDNS services other than the Viewnetcam com service is not guaranteed We are not responsible for any troubles or accidents on the circumstances where the camera is used arising out of such services Refer to the DDNS service providers for the selection and configuration of the DDNS services other than the Viewn...

Страница 130: ...service offered by a contracted provider In this service global addresses are static not changed 15 4 1 Configuration of the DDNS service Example of the Viewnetcam com service A C A B E D D B C E A DNS server B Internet C Provider D Viewnetcam com service server E Remote site Global address is changed The contracted provider allocates a global address to the router or the camera The global address...

Страница 131: ...r or not to use DDNS Off Does not use the DDNS function Viewnetcam com Uses the Viewnetcam com service Dynamic DNS Update Uses Dynamic DNS Update RFC2136 compliant without the DHCP cooperation Dynamic DNS Update DHCP Uses Dynamic DNS Update RFC2136 compliant with the DHCP cooperation Default Off Note When using Dynamic DNS Update RFC2136 compliant refer to the network administrator for whether or ...

Страница 132: ...d to the Internet and click the reload button of the browser 3 Register the information for Viewnetcam com by following the instructions of the wizard When the message The new camera is successfully registered to Viewnetcam com is displayed close the registration window The URL set at the time of registration can be used for camera access However this URL is unavailable when accessing the camera f...

Страница 133: ...ss interval 15 4 4 Checking the information registered for the Viewnetcam com service It is possible to check if the camera has been registered for the Viewnetcam com service page 156 15 4 5 When using Dynamic DNS Update Host name Enter the host name to be used for the Dynamic DNS Update service Available number of characters 3 250 characters Enter in the form of host name domain name Available ch...

Страница 134: ...the SNMP tab on the Network page page 34 page 35 The settings relating to SNMP can be configured on this page It is possible to check the status of the camera by connecting to the SNMP manager When using the SNMP function contact the network administrator Community Enter the community name to be monitored Available number of characters 0 32 characters Default None blank IMPORTANT When using the SN...

Страница 135: ...odically it is necessary to configure the settings of the FTP server in advance page 100 Refer to page 137 for descriptions of how to configure schedules of image transmission IMPORTANT Depending on the network line speed or the network traffic images may not be transmitted at the exact designated interval or period When On is selected for both of the alarm image transmission function and the FTP ...

Страница 136: ...e file will be overwritten each time a file is newly transmitted Available number of characters 1 32 characters Unavailable characters Default None blank Note When Name w time date is selected the file name will be Entered file name Time and date year month day hour minute second Serial number starting from 00 s during summer time Transmission interval Select the interval for the FTP periodic imag...

Страница 137: ...further information about the settings relating to the FTP periodic image transmission 15 7 1 How to set the schedules 1 Check the check box of the desired day of the week of FTP image transmission schedule The selected day of the week will be validated for the schedule 2 To designate time select the desired hour and minute from the pull down menu When not designating time check the checkbox of 24...

Страница 138: ...eting the settings The result will be displayed at the bottom of the window 15 7 2 How to delete the set schedule 1 Uncheck the check box of the set day of the week 138 Operating Instructions 15 Configuring the network settings Network ...

Страница 139: ...2 Click the Set button after completing the settings The schedule of the selected day of the week is deleted Operating Instructions 139 15 Configuring the network settings Network ...

Страница 140: ...pports automatic settings using WPS perform settings automatically page 144 If the wireless router does not support automatic settings using WPS perform settings manually page 140 The camera s Wireless QoS function can be used page 148 After completing the camera s wireless settings information such as the wireless connection status and wireless information can be checked page 148 16 1 Manually co...

Страница 141: ...ailable characters Alphanumeric characters and spaces Entries are case sensitive Default wifi Communication mode Select the same communications mode that is used by the wireless router that the camera will to be connected to 802 11b g Wireless routers that support either 802 11b or 802 11g can be connected to 802 11n b g ShortGI disabled Wireless routers that support 802 11n 802 11b or 802 11g can...

Страница 142: ...TKIP This method has stronger encryption than WEP and WPA WPA2 PSK AES This method has stronger encryption than WEP and WPA Because WPA2 PSK AES processes encryption at hardware level it is able to contain speed losses better than when compared to WPA2 PSK TKIP but it can only connect to devices that support it WPA2 PSK TKIP AES WPA2 PSK TKIP or WPA2 PSK AES is automatically selected according to ...

Страница 143: ...ar if connections cannot be made using mixed mode methods WPA PSK TKIP AES WPA WPA2 mixedmode PSK etc use a single mode method WPA PSK TKIP WPA PSK AES etc The camera only supports open system authentication If shared key authentication is configured for the wireless router change the authentication to auto or open system It is recommended to select the WPA2 PSK AES or WPA PSK AES enhanced encrypt...

Страница 144: ...ed Setup WPS Wi Fi Protected Setup WPS is a function that allows settings for connecting wireless devices and settings related to security to be easily configured In WPS wireless LAN access points or wireless routers become the registrar main device and the wireless camera seeking to join the wireless network becomes the enrollee periphery device SSID or WEP WPA WPA2 encryption settings and other ...

Страница 145: ...page page 148 Note If about 2 minutes pass after the WIRELESS indicator starts blinking and the wireless connection is not completed the WIRELESS indicator will blink red for about 10 seconds and then go off If this happens the wireless settings have failed Check the wireless router s settings and connection procedures and then try performing the settings again If the WPS settings fail to automati...

Страница 146: ...ndicator stops blinking orange and lights green When the POWER indicator lights green the wireless settings have been successfully completed 7 After the WIRELESS indicator lights green start the IP Setting Software on the PC and access the camera See page 161 for information on accessing the camera with the IP Setting Software Confirm the status of the wireless connection on the Status tab of the ...

Страница 147: ... more information refer to the operating instructions included with your wireless router Settings between the wireless router and the camera will automatically start The WIRELESS indicator stops blinking orange and lights green When the POWER indicator lights green the wireless settings have been successfully completed 6 After the WIRELESS indicator lights green start the IP Setting Software on th...

Страница 148: ...he Basic tab on the Wireless page page 34 page 35 Configure the wireless QoS Quality of Service in this section Wireless QoS Wireless QoS is only available when using H 264 RTP transmission When the wireless frequency band is temporarily reduced because of external interference images may not be displayed When this happens Wireless QoS helps to reduce transmission delays and dropped frames by conv...

Страница 149: ...n set is displayed Not set will be displayed The Already been set display is linked to the camera s WIRELESS indicator green light Mac address of the wireless module Displays the camera s wireless module s MAC address When the wireless router limits access with MAC address filtering register the wireless module s MAC address displayed here the camera s MAC address to the wireless router page 156 C...

Страница 150: ... the currently selected encryption method WEP TKIP or AES Radio wave status Displays the signal strength Bad Normal Good These figures are just a guide and may not match the actual wireless communication status The signal strength and connection status are displayed as follows Good When the signal strength is about 60 100 Normal When the signal strength is about 15 59 Bad When the signal strength ...

Страница 151: ...Video motion detection will be active only in the specified schedule VT164W VT164W VT164 VT164 Body heat sensor permission The body heat sensor detection will be active during the period of the schedule Access permission Access to the camera will be allowed only in the specified schedule The Schedule page has only the Schedule tab Up to 5 schedules can be set Operating Instructions 151 17 Configur...

Страница 152: ...e taken for the respective schedule Alarm permission Alarm input terminal alarm will be received during the period of the schedule VMD permission The video motion detection VMD function will be active during the period of the schedule 152 Operating Instructions 17 Configure the settings relating to the schedules Schedule ...

Страница 153: ... on the User auth tab of User mng page page 94 and Off for Host auth on the Host auth page page 95 to validate Access permission 2 Select days of a week by checking the respective checkboxes 3 From the pull down menu select the start time and the end time of the schedule When not designating time check the checkbox of 24h 4 Click the Set button after completing the settings The result will be disp...

Страница 154: ...ll overwrite the older system logs In this case the oldest log is the first to be overwritten The logs will be deleted when the power of the camera is turned off No The serial number of the system log will be displayed Time date Time and date at the error occurrence will be displayed Note When Off is selected for Time display format on the Basic page page 39 time date of logs will be displayed in ...

Страница 155: ...for the name of the directory where the downloaded firmware to be saved 2 Click the Browse button and designate the downloaded firmware 3 Click the radio button respective to the desired option to determine whether or not to initialize the settings after completing the firmware upgrade Note Note that the settings cannot be restored after an initialization is operated 4 Click the Execute button The...

Страница 156: ...t the network settings VT164W VT164W VP104W VP104W The following network settings will not be reset when upgrading the firmware after selecting Reset the settings to the default after completing the upgrade Except the network settings On Off for DHCP IP address subnet mask default gateway HTTP port HTTPS port connection protocol HTTP HTTPS CRT key server certificate UPnP setting line speed bandwid...

Страница 157: ...ng status will be displayed Router global address The global address of router will be displayed Self check The self check result of the hardware will be displayed Note Refer to our website P E U model http security panasonic com pss security support info html BR model http www panasonic com br netcam for further information about the contents of the displayed statuses relating to the Viewnetcam c...

Страница 158: ...camera and the HTML files to the default Note that the network and wireless 1 settings will not be reset It is impossible to operate the camera for about 3 minutes after the initialization Reboot Click the Execute button to reboot the camera It is impossible to operate the camera for about 2 minutes after rebooting the camera Note To initialize the network settings page 104 turn off the power of t...

Страница 159: ...he setting status even when Privacy mode is active Audio is deactivated The privacy mode can be activated and deactivated with 3 methods pressing the PRIVACY button on the camera using the Privacy button in the setup menu and accessing the camera from a cellular phone mobile terminal as the administrator page 19 page 22 19 1 Configuring the Privacy Mode with the PRIVACY button In order to operate ...

Страница 160: ...n turn privacy mode off by Pressing the camera s PRIVACY button the POWER indicator will turn from red to green Accessing the camera with a PC When the following dialog is displayed click Disable Privacy Mode and enter the administrator user name and password if prompted Accessing the camera from a cellular phone mobile terminal as the administrator page 19 page 22 160 Operating Instructions 19 Pr...

Страница 161: ... click the CDLauncher exe file on the CD ROM A C D E B Using the supplied CD ROM the following actions can be performed The Panasonic IP Setting Software can be installed on the PC page 162 Settings related to the camera s network can be set from the Panasonic IP Setting Software page 164 The manuals can be installed on the PC page 163 You can also view the manuals without installing them to the P...

Страница 162: ...e Panasonic IP setting shortcut icon when the Panasonic IP Setting Software is installed Specify which folder on the PC to install the Panasonic IP Setting Software to Click the Install button to start the installation Note To uninstall the Panasonic IP Setting Software delete the shortcut icon from where you specified it to be installed the default is on the desktop during installation and the Ea...

Страница 163: ...he Manual folder from the folder the default is C Panasonic you specified during installation 20 4 Installing the Viewer software The Viewer software Network Camera View 4S must be installed on the PC in order to display camera images On the CD launcher window click the Install button next to Viewer Software and follow the instructions displayed on the window to install the software A message is d...

Страница 164: ...me router This camera cannot be displayed or set with an older version of the IP Setting Software version 2 xx 1 To start the Panasonic IP Setting Software click the Run button next to IP Setting Software from the CD launcher menu window or double click on the shortcut icon created after installing the software on the PC The License Agreement will be displayed Read the Agreement and choose I accep...

Страница 165: ...le cameras can be continuously configured IMPORTANT It may take for around 2 minutes to complete to upload the settings to the camera after clicking the Save button The settings may be invalidated when the LAN cable is disconnected before completing the upload In this case perform the settings again When using a firewall including software allow access to all UDP ports Operating Instructions 165 2...

Страница 166: ...r The IP address of the server may be incorrect Check if the IP address of the server is configured correctly The SMTP server may be down Ask the network administrator Internal error Undefined error An error occurred in the E mail function Check if the E mail settings are configured correctly Error indications relating to FTP Category Indication Description FTP server error Failed to resolve the F...

Страница 167: ...ating to the Viewnetcam com function occurred Check if the Viewnetcam com settings are configured correctly Error indications relating to Dynamic DNS Update Category Indication Description DDNS server error Failed to resolve the DDNS server address from DNS The designated IP address of the DNS may be incorrect Check if the DNS settings are configured correctly The DNS server may be down Ask the ne...

Страница 168: ... signed certificate is complete Self signed Certificate Deleted Deletion of the self signed certificate is complete Certificate Signing Request Generated Generation of the CSR Certificate Signing Request is complete CA Certificate Installed Installation of the server certificate is complete CA Certificate Deleted Deletion of the server certificate is complete Previous CRT key Applied Previous CRT ...

Страница 169: ...ion may be incorrect Check if the IP address of the destination of notification is configured correctly The destination of notification may be down Ask the network administrator Cannot resolve notification addresses from DNS The DNS server settings may be incorrect Check if the DNS settings are configured correctly The DNS server may be down Ask the network administrator Operating Instructions 169...

Страница 170: ...m the camera the connection is normal If not proceed either of the following Reboot the camera and change the IP address by using the Panasonic IP Setting Software within 20 minutes after the restart Reboot the camera while holding down the INITIAL SET button on the camera The camera will be initialized and the IP address will return to the default setting 192 168 0 10 After the camera is initiali...

Страница 171: ...nter the port number 119 Cannot access the camera via the Internet Are the network settings of the camera correct Set the default gateway or DNS server address correctly To use the DDNS service check that the settings are correct Is the setting for Default gateway on the Network page configured Or is the setting correct When communicating using IPv4 Configure the setting for Default gateway of IPv...

Страница 172: ... on the Status tab and the system log on the System log tab of the Maintenance page of the setup menu 132 156 Authentication window is displayed repeatedly Is the user name and password changed While accessing the camera when changing the user name and password of another user logging into the camera on another web browser the authentication window will be displayed each time the screen is changed...

Страница 173: ...access from a PC 22 Is the SSL encryption method different from that of the camera Select HTTP Do not select HTTPS for HTTPS Connection on the Network page the Network tab and access the camera again 104 Did you access http while using the HTTPS function To use the HTTPS function access https It is also necessary to enter the port number 119 A cookie error was displayed when performing user regist...

Страница 174: ... in the Browsing history section on the General tab and then select Every time I visit the webpage for Check for newer versions of stored pages in the Temporary Internet Files section on the Temporary Internet Files and History Settings window When using Internet Explorer 6 0 Click the Settings button in the Temporary Internet Files section on the General tab and then select Every visit to the pag...

Страница 175: ...function 55 Audio is not output from other products such as a network disk recorder or PC software package Some of the products such as a network disk recorder or PC software package may not support G 711 Set the audio encoding format of the products to G 726 32 kbps 72 The alarm occurrence indication button and the AUX buttons on the Live page do not display the current status in real time Is the...

Страница 176: ...ork Camera View 4S 3 When displaying H 264 images on two or more web browser windows images from two or more cameras are displayed in sequence on a single browser window This may occur due to the display adapter and driver combination When this has occurred first update the driver of the display adapter to the latest version If updating the driver does not solve the problem adjust the hardware acc...

Страница 177: ...m the MAC address displayed in Mac address of the wireless module from Wireless Status on the setup menu Wireless communication is unstable VT164W VT164W VP104W VP104W Is the channel used for wireless communication the same as another nearby wireless networks Try changing the wireless communication channel of the wireless router For information about changing the communications channel refer to th...

Страница 178: ...mation bar Pop up blocked To see this pop up or additional options click here Internet Explorer 6 Internet Explorer 7 or Internet Explorer 8 Click the information bar and select Always Allow Pop ups from This Site The dialog window saying Allow pop ups from this site will be displayed Click the Yes button The following message is displayed on the information bar This webpage wants to run the follo...

Страница 179: ...xplorer and then click the Security tab Click Internet in the Select a Web content zone to specify its security settings section Then click the Custom Level button to open the Security Setting window Under Miscellaneous select Enable for Allow script initiated windows without size or position constraints Click the OK button When the warning window is displayed click the Yes button Images are not f...

Страница 180: ...anasonic Way Secaucus New Jersey 07094 U S A Panasonic Canada Inc 5770 Ambler Drive Mississauga Ontario L4W 2T3 Canada 905 624 5010 www panasonic ca For Europe and other countries http panasonic net Importer s name and address to follow EU rules Panasonic Testing Centre Panasonic Marketing Europe GmbH Winsbergring 15 22525 Hamburg Germany Panasonic System Networks Co Ltd 2012 PGQP1208WA C0312 3073...

Отзывы: