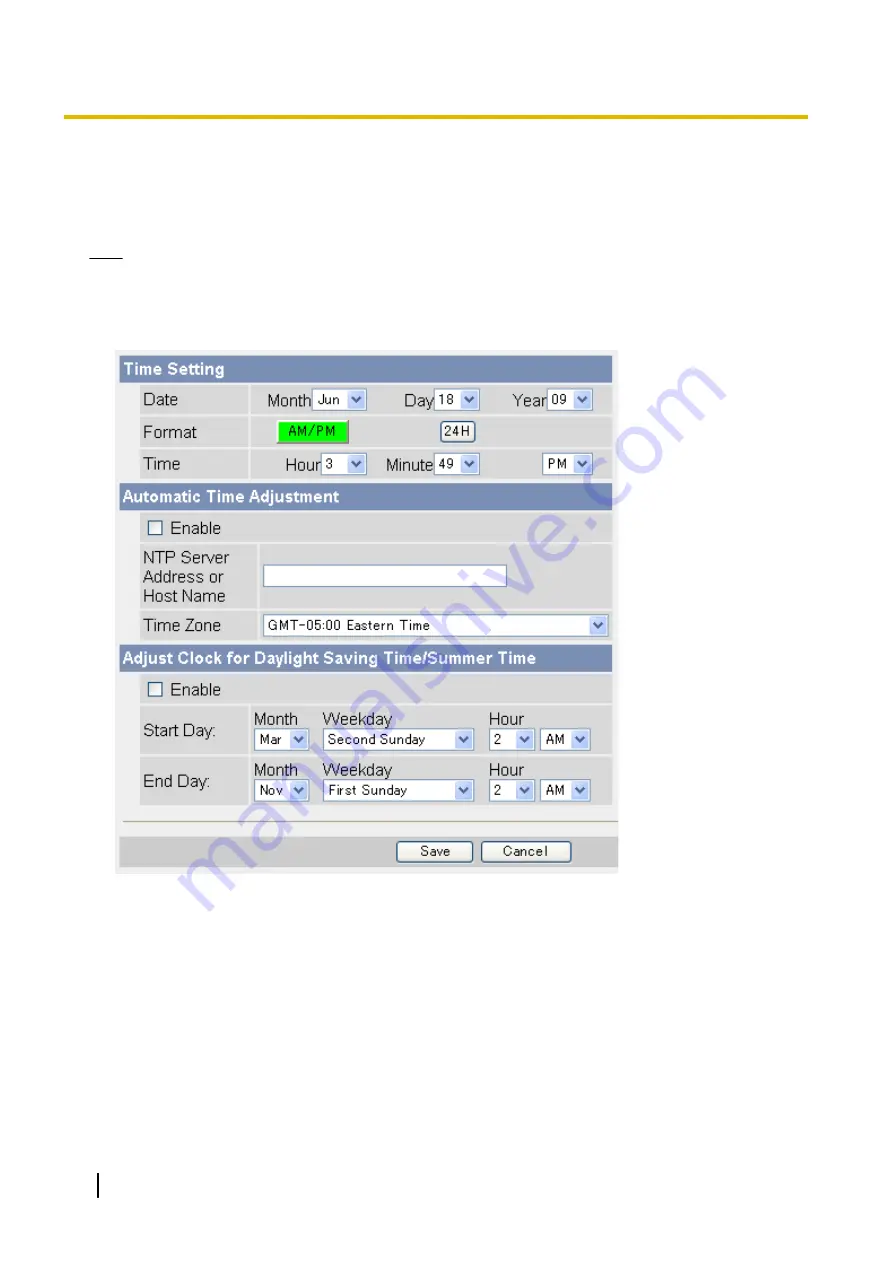
5.5 Setting the Date and Time
Set the camera’s date and time settings to ensure image buffering, image transferring, camera operation time,
and time stamp features function as expected.
Note
•
All images buffered in the internal memory are deleted when you click [Save] at the end of this
procedure.
1.
Click the [Setup] tab.
2.
On the left side of the screen under [Basic], click [Date and Time].
3.
Set the following parameters as desired.
a.
Under [Time Setting], select the current month, day, and year.
b.
Select whether you want to use 12-hour or 24-hour time format.
c.
Select the current time.
d.
Under [Automatic Time Adjustment], select whether you want to enable automatic date and time
adjustment.
i.
If you select to enable this feature, enter the IP address or host name of the desired NTP (network
time protocol) server
(max. 255 characters) that the camera will use to adjust its date and time.
•
An IPv6 address can be specified; note that the IPv6 address must be enclosed in brackets.
ii.
Select your time zone.
e.
Under [Adjust Clock for Daylight Saving Time/Summer Time], select whether you want the camera to
automatically adjust its date and time for Daylight Saving Time/Summer Time.
140
Operating Instructions
5.5 Setting the Date and Time
Содержание BL-C210 Series
Страница 122: ...4 Click Certificate Error in the address bar then click View certificates 122 Operating Instructions 5 2 HTTPS Settings ...
Страница 124: ...6 After the wizard is displayed click Next 124 Operating Instructions 5 2 HTTPS Settings ...
Страница 126: ...9 Click Next 126 Operating Instructions 5 2 HTTPS Settings ...
Страница 127: ...10 Click Finish Operating Instructions 127 5 2 HTTPS Settings ...
Страница 131: ...6 Click Finish 7 Click Yes Operating Instructions 131 5 2 HTTPS Settings ...
Страница 196: ...3 Click the Connections tab then click LAN Settings 196 Operating Instructions 11 1 Proxy Server Settings ...


