


– 45 –
Chapter 4 Preparations — Menu delegation function
Menu delegation function
When a button on the Control Panel is double-clicked, the menu screen displayed on the Menu Panel AV-HS60C3 or the multi-selection panel area can
be switched.
At the same time, the normal operation activated when the button is pressed is also executed.
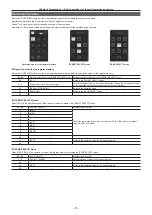
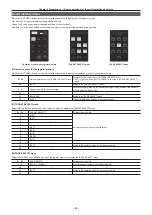
Enabling/disabling the menu delegation function
Enable/disable the menu delegation function at the Menu Panel AV-HS60C3 and the multi-selection panel area separately.
1
Select the <SYS> button
→
[CTRL PANEL]
→
[Main Panel]/[SubPanel1]/[SubPanel2] tab.
2
Select an item in [MenuPanel] or [Select Panel] in the [Delegation] column.
[On] button
Enables the menu delegation function.
[Off] button
Disables the menu delegation function.
Menu delegation function list
Button
Transition menu of the Menu Panel AV‑HS60C3
Transition menu of the multi‑
selection panel area
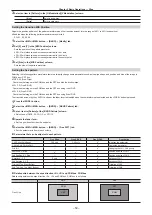
Button position
Operation target button
Crosspoint area
<KEY1 F/S>, <KEY2 F/S>, <KEY3
F/S>, <KEY4 F/S>
f
When the key type is [Lum]/[Linear]/[Full]
The <ME1>/<ME2> button on the top menu
→
[KEY1] to
[KEY4]
→
[Key Setting] tab
f
When the key type is [Chroma]
The <ME1>/<ME2> button on the top menu
→
[KEY1] to
[KEY4]
→
[Chroma] tab
f
When PinP is enabled
The <ME1>/<ME2> button on the top menu
→
[KEY1] to
[KEY4]
→
[PinP Adjust] tab
―
<MCRO>
The <MEM> button on the top menu
→
[MACRO]
→
[XPT
Assign] tab
―
<IMAG> of A bus
The <ME1>/<ME2> button on the top menu
→
[IMAGE]
→
[BKGD] tab
→
[A Effect1] column
―
<IMAG> of B bus
The <ME1>/<ME2> button on the top menu
→
[IMAGE]
→
[BKGD] tab
→
[B Effect1] column
―
<CBGD1>*, <CBGD2>*
The <DSK MISC> button on the top menu
→
[CBGD]
→
[CBGD1]/[CBGD2] tab
→
[Main Color] column
―
<DSK1 F/S> - <DSK4 F/S>
The <DSK MISC> button on the top menu
→
[DSK1] to
[DSK4]
→
[Setting] tab
→
[DSK Adjust] column
―
<VMEM F/S>
The <MEM> button on the top menu
→
[STILL]
→
[Still] tab
―
<DISP>
Switches to the split display in which the image selected in the
DISP bus and the WFM/VECT are displayed.
―
<STILL1 V/K> - <STILL4 V/K>*
The <MEM> button on the top menu
→
[STILL]
→
[Still] tab
Selection of the register memories
([STILL1] to [STILL4])
<CLIP1 V/K> - <CLIP4 V/K>*
The <MEM> button on the top menu
→
[CLIP]
→
[Play Clip1]
to [Play Clip4] tabs
Selection of the register memories
([CLIP1] to [CLIP4])
Transition area
<KEY1> - <KEY4>
The <ME1>/<ME2> button on the top menu
→
[KEY1] to
[KEY4]
→
[Transition] tab
→
[In Type] column
―
<BKGD>
The <ME1>/<ME2> button on the top menu
→
[BKGD]
→
[Transition] tab
―
<WIPE>
The <ME1>/<ME2> button on the top menu
→
[BKGD]
→
[Edge Border] tab
Selection of the BKGD WIPE
waveform
<EMEM LINK>
The <MEM> button on the top menu
→
[EVENT MEMORY]
→
[Register] tab
Selection of the event memories
<MCRO ATCH>
The <MEM> button on the top menu
→
[MACRO]
→
[Macro
Attach] screen
―
<PATT LIMIT>
The <ME1>/<ME2> button on the top menu
→
[BKGD]
→
[Position] tab
→
[Pattern Limit] column
―
<AUTO>
The <ME1>/<ME2> button on the top menu
→
[BKGD]
→
[Transition] tab
―
KEY operation area <KEY1> - <KEY4>
f
When the key type is [Lum]/[Linear]/[Full]
The <ME1>/<ME2> button on the top menu
→
[KEY1] to
[KEY4]
→
[Key Setting] tab
f
When the key type is [Chroma]
The <ME1>/<ME2> button on the top menu
→
[KEY1] to
[KEY4]
→
[Chroma] tab
f
When PinP is enabled
The <ME1>/<ME2> button on the top menu
→
[KEY1] to
[KEY4]
→
[PinP Adjust] tab
―
DSK operation area <DSK1> - <DSK4>
The <DSK MISC> button on the top menu
→
[DSK1] to
[DSK4]
→
[Setting] tab
―
Содержание AV-HS60C1E
Страница 5: ...Please read this chapter and check the accessories before use Chapter 1 Overview ...
Страница 32: ...This chapter describes basic operations and matters to be performed prior to use Chapter 4 Preparations ...
Страница 52: ...This chapter describes menu operations Chapter 5 Basic Operations ...
Страница 118: ...This chapter describes the input output signal settings Chapter 6 Input Output Signal Settings ...
Страница 129: ...This chapter describes how to operate the CONFIG menu displayed when the CONF button is pressed Chapter 7 CONFIG Menu ...
Страница 140: ...This chapter describes how to operate the system menu displayed when the SYS button is pressed Chapter 8 System Menu ...
Страница 162: ...This chapter describes the difference with the Standard mode Chapter 9 3G mode 4K mode ...
Страница 168: ...This chapter describes the terminals and signals of the unit Chapter 10 External Interfaces ...
Страница 173: ...This chapter describes the dimensions and specifications of this product Chapter 11 Specifications ...
Страница 184: ...This chapter describes the setting menu table and terms Chapter 12 Appendix ...
Страница 206: ...Web Site http www panasonic com Panasonic Corporation 2014 ...