– 18 –
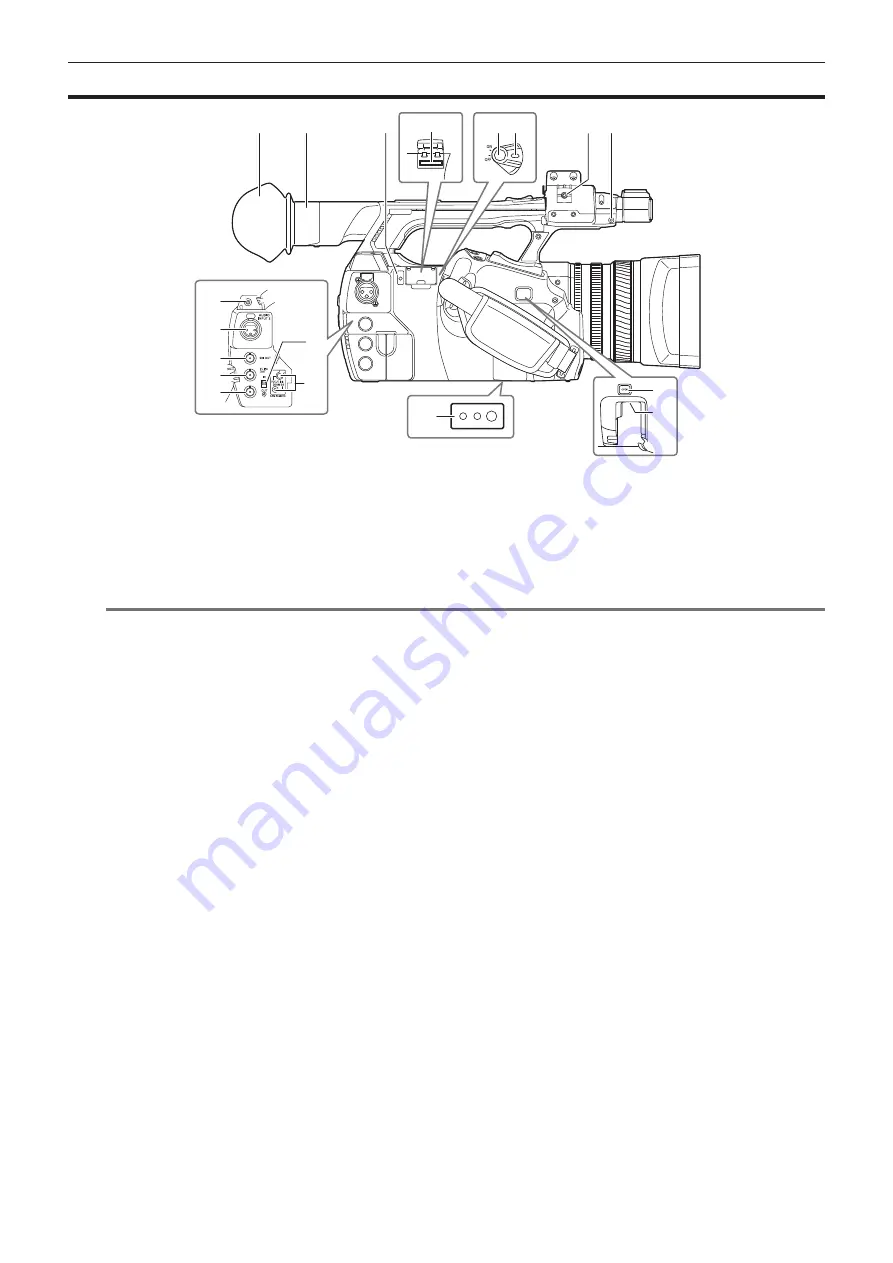
Chapter 2 Description of Parts — Right side
Right side
1
8
7
2
3
5
4
6
16
9
10
11
12
15
13
17
18
14
1 Eye cup (page 29)
2 Eye piece
3 Busy (active status indication) lamp (page 83)
Indicate the active status of the SD memory card, and is illuminated when the card is active.
4 SD memory card slot (page 83)
This is the insertion slot for the SD memory card (optional). Use the SD memory card for recording/opening the setting menu of the camera, or
uploading metadata or proxy recording, etc.
@
@
NOTE
t
Cautions when using SD memory cards
- On the camera, use SD memory cards that conform to the SD standard, SDHC standard, or the SDXC standard. When performing proxy
recording, use SDHC memory cards, SDXC memory cards, or SD memory cards with the class description of class2 or higher.
- MMC (Multi Media Card) cannot be used. (Bear in mind that taking pictures may no longer be possible if you use them.)
- When using miniSD/microSD cards with the camera, always install the adaptor specially designed for miniSD/microSD cards. (The camera will
not work properly if only the miniSD/microSD adaptor is installed. Make sure that the card has been inserted into the adaptor before use.)
- Use of Panasonic SD memory cards and miniSD/microSD cards is recommended. Be sure to format cards on the camera before use.
- Refer to our support desk at the following website for the latest information not included in these operating instructions.
http://pro-av.panasonic.net/
- SDHC memory cards are a standard that was established in 2006 by the SD Association for large-capacity memory cards that exceed 2 GB.
- SDXC memory cards are a standard that was established in 2009 by the SD Association for large-capacity memory cards that exceed 32 GB.
5 Recording button (grip side) (page 43)
Press this button to start recording. Press it again to stop recording.
Used for direct shooting in thumbnail mode.
Switch on/off the power.
7 Microphone cable clamp (page 30)
Used for securing the microphone cable.
8 Pin holder
Attach the zoom ring pin which is removed from the camera.
9 Headphones terminal (page 149)
This is the connecting terminal of headphones for audio monitor.
10 <AUDIO INPUT 2> terminal (XLR, 3-pin) (page 62)
Connect the audio equipment or the microphone.
11 <SDI OUT> terminal (page 95)
This is the output terminal for HD/SD SDI signals.
12 <TC IN/OUT> terminal (page 88)
This is the input/output terminal for time code.
Use the <IN/OUT> switch to select the input or output.
13 <GENLOCK IN/VIDEO OUT> terminal (page 93)
This is the input terminal for reference signals when setting the genlock to the camera section. This is the output terminal of the video for monitor.
Use the <IN/OUT> switch to switch the input or output.
Switch the input and output of the <TC IN/OUT> terminal and <GENLOCK IN/VIDEO OUT> terminal.
Содержание AJ-PX270EJ
Страница 140: ...This chapter describes the screen displayed on the viewfinder or LCD monitor Chapter 7 Display ...
Страница 159: ...This chapter describes how to use the camera by connecting to network Chapter 9 Network Connection ...
Страница 182: ...This chapter describes the specifications of this product Chapter 11 Specification ...


