– 152 –
Chapter 5 Shooting — Display of the viewfinder status
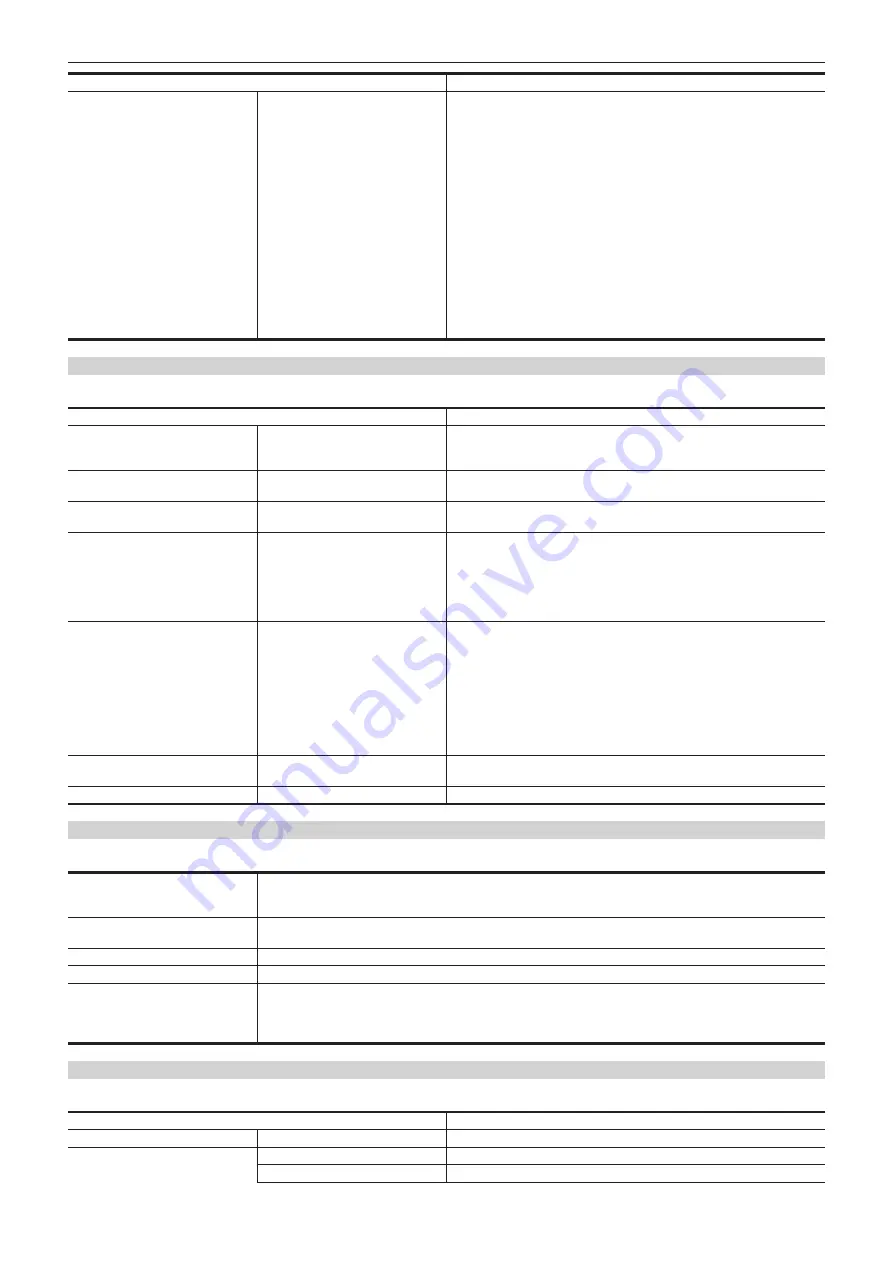
Item
Description
[SLOT3]
Displays the remaining capacity (%)/remaining capacity (minutes)/total
recording time of the memory card inserted in card slot 3.
It is not displayed when set to the [NETWORK] menu
→
[NETWORK FUNC]
→
[NDI
|
HX].
The status of the memory card that is displayed are following types.
f
[NO CARD]:
Memory card is not inserted.
f
[UNSUPPORTED]:
Memory card is not supported.
f
[FORMAT ERROR]:
Memory card cannot be used. (Format error)
f
[PROTECTED]:
It is write protected. The write-protected switch of the
memory card is set to the LOCK side.
f
[NO REMAIN]:
Memory card has no remaining capacity.
f
[NOT SDXC]:
Recording mode is set to MOV but SDXC memory card or
64 GB microP2 card is not inserted.
f
[ENCRYPTED]:
microP2 card formatted with encryption with CPS password
is inserted.
In cases other than above, the remaining capacity of the memory card is
displayed in 0% through 100%.
AUDIO screen
Displays the audio input/output settings and the recording level.
Item
Description
[MIC POWER(MENU)]
Displays the setting value of the [AUDIO] menu
→
[INPUT SETTINGS]
→
[FRONT MIC POWER] and the [AUDIO] menu
→
[INPUT SETTINGS]
→
[REAR MIC POWER].
[VOL. SELECT]
Displays the setting value of the [AUDIO] menu
→
[REC CH SETTINGS]
→
[VOL. SELECT].
[A.IN]
[CH1] to [CH4]
Displays the audio input signal selected with the <AUDIO IN CH1> to <AUDIO
IN CH4> switches.
[LEVEL]
[CH1] to [CH4]
Displays the recording level adjustment method of each channel.
f
[AUTO]:
Automatic adjustment
f
[VOL.]:
Manually adjusted by the <AUDIO LEVEL CH1/3>/<AUDIO LEVEL
CH2/4> dial
f
[MENU]:
Manually adjusted by the [AUDIO] menu
→
[REC CH SETTINGS]
→
[CH1 LEVEL CONTROL] to [CH4 LEVEL CONTROL]
[F.VOL.]
[CH1] to [CH4]
Displays whether the <F.AUDIO LEVEL> dial is enabled in each channel.
f
[ON]:
Enabled
f
[OFF]:
Disabled
Settings in the <AUDIO IN CH1> to <AUDIO IN CH4> switch and the
[AUDIO] menu
→
[REC CH SETTINGS]
→
[FRONT VOL. CH1] to [FRONT
VOL. CH4] does not match.
f
[---]:
Disabled
The channel is not selected in the [AUDIO] menu
→
[REC CH SETTINGS]
→
[VOL. SELECT].
[LIMITER]
[CH1] to [CH4]
Displays enable/disable of limiter for each channel with [ON]/[OFF].
Displays [---] when recording level adjustment method is automatic adjustment.
[LOWCUT]
[CH1] to [CH4]
Displays enable/disable of low-cut filter for each channel with [ON]/[OFF].
CAC screen
Displays information about the chromatic aberration compensation function.
[CAC CONTROL]
Displays the setting value of the [CAMERA] menu
→
[CAC ADJ.]
→
[CAC CONTROL].
[STOP] is displayed when the chromatic aberration compensation function is not active due to conditions of the data or
the lens even if set to the [CAMERA] menu
→
[CAC ADJ.]
→
[CAC CONTROL]
→
[ON].
[CAC MODE]
Displays the operation mode of the chromatic aberration compensation function.
f
[AUTO]:
The CAC file is automatically selected.
[CONNECT LENS TYPE]
Displays the lens ID of the currently connected digital lens.
[SELECT FILE TITLE]
Displays the title and the file version of the CAC file currently used for chromatic aberration compensation.
[CAC WARNING]
Displays a warning when operation of the chromatic aberration compensation has stopped.
f
[CAC LENS DATA INVALID]:
This is displayed, for example, when the response data from the lens is not supported.
f
[LENS INITIALIZATION NOT COMPLETED]:
This is displayed, for example, when initialization of the lens cannot be
completed.
SWITCH screen
Displays the function assigned to the USER button, <GAIN> switch, and <WHITE BAL> switch as well as the setting value.
Item
Description
[USER SW]
[1] to [5]
Displays the function assigned to the <USER 1> through <USER 5> buttons.
[OTHER ASSIGN]
[RET SW]
Displays the function assigned to the <RET> button of the lens.
[GAIN L]
Displays the gain value assigned to <L> of the <GAIN> switch.
Содержание AJ-CX4000
Страница 12: ...Before using the camera read this chapter Chapter 1 Overview ...
Страница 179: ...This chapter describes about the output image Chapter 7 Output ...
Страница 187: ...This chapter describes how to use the camera by connecting to a network Chapter 9 Network Connection ...
Страница 204: ...Maintenance of the camera and error message are described Chapter 10 Maintenance ...
Страница 212: ...This chapter describes the dimensions specifications and connector signals Chapter 11 Specification ...
Страница 223: ...Web Site https www panasonic com Panasonic Corporation 2019 ...


