background image

Reviewing notes

133

Reviewing notes

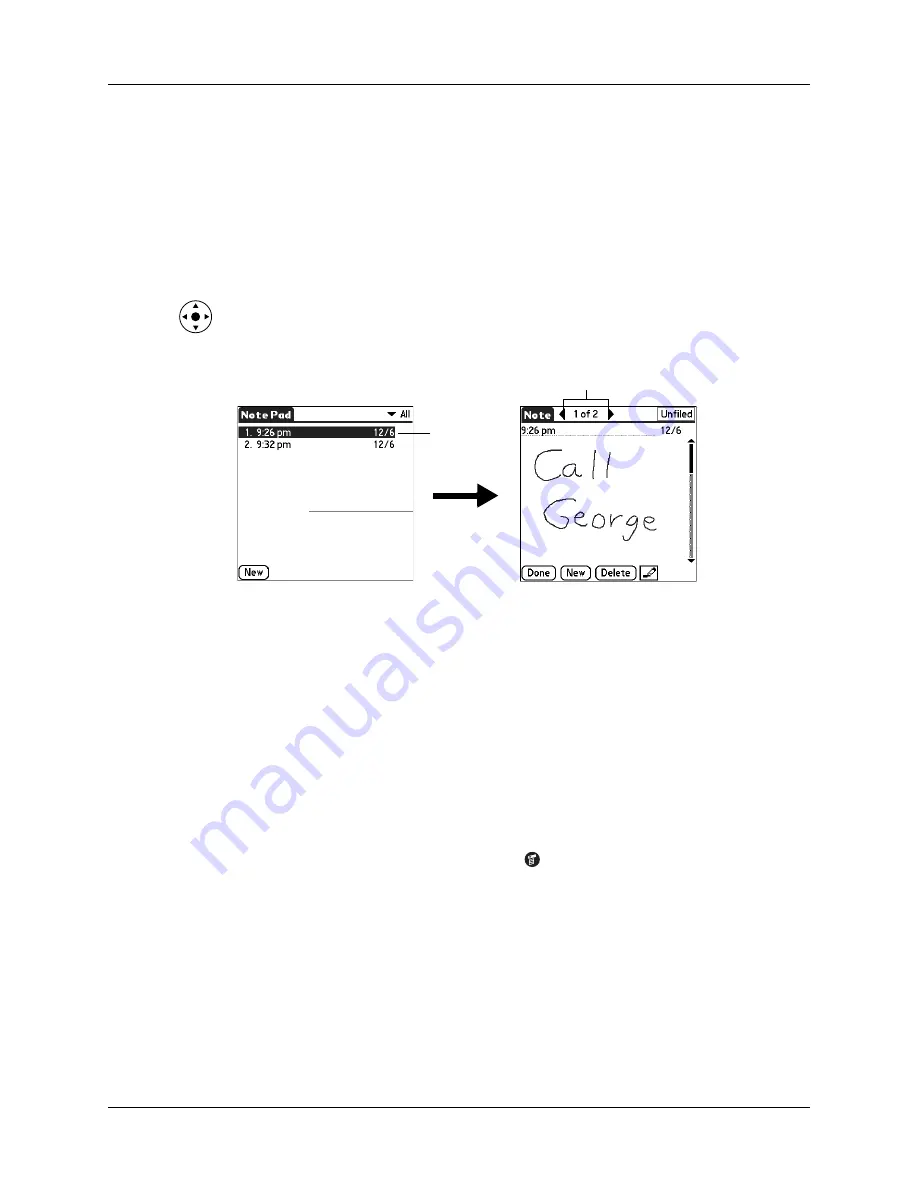
The note title and the date you created the note appear in the Note Pad list. If you 
did not assign a title to your note, the time you created the note appears as the note 
title. This makes it easy to locate and review your notes. 

To review a note:

1.

In the Note Pad list, select the note title.

TIP

You can also select, review, and move between notes with the navigator. 

See

“Using the navigator”

 in 

Chapter 2

 for details.

2.

Review or edit the contents of the note. 

3.

Tap Done.

Changing Note Pad color settings

By default, your notes appear with a white “paper” background, and the ink from 
the pen is blue. You can change the color of both the paper and the ink from the 
pen. Your color selections apply to all your notes. You cannot change the color 
settings for individual notes.

To set the colors:

1.

In the Note Pad list, tap the Menu icon 

.

2.

Select Options, and then select Preferences.

Tap arrows to scroll to 
next and previous notes

Select a 
note to view 

Содержание Tungsten T2

Страница 1: ...Handbook for Palm Tungsten T2 Handheld...

Страница 2: ...or any damage or loss resulting from the use of this handbook Palm assumes no responsibility for any loss or claims by third parties which may arise through the use of this software Palm Inc assumes n...

Страница 3: ...ation 8 Step 6 Register your handheld 8 Congratulations 8 Chapter 2 Exploring Your Handheld 9 Locating handheld components 10 Opening and closing your handheld 10 Locating front panel controls 11 Loca...

Страница 4: ...uter 38 Importing data from a Mac computer 39 Using Note Pad 40 Using a portable keyboard 40 Chapter 4 Working with Applications 41 Opening applications 41 Other ways to open applications 42 Opening e...

Страница 5: ...ng an Address Book entry 78 Selecting types of phone numbers 79 Changing Address Entry details 80 Making connections from Address Book 81 Using Address Book menus 83 Chapter 6 Using Calculator 87 Perf...

Страница 6: ...ting a speed dial entry 115 Dialing a number from the Call History list 116 Chapter 10 Using Expense 119 Adding expense items 120 Changing the date of an Expense item 121 Entering receipt details 121...

Страница 7: ...List view 141 Creating an album 142 Filing photos in albums 142 Copying photos 143 Renaming or deleting an album 144 Beaming photos 145 Deleting photos 146 Working with photos on your computer 146 Us...

Страница 8: ...77 Palm VersaMail personal e mail software features 177 Getting started with the VersaMail application 178 Synchronizing an existing username 178 Upgrading a MultiMail VersaMail database 178 Setting u...

Страница 9: ...beyond the basics 278 Managing mail filters 279 Managing mail settings 283 Adding APOP to an account 291 Adding ESMTP to an account 293 Setting advanced account preferences 294 Cutting and copying te...

Страница 10: ...formation about a web page 324 Using passwords 325 Copying and pasting text 326 Copying text 326 Pasting text 326 Communicating with other users 327 Sending e mail 327 Beaming a URL 327 E mailing a UR...

Страница 11: ...ock menus 350 Chapter 21 Performing HotSync Operations 351 Selecting HotSync setup options 351 Customizing HotSync application settings 354 Conducting cradle cable HotSync operations 357 Performing a...

Страница 12: ...Formats Preferences 382 Graffiti 2 Preferences 384 Power Preferences 384 Sounds Alerts Preferences 386 Writing Area Preferences 388 Setting Communication Preferences 389 Bluetooth Preferences 389 Con...

Страница 13: ...tallation problems 450 Operating problems 451 Tapping and writing problems 452 Application problems 453 HotSync problems 454 Beaming and sending problems 461 Phone connection problems 462 VersaMail pr...

Страница 14: ...Contents xiv...

Страница 15: ...parts of your handheld Viewing and entering data Setting up Bluetooth features and wireless communication features Working with expansion cards Using your handheld with your computer Personalizing you...

Страница 16: ...About This Book 2...

Страница 17: ...cluded expansion cards sold separately View clear sharp colorful images on the high resolution screen Stay organized and on time by keeping your appointments contact information and to do items in one...

Страница 18: ...ts to install Palm Desktop software Windows XP Home or Pro requires administrator rights to install Palm Desktop software Internet Explorer 4 01 with SP2 or later 50 megabytes MB available hard disk s...

Страница 19: ...eld A Bluetooth network connection with Internet access An account with an ISP or Internet service provided by your company NOTE A data connection service may also be required by some mobile phone net...

Страница 20: ...able by gently tilting it forward and then lifting it from the cradle cable Once your handheld is setup and in daily use it requires about 15 to 30 minutes of charge time per day depending on usage To...

Страница 21: ...rive b Windows Follow the onscreen instructions which guide you through installing Palm Desktop software and entering your handheld business card information Mac Double click the Desktop Software CD R...

Страница 22: ...d registered your handheld If you re using a Windows computer you also created your handheld business card For comprehensive information about using your handheld continue reading this electronic hand...

Страница 23: ...preferences for how you receive alarms hearing a sound seeing a blinking indicator light or feeling your handheld vibrate Choose any combination Synchronize your data with Palm Desktop software on yo...

Страница 24: ...tall some software you may need to download files from the Internet to your computer Check the Software Essentials CD for details Locating handheld components Take a few moments to learn how to access...

Страница 25: ...lide the bottom portion of your handheld toward the screen Locating front panel controls Screen Graffiti 2 writing area Application buttons Navigator Headphone jack Date Book Address Book To Do List N...

Страница 26: ...application on your handheld Headphone jack Enables you to connect a standard 3 5mm stereo headset sold separately to your handheld for use with audio applications Speaker Enables you to listen to al...

Страница 27: ...ns your handheld on or off If your handheld is turned off pressing the power button turns the handheld on and returns you to the last screen you viewed If your handheld is turned on you can turn it of...

Страница 28: ...ries are sold separately and are typically available from third party developers Universal connector Connects your handheld to the cradle cable which in turn connects to the back of your computer and...

Страница 29: ...view information on your handheld and use the navigator to navigate through your data and accomplish tasks To remove the cover 1 Gently lift one of the cover tabs from the side of your handheld 2 Stor...

Страница 30: ...facing the display 2 Push lightly against the card with your thumb When the card is released you hear the system sound if system sounds are turned on See Sounds Alerts Preferences in Chapter 22 for mo...

Страница 31: ...s use the point of the stylus for tapping or for making strokes on the handheld screen Never use an actual pen pencil or other sharp object to write on the handheld screen as this will scratch the scr...

Страница 32: ...ations Using menus and Finding information in Chapter 4 and see Buttons Preferences in Chapter 22 for more information about using these icons Brightness control Tap the Brightness icon to open the Ad...

Страница 33: ...Command buttons appear at the bottom of dialog boxes and application screens Next previous arrows Tap the left and right arrows to display the previous and next records tap the up and down arrows to d...

Страница 34: ...To navigate in list screens do any of the following Press Up or Down on the navigator to scroll an entire screen of records Press and hold Up or Down on the navigator to accelerate the scrolling Pres...

Страница 35: ...to close a dialog If there is only one button pressing Select activates that button If there are two buttons pressing Select activates the action button instead of Cancel such as OK Yes or Delete If t...

Страница 36: ...Chapter 2 Exploring Your Handheld 22...

Страница 37: ...sing a portable keyboard accessory sold separately and attached to the universal connector Using the onscreen keyboard You can open the onscreen keyboard anytime you need to enter text or numbers on y...

Страница 38: ...character you can type on a standard keyboard The Graffiti 2 characters closely resemble the letters of the regular alphabet which makes Graffiti 2 writing easy to learn Graffiti 2 writing is differen...

Страница 39: ...l a horizontal stroke from left to right or a period symbol after a down stroke is dependent upon where the down stroke was drawn The Graffiti 2 writing area is divided into two parts one for writing...

Страница 40: ...at the insertion point on the screen To delete Graffiti 2 characters Set the insertion point to the right of the character you want to delete and make the backspace stroke in the Graffiti 2 writing a...

Страница 41: ...of the following letters TIP A full screen pen stroke brings up Graffiti 2 Help on your handheld See Pen Preferences in Chapter 22 for details Draw letters on LEFT side of Graffiti 2 writing area Let...

Страница 42: ...hapes used for a lowercase letter but write across the division line in the middle of the Graffiti 2 writing area Graffiti 2 numbers Writing numbers with Graffiti 2 writing is similar to writing lette...

Страница 43: ...e following table must be written on the right number side of the Graffiti 2 writing area Draw these marks on LEFT side of Graffiti 2 writing area Mark Stroke Mark Stroke Period Ampersand Comma Carria...

Страница 44: ...raw an accented You can use the following accent strokes in combination with Graffiti 2 letters Using these accent strokes you can write the following accented letters Symbols and other special charac...

Страница 45: ...o cancels the automatic capitalization of the first letter of a new record or sentence 2 Write the symbol or other special character shown in the table that follows You can make a symbol stroke anywhe...

Страница 46: ...n Each ShortCut can represent up to 45 characters For example you might create a ShortCut for your name or for the header of a memo See ShortCuts Preferences in Chapter 22 to learn about creating Shor...

Страница 47: ...re on the left side of the screen Write numbers anywhere on the right side of the screen Write uppercase letters aligned with the division marks in the Graffiti 2 writing area Write the Punctuation Sh...

Страница 48: ...c operations in Chapter 21 for more details To select a business card 1 Create an Address Book record that contains the information you want on your business card 2 Tap the Menu icon 3 Tap Record and...

Страница 49: ...To beam an application 1 Tap the Home icon 2 Tap the Menu icon 3 Tap App and then tap Beam 4 Tap the Beam From pick list 5 Select either Handheld or Card 6 Tap the application you want to transfer So...

Страница 50: ...try In Palm Photos you can select and beam multiple photos at the same time See Beaming photos in Chapter 13 for details Sending data You can send data using Bluetooth communication or by using e mail...

Страница 51: ...15 Using your computer keyboard If you have a lot of data to enter or prefer to use the computer keyboard you can use Palm Desktop software or any supported personal information manager PIM such as M...

Страница 52: ...cation into which you want to import data 3 If you are importing records that contain a field with category names do the following Select All in the Category box Be sure that the same categories that...

Страница 53: ...on how to set up a file link see the Palm Desktop online Help Importing data from a Mac computer Palm Desktop software can import data from any applications that can export the data in any of the fol...

Страница 54: ...e Pad application When you use Note Pad you write quick notes directly on the handheld screen in your own handwriting See Chapter 12 for more information and instructions Using a portable keyboard You...

Страница 55: ...ning applications You can use the Applications Launcher to open any application installed on your handheld or an expansion card You can also open Date Book Address Book To Do List Note Pad and Voice M...

Страница 56: ...he navigator to open the application In the Applications Launcher write the Graffiti 2 character for the first letter of its name The Applications Launcher scrolls to the first application with a name...

Страница 57: ...n you return to that application You can also press and hold Select on the navigator to switch to the Applications Launcher at any time When you use an expansion card your handheld creates and display...

Страница 58: ...you can create your own user defined categories You can have a maximum of 15 user defined categories When you have an expansion card properly seated in the expansion card slot the expansion card name...

Страница 59: ...hanging the Applications Launcher display By default the Applications Launcher displays each application as an icon As an alternative you can choose to show a list of applications You can also choose...

Страница 60: ...ect the card name The Copy To pick list appears only if there are multiple cards available 6 Tap an application to copy 7 Tap Copy 8 Tap Done You can install applications to a card that is seated in t...

Страница 61: ...ndheld or send applications from expansion cards to your handheld See Beaming data and Sending data in Chapter 3 for details Selecting copy settings When using the copy feature you can set the followi...

Страница 62: ...ck box Using menus Menus on your handheld are easy to use Once you have mastered them in one application you can use them the same way in all other applications The menus of each application are illus...

Страница 63: ...e TIP After you open the menu bar you can also press Right and Left on the navigator to select a menu press Down on the navigator to select the command you want to use and then press Select on the nav...

Страница 64: ...change preferences for an application 1 Open an application 2 Tap the Menu icon 3 Select Options and then select Preferences NOTE Not all applications have a Preferences command 4 Make changes to the...

Страница 65: ...te or enter new text at any time Two screen features tell you when your handheld is in Edit mode A blinking cursor One or more dotted edit lines NOTE In Note Pad you can write anywhere on the screen T...

Страница 66: ...res the text you removed Undo also reverses deletions you made using backspace Cut Removes the selected text and stores it temporarily in the memory of your handheld You can paste the text you cut int...

Страница 67: ...file on your desktop the next time you perform a HotSync operation To delete a record with alternate methods Delete the text of the record In Date Book Address Book Palm Photos To Do List and Memo Pad...

Страница 68: ...web pages by clearing the cache See Changing the size and content of the cache in Chapter 19 To purge records 1 Open the application 2 Tap the Menu icon 3 Select Purge on the Record menu A confirmatio...

Страница 69: ...h as All and Unfiled and user defined categories such as Business and Personal You cannot modify the system defined categories but you can rename and delete the user defined categories In addition you...

Страница 70: ...in the upper right corner of the screen to assign the item to a different category To display a category of records 1 Tap the category pick list in the upper right corner of the list screen NOTE In th...

Страница 71: ...of the screen or list 2 Select Edit Categories 3 Tap New 4 Enter the name of the new category and then tap OK 5 Tap OK You can assign any of your records to the new category To rename a category 1 Ta...

Страница 72: ...tion However Find does not search through applications on expansion cards Date Book To Do List Memo Pad SMS Phone Lookup displays the Address list screen and enables you to add to a record the informa...

Страница 73: ...if you enter c in the first box only the letters a h and o appear in the second box If there is only one possible match for a particular position the highlight jumps to the next position 4 Press Up o...

Страница 74: ...ls to the first letter of the company name 2 Tap the record to view its contents Using Find You can use Find to locate any text that you specify in any application that resides on your handheld Find d...

Страница 75: ...Address list screen You can add to a record the information that appears in this list To use Phone Lookup 1 Display the record in which you want to insert a phone number The record can be in Date Boo...

Страница 76: ...k record that begins with Wi your handheld inserts the full name such as Fred Williams and its associated information If you have more than one name that begins with Wi the Phone Lookup screen appears...

Страница 77: ...g is available in applications that have list screens Address Book To Do List Note Pad Voice Memo Memo Pad and Expense You can also sort photos in Palm Photo See Sorting photos in List view in Chapter...

Страница 78: ...ct Date Alphabetic Duration or Manual Memo Pad Tap the Sort by pick list and select Alphabetic or Manual 5 Tap OK To sort the Note Pad Voice Memo or Memo list manually tap and drag a note voice memo o...

Страница 79: ...o display an entry tap it or press Up or Down on the navigator to highlight it and then press Select on the navigator 2 In Address Book only Tap Edit 3 Tap Details 4 Tap Note 5 Enter your note 6 Tap D...

Страница 80: ...ld fonts in each application that enables you to change the font style To change the font style 1 Open an application 2 Tap the Menu icon 3 Select Options and then select Font 4 Tap the font style you...

Страница 81: ...Reminder screen displays alerts that await attention To respond to alerts do one of the following Select an item s check box to clear the item Tap an item either the icon or the text description to o...

Страница 82: ...moving applications This section explains how to install and remove applications and other files on your handheld or on an expansion card and how to remove Palm Desktop software from your computer Ins...

Страница 83: ...he operation of your handheld contact the developer of the application Installing applications and files on a Windows computer Palm Quick Install makes it easy to install applications and files during...

Страница 84: ...s can happen if your handheld is too full to install the file or if the file type was not recognized during the HotSync operation If files are unrecognized try launching the associated application fro...

Страница 85: ...ration If files are unrecognized try launching the associated application from your handheld and then performing another HotSync operation If the files still remain in the list they are not associated...

Страница 86: ...m application files To use the right click menu to send the file to Palm Quick Install 1 Copy or download the application s or file s you want to install onto your computer 2 From My Computer or Windo...

Страница 87: ...it easy to install applications and files during a HotSync operation You can specify whether to install the files on your handheld or on an expansion card To install add on software on your handheld...

Страница 88: ...e application you are installing click Change Destination in the Install Handheld Files window and then use the arrows to move applications between your handheld and an expansion card 9 Click OK to cl...

Страница 89: ...ion of your handheld To remove an add on application 1 Tap the Home icon 2 Tap the Menu icon 3 Select Delete on the App menu 4 Tap the Delete From pick list and select either Handheld or Card If you w...

Страница 90: ...mputer 1 From the Windows Start menu select Settings and then click Control Panel 2 Double click the Add Remove Programs icon 3 Click the Change or Remove Programs button 4 Select Palm Desktop 5 Click...

Страница 91: ...s Book using the Quick Connect feature See Making connections from Address Book later in this chapter Define which phone number appears in the Address list for each Address Book entry Attach a note to...

Страница 92: ...ntries to your handheld with your next HotSync operation Palm Desktop software also has data import capabilities so that you can load database files into Address Book on your handheld See Importing da...

Страница 93: ...t the word 7 Tap the scroll arrows to move to the next page of information 8 After you finish entering information tap Done TIP To create an entry that always appears at the top of the Address list be...

Страница 94: ...igator in Chapter 2 for instructions 2 Tap Edit 3 Tap Details 4 Select any of the following settings Tap triangle Show in List Select which type of phone or other information appears in the Address li...

Страница 95: ...our new Palm handheld Some third party applications however may not have been upgraded to be compatible with your new Palm handheld If you suspect that a third party application is adversely affecting...

Страница 96: ...box tap Settings 2 Optional Tap the Number Prefix check box and enter a prefix For example to dial 1 before all phone numbers select this check box and enter a 1 in this field The prefix is not added...

Страница 97: ...phone number tap the number you want to dial To address an e mail message tap an e mail address 3 Optional Tap the number to edit it For example you might want to add an area code a 1 or a country cod...

Страница 98: ...box where you can choose which application you want to use to make the connection Send Category Opens a dialog box where you can choose how you want to send all records in the selected category to ano...

Страница 99: ...cted If you deselect it Address Book displays the All category Rename Custom Fields These custom fields appear at the end of the Address Edit screen Rename them to identify the kind of information you...

Страница 100: ...Chapter 5 Using Address Book 86...

Страница 101: ...l for confirming a series of chain calculations To open Calculator 1 Tap the Home icon 2 Tap the Calculator icon Performing calculations The Calculator includes several buttons to help you perform cal...

Страница 102: ...umber enter the number first and then press the button Places the current number into memory Each new number you enter with the M button is added to the total already stored in memory The number that...

Страница 103: ...is shown here for your reference and Calculator features that are not explained elsewhere in this book are described here See Using menus in Chapter 4 for information about choosing menu commands Opt...

Страница 104: ...Chapter 6 Using Calculator 90...

Страница 105: ...tents Rename a card Format a card Reviewing Card Information You can view the card name type available storage space and a summary of its contents To review Card Information 1 Tap the Home icon 2 Tap...

Страница 106: ...that indicates its contents To rename a card 1 Tap the Home icon 2 Tap the Card Info icon 3 Tap the Menu icon 4 Select Rename Card from the Card menu 5 Enter the new name for the card 6 Tap Rename For...

Страница 107: ...mation on an expansion card uses more battery power than performing the same task on your handheld If you have ample storage space on your handheld consider copying the information to your handheld NO...

Страница 108: ...Chapter 7 Using Card Info 94...

Страница 109: ...quickly spot days where you have morning lunch or afternoon appointments Set an alarm to notify you of the scheduled activity Create reminders for events that are based on a particular date rather tha...

Страница 110: ...ticular date but have no specific start or end times such as birthdays holidays and anniversaries These are referred to as untimed events Untimed events appear at the top of the list of times marked w...

Страница 111: ...select the event A vertical line appears next to the time indicating the duration of the event If two or more events have the same start and end time the time appears only once To schedule an event fo...

Страница 112: ...date follow the steps for scheduling an event for the current day To schedule an untimed event 1 Select the date that you want for the event 2 Tap New 3 Tap No Time so that no start or end times are d...

Страница 113: ...ontents reschedule it make it a repeating event and add alarms or notes To select an event 1 Go to the day on which the event is scheduled 2 Tap the event TIP You can also press Select on the navigato...

Страница 114: ...e event to which you want to assign an alarm 2 Tap Details 3 Tap the Alarm check box to select it The default setting 5 Minutes appears 4 Tap the pick list to select Minutes Hours or Days 5 Select the...

Страница 115: ...alarm for an untimed event that occurs on February 4 If the alarm is set for 5 minutes the reminder message appears at 11 55 PM on February 3 The reminder remains in the reminder list until you turn...

Страница 116: ...End on pick list and tap Choose Date Use the date picker to select an end date 7 Tap OK After you schedule a repeating or continuous event the Repeat icon appears at the far right of the event Changin...

Страница 117: ...urrence of a repeating event such as from January 14 to January 15 and apply the change to all occurrences the new date becomes the start date of the repeating event Your handheld adjusts the end date...

Страница 118: ...the navigation controls to move forward or backward a week at a time or tap on a column to display details of an event The Week View also shows untimed events and events that are before and after the...

Страница 119: ...to scroll to the event or press Up and Down on the navigator to scroll to earlier and later time slots within the selected week Working in Month View The Month View screen shows which days have event...

Страница 120: ...can change them depend on the settings in your To Do Preferences See Setting To Do Preferences in Chapter 16 for more information To display the Agenda View 1 Tap the Agenda View icon 2 Tap the naviga...

Страница 121: ...The first event created appears as a gray bar and any subsequent conflicting events appear as a single red bar The Day View displays overlapping red brackets to the left of the conflicting times The M...

Страница 122: ...ntrol which type of events appear in Month View Purge Opens a dialog where you can choose which old events to purge from your handheld and whether you want to archive purged events on your computer Se...

Страница 123: ...tings Applies to the Month View of Date Book You can deselect any or all of these check boxes to hide Timed Untimed or Daily Repeating events in the Month View only Start End Time Defines the start an...

Страница 124: ...Chapter 8 Using Date Book 110...

Страница 125: ...ap the Palm Dialer icon TIP The Buttons Preferences screen enables you to assign Palm Dialer to the Favorite icon or to one of the application buttons on the front of the handheld For more information...

Страница 126: ...ory list You are now ready to communicate over your mobile phone Redialing the most recently dialed number You can quickly redial the most recently dialed number from the Dialer screen To redial the m...

Страница 127: ...obile phone Using speed dial Speed dialing allows you to quickly dial your most commonly used numbers You can enter up to 10 numbers into the Speed Dial screen Adding a speed dial entry To add a speed...

Страница 128: ...r numeric display or from other Palm applications by using the cut and paste feature on the Edit menu 4 Tap OK The name appears on the speed dial button 5 Tap Done Dialing a speed dial entry To dial a...

Страница 129: ...ory list You are now ready to communicate over your mobile phone Editing a speed dial entry To edit a speed dial entry 1 Tap Speed 2 Tap Edit TIP You can also go directly to the Edit Entry dialog box...

Страница 130: ...of the most recently dialed numbers If the number is a speed dial entry the name from the speed dial entry appears in the Call History list You can dial a number using the Call History list To dial a...

Страница 131: ...Tap Dial The number is dialed and you are now ready to communicate over your mobile phone Date and time you called Number or name if number is a speed dial entry Tap Done to return to Dialer screen Ta...

Страница 132: ...Chapter 9 Using Palm Dialer 118...

Страница 133: ...expense items to categories so that you can organize and view them in logical groups Keep track of vendors companies and people involved with each expense Log miles traveled for a particular date or e...

Страница 134: ...xpense 3 Tap the Expense type pick list and select a type from the list As soon as you select an expense type your handheld saves your entry If you do not select an expense type it does not save the e...

Страница 135: ...tem 3 Tap the new date Entering receipt details Expense provides a variety of options that you can associate with an item These options appear in the Receipt Details dialog box To open the Receipt Det...

Страница 136: ...upplied by your company you can choose Prepaid to place your expense in the appropriate company paid cell of your printed expense report Currency Enables you to choose the type of currency used to pay...

Страница 137: ...he Menu icon 3 Select Options and then select Preferences 4 Tap the Default Currency pick list 5 Tap the currency symbol you want to appear in Expense 6 Tap OK Defining a custom currency symbol If the...

Страница 138: ...ency symbol only for a particular Expense item select the symbol in the Receipt Details dialog box associated with that item Setting Show Options Show Options defines the sort order and other settings...

Страница 139: ...r When you perform a HotSync operation the euro symbol is transferred to Palm Desktop software like any other piece of data on your handheld The symbol appears in Palm Desktop software however only if...

Страница 140: ...ns menu Preferences Opens the Preferences dialog box where you can select automatic fill and default currency options Use automatic fill Enables you to select an expense type by writing the first lett...

Страница 141: ...memos to popular computer applications like Microsoft Word when you synchronize using Palm Desktop software and HotSync technology Assign memos to categories so that you can organize and view them in...

Страница 142: ...appear in the memo Use the carriage return stroke to move down to new lines in the memo 4 Tap Done Reviewing memos The first line of a memo appears in the Memo list This makes it easy to locate and re...

Страница 143: ...ions menus Send Category Opens a dialog box where you can choose how you want to send all records in the selected category to another device The options available depend on the software installed on y...

Страница 144: ...Chapter 11 Using Memo Pad 130...

Страница 145: ...tes to categories so that you can organize and view them in logical groups Exchange notes with other devices that have Note Pad 2 x installed and that use SMS or Bluetooth technology Use Palm Desktop...

Страница 146: ...note 1 Tap New 2 Write the information directly on the handheld screen Tap the pen selector to select a different pen width or select the eraser to remove unwanted strokes 3 Optional Select the time a...

Страница 147: ...he navigator See Using the navigator in Chapter 2 for details 2 Review or edit the contents of the note 3 Tap Done Changing Note Pad color settings By default your notes appear with a white paper back...

Страница 148: ...pecific time and date to remind you to follow up on a note To set an alarm for a note 1 Tap the note to which you want to assign an alarm 2 Tap the Menu icon 3 Select Options and then select Alarm 4 T...

Страница 149: ...urn to the current screen An attention indicator blinks in the upper left corner of the screen to remind you of the pending alarm and the reminder message appears again in five minutes When the remind...

Страница 150: ...n the selected category to another device The options available depend on the software installed on your handheld Send Note Opens a dialog box where you can choose how you want to send the selected no...

Страница 151: ...photos as e mail attachments or to other applications To open Palm Photos Palm Photos is available after the first time you HotSync your handheld 1 Tap the Home icon 2 Select the Palm Photos icon Pal...

Страница 152: ...e album you want to view 3 Tap the thumbnail of the photo you want to view TIP You can also select a photo with the navigator Press Select on the navigator to insert the highlight press Up Down Right...

Страница 153: ...ywhere on the screen to return to List view Viewing a slide show A slide show is a sequential presentation of each of the photos in the current album You can set the length of time each photo remains...

Страница 154: ...rotate a photo 1 Tap the Menu icon 2 Select Photo and then select Rotate 3 Tap the photo you want to rotate TIP You can also select a photo with the navigator Press Select on the navigator to insert...

Страница 155: ...ct to view the photo 4 Review or edit the information 5 Tap Done twice Organizing photos There are several ways you can organize your photos You can sort photos in the List view file photos in albums...

Страница 156: ...ect Edit Albums 3 Tap New 4 Enter a title for the album 5 Tap OK 6 Tap Done Filing photos in albums You can organize the photos on your handheld by filing them into different albums Since each expansi...

Страница 157: ...r handheld it is copied to an expansion card and vice versa When you copy a photo from an expansion card to your handheld a number is appended to the photo name If a photo was originally larger than 3...

Страница 158: ...e Renaming a card in Chapter 7 When you delete an album all the photos in that album are reassigned to the Unfiled album To rename an album 1 Tap the Album pick list in the upper right corner 2 Select...

Страница 159: ...r 3 Follow the steps below to beam multiple photos To beam photos 1 Tap the Menu icon 2 Select Photo and then select Beam 3 Tap the photos you want to beam A plus sign appears next to the photos you s...

Страница 160: ...to and then press Select to view the photo 4 Tap Delete 5 When the confirmation dialog box appears tap Delete Working with photos on your computer After you copy photos onto your handheld and perform...

Страница 161: ...click the Photo and Audio Readme file Using Palm Photos menus Palm Photos menus are shown here for your reference and Palm Photos features that are not explained elsewhere in this book are described h...

Страница 162: ...Chapter 13 Using Palm Photos 148...

Страница 163: ...able connection A wire based link that connects your handheld to a mobile phone with a physical cable Serial cables and mobile phones that are enabled with infrared or Bluetooth technology are sold se...

Страница 164: ...are not included with your handheld Setting up a phone connection To set up a phone connection you must configure connection information on your handheld If you want to connect to the Internet and sen...

Страница 165: ...or your phone see Updating the phone files on your handheld later in this chapter or your phone is not supported at this time 7 Tap Next 8 Tap the Via pick list and select the method you want to use t...

Страница 166: ...he list 4 Tap Next Your handheld connects to your phone 5 When prompted to create a trusted connection tap Next 6 Enter a passkey for this connection on your phone and then tap OK A passkey is a uniqu...

Страница 167: ...s and then follow the instructions in the next section to set up network services for your phone Configuring network service settings for your phone If you want to use your handheld to connect to the...

Страница 168: ...the Network Service box 2 Tap Yes when asked if you subscribe to a high speed data service 3 Tap Next 4 Tap the Select the area pick list and select your mobile phone carrier s location 5 Tap the Sel...

Страница 169: ...ction procedure tap Next on the Network Service Setup screen If you do not see the Network Service Setup screen tap the Home icon select the Phone Link icon and then tap the Network Service box 2 Tap...

Страница 170: ...handheld The instructions in this section assume that you have already installed the desktop software that came with your handheld and have performed at least one HotSync operation You will also need...

Страница 171: ...oth connection with a phone you must first turn on Bluetooth communication and turn on the Discoverable setting on your handheld See Bluetooth Preferences in Chapter 22 for instructions 2 Download the...

Страница 172: ...ernet launch a web browser application To make a cable connection 1 Connect the cable to your handheld and mobile phone 2 Turn on your handheld and your mobile phone 3 Launch the application that requ...

Страница 173: ...sage IMPORTANT Your mobile phone plan must be a GSM phone and must include the ability to send and receive SMS messages in order to use SMS To open SMS 1 Tap the Home icon 2 Tap the pick list in the u...

Страница 174: ...highlight To navigate in message screens Press Up or Down to scroll within the current message Press Right or Left to scroll to the previous or next message Press Select to return to the list screen C...

Страница 175: ...your Outbox and retrieve all the new messages from your mobile phone at the same time To send and receive messages at the same time 1 Connect to your phone See Setting up a phone connection in Chapter...

Страница 176: ...the upper right corner 2 Tap Inbox 3 Tap the message you want to view 4 Tap one of the following Inbox Stores messages downloaded from your phone Outbox Stores messages waiting to be sent Trash Stores...

Страница 177: ...e application or tap No to view the raw data To view messages in your Outbox or Archive categories 1 Tap the category pick list in the upper right corner 2 Tap Outbox or tap Archive 3 Tap the message...

Страница 178: ...n store draft messages for as long as you like and review and edit them before you send them To place a message in the Draft category 1 Create or open the message you want to store in the Draft catego...

Страница 179: ...then add it to a message using menu commands To define a signature 1 Tap the Menu icon 2 Tap Options and then tap Preferences Send Sends the message now Outbox Moves the message to the Outbox to be se...

Страница 180: ...you can create a message that contains data from an application on your handheld For example you can send a Date Book event to someone to remind them to add a meeting to their calendar If the recipie...

Страница 181: ...s Alphabetic Date Phone Number and Status Show Date To display dates in list views select this check box Alert Sound Indicates whether new messages trigger an alert and which alert it triggers To trig...

Страница 182: ...that you can add to your messages Leave Messages on Phone Indicates whether messages are deleted from your phone after you download them to your handheld To keep messages on your phone after you trans...

Страница 183: ...m the following options 4 Hours 1 Day 1 Week 2 Weeks 1 Month and Max Time Message Center Indicates whether your handheld obtains your mobile phone service provider s Message Center number directly fro...

Страница 184: ...dialog box where you can select a mobile phone number where you want to send a message Font Opens the Font dialog box where you can choose different fonts for the list and message views About SMS Sho...

Страница 185: ...items to categories so that you can organize and view them in logical groups Sort your To Do List items by due date priority level or category Attach a note to an individual To Do List item for a des...

Страница 186: ...ing priority You can use the priority setting for items to arrange the tasks in your To Do List according to their importance or urgency The default setting for the To Do List is to arrange items by p...

Страница 187: ...t You can set the To Do List to record the date that you complete the To Do item and you can show or hide completed items See Setting To Do Preferences later in this chapter To check off a To Do List...

Страница 188: ...a To Do List item 1 In the Details dialog box tap No Date to open the Due Date pick list 2 Tap the date that you want to assign the item 3 Tap OK TIP If you turn on the Show Due Dates option in the To...

Страница 189: ...in the memory of your handheld You can purge completed items to remove them from memory Show Only Due Items Shows only the items that are currently due past due or have no due date specified When this...

Страница 190: ...ds Record menu Options menu Send Item Opens a dialog box where you can choose how you want to send the selected item to another device The options available depend on the software installed on your ha...

Страница 191: ...t make sending and receiving e mail messages and managing e mail accounts easier than ever Palm VersaMail personal e mail software features Key features of the VersaMail 2 5 application include the fo...

Страница 192: ...information in the VersaMail application If you enter the e mail account information first and then synchronize your handheld to an existing username the e mail account information you entered is over...

Страница 193: ...using your Yahoo account Account and connection types Two types of e mail accounts are supported Network You can send and receive e mail directly to and from your handheld by connecting with an e mail...

Страница 194: ...account and have a well known ISP such as Earthlink or Mindspring many of the required settings during the account setup are automatically configured For other ISPs you need the following information...

Страница 195: ...corporate firewall or if you are using an 802 11b SDIO card sold separately in your handheld and your company has an 802 11b network located behind the corporate firewall you may not need to set up a...

Страница 196: ...of the following two situations Your company s wireless LAN network is located outside the firewall Your company s wireless LAN network is located inside the firewall but you are trying to access the...

Страница 197: ...ersaMail Account Setup you enter the username and password for this account The VersaMail 2 5 application provides strong 128 bit AES encryption for your password Account Name Enter a descriptive name...

Страница 198: ...ail server settings 1 If you chose a preconfigured service from the Mail Services pick list on the Account Setup screen the e mail address field is completed automatically based on the username and ma...

Страница 199: ...displays different options depending on whether your mail service uses a POP or an IMAP protocol To set mail retrieval server options for a POP or IMAP account 1 Optional Select any of the following G...

Страница 200: ...access your Yahoo e mail Inbox Port Number The port number setting defaults to 110 for POP and to 143 for IMAP servers respectively You may need to change the port number if you choose to retrieve in...

Страница 201: ...y to on your e mail messages only if this is different from the e mail address from which you are sending the message For example if you are sending a message from me yahoo com but you want recipients...

Страница 202: ...res authentication ESMTP check box if the outgoing server SMTP requires authentication Check with your system administrator before selecting this option See Adding ESMTP to an account later in this ch...

Страница 203: ...ynchronize only account NOTE You must be using a Windows computer to use a synchronize only account A synchronize only e mail account enables you to download view and manage e mail between the handhel...

Страница 204: ...screen select the Synchronize Only Account check box 7 Tap Next Account Name Enter a descriptive name for this account such as My Yahoo Mail Service Tap the Mail Service pick list and select the provi...

Страница 205: ...Tap Next Entering the name of the outgoing and incoming mail server You need to enter your e mail address for the account you are accessing as well as the names of the outgoing and incoming mail serve...

Страница 206: ...ext 5 Do one of the following To accept these mail options and begin using the VersaMail application tap Done After you finish setting up a synchronize only e mail account you need to configure this a...

Страница 207: ...x Leave mail on server POP account only To get e mail on your handheld but also leave it on the server so you can view it later on your desktop select the Leave mail on server check box For example if...

Страница 208: ...is different from the e mail address from which you are sending the message For example if you are sending a message from me yahoo com but you want recipients to reply to me earthlink net enter the re...

Страница 209: ...r check with your mail server administrator Authentication Select the My server requires authentication ESMTP check box if the outgoing server SMTP requires authentication Check with your system admin...

Страница 210: ...hapter for information You will not be able to synchronize e mail between your handheld and your desktop until you configure the account on your desktop Editing e mail accounts From time to time you m...

Страница 211: ...VersaMail 2 5 application provides strong encryption for your password To edit the account username and password 1 Optional Enter a new username for accessing your e mail This is generally the part o...

Страница 212: ...red incorrectly you can edit the address or the server names To edit mail server settings 1 Optional Enter a new e mail address for the account you are accessing such as examplename yahoo com 2 Option...

Страница 213: ...e POP protocol does not support retrieval of unread mail only from the server If you have a POP e mail account the VersaMail application downloads all messages from the server regardless of whether yo...

Страница 214: ...nge the port number if you choose to retrieve incoming mail over a secure connection see the next bullet item If you are not sure about the correct port number check with your mail server administrato...

Страница 215: ...e mail address that you want recipients to see and reply to on your e mail messages only if this is different from the e mail address from which you are sending the message For example if you are send...

Страница 216: ...If you are not sure about the correct port number check with your mail server administrator Authentication Select the My server requires authentication ESMTP check box if the outgoing server SMTP requ...

Страница 217: ...ahoo account from the VersaMail application deletes only the account from your handheld Your e mail account still exists at Yahoo com NOTE You can delete all but one of your e mail accounts you must h...

Страница 218: ...pplication uses this service for sending and receiving messages for all e mail accounts you set up See Chapter 22 for information on setting up the default service for your handheld However for any gi...

Страница 219: ...eopen the application the e mail account you selected My Earthlink in this example continues to connect using the new connection Earthlink GPRS in this example until you either select a new service or...

Страница 220: ...s as read or unread This section describes how to do the following Get and send e mail for your e mail accounts View and send e mail attachments such as text or Microsoft Word documents wirelessly Get...

Страница 221: ...get the entire message You can also use the Details dialog box to select options for getting unread e mail only downloading attachments using filters and more To get e mail messages 1 Tap Get Mail If...

Страница 222: ...r information on setting a default connection type 4 Optional For IMAP accounts you have the option of synchronizing IMAP folders from the Get Mail dialog See Wireless IMAP folder synchronization late...

Страница 223: ...ns called the Reminders screen The auto get feature downloads the first 3KB of each message If a message is larger than 3KB tap the More button on the message screen to download and view the entire me...

Страница 224: ...duled auto get takes place at the same time for example for two separate e mail accounts the retrievals take place in the following order Any past due auto get for example a retry of an earlier failed...

Страница 225: ...select the time interval from 15 minutes to 12 hours See Resource issues with auto get mail later in this chapter for information on setting the interval Start Time Tap the Start Time box tap to ente...

Страница 226: ...ave your handheld alert you when a new message arrives in your account The beep or alert sound your hear is called a notification Your handheld also notifies you of a new message s arrival by blinking...

Страница 227: ...m the Inbox or another folder screen tap the Menu icon 2 Tap Options 3 Tap Notification 4 Tap the Notify me of new mail and mail alerts check box 5 Tap the Notify Sound pick list and select a sound Th...

Страница 228: ...references To make your handheld buzz or blink when you get new e mail 1 Tap the Home icon 2 Tap the Prefs icon 3 From the General Preferences list select Sound Alerts 4 Do any of the following To cha...

Страница 229: ...Reminders screen and return to whatever you were doing on your handheld before the Reminders screen appeared Tap Clear All to dismiss all reminders in the Reminders screen When a notification appears...

Страница 230: ...play the error message but would display the number of messages retrieved after the successful retrieval Reminders screen notifications are specific for each account For example if auto get fails for...

Страница 231: ...handheld s battery charge more quickly and thus need to recharge the battery more frequently Increasedmonthly charges If your e mail service provider is a wireless provider such as Cingular or T Mobi...

Страница 232: ...age press Select to close the message If you chose to get messages by subjects only tap the More button to view the body of the e mail message plus any attachments up to the maximum message size you s...

Страница 233: ...age See Working with URLs later in this chapter for more information When you set the VersaMail application to receive e mail messages as HTML any messages sent as plain text will be displayed as plai...

Страница 234: ...t corner of the screen 2 Tap the folder you want to view Managing display options in the folder s list view You can customize the way in which messages appear in the list view of your mail folders The...

Страница 235: ...ort order 1 Tap Display 2 Tap the Sort by pick list and then tap the column name 3 Tap Descend or Ascend to change the sort order 4 Tap OK To select a one line or two line view 1 Tap Display 2 Tap the...

Страница 236: ...change depending on whether you choose a one line or a two line view NOTE If you select Date the Date column displays the message time for any messages received today that is any message received aft...

Страница 237: ...nt style you want 6 Tap OK To select colors for read and unread mail 1 Tap Display 2 Tap the Unread pick list and then tap the color you want to use to display unread messages 3 Tap the Read pick list...

Страница 238: ...der 2 Drag the column divider to change the width of the column 3 Tap OK You can also change the font within an individual message This change affects the the font of all messages you compose To chang...

Страница 239: ...style you want 7 Tap OK Moving e mail between folders You can move one or more e mail messages between folders To move one e mail message 1 Tap the folders pick list in the upper right corner of the s...

Страница 240: ...he folder Alternately tap the folder that you want TIP You can also move a single e mail message from within the body of the message by pressing the command bar stroke in the Graffiti 2 writing area t...

Страница 241: ...pears next to the selected messages 3 Do one of the following Tap the Menu icon and then tap Move To Tap a message icon next to a selected message and then tap Move To on the pick list 4 Tap the folde...

Страница 242: ...aries slightly between POP and IMAP e mail accounts as described in the following procedure To create and edit e mail folders 1 Tap the folders pick list in the upper right corner of the screen and th...

Страница 243: ...nly you have the option of deleting the folder on the server Select the check box if you also want to delete the folder on the server and then tap OK For POP accounts the folder will be deleted immedi...

Страница 244: ...address a message by entering the complete address To enter the address 1 In the New Message screen tap or navigate to the To field and enter the address and then tap Done For multiple recipients type...

Страница 245: ...ssed If you want to edit an e mail address that is longer than the line provided in the New Message screen tap the To field and edit the address 2 To send copies tap cc or bcc and enter the recipient...

Страница 246: ...elected in VersaMail Preferences To use Smart Addressing to address a message 1 In the New Message screen tap in the To field 2 Start entering the person s name such as Joe Smith Once the name is reco...

Страница 247: ...Preferences 1 In the Inbox tap the Menu icon 2 Tap Options 3 Select Preferences 4 Tap Advanced 5 Tap the Enable Smart Addressing check box if it is not selected A checkmark means it is turned on 6 Ta...

Страница 248: ...ld is out of range or the application cannot connect to the mail server you can choose to have the application move the message to the Outbox and continue to try to send the message at 30 minute inter...

Страница 249: ...y notifications If automatic send retry fails after the third attempt a notification appears in the Reminders screen A separate notification appears for each e mail account for which a send retry has...

Страница 250: ...edit the message you will need to perform a manual send in order to send the message If the manual send fails you can choose to store the message in the Outbox to await the next automatic send retry...

Страница 251: ...signature 1 Tap the Menu icon 2 Tap Options 3 Select Preferences 4 Tap Signature 5 Tap the Attach Signature check box to select it 6 Enter your signature information 7 Tap OK Forwarding e mail You can...

Страница 252: ...for more information on addressing messages 6 Optional Enter some text describing the forwarded message 7 Tap Send to send the message or tap Outbox to store it in the Outbox NOTE Forwarded messages a...

Страница 253: ...In the Reply Options dialog box select options for replying to the sender only or to all e mail recipients and for including original message text 4 Tap OK 5 Enter a reply 6 Tap Send to send the mess...

Страница 254: ...t to select this option TIP Alternately you can tap the folders pick list select the folder that contains the e mail tap the envelope icon next to the message and then tap Reply on the pick list 3 In...

Страница 255: ...ifferent forms as follows Working with attachments You can easily download view and send attachments with e mail messages Downloading attachments to your handheld At times e mail contains attached fil...

Страница 256: ...uments is shown JPG jpg bitmap bmp and TIFF tif tiles These are graphics files You can download these files and view them using the Photo Viewer application on your handheld Other application files Fo...

Страница 257: ...chments exceeds your maximum message size you see a message showing that the message and or attachments were too large and asking if you would like to continue downloading them For example if the maxi...

Страница 258: ...on your handheld and you select a photo attachment on the list the Viewer pick list appears containing the names of the photo viewing applications Tap the pick list and select the application you wan...

Страница 259: ...our maximum message size or a message with multiple attachments whose total size exceeds your maximum message size requires some extra steps To determine if a message has an attachment or multiple att...

Страница 260: ...llow the procedure for viewing an attachment presented earlier in this chapter To download multiple attachments whose total size exceeds the maximum message size 1 Tap the red paper clip icon 2 Select...

Страница 261: ...dure for downloading attachments described earlier in this chapter 3 On the Attachments screen tap Save to Card 4 Tap OK Attaching files from a handheld application You can attach files on your handhe...

Страница 262: ...ap the Type pick list and select the file type All files of the selected type appear in the Type box For example if you select Appointments vCal tap Date Book to see a list of appointments from a part...

Страница 263: ...from an expansion card If you have purchased an expansion card and have saved files to the card you can attach files from the card to an e mail message you are sending The types of files you can attac...

Страница 264: ...Only file types that correspond to the types of files on the card will be displayed on the list For example if the card contains only Word docs and Address Book entries only the file types doc and vCa...

Страница 265: ...k up the recipient address See the procedure for creating e mail earlier in this chapter for more information on addressing messages 5 Follow the procedure for attaching files presented earlier in thi...

Страница 266: ...Tap Also delete message s on server if you want to delete the message from the server now The selected messages move to the Trash folder and are deleted from your handheld when you empty the trash If...

Страница 267: ...age on the server you cannot retrieve it and view it again later To delete messages before a certain date 1 Tap the Menu icon and then select Delete Old from the Message menu 2 Tap the Folder pick lis...

Страница 268: ...sh folder and takes up space on your handheld To increase memory you should empty the trash regularly If you want to automatically empty the trash you can set a preference to empty the trash immediate...

Страница 269: ...Many e mail providers such as Yahoo have size restrictions for mail storage If your mailbox on the server becomes full messages are returned to the senders To have the trash emptied automatically 1 T...

Страница 270: ...1 Tap the folders pick list and select the folder you want 2 Tap the icon next to the message you want to mark 3 Tap Mark Read or tap Mark Unread TIP To mark multiple messages tap the bullets next to...

Страница 271: ...r typeface for POP accounts on the handheld but you can t connect with the server to change the message state Read messages appear in plain text unread messages appear in bold text Setting preferences...

Страница 272: ...commend periodically deleting messages on the server Download Attachments Causes files attached to e mail to be automatically downloaded to your handheld Attachments that exceed the maximum message si...

Страница 273: ...message and a record already exists for the recipient name you are prompted either to update the e mail address for the recipient or to create a new record for the recipient Synchronizing e mail betwe...

Страница 274: ...alm VersaMail HotSync Conduit 1 Click the HotSync Manager icon in the Windows system tray 2 Select Custom 3 Select VersaMail in the Conduit list 4 Click Change 5 Select Synchronize Active Accounts 6 O...

Страница 275: ...o synchronize that with the desktop set the synchronization options for the Earthlink account During a HotSync operation the Earthlink account on the handheld and the e mail application specified in t...

Страница 276: ...tion Although Netscape uses SMAPI Netscape is not supported Optional If prompted enter profile and password information for the client you selected IMPORTANT You must select the synchronize check box...

Страница 277: ...about the incoming POP server the outgoing SMTP server your e mail username your password and your e mail address You can change these settings under Handheld Settings in the conduit see the procedur...

Страница 278: ...in this chapter During the HotSync operation the conduit reads the settings you made If the settings do not exist or all server information is wrong an error is reported in the HotSync log file Howeve...

Страница 279: ...0KB In this case the conduit puts the message header body and attachment 2 totaling 41KB on the handheld Attachment 1 is removed because adding it to the message causes the message to exceed the maxim...

Страница 280: ...check box is unselected meaning that all e mail will be synchronized Download attachments Select whether to download attachments during synchronization By default the check box is selected if unselect...

Страница 281: ...follows Click the name of the folder you want Click in the Synchronize column to the right of the folder name Click the arrow to open the drop down list and click Yes or No to synchronize the folder o...

Страница 282: ...Palm VersaMail Personal E mail Software 268 To set handheld synchronization settings 1 Under the selected account name click the plus sign to the left of Handheld Settings 2 Click Account Information...

Страница 283: ...d on your handheld the account information will already be entered If not enter the following NOTE You do not need to fill in these fields if the account is a synchronize only account and the mail cli...

Страница 284: ...Server Enter the name of your outgoing SMTP mail server such as smtp mail yahoo com Outgoing Mail Server Port Number The default is 25 the port number most SMTP servers use If you are not sure about...

Страница 285: ...e account is active whether the account has been synchronized and if so the last synchronization date the mail client for this account and whether the mail client and or the incoming mail server has b...

Страница 286: ...you must select the option to use APOP ESMTP or a secure connection on your handheld See Adding APOP to an account Adding ESMTP to an account and Using Secure Sockets Layer SSL later in this chapter...

Страница 287: ...Outlook Configuring Microsoft Outlook Express You can synchronize a VersaMail e mail account with Microsoft Outlook Express 5 5 or 6 0 but you must set Outlook Express as the default e mail handler N...

Страница 288: ...ched files that you are receiving DataViz Documents To Go plug ins enable you to convert attachments using HotSync operations With Documents To Go you can view create and edit Word Excel and PowerPoin...

Страница 289: ...he plug in If a plug in is not selected the right column reads Not Selected NOTE The drop down lists in the right column display only the companies currently supplying plug ins for a particular type I...

Страница 290: ...on To select which accounts are synchronized during a HotSync operation 1 Click the HotSync Manager icon in the Windows system tray 2 Select Custom Item Action To deselect a plug in Click the right co...

Страница 291: ...ions Otherwise the settings apply to the next HotSync operation only 7 Click OK 8 Perform a HotSync operation Synchronize Active Accounts Select this option to include active accounts in the next HotS...

Страница 292: ...t When you set up an e mail account you can choose to use a secure connection Secure Sockets Layer or SSL for sending and receiving e mail messages The Palm VersaMail HotSync Conduit supports SSL when...

Страница 293: ...s are downloaded to your handheld and in which folder the downloaded messages are stored For example you may want to file e mail about sales meetings in a Sales folder You can create a filter that aut...

Страница 294: ...NOT containing onlinebroker in the From field should be moved to the Inbox or other folder you designate If you do not create this second filter then only messages containing onlinebroker in the From...

Страница 295: ...t once Before you download e mail be sure to turn on the filters you want and turn off those you don t want To pick list Select the message header field with the information contained in the edit line...

Страница 296: ...Synchronize Connected applies a filter to messages downloaded to your handheld over a modem or network connection Synchronize applies a filter to messages downloaded to your handheld during a HotSync...

Страница 297: ...in the pick lists and revise the text in the edit line Tap OK To delete the filter tap Delete and then tap Yes to confirm the deletion 5 Tap OK Managing mail settings You can configure advanced mail s...

Страница 298: ...o manage and then tap OK To change the protocol type 1 In the Server Settings screen tap the Protocol pick list and then tap POP or IMAP 2 Tap OK To change your username or password 1 In the Server Se...

Страница 299: ...d to make a connection with your corporate account through a VPN However for your Earthlink account you may want to switch to the Earthlink service which uses an external modem accessory to make a con...

Страница 300: ...pick list and select Address Servers 3 Edit any of the following 4 Tap OK Email address Enter the e mail address of the account you are accessing such as examplename yahoo com Incoming mail server Ent...

Страница 301: ...retrieval of unread mail only from the server If you have a POP e mail account the VersaMail application downloads all messages from the server regardless of whether you have read them for example on...

Страница 302: ...h your mail server administrator Secure Connection Retrieves incoming mail over a secure Secure Sockets Layer or SSL connection See Using Secure Sockets Layer SSL later in this chapter for information...

Страница 303: ...f your Deleted Mail folder is called Trash on the server you must enter Trash in this space Sent Mail IMAP only Shows the name of your Sent Mail folder on the server This field is case sensitive and t...

Страница 304: ...pick list and select Advanced Outgoing BCC Select the BCC check box to send a blind copy of any e mail message you send to another e mail address The blind copy e mail address is not seen by the othe...

Страница 305: ...lect the My server requires authentication ESMTP check box if the outgoing server SMTP requires authentication Check with your system administrator before selecting this option See Adding ESMTP to an...

Страница 306: ...der screen tap the Menu icon 2 Tap Options 3 Select Mail Servers 4 Tap the Account pick list and select Edit Accounts 5 Tap the name of the account you want to change and then tap OK 6 In the Server S...

Страница 307: ...erver If you aren t sure if your ISP or web e mail provider supports ESMTP check with your e mail provider To edit an account and add ESMTP 1 In your Inbox or another folder screen tap the Menu icon 2...

Страница 308: ...orrect however occasionally your authentication username and or password is different from your account username or password Check with your e mail service provider for authentication username and pas...

Страница 309: ...onnection with the e mail service provider The default setting is 45 seconds To change tap the Timeout field and enter a new value Auto Disconnect Automatically disconnects your remote connections aft...

Страница 310: ...other application 1 Go to the new location and tap the Menu icon 2 Tap Edit and select Paste You can also cut or copy text from a Word document that you download as an attachment and view on your hand...

Страница 311: ...st Inbox Outbox and so on showing list of messages Select all messages Deselect all messages Change display font toggles between large and small font Delete messages from the handheld icon appears onl...

Страница 312: ...line Subj field Full header Shows the following Sender s name or e mail address From field Subject line Subj field Date message was composed sent or received Date field Size of message including any a...

Страница 313: ...cases your e mail is on your server so you do not need to back up your e mail database from your handheld If you want to make sure you have a current copy of all your e mail you can back up all the e...

Страница 314: ...r check box as described in that section After creating the folders continue with the following procedures for synchronizing IMAP folders If there is a folder on the mail server but you need to create...

Страница 315: ...ect Sync IMAP Folders 4 Select the folders you want to synchronize from the pick list either by tapping the folder name or by using the navigator as follows A connection is made to your e mail service...

Страница 316: ...tering the name of the outgoing and incoming mail server earlier in this chapter for information on entering the outgoing mail server 2 Set the reply to address to an e mail address from an e mail ser...

Страница 317: ...ally appears when you click on the e mail icon for each message Left Deselects the highlighted message Compose New Message N A Up Down In To cc bcc and Subject fields Tabs to the next previous field I...

Страница 318: ...elect the message 5 Press Right to open the pop up menu 6 Press Down to scroll to Delete Message 7 Press Select to delete the message 8 Press Select to confirm that you want to delete the message Keyb...

Страница 319: ...beyond the basics 305 O Reply to Message P Paste Q Go to Bottom R Preferences S Select All T Go to Top U Undo V Move To W Save to Draft X Cut Y Send Z Deselect All Press hold Mail Get Send ShortCut Fe...

Страница 320: ...Chapter 17 Using Palm VersaMail Personal E mail Software 306...

Страница 321: ...t you can organize and view them in logical groups Synchronize with your computer using Palm Desktop software and HotSync technology and then listen to voice memos on your computer or send them as e m...

Страница 322: ...ton To record a voice memo on your handheld 1 Press and hold the Voice Memo application button IMPORTANT Continue holding the Voice Memo application button until you finish recording If you are record...

Страница 323: ...while recording a voice memo you must use the onscreen controls This section covers how to use the onscreen controls to pause and resume while recording a voice memo To pause and restart while creatin...

Страница 324: ...paused NOTE If you use other applications on your handheld while pausing the recording press and release the Voice Memo application button to resume recording later 6 Tap Record A tone sounds to indic...

Страница 325: ...d party application to back up data stored on an expansion card Additionally you cannot mark voice memos private or attach alarms to voice memos that are stored on an expansion card NOTE Palm works wi...

Страница 326: ...or details The voice memo begins to play after a few seconds To start playing immediately tap Play 2 Tap the arrows at the top of the screen to listen to the next or previous voice memo TIP You can al...

Страница 327: ...memo You can set an alarm for a specific time and date to remind you to follow up on a voice memo To set an alarm for a voice memo 1 Select the voice memo to which you want to assign an alarm 2 Tap t...

Страница 328: ...nd return to the current screen An attention indicator blinks in the upper left corner of the screen to remind you of the pending alarm and the reminder message appears again in five minutes When the...

Страница 329: ...Opens a dialog box where you can choose how to send the voice memo You can send the voice memo using Bluetooth communication SMS or the VersaMail application Voice Memo list V Memo screen Preferences...

Страница 330: ...Chapter 18 Using Voice Memo 316...

Страница 331: ...ses saves and displays web pages IMPORTANT To use Web Browser Pro you must first configure and establish a connection with the Internet such as through a mobile phone For more information on connectin...

Страница 332: ...to navigate in the browser to refresh pages and to bookmark pages The URL Entry field allows you to quickly enter web page addresses URL stands for uniform resource locator The rest of the screen is...

Страница 333: ...ers tap the Menu icon tap Edit and then tap Graffiti 2 Help Disconnecting from and connecting to the Internet While you re working with stored information in Web Browser Pro such as saved pages stored...

Страница 334: ...ck to the pages you already visited by using the Back and Forward icons Return to your home page Visiting a web page You can visit web pages using the Open URL dialog box or using the URL Entry field...

Страница 335: ...y field Web Browser Pro completes the URL for you For more information on autofill see Enabling or disabling autofill Following a link Many web pages contain links which are text or pictures that when...

Страница 336: ...o an earlier page and Right to go forward through the cache Returning to your home page Your home page is the web page that is displayed first every time you start Web Browser Pro No matter where you...

Страница 337: ...ess of the download 4 When the file download is complete a message is displayed 5 Tap OK If you decide that the download process is taking too long you can stop it To stop a web page from downloading...

Страница 338: ...Browser Pro accesses the Internet Web Browser Pro lets you know you re looking at old content by displaying a dialog box when you open the web page Tap Yes to view the stored version or force the late...

Страница 339: ...d 1 Open the web page where you must enter the password The password field contains the word Unassigned 2 Enter your sign in name in the appropriate field 3 Tap the password field 4 Enter your passwor...

Страница 340: ...Place the cursor where you want the text pasted 2 Tap the Menu icon 3 Tap Edit and then tap Paste To paste text in another application 1 Open the application 2 Place the cursor where you want the text...

Страница 341: ...to others if you use the VersaMail application or another application that supports this functionality For more information on the VersaMail application see Chapter 17 To send e mail 1 Tap a mailto li...

Страница 342: ...f they choose not to accept the URL the beaming process ends 5 While the URL is prepared for beaming a message is displayed 6 While the URL is being beamed a message is displayed When the message clos...

Страница 343: ...where you stopped In the same way you can bookmark a web page for later reference A bookmark in Web Browser Pro doesn t store the actual page instead it stores a reference to the page s URL Adding a...

Страница 344: ...Up and Down on the navigator to scroll through the list of bookmarks to the bookmark you want to edit 3 Tap Edit 4 Edit the bookmark Tap the Name field and then enter a new name Tap the URL box to ch...

Страница 345: ...y allocated to storing saved pages To increase or decrease the amount of memory allocated see Changing the size and content of the cache Saving a page To save a web page 1 Open the web page you want t...

Страница 346: ...e Page menu 3 Tap the name of the saved page you want to edit 4 Tap Edit 5 Edit the information about the saved page Tap the Name field and then enter a new name Tap the Category pick list to change t...

Страница 347: ...Finding web pages you recently visited Using the Back and Forward icons to browse through the pages you recently visited one page at a time can be tedious Instead you can use the History list to view...

Страница 348: ...hanging the size and content of the cache For more information on the Back and Forward icons see Returning to a web page you just visited To clear the History list 1 Tap the Menu icon 2 Tap Options an...

Страница 349: ...led your changes have no effect To change your home page 1 Tap the Menu icon 2 Tap Options and then tap Preferences 3 Tap Default 4 Do one of the following Enter the address of the new home page Tap C...

Страница 350: ...n tap Display Options 3 Select one of the following items from the Graphics pick list 4 Tap OK No Images All web pages are downloaded without images Low Quality Images are compressed and shown in gray...

Страница 351: ...address phone number and so on By default Web Browser Pro stores the information you entered in these fields The next time you use that order form and type the first few letters in a field Web Browse...

Страница 352: ...ookies To enable or disable cookies 1 Tap the Menu icon 2 Tap Options and then tap Preferences 3 Tap Advanced 4 In the Accept cookies check box do one of the following To not store cookies tap to remo...

Страница 353: ...o clear the cache each time you exit Web Browser Pro so it starts fresh at the beginning of each session To change the size and content of the cache 1 Tap the Menu icon 2 Tap Options and then tap Pref...

Страница 354: ...Tap the check box next to the following options to enable or disable that option By default these options are disabled that is there are no checks in the check boxes 5 Tap OK Changing Network Prefere...

Страница 355: ...your system administrator To access a new host server 1 Tap the Menu icon 2 Tap Options and then tap Preferences 3 Tap Advanced 4 Tap the Host Address field 5 Enter the Internet Protocol IP address o...

Страница 356: ...Chapter 19 Using Web Browser Pro 342...

Страница 357: ...es screen where you can set the time and date for all the applications on your handheld Set an alarm Set Daylight Saving options To open World Clock 1 Tap the Home icon 2 Select the World Clock icon T...

Страница 358: ...and time for the primary location Keep in mind that the primary location settings are also your system date and time and that these settings are used by all the applications on your handheld The prima...

Страница 359: ...not appear in the list see Adding a location later in this chapter to create a new location 3 Tap OK To set the date 1 Tap Set Date Time 2 Tap the Set Date box 3 Tap the arrows to select the current...

Страница 360: ...ation unchanged To change the primary location 1 Tap the pick list next to the current primary location 2 Tap the location you want to use as the new primary location If the new location is in another...

Страница 361: ...e list When you add a location the default Time Zone and Daylight Saving settings are usually correct However you can adjust these settings if necessary When the Daylight Saving options are active the...

Страница 362: ...en daylight saving begins within the selected month 6 Tap the Day pick list 7 Select the day of the week when daylight saving begins within the selected week 8 Tap OK 9 Tap the End box and repeat step...

Страница 363: ...cation To remove a location 1 Tap a Location pick list 2 Select Edit List 3 Select the location you want to remove 4 Tap Remove 5 Tap OK to confirm the deletion 6 Tap Done Setting an alarm In addition...

Страница 364: ...re shown here for your reference and World Clock features that are not explained elsewhere in this book are described here See Using menus in Chapter 4 for information about choosing menu commands Opt...

Страница 365: ...n Indirect methods include using a modem or network HotSync technology Selecting HotSync setup options You can choose when HotSync Manager will run If necessary you can adjust the local and modem HotS...

Страница 366: ...your handheld With this option the HotSync Manager synchronizes data even when Palm Desktop software is not running Available only when the Palm Desktop software is running Starts HotSync Manager and...

Страница 367: ...ares your Mac computer to synchronize with your handheld By default the transport monitor is enabled listen on USB and PalmConnect whenever you start your computer If you are using Mac OS 9 1 and the...

Страница 368: ...window Customizing HotSync application settings For each application you can define a set of options that determines how records are handled during synchronization These options are called a conduit B...

Страница 369: ...n application in the Conduit list 5 Click Change 6 For each application click the direction in which you want to write data or click Do Nothing to skip data transfer for an application Changing the Ho...

Страница 370: ...Settings 6 For each application click the direction in which you want to write data or click Do Nothing to skip data transfer for an application Changing the HotSync setting from the default affects...

Страница 371: ...you may want to create a user profile See Creating a user profile later in this chapter before performing the following steps IMPORTANT You must perform your first HotSync operation with a local direc...

Страница 372: ...a unique name To prevent loss of a user s records never try to synchronize more than one handheld to the same user name The HotSync Progress dialog box appears and synchronization begins 4 Wait for a...

Страница 373: ...change users by selecting a new name in the pop up menu Each subsequent time you perform a HotSync operation HotSync Manager reads the user name from your handheld and synchronizes the data in the fo...

Страница 374: ...he HotSync cradle cable 2 Make sure that HotSync Manager is enabled Double click the HotSync Manager icon in the Palm folder Click the HotSync Controls tab and make sure the Enabled option is selected...

Страница 375: ...t need your cradle cable However you must have a computer that s equipped with an IR port and that supports the IrCOMM implementation of the Infrared Data Association IrDA standards This is especially...

Страница 376: ...HotSync Manager for infrared communication on a Windows computer Click the HotSync Manager icon in the Windows system tray and make sure that Infrared is selected If you have an Infrared option on the...

Страница 377: ...er 1 Double click the HotSync Manager icon in the Palm folder 2 In the HotSync Controls tab select Enabled 3 Click the Connection Settings tab 4 Select the On check box next to IR port 5 Close the Hot...

Страница 378: ...Manager icon in the Windows system tray and select Local USB if it is not already selected To return to local Serial cradle cable HotSync operations on a Windows computer 1 If necessary connect the c...

Страница 379: ...h the modem A modem connected to your handheld A configuration for the kind of modem connection you want to make See Connection Preferences in Chapter 22 for more information Preparing your computer f...

Страница 380: ...Sync Controls tab and enable the Transport Monitor if it is not already enabled Serial Port Identifies the port for the modem If you are unsure of the port assignment look at the Modem Properties in t...

Страница 381: ...e a few steps you must perform to prepare your handheld for a modem HotSync operation To prepare your handheld for a modem HotSync operation 1 Tap the Home icon 2 Select the HotSync icon 3 Tap Modem M...

Страница 382: ...tions later in this chapter 6 Enter the telephone number to access the modem connected to your computer 7 If necessary enter a dial prefix such as 9 to access an outside line and then tap the Dial Pre...

Страница 383: ...ns that you do not want to synchronize during a modem HotSync operation The default setting is to synchronize all files Applications that do not have a database such as games do not synchronize even i...

Страница 384: ...paring your computer for a Bluetooth HotSync operation There are a few steps you must perform to prepare your computer for a Bluetooth HotSync operation To prepare your Windows computer for a Bluetoot...

Страница 385: ...and select the On check box next to bluetooth pda sync port 4 Close the HotSync Software Setup window Preparing your handheld for a Bluetooth HotSync operation There are a few steps you must perform t...

Страница 386: ...dvantage of the LAN and WAN connectivity available in many office environments Network HotSync technology enables you to perform a HotSync operation by using Bluetooth technology or an 802 11 accessor...

Страница 387: ...ting to your company s dial in server network modem is included with Palm Desktop software and handheld software You need to activate the feature however on both Palm Desktop software and your handhel...

Страница 388: ...ormation your handheld can locate your computer when you perform a HotSync operation over the network To prepare your handheld for a network HotSync operation 1 Tap the Home icon 2 Select the HotSync...

Страница 389: ...ons you are ready to perform a network HotSync operation To perform a network HotSync operation Tap the modem HotSync icon to begin the operation Using File Link The File Link feature enables you to i...

Страница 390: ...user name The handheld acquires a unique user name when the new user performs his or her first local HotSync operation For example suppose a sales organization wants to distribute two dozen handhelds...

Страница 391: ...profile on a Mac computer 1 Open Palm Desktop software 2 From the User pop up menu select Edit Users 3 Click New Profile 4 Enter a unique name for the profile and click OK 5 Close the Users window 6...

Страница 392: ...t to load on the handheld and click OK 5 Click Yes to transfer all the profile data to the handheld The next time you perform a HotSync operation Palm Desktop software prompts you to assign a user nam...

Страница 393: ...ry default and the formats for times dates calendar and numbers Graffiti 2 Select alternate strokes for selected Graffiti 2 characters Power Set these features auto shutoff interval Stay on in cradle...

Страница 394: ...the Preferences screen you want to view TIP You can also press Left Right Up and Down on the navigator to highlight a Preferences screen name and then press Select on the navigator to open that Prefe...

Страница 395: ...details To set the location 1 From the General Preferences list select Date Time 2 Tap the Location pick list and select the location you want to use as your primary location The location you select...

Страница 396: ...er Adding a location in Chapter 20 to select the time zone and daylight saving time settings 7 Tap Done Digitizer Preferences The Digitizer Preferences screen opens the digitizer calibration screen Th...

Страница 397: ...t select Formats 2 Tap the country name pick list 3 Select the setting you want to use 4 Tap Done Time date week start and numbers formats The Time setting defines the format for the time of day The t...

Страница 398: ...om the General Preferences list select Graffiti 2 2 Tap the letter you want to change 3 Tap the check box to activate the alternate stroke 4 Tap Done 5 Repeat steps 2 through 4 for other letters 6 Tap...

Страница 399: ...remains on when it is in the cradle cable and is connected to a power source To change the cradle cable setting 1 From the General Preferences list select Power 2 Tap the Stay on in Cradle pick list 3...

Страница 400: ...connect a headset to your handheld the external speaker is automatically silenced the Sounds Alerts settings are maintained and all volume levels are automatically adjusted for use with a headset To s...

Страница 401: ...t and select the sound level 5 Tap the Alarm Sound pick list and select the sound level 6 Tap Done The Game Sound setting works only with games that are programmed to respond to this setting Older gam...

Страница 402: ...ywhere on the right side of the screen and write capital letters across the imaginary division line in the middle of the screen You access buttons and other controls that appear on the screen by tappi...

Страница 403: ...vigator to highlight a Preferences screen name and then press Select on the navigator to open that Preferences screen Bluetooth Preferences When another Bluetooth device is within range typically 10 m...

Страница 404: ...ommunication 1 From the Communications Preferences list select Bluetooth 2 Tap the Bluetooth pick list and select On NOTE Switching Bluetooth On and Off may take several seconds Please wait before con...

Страница 405: ...bolt a security chain and disabling the door bell When Bluetooth is off you cannot access the Discoverable setting See Turning Bluetooth communication on and off earlier in this chapter for instructio...

Страница 406: ...is setting is enabled you can receive requested information when your handheld is off and then review it later You can allow wakeup at any time during specific hours of the day or not at all By defaul...

Страница 407: ...specific hours 1 From the Communications Preferences list select Bluetooth 2 Tap the Allow Wakeup pick list 3 Select Scheduled 4 Tap the hours box 5 Tap the From box select the start time and then tap...

Страница 408: ...device without a recognized passkey attempts to communicate with your handheld it goes through the discovery and authentication process and you can choose to accept or reject the communication To add...

Страница 409: ...use the same passkey for both the device and your handheld Many phones also require you to put the phone into a mode where it can accept a key exchange for bonding in a trusted pair See the documenta...

Страница 410: ...the Trusted Devices screen 6 Tap Done again to return to the Bluetooth Preferences screen 7 Tap Done again To delete a trusted device 1 From the Communications Preferences list select Bluetooth 2 Tap...

Страница 411: ...nnections There are several ways you can make Bluetooth connections The method you use determines the types of devices your handheld can discover The following methods enable you to discover the types...

Страница 412: ...n the list If you have this modem you need only to specify the phone setup and network connection if required to complete the configuration You can also create custom configurations which include the...

Страница 413: ...ur desktop computer to synchronize with your Desktop application To edit the IR to Phone connection 1 From the Communications Preferences list select Connection 2 Select the IR to GSM Phone connection...

Страница 414: ...M mobile phones See Connecting to non GSM phones later in this chapter for information on connecting to other mobile phones TIP For Global System for Mobile Communications GSM phones use Phone Link to...

Страница 415: ...t select Connection 2 Tap New 3 Enter a name for the connection such as BT to LAN 4 Tap the Connect to pick list and select Local Network 5 Tap the Via pick list and select Bluetooth 6 Make sure the n...

Страница 416: ...GSM phone enabled with Bluetooth technology you can connect with the phone from your handheld to access the Internet and use Internet based applications such as e mail or a web browser To access the...

Страница 417: ...ails Network Preferences You can use your handheld s Bluetooth technology and the software that is included in the handheld operating system to connect with Internet service providers ISPs or dial in...

Страница 418: ...r new Palm handheld If you suspect that a third party application is adversely affecting the operation of your handheld contact the developer of the application The Network Preferences settings give y...

Страница 419: ...ct the predefined network service profile you want to duplicate 4 Tap the Menu icon 5 Select Service and then select Duplicate A copy of the network service profile is added to the Service pick list E...

Страница 420: ...rd your handheld displays the word Prompt in this field and asks you to enter a password during the login procedure If you are concerned about security select the Prompt option If you enter a password...

Страница 421: ...want to use 4 Tap Done Adding telephone settings The Phone field enables you to store the telephone number you use to connect with your ISP or dial in server You can also define a prefix disable Call...

Страница 422: ...elect it 4 Enter the prefix 5 Tap OK 6 Tap Done Disabling Call Waiting Call Waiting can cause your session to terminate if you receive a call while you are connected If your telephone has Call Waiting...

Страница 423: ...mpensate for this delay Each comma delays transmission of your calling card number for two seconds To use a calling card 1 From the Communications Preferences list select Network 2 Tap the Phone box 3...

Страница 424: ...areas In some cases there may be a fee to use a LAN access point To access a LAN access point from your handheld you must set your Network Preferences as described in the sections that follow Accessi...

Страница 425: ...ect a connection to a Bluetooth GSM phone a high speed wireless data network or a LAN access points for which you have already created a trusted pair The Connection name is based on the model of your...

Страница 426: ...dheld 412 To enter an INIT string for a high speed wireless data network connection 1 After completing step 5 in the preceding procedure tap Details 2 Tap Script 3 Tap End to expand the pick list and...

Страница 427: ...st switch your phone to a standard non GPRS phone connection and access the Internet using your ISP You can do this only if you have previously created a standard connection with your phone For instru...

Страница 428: ...ou are identifying a specific server that handles the translation services Each IP address has four sections separated by periods In the Details dialog box you enter each section separately Each secti...

Страница 429: ...lly assign a temporary IP address when clients log in You can use the IP Address field to indicate whether your network provides automatic dynamic temporary IP addressing If your IP address is permane...

Страница 430: ...lace to establish a connection between your handheld and the corporate servers You can create login scripts in two ways In a text editor on your desktop computer in which you create a file with the ex...

Страница 431: ...your handheld This command takes two arguments separated by a vertical bar on the input line Send Transmits specific characters to the TCP IP server to which you are connecting Send CR Transmits a car...

Страница 432: ...turn control to a login script after it terminates Created using a development environment that supports Palm OS software such as Metrowerks CodeWarrior for Palm Platform For additional information on...

Страница 433: ...lay the expanded Service Connection Progress messages These messages describe the current stage of the login procedure Press Down on the navigator at any point during login to display these messages V...

Страница 434: ...a GSM mobile phone sold separately To use this feature you must first install the appropriate files for your carrier and phone For more information see Chapter 14 To set Phone Preferences 1 From the C...

Страница 435: ...de of the handheld Preferences is assigned to the Favorite icon by default But if you use Memo Pad more frequently you can assign Memo Pad to the icon so that you don t have to scroll through the Appl...

Страница 436: ...en pen stroke By default the full screen pen stroke activates Graffiti 2 Help To change the pen preferences 1 From the Personal Preferences list select Buttons 2 Tap More 3 Tap the pick list and selec...

Страница 437: ...Preferences list select Buttons 2 Tap More 3 Tap HotSync 4 Tap the pick list next to the button you want to assign 5 Select the application that you want to assign to each button The default setting...

Страница 438: ...reen enables you to update the name company name phone number or any other information that you want to associate with your handheld This information could help someone contact you if you ever lose yo...

Страница 439: ...tom of the screen 3 Tap Done To unlock the Owner Preferences screen 1 From the Personal Preferences list select Owner 2 Tap Unlock 3 Enter the password that you defined in Security Preferences 4 Tap O...

Страница 440: ...rst login attempt and for a limited amount of time You can set the amount of time you need to enter the quick password To assign a password 1 From the Personal Preferences list select Security 2 Tap t...

Страница 441: ...K To remove the password tap Unassign 6 Tap Done Masking your password entry Masking your password entry secures your password against accidental viewing by another person The password only shows aste...

Страница 442: ...te your personal preference After the delay limit has been reached you must enter the full password For more information about the quick password see Changing or deleting a password earlier in this ch...

Страница 443: ...matically or you can lock it manually Locking your handheld automatically You can set your handheld to lock automatically when any one of the following occurs When you turn off the power At a time you...

Страница 444: ...ld box 2 Enter your password 3 Select At a preset time and then use the arrows to set the time 4 Tap OK NOTE Turn off and then turn on your handheld to enable this change To set your handheld to lock...

Страница 445: ...remember the password If you still cannot remember the password you must perform a hard reset to resume using your handheld Performing a hard reset deletes all the records in your handheld however you...

Страница 446: ...s your private entries the next time you perform a HotSync operation but it does not restore the password If you locked your handheld you must enter the exact password to reactivate your handheld If y...

Страница 447: ...ders in the same position they would appear if they were not masked and are marked with a lock icon Hidden records disappear completely from the screen If you define a password for your handheld you m...

Страница 448: ...to mask private records 4 Tap Done To display all private records 1 From the Personal Preferences list select Security 2 Do one of the following Tap the Current Privacy pick list and select Show Priva...

Страница 449: ...OK To make a record private 1 Display the entry that you want to make private 2 Tap Details 3 Tap the Private check box 4 Tap OK Hiding or masking your private records automatically You can set your h...

Страница 450: ...ask Private Records or Hide Public Records 3 Tap When box 4 Select On power off 5 Tap OK NOTE Turn off and then turn on your handheld to enable this change To automatically hide or mask records at a p...

Страница 451: ...3 Tap When box 4 Select At a preset time and then use the arrows to set the time 5 Tap OK NOTE Turn off and then turn on your handheld to enable this change To automatically hide or mask your records...

Страница 452: ...held locks The more applications and data that are selected the longer the encryption process When you unlock the handheld and enter a valid password the encrypted data is decrypted The more applicati...

Страница 453: ...se Applications button 7 Select the applications whose data you want to encrypt and tap OK 8 If you want to encrypt only private records select Encrypt private records only 9 Tap the Encryption type p...

Страница 454: ...want to change the current character tap and drag the stylus to select the character and type the new character ShortCuts Preferences The ShortCuts Preferences screen enables you to define abbreviatio...

Страница 455: ...ce automatically follows the ShortCut text 5 Tap OK To use a ShortCut draw the ShortCut stroke followed by the ShortCut characters When you draw the ShortCut stroke the ShortCut symbol appears at the...

Страница 456: ...42 Deleting a ShortCut If you no longer need a ShortCut you can delete it from the list of ShortCuts To delete a ShortCut 1 From the Personal Preferences list select Shortcuts 2 Select the ShortCut yo...

Страница 457: ...nd should not be exposed to rain or moisture Under extreme conditions water may enter the circuitry through the front panel buttons In general treat your handheld as you would a pocket calculator or o...

Страница 458: ...c operation to back up your data then leave your handheld in the cradle cable to recharge the unit This helps prevent accidental data loss If the battery drains to the point where your handheld does n...

Страница 459: ...a sharp tip to gently press the reset button inside the hole on the back panel of your handheld Performing a hard reset With a hard reset all records and entries stored in your handheld are erased Ne...

Страница 460: ...dows system tray bottom right corner of the taskbar You can also click the HotSync command on the Palm Desktop software menu bar 2 From the HotSync Manager menu select Custom 3 Select the appropriate...

Страница 461: ...ngs 6 Click Macintosh overwrites handheld for each conduit Changing the HotSync setting from the default affects only the next HotSync operation Thereafter the HotSync Actions revert to their default...

Страница 462: ...Appendix A Maintaining Your Handheld 448...

Страница 463: ...on folder on your installation CD The Palm Knowledge Library accessible at www palm com intl in the Support section The most recent Palm Tungsten T2 handheld HelpNotes on your regional web site If you...

Страница 464: ...I cannot install Palm Desktop software on my Mac computer Try the following 1 Disable any virus scanning software on your computer 2 Quit any open applications 3 Make sure your computer has at least 5...

Страница 465: ...less a soft reset does not solve your problem You can restore any data previously synchronized with your computer during the next HotSync operation I get a warning message telling me my handheld memor...

Страница 466: ...re Calibrate the screen See Digitizer Preferences in Chapter 22 When I tap the Menu icon nothing happens Not all applications or screens have menus Try changing to a different application I can t get...

Страница 467: ...view your memos notes or voice memos alphabetically on Palm Desktop software and then perform a HotSync operation the memos on your handheld still appear in the order defined in the Preferences setti...

Страница 468: ...n I cannot perform a HotSync operation What should I check to make sure I m doing it correctly Make sure the HotSync cradle cable is connected securely On a Windows computer try these steps 1 Check th...

Страница 469: ...ick the HotSync Manager and select Custom Check that the correct conduit is active On a Mac computer double click the HotSync Manager icon From the HotSync menu select Conduit Settings Select your use...

Страница 470: ...tup dialog box It should be set to the port where you connected the HotSync cradle cable If you are using the serial cradle cable try a lower baud rate setting on the Local tab in the Setup dialog box...

Страница 471: ...the following Make sure that Modem is selected in the HotSync Manager menu Confirm that the Setup String in the Setup dialog box configures your modem correctly You may need to select a different Mode...

Страница 472: ...y software or AppleTalk networking that uses the serial port you selected in the Connection Settings tab Make sure your modem resets before you try again Turn off your modem wait a minute and then tur...

Страница 473: ...is enabled and that the Local Setup Port is set to Infrared Port See Conducting IR HotSync operations in Chapter 21 for more information On your handheld be sure the HotSync application is set to Loc...

Страница 474: ...problem I want to synchronize my computer with more than one handheld If the computer running Palm Desktop software synchronizes with more than one handheld each handheld must have a unique name Assig...

Страница 475: ...lected on the HotSync Manager menu on your computer Contact your system administrator to make sure you network computer is properly set up Problem Solution I cannot beam data to another device with an...

Страница 476: ...ion 1 Tap the Home icon 2 Select the Phone Link icon 3 Tap Connect 4 If the connection is successful open the application that requires the connection and complete the desired task If the connection i...

Страница 477: ...elected Problem Solution I am having problems accessing my account Occasionally you may experience problems using an e mail account after you set it up Be sure to follow the account setup procedures i...

Страница 478: ...nly account Make sure you have chosen the same settings for the account on both your handheld and your desktop For example if the account is set up on the handheld to use the POP protocol check the Ho...

Страница 479: ...hint to try and remember the password If this doesn t help or if you do not have a password hint you can use Security to delete the password but your handheld deletes all entries marked as private How...

Страница 480: ...the compatibility of these applications with your new Palm handheld Some third party applications however may not have been upgraded to be compatible with your new Palm handheld If you suspect that a...

Страница 481: ...to radio or television reception which can be determined by turning the equipment off and on the user is encouraged to try to correct the interference by one or more of the following measures Reorien...

Страница 482: ...nadian Interference Causing Equipment Regulations Cet appareil num rique de la classe B respecte toutes les exigences du R glement sur le mat riel brouilleur du Canada FAA Statement Whenever you use t...

Страница 483: ...mission of a signal 3 If other electrical interference or related problems should occur contact the responsible party Europe R TTE Directive Europe Declaration of Conformity Application of Council Dir...

Страница 484: ...hinery Battery Warning Do not mutilate puncture or dispose of batteries in fire The batteries can burst or explode releasing hazardous chemicals Discard used batteries according to the manufacturer s...

Страница 485: ...1 290 message 230 233 using Smart Addressing 232 Addressing SMS messages 160 Advanced VersaMail preferences 255 Agenda Date Book view 106 Alarm indicator light 13 LED 13 387 388 lists 67 preset 109 se...

Страница 486: ...t See Graffiti 2 shortcuts for entering text B Background sending of messages See Send retry Backing up e mail databases 299 See also Archive files and HotSync Battery conserving power 385 disposal 47...

Страница 487: ...ications 455 for synchronizing applications Mac 356 shortcuts 272 SSL and 278 for synchronizing applications 354 355 446 447 synchronizing multiple accounts 278 Conflicting events 107 Connecting servi...

Страница 488: ...2 Agenda view 106 alarm 100 archive files dba 38 changing event time 99 changing event to untimed 99 conduit for synchronizing 354 conflicting events 107 continuous events 101 103 creating records 50...

Страница 489: ...e features 422 using the stylus 17 E Editing bookmarks 330 records 51 52 saved web pages 332 E mail adding Address Book entry from e mail 258 259 adding attachments 247 249 addresses in Address Book 7...

Страница 490: ...synchronizing 260 276 277 troubleshooting 206 username 184 191 197 Emptying the History list 334 Enabling autofill 337 cookies 337 JavaScript 338 Encrypting data 438 439 Entering data 23 40 importing...

Страница 491: ...aMail problems 463 Frozen handheld 452 G Games 387 General preferences 214 380 388 alarm LED 387 alarm sounds 387 alarm vibrate 387 Date Time 381 382 Digitizer 382 Formats 382 383 Graffiti 2 384 openi...

Страница 492: ...restoring data 446 447 selecting HotSync operations on your handheld 371 372 setting options 351 353 starting Manager 260 synchronize active accounts 260 synchronizing e mail 277 user profiles 376 us...

Страница 493: ...1 login script 181 requirements for 180 requiring APOP 288 291 293 requiring ESMTP 293 Items See To Do List or Expense J JavaScript enabling and disabling 338 Jumping to another web page 321 K Keyboar...

Страница 494: ...ng 461 Calculator 88 limitations on History list 322 regaining 54 451 Memos See Memo Pad Menus 48 50 169 452 Address Book 83 Calculator 89 choosing 49 command equivalents Graffiti 2 writing 49 command...

Страница 495: ...3 Graffiti 2 writing 28 onscreen keyboard 18 23 O Old messages deleting 251 Old web page content viewing if available 340 Onscreen keyboard 23 52 319 pen stroke to open 422 Opening Address Book 77 app...

Страница 496: ...ting types 79 preferences 420 settings for ISP or dial in server 407 409 Phone Link Bluetooth connection 149 158 creating connections with 150 156 entering passkey 462 overview 149 150 Phone preferenc...

Страница 497: ...ng Push e mail 215 Q Query applications downloading 322 Quick Connect 81 83 Quick Install 69 73 R Range of times in Day view 109 Read messages marking 256 Reading e mail 206 218 Receipts recording in...

Страница 498: ...try 234 modifying messages during 236 notifications 235 Sending data from applications 166 data using Bluetooth communication 36 e mail 233 messages in SMS 161 problems with 461 requirements for e mai...

Страница 499: ...port 449 465 Text copying 52 copying and pasting in e mail 296 cutting 52 entry See Entering data files importing data from 38 39 fonts for 66 selecting all 52 size setting in Web Browser Pro 334 Thou...

Страница 500: ...7 User name for ISP 405 identifying handheld 424 User profiles HotSync 376 378 Username 184 191 197 changing 284 editing in account 196 entering 284 synchronizing existing 178 V vCal 38 39 vCard 38 39...

Страница 501: ...Index 487 Writing area on handheld 12 preferences 388 Writing See Entering data...

Страница 502: ...Index 488...

Отзывы: