S
liding wardrobe Caiser 2400x2200x600
mm
Dimensions
Height: 2400
mm
Width: 2200
mm
Depth: 600
mm
ASSEMBLY INSTRUCTION
NOTE!
For all questions and complaints about this product, please contact the place
of purchase of this product.
1. Use furniture only in dry rooms protected from the effects of weather conditions.
2. Install with suitable tools according to these assembly instructions.
3. Try to assemble as close to the location as possible.
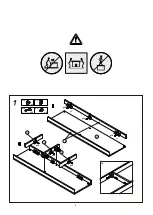
4. The body is assembling in a horizontal position.
5. Before moving furniture, make sure that it is not loaded with items.
Caution:
m
oving furniture may damage it.
When moving, hold on to vertical elements only; moving furniture by horizontal
parts can break
the product.
6. Overloading the furniture can damage it.
7. From time to time check the fittings and their correct position.
8. Wipe the furniture surface only with a slightly damp cloth or paper towels. Do not use chemical
cleaning agents other than those specifically made for this.
RULES FOR USE AND CARE OF FURNITURE
Содержание Caiser
Страница 2: ...SHOP 2 60 120 min ...
Страница 4: ...4 p38 c3 12 13 13 13 p38 c3 p38 c3 p38 p38 p38 9 3Х p38 48х 2х c3 12x с4 4х ...
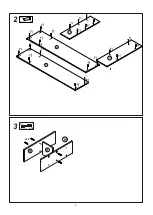
Страница 5: ...5 e32 8 10 2 1 2 3 e32 22 4 4 9 10 ...
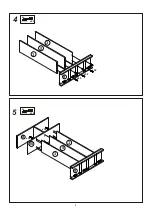
Страница 6: ...6 4 e32 4 e32 4 5 9 e32 3 5 3 e32 e32 3 5 3 9 8 10 e32 e32 ...
Страница 7: ...7 6 7 p38 4 16 e32 12 1 e32 e32 e32 e32 2 8 9 3 3 e32 e32 5 3 3 9 8 1 p38 p38 p38 p38 5 ...
Страница 8: ...8 8 3 3 9 8 1 2 11 11 11 11 11 11 11 11 11 11 32x r11 5 9 ...
Страница 9: ...9 p38 p38 12x 6 см 25 см 4x 11 10 ...
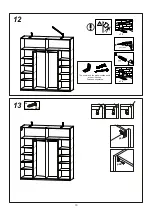
Страница 11: ...14 11 p38 6 p38 p38 p38 p38 p38 p38 p38 15 d5 ...
Страница 12: ...p38 2 p38 6 12 16 d5 24x 12x r10 17 18x f6 r10 ...
Страница 15: ...14x 22 23 15 ...
Страница 16: ...24 2x d5 16 p40 p40 2 4 0 ...
Страница 17: ...60 С ...


