User’s Manual
Wireless Digital Video Doorbell
External Camera
SFW-0
01
-E
Indoor Handset
SFW-00
1
-H
Страница 1: ...User s Manual Wireless Digital Video Doorbell User s Manual External Camera SFW 001 E Indoor Handset SFW 001 H Wireless Digital Video Doorbell ...
Страница 2: ......
Страница 3: ...bt please call our tech supporting and customer center Our company applies ourselves to reformation and innovation of our products No extra informing for any change The illustration shown here only used for reference if there is any difference please take the actual product as standard product ...
Страница 4: ...CATALOG Product Features 1 Package Contents 2 Product Pictures 3 Installing Batteries 4 Installation Instruction 5 Diagram 6 Settings 8 Engineering Mode 16 Operations 18 Technical Parameters 20 Notes 22 ...
Страница 5: ... camera IP55 Microphone and speakerphone Basic video intercom monitoring remote unlock and anti dismantle alarm feature Brightness and talk volume are adjustable Supports up to 2 door cameras and 2 indoor handsets Transmitting distance with up to 500m range out of doors DIY installation to save labor cost PIR function Optional DC12V power supply only Product Features 1 ...
Страница 6: ...any pieces are missing or broken please promptly call you dealer 2 Parts of door camera Indoor Handset SFW 100 H Charger Base Parts of indoor handset External Camera SFW 001 E Cable Cover Screws Power Adapter Optional for PIR function 12V 500mA User s Manual User s Manual Wireless Digital Video Doorbell User s Manual Wireless Digital Video Doorbell Model D R9 Model K R9 Model D R7 ...
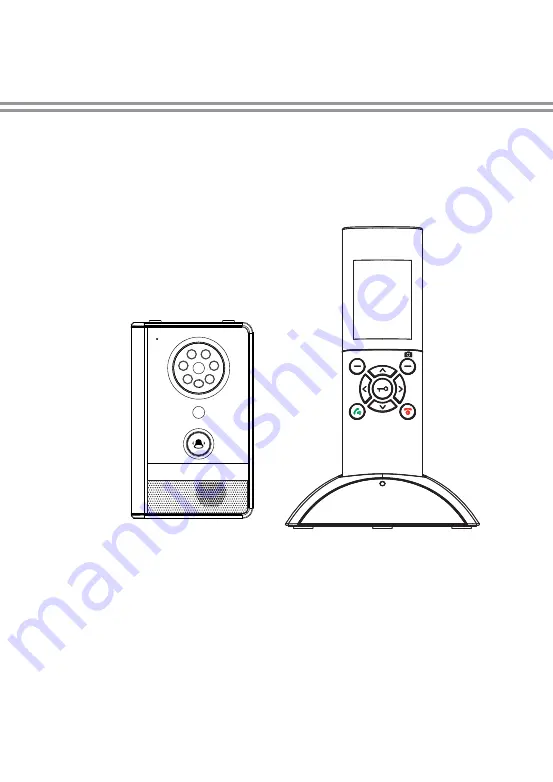
Страница 7: ...Pins 3 LCD Display Navigation Key Right Soft Key Monitor Snapshot Power End Key Left Soft Key Unlock Key Charger LED Accept Key Microphone Speaker Battery Compartment Cover Charging Pins LED Lights Sensor Light Speaker Microphone Call Button Camera PIR Optional ...
Страница 8: ... cover up until it snaps in place Notes 1 To activate battery please remove protective cover from the battery prior to use 2 The battery need to be replaced if they do not recover their full storage capacities after recharging 3 When replacing the battery make sure using good quality re chargeable lithium battery Never use other battery or conventional alkaline battery 1 2 Lithium battery Battery ...
Страница 9: ...ore initial operation YOU SHOULD FULLY CHARGE THE INDOOR HANDSET for about 5 hours To charge the indoor handset you should place it on the charger base Door Camera 1 Install two C size 1 5V batteries not supplied into the battery compartment or connect with DC 12V power adapter to turn on the door camera PIR for the DC12V independent power supply 2 Drill one screw to fix the battery cover up Screw...
Страница 10: ...A Door Camera Door Camera DC power for Lock DC9 12V BAT Optional NO COM NC GND GND DC9 12V GND BAT DC Power Supply Backup power Note The door camera may be powered by the batteries or the power supply not included Do not use batteries and power supply together at the same time If the door camera is powered by power supply the monitor feature is available If the door camera is powered by batteries ...
Страница 11: ...e cable cover of the connection terminal 2 Choose a proper location for the door camera Be sure to consider the average height of visitors Drill screws to fix bracket in the wall Hang the door camera on the bracket Drill screws to fix door camera and finish the installation Cable cover Cable Screw Plastic expansion tube Rain cover D R9 ...
Страница 12: ...tem will enter into the following interface 8 Note When the battery power of indoor handset is insufficient it will display an indication icon and warning tone The indoor handset will automatically turn off You need to charge it Turning On Off To turn on the indoor handset press and hold To turn off the indoor handset press and hold 15 36 ...
Страница 13: ...n to choose Volume menu then press beneath Select 2 Press Left or Right to select the volume that you like Each time you press Left or Right the indoor handset sounds with the selected volume 3 Press beneath Select to save the settings and return to the previous menu ________ This function allows you to adjust the volume 9 levels are adjustable during a call Chapter 2 Brightness ________ This func...
Страница 14: ...tain error conditions a warning tone will sound when an incorrect key is pressed 1 Press Up or Down to choose Key Tone menu then press beneath Select 2 Press Up or Down to choose On or Off to enable or disable the function 3 Press beneath Select to save the settings and return to the previous menu Chapter 4 Ring Tone This function allows you to change the ring tone of indoor handset There are thre...
Страница 15: ...indoor handset 1 Press Up or Down to choose Snap Set menu then press beneath Select 2 Press Up or Down to choose On or Off to enable or disable the function 3 Press beneath Select to save the settings and return to the previous menu Chapter 5 Snap Set Notes 1 During a conversation the camera can take a photo of visitor if you press the Snap key and save it into the indoor handset 2 During a monito...
Страница 16: ...eneath The display will show press beneath to confirm 4 After one warning tone it will display the next photo 5 Press beneath to return to the previous menu Chapter 6 Snap Show You can review or delete the recorded photos under this menu The door camera s number will also be displayed on the upper left of photo correspondingly Chapter 7 Date Time 16 03 2015 05 25 12 1 001 100 2015 05 25 00 22 ...
Страница 17: ...date format is YYYY MM DD 2 The Date Time must be set in advance to ensure that the time displayed on the indoor handset s pictures are correct 3 When you replace battery you must set the time and the date again 4 The Date Time setting order is Hour Minute Year Month Date 1 Press Up or Down to choose Door Set menu then press beneath Select 2 If you want to adjust the volume of door camera you can ...
Страница 18: ...Down to choose Language menu then press beneath Select 2 Press Up or Down to choose the corresponding language 0 stands for English 1 stands for Chinese 3 Press beneath Select to save the settings and return to the previous menu Note When there are two indoor handsets connected to one door camera the setting of these two indoor handsets should be the same Chapter 9 Language Chapter 10 Wallpaper 14...
Страница 19: ...e If you reset the indoor handset to the factory default all of settings will be return to the factory default 1 Press Up or Down to choose Default Set menu then press beneath Select 2 Press Up or Down to choose YES or NO to enable or disable the function 3 Press beneath Select to save the settings and return to the previous menu Result After resetting the indoor handset will return to standby mod...
Страница 20: ...nu press Up or Down to choose one door camera 1 2 are selectable that you want to connect and press beneath to confirm the setting Then the door camera will automatically search for the indoor handset which needs to be registered When the indoor handset gives an indication tone it means that it is registered successfully 2 Pressing beneath the Menu and then selecting the Register menu the system w...
Страница 21: ...ory default Press register button for 3 seconds and make the door camera enter the registration status Press register button again for 3 seconds The door camera will give bi bi bi tone and switch from power saving mode into power consumption mode Then the monitoring function is available for the indoor handset 2 In registration status press register button for 3 seconds The door camera will beep a...
Страница 22: ... time can be up to 45 seconds Alarm When someone takes the door camera apart from the bracket the door camera and indoor handset will sound an alarm tone the call button is invalid on the door camera press or to stop alarm sounds Note The alarm time can be up to 5 minutes Calling indoor handset If the visitor press the Call button on the door camera the corresponding indoor handset rings and the i...
Страница 23: ...e door Backlight 1 If the door camera is supplied by DC 12V the backlight of call button is lighted 2 If the door camera is supplied by battery the backlight of call button will turn off 3 In the registering calling alarm monitoring and intercom status the backlight will flash Note During call alarm and monitor status the door camera is supplied by battery and in power saving mode the backlight of...
Страница 24: ...ls White Balance Viewing Angle Diagonal LED Power Requirement Power Consumption Operating Temperature Operating Humidity Size W H D Door Camera 2 4GHz 2 4835GHz 2 0Mbps 19dBm TYP GFSK about 500m Color CMOS Image sensor H 264 640 480 Auto 120 6 LEDs 9V 12V 5 2 LR14 C 1 5V batteries 500mA Max Cells 200mA Max 12 V DC 20 55 20 80 105 167 50mm No of indoor handset supported Max 2 PIR 2 5m 100 ...
Страница 25: ...r Power Requirement Power Consumption Operating Temperature Operating Humidity Size W H D Item Detail No of door camera supported Indoor Handset 2 4GHz 2 4835GHz 2 4 Color LCD 2Mbps 85dBm GFSK 320X240 RGB 19dBm TYP BL 5C 3 7V 1100mAh lithium battery 400mA Max 10 55 20 90 Max 2 Indoor Monitor 51 152 19 5mm Charger base 123 5 119 37 5mm 21 ...
Страница 26: ...2 Be sure to use only the power adapter and that your power source matches the rating listed for it If you are not sure check with your dealer or with your local power company 3 Avoid strong hits or shocks Do not use the power adapter if it is has received any hard knocks or looks damaged in any way immediately contact an authorised service center 4 The product should be placed where is stable win...