


RT-UPS User Manual
Revision: 150609
13
Operation
Mount the RT-UPS so the fan and air vent holes are not covered—allowing heat to be
removed from the internal components.
To operate the RT-UPS, connect the output connector (Binder Series 763) to the
product that needs a stable 12 V power supply. Insert the input connector (auxiliary
power plug) into the vehicle’s auxiliary power socket. The input power supply can be
disconnected at any time. To stop the output power early, disconnect the INS from the
output power connector.
It is not recommended to operate an RT-UPS with an input voltage lower than nine
volts as this may result in an unstable operation that could damage the internal battery.
When a load is connected, the RT-UPS will warn when under-voltage conditions exist
by sounding the internal buzzer.
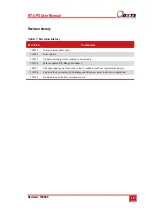
LED definitions
Table 5 lists the definitions of the LEDs on the RT-UPS. As a special condition, all
LEDs flash when the RT-UPS has overheated.
Table 5. LED definitions
LED label
Description
No power
Lit when there is no power available in the internal battery to supply the
output.
Discharging
Lit when power is being supplied from the internal battery.
Charging
Lit when charging. Flashing at 1 Hz means fast charging, continuously on
means trickle charging. A single fast flash when too cold to charge and a
double fast flash when too hot to charge.
Output OK
Output power on.
Note: Older models prior to January 2015 have a slightly different charging definition. These have a slow
flash when charging at the fast rate and lit when charging at the standard rate. If you are unsure, please
contact OxTS and provide the serial number of your device.
Extended storage
The battery life of the RT-UPS is reduced if it is left discharged for a long period of
time. When leaving the RT-UPS for long periods, it should be charged monthly.