background image

4.Appendix


15 


4. Appendix   

Appendix A: Enclosure   

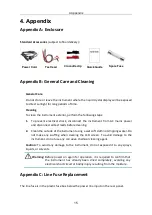
Standard Accessories 

(subject to final delivery)

:   


Power Cord


Test lead


Crocodile clip


Quick Guide 


Spare Fuse


Appendix B: General Care and Cleaning   

General Care   

Do not store or leave the instrument where the liquid crystal display will be exposed 
to direct sunlight for long periods of time.   

Cleaning   

To clean the instrument exterior, perform the following steps: 

1.


To  prevent  electrical  shock,  disconnect  the  instrument  from  AC  mains  power 
and disconnect all test leads before cleaning. 

2.


Clean the outside of the instrument using a wet soft cloth not dripping water. Do 
not  make  any  scuffing  when  cleaning  the  LCD  screen.  To  avoid  damage  to  the 
instrument, do not use any corrosive chemical cleaning agent.   

Caution:

  To  avoid any damage  to  the  instrument,  do  not exposed  it  to  any  sprays, 

liquids, or solvents. 


Warning: 

Before power  on  again  for  operation,  it is  required  to  confirm  that 
the  instrument  has  already  been  dried  completely,  avoiding  any 
electrical short circuit or bodily injury resulting from the moisture. 

Appendix C: Line Fuse Replacement   

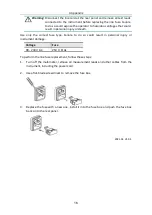
The line fuse is in the plastic fuse box below the power line input on the rear panel. 
 

Содержание XDM1041

Страница 1: ...ntre a copy of the customers proof of purchase is also required This warranty shall not apply to any defect failure or damage caused by improper use or improper or inadequate maintenance and care We shall not be obligated to furnish service under this warranty a to repair damage resulting from attempts by personnel other than our company representatives to install repair or service the product b t...

Страница 2: ...t Limits 3 Measurement Category 3 2 Quick Start 5 General Inspection 5 Dimensions 5 Foot Stool Adjustment 6 Front Panel Overview 6 Rear Panel Overview 8 User Interface 8 Power On 9 Measurement Connections 10 Data Record Function 12 Manual Record 12 Auto Record 12 3 Troubleshooting 14 4 Appendix 15 Appendix A Enclosure 15 Appendix B General Care and Cleaning 15 Appendix C Line Fuse Replacement 15 ...

Страница 3: ...he instrument or other property might occur Safety Symbols Symbols on the Product The following symbol may appear on the product Direct current DC Warning risk of electric shock Alternating current AC Caution risk of danger refer to this manual for specific Warning or Caution information Both direct and alternating current Conforms to European Union directives Ground terminal Chassis Ground IEC Me...

Страница 4: ...is product Refer to the user s manual for the Measurement Limits before connecting to the instrument Do not exceed any of the Measurement Limits defined in the following section Do not operate without covers Do not operate the instrument with covers or panels removed Use Proper Fuse Use only the specified type and rating fuse for this instrument Avoid exposed circuit Do not touch exposed junctions...

Страница 5: ...his limit can also be expressed as 1000 Vpk maximum Current Input Terminal Measurement Limits The measurement limit from 10A input terminal to COM Input terminal is 10 A DC or AC The measurement limit from μA mA input terminal to COM Input terminal is 600 mA DC or AC Note that the current input terminals will always be at approximately the same voltage as the COM Input terminal Measurement Categor...

Страница 6: ...rement CAT III applies to protect against transients in equipment in fixed equipment installations such as distribution panels feeders and short branch circuits and lighting systems in large buildings Measurement CAT IV applies to measurements performed at the source of the low voltage installation Examples are electricity meters and measurements on primary over current protection devices and ripp...

Страница 7: ...Manual You can check whether there is any loss of accessories with reference to this description If it is found that there is any accessory lost or damaged please get in touch with our distributor responsible for this service or our local offices 3 Check the Complete Instrument If it is found that there is damage to the appearance of the instrument or the instrument cannot work normally or fails i...

Страница 8: ... Adjustment Unfold the foot stool on the bottom of the multimeter Front Panel Overview 2 4 5 1 7 3 6 Figure 2 1 Front panel overview Item Name Description 1 LCD Display the user interface 2 Menu selection Keys Activate the corresponding menu ...

Страница 9: ...ess or keys to increase or decrease the value 6 Operation Keys Run Stop Start or stop auto trigger When the trigger is stopped the displayed data will be held Record Access menus of manual record and auto record See page 12 Data Record Function Utility Set the auxiliary system function including Language Backlight Clock Default and Serial port Math Perform math operations Max Min dB dBm on the mea...

Страница 10: ...ted to the computer via USB Device 2 Line Fuse The fuse rating is 250 V F1AL To replace the fuse see page 15 Appendix C Line Fuse Replacement 3 AC Mains Input AC mains input connector User Interface Trigger Mode Reading Range Function Operation Menus Unit Status Icon Figure 2 3 User interface Single display Trigger Mode Status Icon Display Description Trigger Auto trigger Icon Description Auto rec...

Страница 11: ...n Figure 2 4 User interface Dual display Power On 1 Connect the instrument to the AC supply using the supplied power cord Warning To avoid electric shock the instrument must be grounded properly 2 Press down the power button at the front panel the screen shows the boot screen ...

Страница 12: ...evice under test to the multimeter according to the method below To avoid instrument damage do not discretionarily switch the measurement function when measuring DC Voltage Measurement DC Voltage AC Voltage Measurement AC Voltage DC Current Measurement DC Current DC Current AC Current Measurement AC Current AC Current ...

Страница 13: ...stance Measurement Resistance I Continuity Test Open or Closed Circuit I Diode Measurement I Forward Bias Capacitance Measurement Capacitance Frequency Period Measurement AC Signal Temperature Measurement I Temp Transducer ...

Страница 14: ... the data table by serial number The icon will show up on the top of the display Note The measurement function can be switched during manual record Save only the main display readings 2 View the manual record Press the front panel key press the Manual softkey to display the data table Press or keys to turn the page Note When the recording data exceeds the current range the data will be marked as o...

Страница 15: ...End softkey to stop recording the data table shows the readings taken Press or keys to turn the page Note Automatic recording function supports switching measurement function In auto range the relay switch may cause jitter the data at this time is invalid It will last about a few hundred milliseconds and the data acquired in this period will be marked as invalid When the dual display is enabled on...

Страница 16: ...till exists please contact us for our service 2 The reading does not change when a current signal is input 1 Check whether the test lead is correctly inserted into the current input terminals 2 Check whether the DCI or ACI measurement function is enabled 3 Check whether the DCI measurement function is used to measure AC current If you encounter other problems try to reset the settings or restart t...

Страница 17: ... disconnect all test leads before cleaning 2 Clean the outside of the instrument using a wet soft cloth not dripping water Do not make any scuffing when cleaning the LCD screen To avoid damage to the instrument do not use any corrosive chemical cleaning agent Caution To avoid any damage to the instrument do not exposed it to any sprays liquids or solvents Warning Before power on again for operatio...

Страница 18: ...correct fuse type Failure to do so could result in personal injury or instrument damage Voltage Fuse 90 240 V AC 250 V F1AL To perform the line fuse replacement follow these steps 1 Turn off the multimeter remove all measurement leads and other cables from the instrument including the power cord 2 Use a flat blade screwdriver to remove the fuse box 3 Replace the fuse with a new one install it into...

Отзывы: