Otto Bock Invader Pointer Скачать руководство пользователя страница 25

Maintenance and repair

Invader Pointer

Ottobock  |  25 

Inspection task

Check off after 

completion

General inspection

Check all screw connections for firm fit
Check the attachment of all add-on components
Check  hook-and-loop  closures,  add-on  components  and  ac-

cessories

Rear wheels

Check that wheel mounts are securely fastened
Check that wheels rotate freely and without axial runout
Check the driving characteristics of the wheelchair
Check the spoke tension
Check push rings for damage
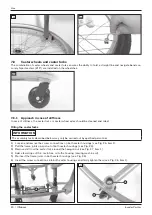
Caster wheels

Check that the fork is seated in the adapter without play
Check that wheels rotate freely and without axial runout
Check that the mounting nuts are tight
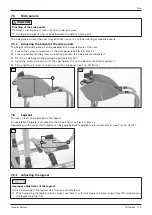
Legrest

Check for functionality and firm fit
Check legrest for damage

Padding/straps

Ensure padding is in perfect condition
Check adjustment straps for signs of wear

Tyres

Check tyre pressure (see tyre sidewall)
Check for sufficient tread depth (min. 1 mm)
Check for damage

Oil/grease

Oil pivot points and bearing points of movable components
Grease spokes

Final inspection

Check the general functionality of the mechanical adjustment 

mechanisms
Driving test

8.3    Repair

8.3.1    Inner tube, rim tape and tyre replacement

CAUTION


Improper tyre replacement

Injuries to the user due to incorrect installation, product damage


f

No person is permitted to sit in the wheelchair during tyre replacement�


f

Before removing a wheel, support the product so it cannot tip over�


f

Always replace the tyres in pairs� Two differently worn tyres affect the directional stability of the wheelchair�

INFORMATION

Tubeless TUFO indoor sport tyres can be ordered as an option for this wheelchair type� They have to be replaced 

entirely in case of damage�

Repairing flat tyres requires only the necessary tools and users may change tyres themselves if they wish�
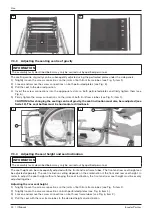
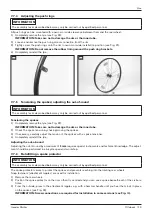
Removal and preparing for installation

1)  Carefully remove the tyre from the rim using appropriate tools�

INFORMATION: Take care not to damage the rim or the inner tube.

2)  Unscrew the valve nut from the valve and remove the tube�

3)  Repair the tube according to the directions in the repair kit or replace it with a new tube�

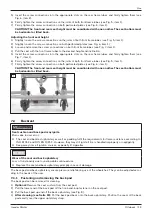
4)  Before fitting the tyre again, inspect the rim bed and tyre inner wall for foreign objects� This could have caused 

the puncture�

5)  Before installing the tube, check that the rim band is in proper condition� The rim band protects the tube from 

being damaged by the ends of the spokes�

Содержание Invader Pointer

Страница 1: ...Invader Pointer Instructions for use 3...

Страница 2: ...Invader Pointer 2 Ottobock...

Страница 3: ...2 7 4 Backrest 13 7 4 1 Fastening and removing the back pad 13 7 4 2 Adjusting the back upholstery 14 7 4 3 Adjusting the back angle 14 7 5 Side panels 15 7 5 1 Adjusting the height of the side panels...

Страница 4: ...n maintenance 24 8 2 Inspection 24 8 3 Repair 25 8 3 1 Inner tube rim tape and tyre replacement 25 8 3 2 Replacing the side panels 26 8 3 3 Replacing the seat upholstery 27 8 3 4 Replacing the back up...

Страница 5: ...or back page for addresses Service and repairs to the product may only be carried out by qualified personnel If you have any problems please contact your dealer This ensures that any necessary repair...

Страница 6: ...eelchair features can be adjusted Seat height Seat inclination Centre of gravity Back angle Legrest The frame material and its processing ensure great stability and durability The rear wheels are atta...

Страница 7: ...ach of children Risk of hand injuries CAUTION Pinching on components Pinching crushing due to lack of caution in danger areas f f Do not reach between the rear wheel and side panel when driving your w...

Страница 8: ...se the product to any extreme temperatures e g direct sunlight extreme cold Hazards due to improper use of the product WARNING Overloading Severe injuries if the wheelchair tips over due to overloadin...

Страница 9: ...ambient temperature between 10 C and 40 C must be maintained Tyres contain chemical substances that can react with other chemical substances such as cleaning agents acids etc 6 Preparation for use 6 1...

Страница 10: ...h the user seated all hook and loop connections must be firmly fastened and all screw connections must be firmly tightened f f Check the product for safety and functionality after changing the setting...

Страница 11: ...However they may still ignite if fire is handled improperly or negligently f f Keep away from all ignition sources especially lit cigarettes NOTICE Wear of the seat and back upholstery Loss of functi...

Страница 12: ...tion must also be readjusted see Seite 12 The seat bottom must be horizontal or tilted back 5 6 7 3 4 Adjusting the seat height and seat inclination INFORMATION The assembly tasks described below may...

Страница 13: ...nection on both perforated plates see Fig 6 item 1 CAUTION The front and rear seat height must be coordinated with one another The seat bottom must be horizontal or tilted back 7 7 4 Backrest WARNING...

Страница 14: ...loop strap have to overlap by at least 100 mm in each case INFORMATION Adjust the respective lower hook and loop straps somewhat tighter INFORMATION Deviating adjustments may be required in specific c...

Страница 15: ...panel and backrest 3 Pivot the side panel to the desired height see Fig 13 4 Insert the screw connection into the appropriate slot on the backrest and firmly tighten it 5 Firmly tighten all screw conn...

Страница 16: ...ctions on the footplate see Fig 16 item 1 2 Move the footplate to the desired position on one of the 3 levels INFORMATION If the legrest is equipped with lateral heel blocks the adjustment range of th...

Страница 17: ...el CAUTION Defective tyres Accidents falling due to poor traction reduced braking force or lack of manoeuvrability f f Maintain sufficient tyre pressure The correct tyre pressure is printed on the tyr...

Страница 18: ...track width INFORMATION The assembly tasks described below may only be carried out by qualified personnel The track width of the rear wheels can be subsequently adjusted within a narrow range This mak...

Страница 19: ...o damage the rim or the inner tube 2 Check the spoke tension by shaking moving the spokes 3 If necessary carefully adjust the tension of the spokes with a spoke tensioner 4 Completely reinstall the ty...

Страница 20: ...caster forks INFORMATION The assembly tasks described below may only be carried out by qualified personnel 1 Loosen and remove the screw connections on both caster housings see Fig 26 item 1 2 Pull t...

Страница 21: ...tion see Fig 28 item 1 2 Remove the caster wheel axle spacers see Fig 28 item 2 3 Remove and replace the caster wheels 4 Install the caster wheels together with the spacers Tighten the caster wheel ax...

Страница 22: ...tach the protective pad and fasten the hook and loop closure see Fig 32 7 9 2 Approach in case of stiffness In case of stiffness the anti tipper wheel axle should be cleaned and oiled 1 Remove dirt fr...

Страница 23: ...duct is used by more than one person using a conventional disinfectant is required Only use colourless water based disinfectants Observe the instructions for use provided by the manufacturer 8 Mainten...

Страница 24: ...e wheelchair If a screw connection loosens repeatedly contact the dealer who issued the product to you or the manufacturer s service promptly Hair and dirt particles generally accumulate between the c...

Страница 25: ...s Driving test 8 3 Repair 8 3 1 Inner tube rim tape and tyre replacement CAUTION Improper tyre replacement Injuries to the user due to incorrect installation product damage f f No person is permitted...

Страница 26: ...d rim during this process 36 37 Inflating the tube 1 Ensure that the valve is positioned perpendicularly for proper positioning of the tube and tyre in the region of the valve 2 Firmly screw on the va...

Страница 27: ...upholstery with the upholstery bars on the frame tubes INFORMATION Align the seat pad with the centre hook and loop strip towards the backrest see Fig 40 6 Adjust the seat upholstery and firmly tight...

Страница 28: ...fe 4 years The design manufacturing and requirements for the intended use of the product are based on the expected service life These also include the requirements for maintenance ensuring effectivene...

Страница 29: ...res Tubeless indoor sport tyres 8 11 16 Temperatures Ambient temperature C 20 to 40 Storage temperature C 10 to 40 Weights Maximum load capacity maximum user weight kg 120 11 2 Required tools The foll...

Страница 30: ...Invader Pointer 30 Ottobock...

Страница 31: ...0 212 3565040 F 90 212 3566688 info ottobock com tr www ottobock com tr Africa Otto Bock Alg rie E U R L 32 rue Ahc ne Outaleb Coop rative les Mimosas Mackle Ben Aknoun Alger DZ Alg rie T 213 21 91386...

Страница 32: ...Otto Bock Mobility Solutions GmbH Lindenstra e 13 07426 K nigsee Rottenbach Germany www ottobock com Ihr Fachh ndler Your specialist dealer Ottobock 647G1254 EN 02 1704...

Отзывы: