background image


One Stop Systems 


ExpressBox 16 Basic| 24 


2.6 

Connect Cables 

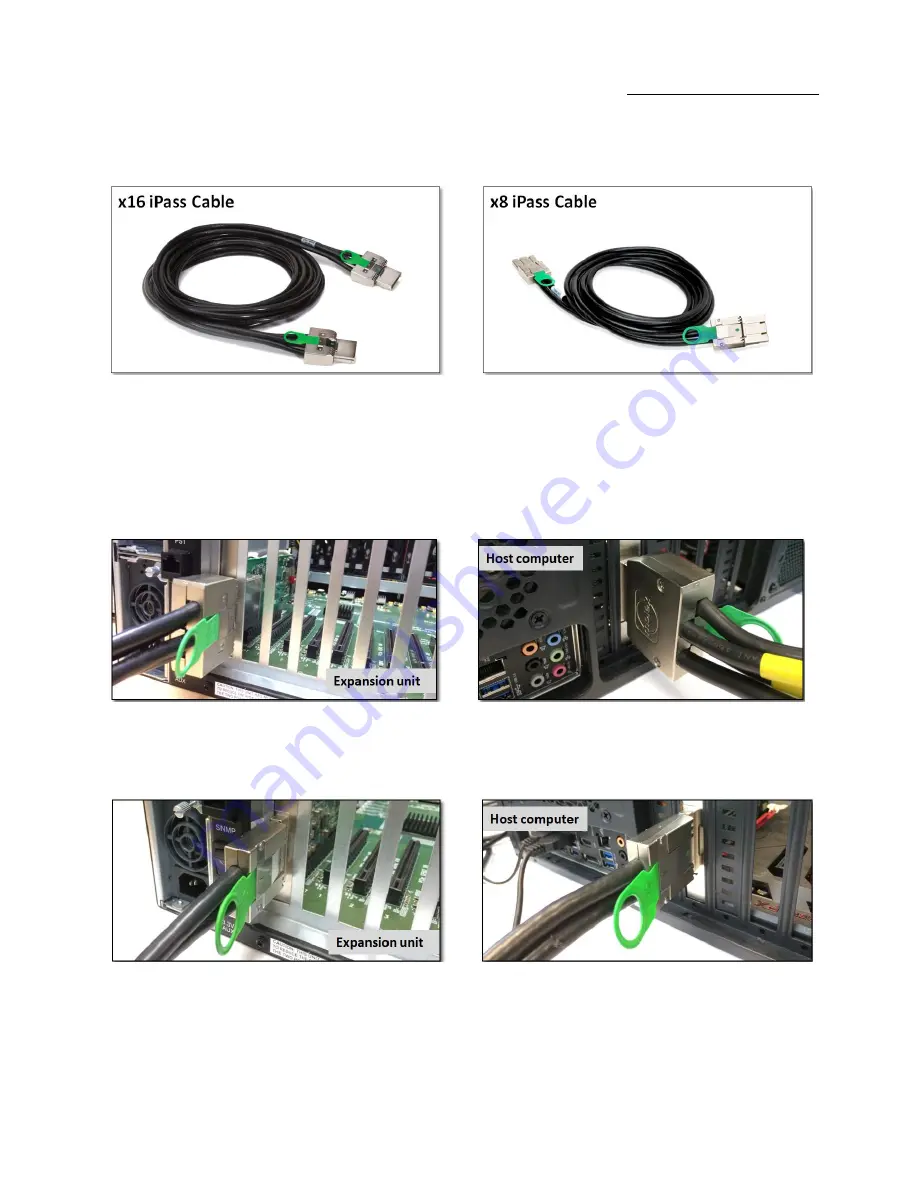
Depending on the interface cards, a x16 PCIe or x8 PCIe 3-meter iPass cable is included.  


Carefully position the expansion chassis so that the expansion cable will conveniently reach from the host computer to the OSS Expansion 
chassis. Cables attached to the expansion chassis must be securely fastened. When you hear a “click,” it is properly secured. If not securely 
connected, the connectors may cause intermittent or lost connections. 


2.6.1 

Connecting x16 Cable 


2.6.2 

Connecting x8 Cable 


Содержание EB16-Basic

Страница 1: ...ExpressBox 16 Basic 16 Slot Gen 2 PCI Express Expansion System EB16 Basic User s Manual SKU EB16 BX4 EB16 BX8 www onestopsystems com ...

Страница 2: ...all PCIe Cards 16 2 5 Install Host Card 19 2 5 1 x8 Interface Card 20 2 5 2 x16 Interface Card 20 2 5 3 Which slot to plug in the host card 21 2 5 4 Host mode Dipswitch Setting 22 2 5 5 Expansion mode Dipswitch Setting 23 2 6 Connect Cables 24 2 6 1 Connecting x16 Cable 24 2 6 2 Connecting x8 Cable 24 2 7 Connect Power Cables 25 2 8 Power ON Expansion chassis 25 2 9 Power ON Computer 27 2 10 Hardw...

Страница 3: ...4 10 Backplane LEDs 46 4 10 1 Power Management Backplane 46 4 10 2 Backplane Power Indicator 46 4 10 3 Activity Indicator 46 5 Chassis Maintenance 48 5 1 Chassis Cleaning 48 5 2 Fan Replacement 50 5 3 Power Supply Replacement 51 6 Troubleshooting 53 6 1 Locate the Problem 53 6 1 1 Windows 53 6 1 2 MacOS 53 6 2 Computer Hangs During Start Up 53 6 3 Computer Doesn t Detect the Expansion System 54 6 ...

Страница 4: ...One Stop Systems ExpressBox 16 Basic 4 8 2 Industry Canada 59 8 3 CE 59 8 4 ISO 9001 2008 59 8 5 RoHS 59 8 6 WEEE 59 ...

Страница 5: ...d to indicate an important piece of information or special tip to help you CAUTION Used to indicate and prevent the following procedure or step from causing damage to the equipment WARNING Used to indicate and prevent the following step from causing injury DANGER or STOP Used to indicate and prevent the following step from causing serious injury or significant data loss COMPATIBILITY ISSUE Used to...

Страница 6: ...laimer We have attempted to identify most situations that may pose a danger warning or caution condition in this manual However OSS does not claim to have covered all situations that might require the use of a Caution Warning or Danger indicator ...

Страница 7: ...ing covers off a computer perform the following steps 2 Turn off the computer and any peripheral devices 3 Disconnect the computer and peripheral power cords from their AC outlets or inlets in order to prevent electric shock or system board damage In addition take note of these safety guidelines when appropriate To help avoid possible damage to systems boards wait five seconds after turning off th...

Страница 8: ...tatic sensitive component from its shipping carton do not remove the component s anti static packaging material until you are ready to install the component in a computer Just before unwrapping the anti static packaging be sure you are at an ESD workstation or are grounded When transporting a sensitive component first place it in an anti static container or packaging Handle all sensitive component...

Страница 9: ...face Card 7 No Netburner 8 Single Power Switch 9 No LED Locator Reset Button 10 1iPass Connectors to Host 11 16 Card slots 12 2 Thumb Screws 13 Two Front Handles 14 Front Power Button On OFF 15 No Front LED Indicators 16 1 Link Cable 17 1 Host Interface card 18 No Express IO Manager WEB GUI 1 2 Basic Features Easy Plug and Play installation PCI Express Gen 2 x16 or x8 interconnection All slots sup...

Страница 10: ... Power Consumption x8 PCIe 1 2A 3 3V 3 96 watts x16 PCIe 1 5A 3 3V 5 watts Enclosure 4U Rack mount 19 W x 7 H x 20 D Removable cleanable air filter 34 lbs 15 5 Kg System Cooling 4 77 CFM Fans Hot Swappable Power Supply Options 850 Watt 1700 Watt or 850 Watt Redundant Optional 100 240 VAC 47 63 Hz Power Input 12V 60Amps 3 3V 33 Amps Environmental Ambient Temperature 0 to 50 C Storage Temperature 55...

Страница 11: ...One Stop Systems ExpressBox 16 Basic 11 1 4 Basic Main Components ...

Страница 12: ...pping carton contents for all of the required parts Gather all of the necessary tools required for installation Read this manual 1 6 Parts List Item Item Name Qty 1 16 Slot Expansion Chassis 1 2 3 meter shielded iPass x8 or x16 PCIe 1 3 Interface cards x8 or x16 PCIe 2 4 U S Standard 115V Power Cord 1 for Basic model 2 for Smart model 5 Quick Start Guide 1 ...

Страница 13: ...One Stop Systems ExpressBox 16 Basic 13 ...

Страница 14: ...Systems ExpressBox 16 Basic 14 1 7 Tools Required for Installation To complete the installation of the OSS product you will need a Phillips head screwdriver and ESD wrist strap to prevent electrostatic discharge ...

Страница 15: ...on top of an anti static surface For more information see Protecting Against Electrostatic Discharge in the Preface WARNING High voltages are present inside the expansion chassis when the unit s power cord is plugged into an electrical outlet Disconnect the power cord from the AC outlet before removing the enclosure cover Turning the system power off at the power on off switch does not remove powe...

Страница 16: ...rge When moving cards it is best to carry the cards in anti static packaging If you need to set a circuit card down be sure to place it inside or on top of an anti static surface For more information see Protecting Against Electrostatic Discharge in the Preface WARNING High voltages are present inside the expansion chassis when the unit s power cord is plugged into an electrical outlet Disconnect ...

Страница 17: ...input label is not exceeded All slots support any combination of x1 x4 x8 and x16 PCIe cards All slots are physically a x16 but any add in card is supported Use the card hold down to secure the card in the slot Refer to the labeling on the backplane to determine electrical configuration of each slot For trouble shooting purposes it is recommended to install a small number of cards and verify insta...

Страница 18: ...X4 PCIe GEN2 X4 PCIe GEN2 X4 HOST SLOT 1 2 3 4 5 6 7 8 9 10 11 12 13 14 15 16 For Model EB16 BX8 and EB16 SX8 a mixture of x8 and x16 PCIe Gen 2 slots are available as shown in this diagram Expansion Slot PCIe x16 PCIe GEN2 X8 PCIe GEN2 X8 PCIe GEN2 X16 PCIe GEN2 X8 PCIe GEN2 X8 PCIe GEN2 X16 PCIe GEN2 X8 PCIe GEN2 X8 PCIe GEN2 X8 PCIe GEN2 X8 PCIe GEN2 X8 PCIe GEN2 X8 PCIe GEN2 X8 PCIe GEN2 X8 PC...

Страница 19: ...ion such as the case with 2 single full length PCIe cards Card guides for this system can be purchased separately from OSS Re install cardholder assembly and position guides The plastic guides can be removed and reversed for short cards Tighten plastic guides with a screwdriver Rotate the plastic pieces until their grooves are aligned with the cards Reinsert the cardholder into the chassis and tig...

Страница 20: ... and all power cords are disconnected from the AC outlet remove the cover and prepare your host card for insertion into a PCIe slot There two types of host interface cards to use You can use the x8 or x16 See photos below 2 5 1 x8 Interface Card 2 5 2 x16 Interface Card ...

Страница 21: ...poses of the PCIe card The number of lanes is typically noted on a motherboard computer next to the PCI Express slot See photos below STOP YOU MUST ONLY INSTALL THE PCIe HOST CARD INTO A PCI EXPRESS SLOT Only use cards WITH brackets This will ensure that your PCIe host card can only be inserted into a PCIe slot Although PCI Express cards without brackets may fit into conventional PCI slots you run...

Страница 22: ...the dipswitch to the ON position only if the same card is used as an Expansion Interface in the OSS expansion backplane The x8 and x16 PCIe interface cards have the dipswitch to change between different modes host and expansion Note The expansion chassis will NOT function if SW2 on the Interface card 01 04978 03 or SW1 01 5018 00 is set to ON and the Interface card is inserted into the host comput...

Страница 23: ... 5 Expansion mode Dipswitch Setting The OSS host interface is the same card as the expansion interface only that its SW1 or SW2 switch is set to ON EXP By default the expansion interface card should already be installed in the Expansion chassis ...

Страница 24: ...expansion chassis so that the expansion cable will conveniently reach from the host computer to the OSS Expansion chassis Cables attached to the expansion chassis must be securely fastened When you hear a click it is properly secured If not securely connected the connectors may cause intermittent or lost connections 2 6 1 Connecting x16 Cable 2 6 2 Connecting x8 Cable ...

Страница 25: ... it 2 7 Connect Power Cables Connect the power cable to the power receptacle of the power supply located on the back of the unit For EB16 Smart you need two power cables and one power cable for EB16 Basic EB16 SMART has two power supply modules EB16 BASIC has one power supply module 2 8 Power ON Expansion chassis Turn on ALL power supply switches at the rear then power on the chassis using the gre...

Страница 26: ...ts power status Ensure that the power switch next to the power cord is flipped ON the symbol This enables the device to turn ON once it is activated through the main POWER SWITCH The LED on the top should turn on when the power cord is connected to the device from the outlet In this case the AC POWER LED would turn green The LED below that is for DC power and should be red until the entire chassis...

Страница 27: ...n the front panel and then turning on the computer 2 10 Hardware Verification Verify the following LEDs on the Expansion and Host interface cards A x8 Interface card both expansion and host cards with proper link established should show up with FIVE solid green LEDs The normal LED indicator on the expansion card should display five solid green LEDs This signifies that the expansion unit is trainin...

Страница 28: ...fy a successful installation on Windows find the My Computer icon and right click on it Then select Manage from the pop up menu Next click on Device Manager in the leftmost Computer Management window Finally click on the View Menu and select View Devices by Connection Open ACPI BIOS Open PCI Bus Click the sign several times until your reach a PCI Express Root Port with a PCI Standard PCI to PCI Br...

Страница 29: ... 1st PCIe Switch controls Slots 0 1 2 3 4 5 6 The 2nd PCIe Switch controls slots 7 8 9 10 11 12 13 14 15 16 Note To view the slots pertaining to the 2nd PCIe Switch you must click to expand Slot 15 If the verification is successful you can install 3rd Party cards as well as auxiliary peripherals such as hard drives into the chassis If however the installation was unsuccessful you may not see the P...

Страница 30: ...hed devices The OSS host interface card can communicate up to a bandwidth of x16 x8 or x4 from and to the expansion chassis and devices Again you have to verify the configuration of your card For assistance refer to Page 31 32 You should choose a profile that matches the configuration of all the cards installed in your Mac 3 2 2 Apple System Profiler Select About This Mac under the Apple Icon Then...

Страница 31: ...Support at 858 530 2511 3 3 Linux After the expansion chassis has been installed in a Linux based system its installation can be verified by typing the following command lines lspci t Display the overall structure of the expansion chassis lspci vv Lists additional information about the PCIe switch in our case it will list the PLX information Ispci vvv Display the most comprehensive information abo...

Страница 32: ...any of your 3rd Party PCIe cards containing an exclamation point You may have a problem with that card Refer to Troubleshooting for further guidance IMPORTANT We will provide reasonable technical support with 3rd Party cards However if you have verified a successful installation of the OSS Expansion chassis but experience difficulty installing your 3rd Party cards the card manufacturer should be a...

Страница 33: ...upply would not suffice One power supply is capable of producing only 850 Watts of power Users would need to acquire a second power supply for all slots to work properly In general the best support for power hungry cards requires 1200 Watts 2 power supply units Each slot is designed to support 3 0 amps 3 3v 9 9 watts 5 5 amps 12v 66 watts IMPORTANT Customer should be aware he or she cannot use wit...

Страница 34: ... until one unit becomes nonoperational In this case the effect of power distribution is shifted to the functional Power Supply Further information about the Power supply s electromagnetic capability EMC is listed below DANGER or STOP DO NOT TEMPER WITH THE INTERIOR POWER CONNECTIONS THAT LINKS TO CONNECTORS J24 AND J25 IT PROVIDES POWER TO THE ENTIRE BACKPLANE ONLY USE THE GIVEN CABLE FOR CONNECTI...

Страница 35: ...ore discussing a troubleshooting methodology for locating the problem we will first introduce several indicators and configuration switches that provide general and specific information for this process 4 3 Interface Cards 4 3 1 x16 Interface Card LEDs The host card has indicators that provide the status of the clock the power distribution and the active data lanes To verify that your expansion de...

Страница 36: ...the PCIe slot that you are using for your OSS host interface card Be sure to check the PCIe slot in your computer to determine how many data lanes it can support It should be labeled near the slot The default value that the card is operating in is x16 In order to change the bandwidth of the card refer to the Dipswitch labeled SW100 ...

Страница 37: ... iPass cable contains status indicators that tell users the condition it is currently operating in There are LED indicators for the lanes that are being used for data transfer and whether the board is powered correctly A switch is also available to change the amount of lanes that would be operational for usage by the user ...

Страница 38: ...One Stop Systems ExpressBox 16 Basic 38 4 4 Backplane This is current new EB16 backplane ...

Страница 39: ...nit from slot 0 to slot 16 Slot0 is the designated slot for expansion interface card There are three x16 PCIe slots and thirteen x8 PCIe slots Main board with 16 slot PCIe slots is Gen 2 with PLX PCIe switch Expansion and Host cards are Gen 2 x16 4 5 Backplane Block Diagram ...

Страница 40: ...Expansion slot 96 lanes minus 16 from PCIe switch minus 16 from Upstream port 64 Lanes available ready to use From Slot1 to Slot6 There are 64 lanes available combined Slot 0 x16 Slot 1 x8 Slot 2 x8 Slot 3 x16 Slot 4 x8 Slot 5 x8 Slot 6 x16 Total 64 Lanes On the second switch station 2 there are also 96 available lanes from slot7 to slot16 The PCIe switch itself uses 16 lanes 96 16 80 Available la...

Страница 41: ...cturing use only for programming EEPROM SW2 SW4 SW5 SW7 SW9 SW10 SW11 DO NOT TOUCH THIS DO NOT CHANGE SETTINGS Changing or moving the dipswitches will corrupt the EEPROM which will render the slots or the entire expansion board non operational Below are the manufacturing default settings for the backplane expansion board dipswitches ...

Страница 42: ...One Stop Systems ExpressBox 16 Basic 42 ...

Страница 43: ...es below are the two female Power Supply connectors 18 pin connector on the main board backplane 4 8 1 Backplane Aux Power Connectors These are the four Auxiliary power connectors available on the main board backplane It is a10 pin power connector 4 8 2 Fan Connectors Power LED Connectors ...

Страница 44: ...sold separately you need to contact OSS Sales to order the item 6 8 pin aux cable SKU 01 05996 04 1 10 pin PCB connector to 2 6 pin connectors and 2 6 8 pin connectors 8 pin connectors that can break away to become 6 pin connectors 4 6 pin aux cable SKU 01 05996 03 1 10 pin PCB connector to 2 4 pin connectors and 1 6 pin connector 4 9 1 Aux Cable Installation Plug in the 10pin male connector direc...

Страница 45: ...One Stop Systems ExpressBox 16 Basic 45 ...

Страница 46: ...ther power is an issue 4 10 3 Activity Indicator These LEDs tell whether data is processed correctly throughout the entire backplane LEDs D32 and D33 indicate whether information from the EEPROM has properly transferred the data set to the PLX PCI Express switches when the chassis is initially turned on These LEDs should go off after a short period The picture on the left is shown before the host ...

Страница 47: ...he inserted card is using the maximum capability of the backplane s PCIe slot For example if the card features a x16 bandwidth and is operating at a Gen 2 speed once the card is plugged into a x16 slot the lit LED will remain consistent Otherwise the card is not using the full potential of the slot s capability and the bottom indicator would blink The card would still be operational through the ba...

Страница 48: ...and remove any dust build up CAUTION Always remember to power down your computer and the expansion chassis BEFORE you attempt to perform any maintenance tasks 5 1 Chassis Cleaning The environment where your OSS chassis is operating should be the determining factor as to how often you should perform a general cleanup of the chassis To perform a routine general cleaning of your chassis you will need...

Страница 49: ...fan blade you can use the cotton swabs dipped in the isopropyl alcohol to gently rub the area clean Lastly if the chassis was extremely dirty you can remove any installed 3rd Party cards and wipe the slots with a soft bristle brush like a toothbrush dipped in the isopropyl alcohol to gently clean each slot When finished blow the slots with compressed air from about six inches away until dry IMPORT...

Страница 50: ...the chassis is powered on First you will need to remove the chassis lid Then locate the fan that has failed unlock its thumbscrew lift up its metal tab and pull it out Insert the new fan in and secure it in place Verify the new fan is spinning and restore the chassis lid NOTE The OSS part number for a replacement fan is 26 00031 00 ...

Страница 51: ...ifted to the other module An indicator for the failure would be the LEDs on the back panel of the power supply behind the chassis For non functioning equipment these indicators would not show If you have an EB16 SXS then the audible alarm would be initiated to alert you on this condition If this is the case press the black button on the status panel on the front of the unit to stop the audible ale...

Страница 52: ...TANT In order to ensure the safety and efficiency of your expansion chassis it is recommended that you keep a spare power supply module on hand just in case Protect yourself keep a spare Order your spare power supply module from OSS PN 40 00031 00 ...

Страница 53: ...rd drives in addition to several cards ensure that you have not exceeded the power capabilities of the expansion chassis power supply You can verify the capacity of your power supply by checking the label on the power supply If you are not certain about the power consumption of your peripherals it is best to remove them one by one starting with those you suspect of being most power hungry until th...

Страница 54: ...are the LEDs that indicate the cards are inserted in the slots These LEDs are relevant to the speed and the amount of data lanes available on the cards Also verify the OSS host interface card is properly inserted into the host computer slot In case any other LED is off ensure the respective card is functional and properly seated in its slot Try moving the host interface card to a different slot If...

Страница 55: ...pansion chassis and then turn on the computer Windows Open the Device Manager View by Connection selection If the is gone the problem is with the 3rd Party card or the card drivers You should go to the Windows Error Codes section of this chapter to learn how to troubleshoot using error codes If the is still visible the problem may be with the OSS Expansion chassis Contact OSS Technical Support for...

Страница 56: ... code indicates that there is a problem with the 3rd Party card driver If necessary contact the card s manufacturer for updated software drivers If all else fails contact OSS Technical Support for further assistance 12 On the Bridge If you receive error code 12 on the first PCI to PCI Bridge call OSS Technical Support On the Card This usually means the memory I O or prefetch is more than has been ...

Страница 57: ...ure we pre allocate them sufficiently It is therefore imperative that our computing platform allocates at least 32KB of I O memory space to allow multiple add in cards to operate properly This setting may be editable or preset by your BIOS or computer vendor If you are having this problem it is recommended that you first update your system to the latest firmware provided by your vendor Instruction...

Страница 58: ...ber and your return address on the shipping label when you return the item s for service Please note that One Stop Systems WILL NOT accept COD packages so be sure to return the product freight and duties paid Ship the well packaged product to the address below Attention RMA ________ One Stop Systems 2235 Enterprise Street 110 Escondido CA 92029 USA It is not required though highly recommended that...

Страница 59: ...embler of a personal computer system may be required to test the system and or make necessary modifications if a system is found to cause harmful interferences or to be noncompliant with the appropriate standards for its intended use 8 2 Industry Canada This Class A digital apparatus complies with Canadian ICES 003 Cetappareilnumériqué de la classe A estconformé à la norme NMB 003 du Canada 8 3 CE...

Страница 60: ...One Stop Systems ExpressBox 16 Basic 60 Manual P N 09 09979 00 Rev C ...

Отзывы: