background image

KLEMANTIS AS 1000 RGBW

8

4.  INSTALLATION AND START-UP

5

4.1

Installing the fixture

4.1.1  Introduction

The Klemantis’ unique asymmetric optical unit has been designed to respond to the increasing need to illuminate walls, scenery and cycloramas uniformly
with  a  smooth,  even  wash  of  seamlessly  blended  colours. The  Klemantis  ensures  good  colour  consistency  and  uniform  light  distribution  on  very  high
scenery, even when the lighting fixture and the projection surface are very close together.
One  of  the  key  aspects  of  the  Klemantis  is  its  special  precise  light  intensity  distribution.  It  should  therefore  be  installed  carefully  in  order  to  exploit  its
potential and optimize its performance in cyclorama illumination.

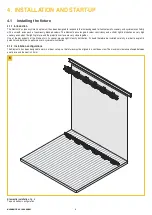
4.1.2   Installation configurations

The Klemantis has been designed to work in a linear set-up, so the fixtures must be aligned in a continuous row. The maximum clearance allowed between
one fixture and the next is 20 mm.

Klemantis installation 

Fig. 5

Top and bottom configuration

Содержание ADB KLEMANTIS AS 1000

Страница 1: ... your custom Please note that this fixture like all the others in the wide ADB range has been designed and made with total quality assurance to ensure excellent performance and best meet your expectations and requirements EN KLEMANTIS INSTRUCTION MANUAL KLEMANTIS AS 1000 RGBW AL2025 ...

Страница 2: ...lling the fixture 4 1 1 Introduction 4 1 2 Installation configurations 4 1 3 How to calculate positioning distance from cyclorama 4 1 4 Focus and tilt angle 4 1 5 Tips tricks 4 2 Connecting to main Supply 4 3 Connecting the control signal line DMX Art Net 4 4 Control Panel 5 MAINTENANCE 5 1 Fuses replacing 5 2 Periodic cleaning 6 TECH DATA 7 APPENDIX 7 1 The Klemantis installation procedure ...

Страница 3: ...lgendem Link herunterladen https www adbstagelight com Ref FIS01B KLEMANTIS AS Safety Information Cómo obtener tu INFORMACIONES DE SEGURIDAD en la versión multilingüe Siempre puedes descargar la versión multilingüe del Manual de Instrucciones de Seguridad para este producto ADB en el siguiente enlace https www adbstagelight com Ref FIS01B KLEMANTIS AS Safety Information Comment obtenir votre CONSI...

Страница 4: ...modules They can be used horizontally vertically laid on the floor or hung from above on a bar Unlike any other light on the market the KLEMANTIS can be installed very close to the cyclorama as little as 60 cm away without the light distribution becoming uneven The Klemantis is a creative tool designed to meet today s lighting design needs Its unique features and design reinvent the cyclorama conc...

Страница 5: ... 40 0 ta 40 ta 40 C C ta 40 C 0 0 0 0 2 2 0 2 m m 0 2 m WARNING RISK OF DAMAGE CONTIENE COLLIMATORI DI LUCE EVITARE LUCE INTENSA DA QUALSIASI ANGOLAZIONE INTERNAL LIGHT COLLIMATION SYSTEM AVOID INTENSE LIGHT FROM ANY ANGLE CONTIENT SYSTÈME DE COLLIMATION DE LUMIÈRE EVITER LUMIÈRE INTENSE DE N IMPORTE QUEL ANGLE DISCONNECT POWER BEFORE CHANGING FUSES USE REPLACEMENT FUSES RATED T 4A 250V COUPER LE ...

Страница 6: ... The instructions in the manual are essential for correct installation maintenance and use of the appliance In the download area you can also find the following documents t Product Datasheets t Product Brochures t Set Up Guides t Quick Start Guides t Software Relese Notes t Software Files Please read carefully the attached safety instructions CONSIGNES DE SÉCURITÉ Lire attentivemen t INFORMATIONEN...

Страница 7: ...000200 Kit Klemantis Symmetric Lenses 28 2 sets of 0 5 meter AZ2001000210 Kit Klemantis Symmetric Lenses 40 2 sets of 0 5 meter provided in a box where both symmetrical and asymmetrical lenses can be stored B Hook clamp ADB 1092 10 600 C Safety bond 105041 001 D Junction pin AA20000001020 E Base accessory to mount 2 Klemantis AR2001000000 ...

Страница 8: ...igh scenery even when the lighting fixture and the projection surface are very close together One of the key aspects of the Klemantis is its special precise light intensity distribution It should therefore be installed carefully in order to exploit its potential and optimize its performance in cyclorama illumination 4 1 2 Installation configurations The Klemantis has been designed to work in a lin...

Страница 9: ...or and on the ceiling top and bottom rows at the same distance from the cyclorama they create an outstandingly uniform vertical light distribution see Fig 2 Top and bottom set up is ideal in order to achieve the most even light distribution on the cyclorama Figure 1 single row setup Figure 2 top and bottom row setup 0 1000 Y mm 2000 3000 4000 1000 2000 3000 4000 0 X mm 1000 2000 3000 4000 5000 100...

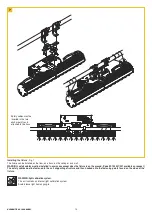
Страница 10: ...ure is on the ground Code 2X 105041 001 available on request The safety cables must be fastened to the unit supporting structure and then hooked onto the fastening points found on the sides of the fixture Safety cables must be inserted in the two anchor points and attached to the truss WARNING light collimation system This unit contains an internal light collimation system Avoid intense light from...

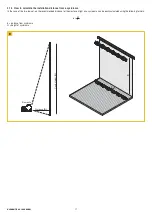
Страница 11: ...stance from a cyclorama In the case of the two row set up the recommended distance for the most even light on a cyclorama can be easily calculated using the following formula d distance from cyclorama H height of cyclorama d H 8 D Distance D Cyclo Height H Klemantis H 8 ...

Страница 12: ...nerated target light rectangle becomes a trapezium with major base on the bottom If tilted downwards the generated target light rectangle becomes a trapezium with major base on the bottom adjust the Klemantis s tilting Narrow vertical gaps in light 10 30 cm which appear on the cyclorama from either floor or ceiling Klemantis units Clearance effect there might be too large a clearance between two a...

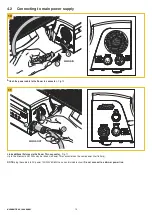
Страница 13: ... In connector Fig 10 1 2 3 MAINS OUT 11 Link additional fixtures via the Power Thru connector Fig 11 Up to five Klemantis AS1000s may be linked via Power Thru connectors on the same power line 16 Amp NOTE plug the cable into AC power 100 240V 50 60Hz on a non dimmable circuit Do not connect to a dimmer power line ...

Страница 14: ...ted shielded 120Ω characteristic impedance 22 24 AWG low capacity Do not use microphone cable or other cable with characteristics differing from those specified Use XLR type 5 pin male female connectors for end connections A terminating plug with a resistance of 120 minimum 1 4 W between terminals 2 and 3 must be inserted on the last unit IMPORTANT Avoid contact between wires and with the metal ca...

Страница 15: ...hanging anything exits the function Decreases the value displayed with auto repetition or passes to the next item on the menu For quick access to the minimum parameter value press the UP key while holding down the DOWN key Increases the value displayed with auto repetition or passes to the previous item on the menu For quick access to the maximum parameter value press the DOWN key while holding do...

Страница 16: ...KLEMANTIS AS 1000 RGBW 16 5 MAINTENANCE 5 1 Replacing fuses 2 3 1 2 Fusibili 6 3 x 32 mm 4AT p n FUS00B 16 Replacing fuses Fig 16 Each fixture has two fuses on the main power cord connection ...

Страница 17: ...ure undergoes annual servicing by a qualified technician for special maintenance involving at least the following operations General cleaning of internal parts General visual check of internal parts cabling mechanical parts etc Electrical photometric and functional checks any necessary repairs IMPORTANT Do not use compressed air at more than four atmospheres to clean the inside of the fixture LED ...

Страница 18: ...est Data IN connector 5 pins XLR RJ45 Data OUT connector 5 pins XLR MECHANICAL SPECS Painting black with epoxidic powder Body extruded aluminium and steel sheet Cooling system automatic fan with variable speed LED cooling by natural convection IP protection rate IP20 WEIGHT Klemantis AS1000 16 kg OPERATIONAL SPECS Working position 45 std rot 45 Min distance to illuminated surface 0 2m Ambient temp...

Страница 19: ...yclorama 2 Place the Klemantis stably and make sure all Klemantis units are parallel to the cyclorama at the set distance D Reduce the gap between two adjacent fixtures to a minimum 1 2 mm 3 If the floor is not level use the adjustable feet fig 18 4 Adjust the tilt of each unit a digital bubble level smartphone app may be used a Before tightening the clamps set all the Klemantis units to 0 in the ...

Страница 20: ... housing as shown in the picture fig 21 so that the plastic bulges on the top surface between the lenses define the slope of your smartphone d Set the tilt angle to 43 5 to the vertical wall or 46 5 to the horizontal floor fig 21 22 The correct reference angles are shown in the layout for completeness fig 23 20 43 5 21 43 65 46 35 45 00 45 00 23 24 46 5 22 ...

Страница 21: ...ulated distance D and reduce the gap between two adjacent fixtures to a minimum 1 2 mm 10 Adjust all the ceiling Klemantis units in such a way that their base plates are oriented in the same way fig 27 This can be checked easily the circular end plates on the central cylinders of the two side Klemantis units should match up fig 26 11 Adjust the tilt of each top Klemantis unit e g with a digital bu...

Страница 22: ...KLEMANTIS AS 1000 RGBW 22 ...

Страница 23: ...KLEMANTIS AS 1000 RGBW 23 ...

Страница 24: ...I 24068 Seriate BG via Pastrengo 3 b Phone 39 035 654311 www adbstagelight com IST01X 001 EN Rev B 04 2020 ...

Отзывы: